
Popular categories
Looking for a yarn?


Comments / Questions (27)
![]() Mel wrote:
Mel wrote:
Könnte man Glitter auch weglassen? Wie wirkt sich die Stärke des Fadens auf die Maschenprobe aus? Ist das Modell ohne Glitter formstabil genug?
05.04.2016 - 17:06DROPS Design answered:
Liebe Mel, Sie können das Modell gut ohne Glitter stricken, Der Faden ist so dünn, dass es keine Auswirkungen auf die Maschenprobe hat. Glitter wurde hier in erster Linie wegen der Optik verwendet.
06.04.2016 - 09:15
![]() Marie wrote:
Marie wrote:
Der Pulli ist sehr schön geworden, einfach toll der Schnitt! Habe ihn in Perlgrau mit Silber gestrickt, sieht sehr edel aus! Werde das Modell noch in anderen Faeben stricken. Sieht gut Auge zu einer Jeans mit Top oder T-Shirt oder elegant über einem Kleid. Danke für diese tolle und einfache Anleitung!
12.03.2016 - 14:02
![]() Jacqueline Schop wrote:
Jacqueline Schop wrote:
Je begint met de pas op te zetten met de korte rondbreinaald staat er. Maar wanneer ga je dan over op de langere rondbreinaald en hoe doe je dat?
17.02.2016 - 16:22DROPS Design answered:
Hoi Jacqueline. Als je niet meer ruimte hebt voor de steken op de korte naald, ga je over op de langere naald. Je breit de st gewoon lopend over op de nieuwe naald
22.02.2016 - 14:18
![]() Anidy29 wrote:
Anidy29 wrote:
J'adore !!!
16.01.2016 - 09:28
![]() Janne Yde wrote:
Janne Yde wrote:
Smuk og klassisk model!
14.01.2016 - 22:46
![]() Frisoline wrote:
Frisoline wrote:
A porter en toute simplicité
30.12.2015 - 09:13
![]() Monika wrote:
Monika wrote:
Schöner Schnitt, der ist für alle Größen tragbar!
13.12.2015 - 12:19
|
|
Stay Longer#staylongersweater |
|
|
|
|
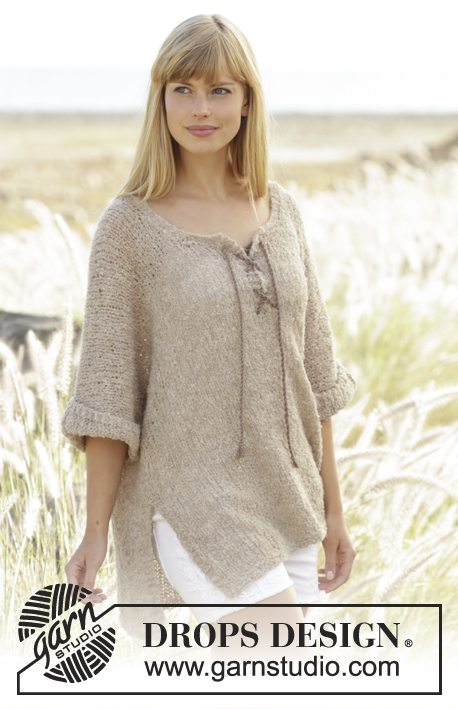
Knitted DROPS jumper with raglan, worked top down in ”Melody” and “Glitter”. Size: S - XXXL.
DROPS 167-23 |
|
|
GARTER ST (worked in the round): 1 ridge = 2 rounds. * K 1 round and P 1 round *, repeat from *-*. INCREASE TIP RAGLAN: Inc every other round: Inc 16 sts as follows: Beg 2 sts before marker and work as follows: Work 2 sts in first st, 1 YO, K 2 (marker is in the middle of these sts), 1 YO, work 2 sts in next st = 16 sts inc. On next round K the YO to make hole. Inc 8 sts as follows: Beg 1 st before marker and work as follows: 1 YO, K 2 (marker is between these sts), 1 YO = 8 sts inc. On next round K the YO to make hole. INCREASE TIP BODY: Inc 1 st on each side of marker in the sides as follows: Work until 1 st before marker, 1 YO, K 2 (marker is in the middle of these sts), 1 YO. On next round K the YOs to make holes. Work as follows on next inc: Work until 2 st before marker, 1 YO, K 4 (marker is in the middle of these sts), 1 YO. On next round K the YOs to make holes. Continue inc like this - beg 1 st more before marker for every inc. ---------------------------------------------------------- JUMPER: Worked in the round from top down. YOKE: Cast on 60-64-68-72-72-76 sts on a short circular needle size 7 mm with 1 strand Melody and 2 strands Glitter. Work 2 ridges in GARTER ST - see explanation above. K 1 round while AT THE SAME TIME inc 12-8-12-16-24-32 sts evenly = 72-72-80-88-96-108 sts. Insert 4 markers in the piece as follows - from mid back: Work 13-13-15-17-19-22 sts in stocking st (= half back piece), insert 1 marker, work 10 sts in stocking st (= sleeve), insert 1 marker, work 26-26-30-34-38-44 sts in stocking st (= front piece), insert 1 marker, work 10 sts in stocking st (= sleeve), insert 1 marker, finish with 13-13-15-17-19-22 sts in stocking st (= half back piece). READ ALL OF THE FOLLOWING SECTION BEFORE CONTINUING: Then work in stocking st AT THE SAME TIME inc on each side of every marker - READ INCREASE TIP RAGLAN. Inc every other round as follows: Inc 16 st 1-3-3-3-4-5 times, then inc 8 sts 11-9-10-11-11-10 times. REMEMBER THE KNITTING TENSION After all inc for raglan there are 176-192-208-224-248-268 sts on round and piece measures approx. 15-15-17-18-19-19 cm from cast-on edge. Work next round as follows: Work 26-28-31-34-38-42 sts (= half back piece), slip the next 36-40-42-44-48-50 sts on 1 stitch holder (= sleeve), cast on 6 new sts (= under sleeve), work 52-56-62-68-76-84 sts (= front piece), slip the next 36-40-42-44-48-50 sts on 1 stitch holder (= sleeve), cast on 6 new sts (= under sleeve), work the remaining 26-28-31-34-38-42 sts (= half back piece). BODY: = 116-124-136-148-164-180 sts. Insert a marker in each side, in the middle of the 6 new sts that were cast on. Continue in stocking st, NOW MEASURE PIECE FROM HERE! When piece measures 3 cm, inc 1 st on each side of markers in the sides (= 4 sts inc) - READ INCREASE TIP BODY. Repeat inc every 3-3-3-3½-3½-3½ cm 9 more times = 156-164-176-188-204-220 sts. Continue in stocking st until piece measures 34-36-36-37-38-40 cm, work 2 ridges over all sts, cast off. The whole piece measures approx. 50-52-54-56-58-60 cm. SLEEVE: Worked in the round on double pointed needles. Slip the 36-40-42-44-48-50 sts from stitch holder in one side of piece back on double pointed needles size 7 mm and cast in addition on 6 new sts mid under sleeve = 42-46-48-50-54-56 sts. Insert 1 marker in the middle of the new sts, MEASURE PIECE FROM HERE. Work in stocking st in the round. AT THE SAME TIME after 3 cm, dec 1 st on each side of marker, dec by K sts tog 2 by 2. Repeat dec every 7-4½-4½-3½-3-2½ cm 4-6-6-7-8-9 more times = 32-32-34-34-36-36 sts. When sleeve measures 34-34-33-32-32-31 cm, work rib K 2/P 2 over all sts for 3 cm. Cast off sts with K over K and P over P. Work the other sleeve the same way. ASSEMBLY: Sew the openings under the sleeves. |
|
 |
|
Have you finished this pattern?Tag your pictures with #dropspattern #staylongersweater or submit them to the #dropsfan gallery. Do you need help with this pattern?You'll find 22 tutorial videos, a Comments/Questions area and more by visiting the pattern on garnstudio.com. © 1982-2026 DROPS Design A/S. We reserve all rights. This document, including all its sub-sections, has copyrights. Read more about what you can do with our patterns at the bottom of each pattern on our site. |


With over 40 years in knitting and crochet design, DROPS Design offers one of the most extensive collections of free patterns on the internet - translated to 17 languages. As of today we count 324 catalogues and 12267 patterns translated into English (UK/cm). 12267
We work hard to bring you the best knitting and crochet have to offer, inspiration and advice as well as great quality yarns at incredible prices! Would you like to use our patterns for other than personal use? You can read what you are allowed to do in the Copyright text at the bottom of all our patterns. Happy crafting!
Post a comment to pattern DROPS 167-23
We would love to hear what you have to say about this pattern!
If you want to leave a question, please make sure you select the correct category in the form below, to speed up the answering process. Required fields are marked *.