
Popular categories
Looking for a yarn?


Comments / Questions (82)
![]() Haschenz Monika wrote:
Haschenz Monika wrote:
Ich möchte diesen Pullover in Größe XXXL stricken. Nun sehe ich in den Kommentaren und Fragen , dass die Anleitung fehlerhaft ist. Mir ist aufgefallen dass nach dem Stricken der Passe die Anleitung für Gr. S-M-L angegeben ist , dann müsste doch die für die großen Größen kommen , oder verstehe ich das falsch (Seite 4). Ist die Anleitung nun überarbeitet oder sollte ich noch warten bevor ich mit dem Stricken beginne ?
01.06.2016 - 00:44DROPS Design answered:
Liebe Monika, warten Sie besser noch etwas - wir entschuldigen uns für die lange Wartezeit!
01.06.2016 - 07:48
![]() Langlet wrote:
Langlet wrote:
Ce très joli pull pose apparemment des problèmes à de nombreuses personnes . Je n'ai toujours pas eu de réponse concernant le nombre de mailles et le lien que vous proposez n'a pas solutionné mon problème. Serait-il possible de rectifier les explications pour que ce pull soit réalisable sans "bidouillage". Merci MJo Langlet
31.05.2016 - 17:17DROPS Design answered:
Chère Madame Langlet, nous nous excusons pour la longue période d'attente et vous remercions d'avance pour votre patience.
01.06.2016 - 09:14
![]() Margret Weiße wrote:
Margret Weiße wrote:
Weitere Fehler in der Anleitung: Reihenfolge der unteren Streifen stimmt nicht. Bei den verkürzten Reihen wurde bei der Drehung kein Umschlag angegeben, es entsteht dan ein Loch. Es wurde nicht angegeben das der Ärmel dann noch ohne Abnahmen bis auf gewünschte Länge gestrickt wird. Eine sehr schlechte Anleitung.
22.05.2016 - 11:49
![]() Dilianne wrote:
Dilianne wrote:
Hallo Drops team, is er al iets meer bekend vanuit het design team betreffende de aanpassingen in dit patroon? Alvast bedankt.
09.05.2016 - 13:41DROPS Design answered:
Hoi Dilianne. Nee, helaas heb ik nog geen bericht.
09.05.2016 - 14:33
![]() Ute Schneider wrote:
Ute Schneider wrote:
Ist die Anleitung mittlerweile überarbeitet worden?
04.05.2016 - 10:33DROPS Design answered:
Liebe Ute, wir entschuldigen uns für die lange Wartezeit!
01.06.2016 - 07:47
![]() Weiße, Margarete wrote:
Weiße, Margarete wrote:
Die Anleitung für diesen Pullover hat einen Fehler. Die Zunahmen von Makierung 2, 3, 5 und 6 stimmen nicht. Nach ihrer Anleitung sind die Zunahmen im Rücken- und Vorderteil und nicht im Ärmel.
18.04.2016 - 17:18
![]() Langlet wrote:
Langlet wrote:
Je ne comprends pas quand il est dit"joindre en rond et tricoter 3m au point mousse.De quelle couleur? Que deviennent les 103 m suivantes? Pour la ligne qui totalise 114m est-ce que les jetés sont alignés avec les précédents sur mon tricot j'ai un décalage, ça ne doit pas être normal. Si je totalise les points de ce rang(points et surjets) je compte 114 je ne peux donc pas tricoter les 3m du reste de ce tour.
17.04.2016 - 14:14DROPS Design answered:
Bonjour Mme Langlet, les rayures doivent toujours être les mêmes: 1 côte mousse de chaque couleur. Les augmentations doivent être alignées, notre équipe de stylistes a été informée de votre retour. Merci d'avance pour votre patience.
18.04.2016 - 11:19
![]() Cindy wrote:
Cindy wrote:
Where can I read about the sizing and fit? For example, how much ease is it meant to have? Also, is there a way to translate the other people's questions. If one person is asking, chances are there are others that would like to know as well. Thank you!
13.04.2016 - 06:12DROPS Design answered:
Dear Cindy, you will find at the bottom of the pattern a measurement chart with all measurements taken flat from side to side in cm (convert here into inches), compare these to a similar garment you have and like the shape to find out the matching size, this is the most accurate way for you to get the correct size - read more here. If you like to read previous comments/questions you can use an online translator. Happy knitting!
13.04.2016 - 09:09
![]() Susanne wrote:
Susanne wrote:
Könnten Sie bitte bei der Überarbeitung auch klären, ob die Umschläge wirklich in der ersten Reihe nach dem Rundenschluss Sinn haben, da man ja eigentlich sich in der Rückreihe der vorhergehenden Reihe befindet, wo ansonsten keine Umschläge vorgesehen sind. Auch fehlen meiner Ansicht nach die Umschläge in der vorhergehenden Reihe 2 Maschen nach Beginn und vor dem Ende der Reihe. Es wäre auch möglich, dass eine Rückreihe vor der Zunahme und dem Rundenschluss fehlt! Danke!
06.04.2016 - 01:03DROPS Design answered:
Liebe Susanne, diese Anleitung wird von unserem Designteam komplett überarbeitet.
06.04.2016 - 09:53
![]() DROPS Design wrote:
DROPS Design wrote:
Beste Annelies & Dilianne. Ik heb de vraag doorgegeven aan ons Design Team om te laten nakijken voor foutjes. Ik kom zsm terug - ik kan helaas niet zeggen hoelang dit gaat duren. Excuus.
24.03.2016 - 15:16
|
|||||||
Crayons#crayonssweater |
|||||||
|
|
|||||||
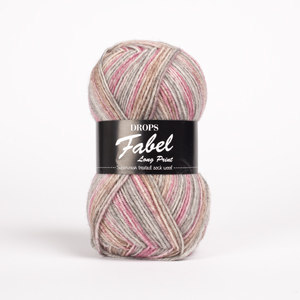
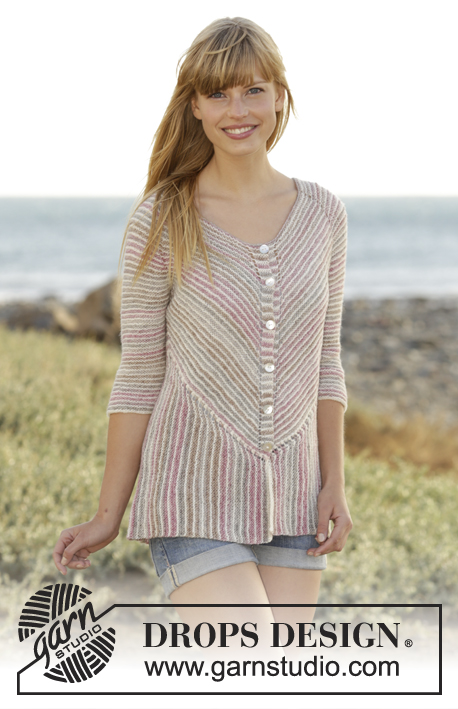
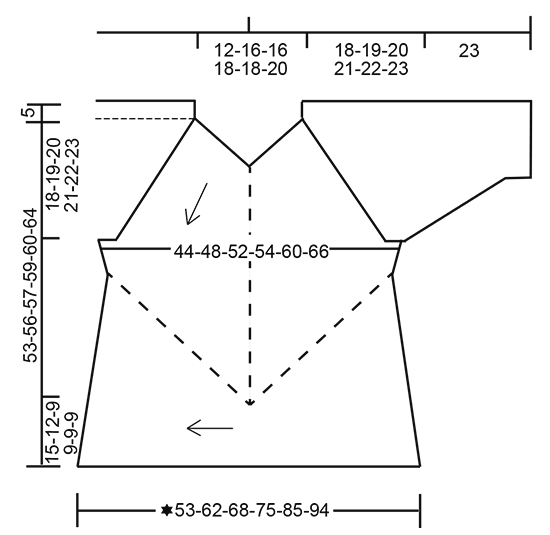
Knitted DROPS jumper worked diagonally in garter st with stripes and domino squares in ”Fabel” or "Flora". Worked top down. Size: S - XXXL.
DROPS 167-36 |
|||||||
|
FABEL/FLORA: Cast on with different colour so that stripes fit vertically. In size S-M-L-XXXL cast on with off white. In size XL-XXL cast on with rose mist / pink. GARTER ST (back and forth): K all rows. 1 ridge = 2 rows K. GARTER ST (worked in the round): 1 ridge = 2 rounds. * K 1 round and P 1 round *, repeat from *-*. STRIPES: Work stripes in the different sizes as follows: SIZE S-M-L-XXXL: 1 ridge (work first round/row K) with off white. 1 ridge rose mist / pink. SIZE XL-XXL: 1 ridge (work first round/row K) with rose mist / pink. 1 ridge in off white. DOMINO SQUARE: SIZE S-M-L-XL: ROUND 1: P all sts. ROUND 2: Inc 1 YO before 1st-3rd-4th-6th marker and 1 YO after 1st-2nd-4th-5th marker (= 8 sts inc on round). ROUND 3 (and all uneven numbered rounds): P all sts, do not work YOs twisted; they should make holes. ROUND 4: Inc 2 YOs on each side of 1st and 4th marker (= front and back piece) as follows: Work until 1 st remains before st with marker, 1 YO, K 1, 1 YO, work st with marker, 1 YO, K 1, 1 YO (= 8 sts inc on back and front piece). ROUND 6: Work as 2nd round. ROUND 8: Inc 1 YO on each side of 1st and 4th marker as follows: Work until st with marker, 1 YO, work st with marker, 1 YO. ROUND 10: Work as 2nd round. SIZE XXL-XXXL: ROUND 1: P all sts. ROUND 2: Inc 1 YO before 1st-3rd-4th-6th marker and 1 YO after 1st-2nd-4th-5th marker (= 8 sts inc on round). ROUND 3 (and all uneven numbered rounds): P all sts, do not work YOs twisted; they should make holes. ROUND 4: Inc 2 YOs on each side of 1st and 4th marker (= front and back piece) as follows: Work until 1 st remains before st with marker, 1 YO, K 1, 1 YO, work st with marker, 1 YO, K 1, 1 YO (= 8 sts inc on back and front piece). ROUND 6: Work as 2nd round. ROUND 8: Work as 4th round. ROUND 10: Work as 2nd round. ROUND 12: Work as 2nd round. DECREASE TIP (applies to mid under sleeve): Dec on each side of marker as follows: Beg 4 sts before marker and K 2 tog, K 4 (marker is between these 4 sts), slip 1 st as if to K, K 1, psso (= 2 sts dec). MEASURING TIP: All measurements on sleeves are done when piece is held up, sleeves will be somewhat longer when used and it is therefore important not to make them too long. ---------------------------------------------------------- JUMPER: First worked back and forth, then in the round from top down. When yoke has been worked, work a bottom edge back and forth. Work entire piece in STRIPES - see explanation above. YOKE: Work first back and forth as follows: Cast on 7 sts on circular needle size 3.5 mm with Fabel/Flora - see explanation above. Work 1 ridge in GARTER ST - see explanation above. Work as follows from RS: 2 sts in garter st, 1 YO, 1 st in garter st (insert 1 marker in this st), 1 YO, 1 st in garter st (= mid st, insert 1 marker in this st), 1 YO, 1 st in garter st (insert 1 marker in this st), 1 YO, 2 sts in garter st (= 4 sts inc) = 11 sts. Repeat inc on each side of mid st and inside 2 edge sts in garter st in each side of piece on every row from RS 5-7-7-8-8-9 more times = 31-39-39-43-43-47 sts (= 13-17-17-19-19-21 sts between mid st and markers in each side). K 1 row from WS. K 1 row from RS as follows: Work in garter st until mid st AT THE SAME TIME inc 0-0-0-1-1-1 st, 1 YO, 1 st in garter st (= mid st), 1 YO, work in garter st the rest of row AT THE SAME TIME inc 0-0-0-1-1-1 st, cast on 73-81-81-87-87-91 loose sts (= sleeves and front piece) at the end of row (= 2-2-2-4-4-4 sts inc) = 106-122-122-134-134-142 sts. Join piece tog and work the next 2 sts in garter st, round is displaced to that next round beg here. Now work in the round in GARTER ST - see explanation above and stripes as before as follows: P first round. Work next round as follows: Work 14-18-18-21-21-23 sts and inc 0-0-4-0-2-7 sts evenly (= half back piece), 1 YO, insert 1st marker in next st, 1 YO, work 14-18-18-21-21-23 and inc 0-0-4-0-2-7 sts evenly (= half back piece), 1 YO, insert 2nd marker in next st, work 22 sts in garter st and inc 0-0-2-2-0-0 sts evenly, insert 3rd marker in next st, 1 YO, work 14-18-18-21-21-23 sts and inc 0-0-4-0-2-7 sts evenly (= half front piece), 1 YO, insert 4th marker in next st, 1 YO, work 14-18-18-21-21-23 sts and inc 0-0-4-0-2-7 sts evenly (= half front piece), 1 YO, insert 5th marker in next st, work 22 sts in garter st and inc 0-0-2-2-0-0 sts evenly, insert 6th marker in next st, 1 YO = 114-130-150-146-150-178 sts. Work DOMINO SQUARE – see explanation above, beg to work 3rd round. REMEMBER THE KNITTING TENSION Work 3rd to 10th-10th-10th-10th-12th-12th round 1 time, then repeat 1st to 10th-10th-10th-10th-12th-12th round 7-7-8-8-7-7 times in total. Then work the first 0-6-0-4-4-8 rounds 1 more times = 62-70-76-78-90-100 sts between 1st and 2nd marker/3rd and 4th marker/4th and 5th marker/6th and 7th marker (= front/back piece), 1 st with each of markers (= 6 sts), 70-74-78-80-88-90 sts between 2nd and 3rd marker/5th and 6th marker (= sleeves) = 394-434-466-478-542-586 sts in total. Piece now measures approx. 18-19-20-21-22-23 cm measured along the shoulder. Work next round as follows: Continue with garter st and stripes as before. Work the first 2 sts tog, work in garter st until 1st marker, 1 YO, work st with marker, 1 YO, work in garter st until 2 sts remain before 2nd marker, work 2 sts tog, slip the next 72-76-80-82-90-92 sts (incl sts with 2nd and 3rd marker) on a stitch holder for sleeve, cast on 8-8-8-12-12-12 sts under sleeve (insert 1 marker in the middle of the new sts), work 2 sts tog, work in garter st until 4th marker, 1 YO, work st with marker, 1 YO, work in garter st until 2 sts remain before 5th marker, work 2 sts tog, insert the next 72-76-80-82-90-92 sts (incl sts with 5th and 6th marker) on a stitch holder for sleeve, cast on 8-8-8-12-12-12 sts under sleeve (insert 1 marker in the middle of the new sts), work in garter st the rest of round = 266-298-322-338-386-426 sts. SIZE S-M-L: ROUND 1 (= all uneven numbered rounds): P all sts, do not work YOs twisted; they should make holes. ROUND 2: Continue with stripes and in garter st as before, work until 1st marker (= mid back), 1 YO, K 1 (= st with marker), 1 YO (= 2 sts inc), work until 4 sts remain before marker under sleeve, K the next 2 tog (= 1 st dec), work 4 sts (marker is in the middle of these sts), K the next 2 tog (= 1 st dec), work until 4th marker (= mid front), 1 YO (= 1 st inc), K 1 (= st with marker), 1 YO (= 1 st inc), work until 4 sts remain before marker under sleeve, K the next 2 tog (= 1 st dec), work 4 sts (marker is in the middle of these sts), K the next 2 tog (= 1 st dec), work the rest of round. ROUND 4: Work as 2nd round. ROUND 6: Work until 1st marker (= mid back), 1, YO, K 1 (= st with marker), 1 YO (= 2 sts inc), work until 6 sts remain before marker under sleeve, * K the next 2 tog (= 1 st dec) *, repeat from *-* 1 more time (= 2 sts dec), work 4 sts (marker is in the middle of these sts), * K the next 2 tog (= 1 st dec) *, repeat from *-* 1 more times (= 2 sts dec), work until 4th marker (= mid front), 1 YO (= 1 st inc), K 1 (= st with marker), 1 YO (= 1 st inc), work until 6 sts remain before marker under sleeve, * K the next 2 tog (= 1 st dec) *, repeat from *-* 1 more time (= 2 sts dec), work 4 sts (marker is in the middle of these sts), * K the next 2 tog (= 1 st dec) *, repeat from *-* 1 more time (= 2 sts dec), work the rest of round (= 4 sts dec in total on round). Repeat 1st-6th round 4 times in total = 250-282-306 sts. ALL SIZES: = 250-282-306-338-386-426 sts. Leave sts on circular needle. They should be worked tog with an edge worked from side to side. Displace sts so that st with 1st marker is beg of round. KNIT TOGETHER: Now work from mid back to the left side to mid front piece to right side, back to mid back. Cast on 34-28-20-20-20-20 sts on circular needle size 3.5 mm with off white. Now work back and forth as follows: LEFT BACK PIECE (bottom edge): Piece should now be worked tog with sts from needle from 1st marker and to marker under sleeve, from mid back on tip of domino to the left side. ROW 1 (= RS): K 1, 1 YO and K rest of row (= 1 st inc). ROW 2 (= WS): K until 1 st remains on row, do not work YOs twisted on this row, they should make holes, slip the first 2 sts from yoke back on needle, K 3 tog. Switch to rose mist / pink. ROW 3 (= RS): K 1, 1 YO and K rest of row (= 1 st inc). ROW 4 (= WS): K until 6 sts remain on row, turn piece. ROW 5 (= RS): K all sts. ROW 6 (= WS): K until 4 sts remain on row, turn piece. ROW 7 (= RS): K all sts. ROW 8 (= WS): K until 1 st remains on row, slip the first 2 sts from yoke back on needle, K 3 tog. Switch to off white. Repeat 1st-8th row until all sts before marker in the side (= from left back piece) is worked tog with edge. LEFT FRONT PIECE (bottom edge): Piece is worked tog with sts from half front piece, i.e. from marker in the side and down to tip of domino mid front. ROW 1 (= RS): K 1, 1 YO, K 2 twisted tog, K 2 twisted tog, K the rest of row (= 1 st dec). ROW 2 (= WS): K until 1 st remains on row, do not work YOs twisted on this row, they should make holes, slip the first 2 sts from yoke back on needle, K 3 tog. Switch to rose mist / pink. ROW 3 (= RS): As 1st row. ROW 4 (= WS): K until 6 sts remain on row, turn piece. ROW 5 (= RS): K all sts. ROW 6 (= WS): K until 4 sts remain on row, turn piece. ROW 7 (= RS): K all sts. ROW 8 (= WS): K until 1 st remains on row, slip the first 2 sts from yoke back on needle, K 3 tog. Switch to off white. Repeat 1st-8th row down to tip mid front, on last repetition of 8th or 2nd row slip the first 3 sts from stitch holder back on needle, K 4 tog. RIGHT FRONT PIECE (bottom edge): Piece is worked tog with sts from the tip of domino mid front and up to the marker in the side. Work as left back piece. RIGHT BACK PIECE (bottom edge): Work piece tog with sts from the side i.e. marker, to mid back i.e. tip of domino. Work as left front piece. Cast off when all sts from yoke have been worked tog with edge, adjust so that last stripe is with rose mist / pink. SLEEVE: Worked in the round on double pointed needles in GARTER ST - see explanation above and stripes. Slip sts from stitch holder in one side of piece on double pointed needles size 3.5 mm = 72-76-80-82-90-92 sts. Cast on 8-8-8-12-12-12 sts at the end of first round = 80-84-88-94-102-104 sts. Then work stripes. Insert 1 marker in the middle of the new sts (= mid under sleeve) – NOW MEASURE PIECE FROM HERE - READ MEASURING TIP. When piece measures 2 cm, dec 1 st on each side of marker (= 2 sts dec) - READ DECREASE TIP, repeat dec every 1 cm 6-6-10-12-17-17 times, then every 2 cm 4-5-2-2-0-0 times = 60-62-64-66-68-70 sts. Cast off when piece measures 23 cm. Work the other sleeve the same way. ASSEMBLY: Sew the opening under the sleeves. Sew cast-on edge tog (i.e. the first 7 sts). |
|||||||
Diagram explanations |
|||||||
|
|||||||
 |
|||||||
Have you finished this pattern?Tag your pictures with #dropspattern #crayonssweater or submit them to the #dropsfan gallery. Do you need help with this pattern?You'll find 18 tutorial videos, a Comments/Questions area and more by visiting the pattern on garnstudio.com. © 1982-2026 DROPS Design A/S. We reserve all rights. This document, including all its sub-sections, has copyrights. Read more about what you can do with our patterns at the bottom of each pattern on our site. |
|||||||


With over 40 years in knitting and crochet design, DROPS Design offers one of the most extensive collections of free patterns on the internet - translated to 17 languages. As of today we count 324 catalogues and 12267 patterns translated into English (UK/cm). 12267
We work hard to bring you the best knitting and crochet have to offer, inspiration and advice as well as great quality yarns at incredible prices! Would you like to use our patterns for other than personal use? You can read what you are allowed to do in the Copyright text at the bottom of all our patterns. Happy crafting!
Post a comment to pattern DROPS 167-36
We would love to hear what you have to say about this pattern!
If you want to leave a question, please make sure you select the correct category in the form below, to speed up the answering process. Required fields are marked *.