
Popular categories
Looking for a yarn?


Comments / Questions (82)
![]() Heike Faßbender wrote:
Heike Faßbender wrote:
Hallo, ich bin gerade dabei den Pulli zu stricken in Gr. XL. Ich habe ein Problem, nachdem ich die Maschen für die Arme stillgelegt habt. Lt. Anleitung soll ich sofort mit dem Anstricken der unteren Teile beginnen. Aber da fehlt mir noch Länge. Meiner Meinung nach, fehlt ein Mittelstück in der Anleitung.
23.08.2019 - 09:33DROPS Design answered:
Liebe Frau Faßbinder, Stimmt Ihre Maschenprobe? Haben Sie von der Anschlagskante bis die Maschen auf der Nadel für den Ärmel gemessen? (dh nicht von der Anschlagskante am Rücken- Vorderteil messen). Nach allen Zunahmen sollen Sie 338 M haben. Viel Spaß beim stricken!
23.08.2019 - 10:00
![]() Tove Brændstrup wrote:
Tove Brændstrup wrote:
Jeg har et problem med sammensætningen, når jeg har slået 91 masker op XXXL. Jeg har læst opskriften mange gange, pillet op lige så mange gange. Jeg kan ikke få det til at gå op med 174m (jeg kan heller ikke få det pænt med udtagningerne i de nye masker). Jeg er faktisk en habil strikker.
12.08.2019 - 19:35DROPS Design answered:
Hej Tove, har du skrevet opskriften ud fra nettet? Når du har slået de nye masker op og taget ud ifølge "Arb strikkes nu rundt i RETSTRIK" så skal du have 178 masker på pinden. Nu kan du starte med DOMINORUDE. God fornøjelse!
03.10.2019 - 13:56
![]() Barbara wrote:
Barbara wrote:
Bin leider auf einen Fehler gestoßen und kann nicht weiterstricken. Das Dominoquadrat habe ich gestrickt bis es heißt, das man nun 426 M. Hat. Dann folgen die Angaben für Gr. S-M-L aber nicht für XL. Können Sie mir bitte diesen Teil der Anleitung schicken?
02.04.2019 - 09:47DROPS Design answered:
Liebe Barbara, in die 3 grösseren Größe ist Quadrat fertig, jetzt stricken Sie weiter mit "ALLE GR." = 426 M. dh das Teil für S-M-L betrifft nur diese 3 Grössen und wird nicht in die anderen Größen gestrickt. Viel Spaß beim stricken!
02.04.2019 - 10:46
![]() Karin wrote:
Karin wrote:
Jag var tvungen att gå ned och leta i kommentarerna för att se vilken enhet måtten på bilden var i också. Cm verkade som en rimlig gissning, men med tanke på att mönstret också finns på engelska så är det inte uppenbart.
07.03.2019 - 10:24
![]() Karin wrote:
Karin wrote:
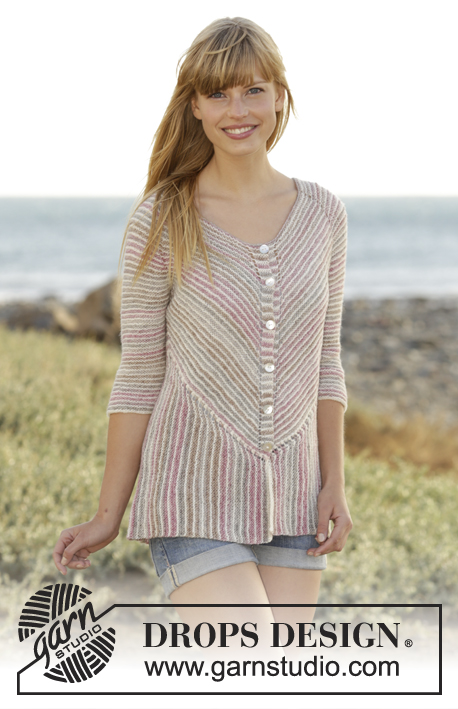
Det här mönstret är verkligen svårbegripligt, särskilt hur man börjar det. Jag var tvungen att kolla på cardigan för att över huvud taget fatta vad som pågick. Lite fler närbilder där färgerna inte är så bleka att de flyter in i varandra och skillnaden på räta och aviga maskor faktiskt syns hade varit välkommet, särskilt bakifrån som den som finns i cardigan-mönstret.
07.03.2019 - 10:19
![]() Zita wrote:
Zita wrote:
Können sie mir bitte einen Tipp geben...........Am Anfang der runden habe ich eine sichtbare Naht ,das heißt es sie aus als ob ich da den Pullover zusammengenäht habe .....das wirkt störend .Bei Ihrem Model sieht man keinen Übergang .Video dazu finde ich leider nicht auf Ihrer Seite.Hoffe um Hilfe ...Danke für die Anleitung
29.01.2019 - 14:41DROPS Design answered:
Liebe Zita, wenn mann Krausrechts strickt, sieht man oft diesn Übergang, Sie können mal versuchen, den Faden etwas hochziehen (aber nicht zu streng, damit die Arbeit nicht eng wird). Ihr DROPS Laden hat auch sicher mal Tipp für Sie, nehmen Sie nur Kontakt mit ihm auf - auch telefonisch oder per Email. Viel Spaß beim stricken!
29.01.2019 - 16:34
![]() Conni Homeier wrote:
Conni Homeier wrote:
Der Pulli gefällt mir so gut, dass ich ihn gerne stricken möchte. Ich habe allerdings noch nie einen pulli gestrickt. Ist die Anleitung für Anfänger geeignet?
14.01.2019 - 22:00DROPS Design answered:
Liebe Frau Homeier, lesen Sie die Anleitung durch und folgen Sie die Anleitung wie beschrieben, sollten Sie Frage haben, die können Sie einfach hier stellen. Ihr DROPS Laden wird Ihnen auch gerne weiter helfen, auch telefonisch oder per E-mail. Viel Spaß beim stricken!
15.01.2019 - 09:27
![]() Donatella wrote:
Donatella wrote:
Non riesco a capire il LAVORIAMO INSIEME. Sto facendo una M quindi le 28 maglie le devo avviare in un ferro a parte? E poi come le inserisco? Non mi risulta molto chiara la spiegazione. Attendo istruzioni perché mi sono veramente bloccata. Grazie e cordiali saluti. Donatella
26.11.2017 - 19:10DROPS Design answered:
Buongiorno Donatella. Deve avviare le maglie del bordo su un ferro a parte, poi lavora il primo ferro a diritto su queste maglie; al ferro due, inizia ad attaccare il bordo alla parte già lavorata della maglia: lavora l’ultima maglia del bordo insieme alle prime 2 maglie che trova sul ferro circolare (l’inizio del giro coincide con la maglia con il primo segno). Lavora poi come indicato per gli altri ferri e attacca nuovamente il bordo al ferro 8. Buon lavoro!
27.11.2017 - 16:34
![]() Donatella wrote:
Donatella wrote:
Buongiorno, quando si unisce in tondo è scritto che il giro inizia dopo le 2 maglie a legaccio. Significa che queste 2 maglie diventano le ultime, ho capito bene? Grazie e saluti. Donatella
21.11.2017 - 00:59DROPS Design answered:
Buongiorno Donatella. Sì esatto, è come ha scritto. Buon lavoro!
21.11.2017 - 15:38
![]() Christa wrote:
Christa wrote:
Drer Pullover sieht toll aus. ICh würde ihn gern strecken, bevor ich das Garn bestelle möchte ich wissen ob die Anleitung überarbeitet wurde. danke für eien ANtwort und die besten Grüße CHrista
16.11.2017 - 10:20DROPS Design answered:
Liebe Christa, die Anleitung wurde korrigiert und jetzt können Sie sie mit allen Korrketuren neu drücken. Viel Spaß beim stricken!
20.11.2017 - 11:02
|
|||||||
Crayons#crayonssweater |
|||||||
|
|
|||||||
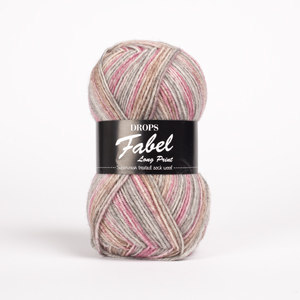
Knitted DROPS jumper worked diagonally in garter st with stripes and domino squares in ”Fabel” or "Flora". Worked top down. Size: S - XXXL.
DROPS 167-36 |
|||||||
|
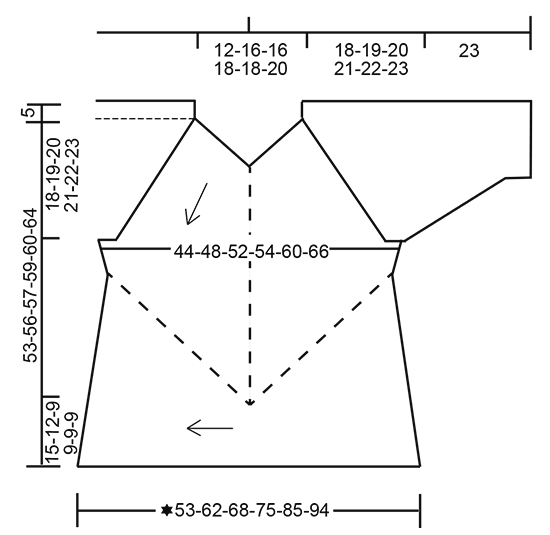
FABEL/FLORA: Cast on with different colour so that stripes fit vertically. In size S-M-L-XXXL cast on with off white. In size XL-XXL cast on with rose mist / pink. GARTER ST (back and forth): K all rows. 1 ridge = 2 rows K. GARTER ST (worked in the round): 1 ridge = 2 rounds. * K 1 round and P 1 round *, repeat from *-*. STRIPES: Work stripes in the different sizes as follows: SIZE S-M-L-XXXL: 1 ridge (work first round/row K) with off white. 1 ridge rose mist / pink. SIZE XL-XXL: 1 ridge (work first round/row K) with rose mist / pink. 1 ridge in off white. DOMINO SQUARE: SIZE S-M-L-XL: ROUND 1: P all sts. ROUND 2: Inc 1 YO before 1st-3rd-4th-6th marker and 1 YO after 1st-2nd-4th-5th marker (= 8 sts inc on round). ROUND 3 (and all uneven numbered rounds): P all sts, do not work YOs twisted; they should make holes. ROUND 4: Inc 2 YOs on each side of 1st and 4th marker (= front and back piece) as follows: Work until 1 st remains before st with marker, 1 YO, K 1, 1 YO, work st with marker, 1 YO, K 1, 1 YO (= 8 sts inc on back and front piece). ROUND 6: Work as 2nd round. ROUND 8: Inc 1 YO on each side of 1st and 4th marker as follows: Work until st with marker, 1 YO, work st with marker, 1 YO. ROUND 10: Work as 2nd round. SIZE XXL-XXXL: ROUND 1: P all sts. ROUND 2: Inc 1 YO before 1st-3rd-4th-6th marker and 1 YO after 1st-2nd-4th-5th marker (= 8 sts inc on round). ROUND 3 (and all uneven numbered rounds): P all sts, do not work YOs twisted; they should make holes. ROUND 4: Inc 2 YOs on each side of 1st and 4th marker (= front and back piece) as follows: Work until 1 st remains before st with marker, 1 YO, K 1, 1 YO, work st with marker, 1 YO, K 1, 1 YO (= 8 sts inc on back and front piece). ROUND 6: Work as 2nd round. ROUND 8: Work as 4th round. ROUND 10: Work as 2nd round. ROUND 12: Work as 2nd round. DECREASE TIP (applies to mid under sleeve): Dec on each side of marker as follows: Beg 4 sts before marker and K 2 tog, K 4 (marker is between these 4 sts), slip 1 st as if to K, K 1, psso (= 2 sts dec). MEASURING TIP: All measurements on sleeves are done when piece is held up, sleeves will be somewhat longer when used and it is therefore important not to make them too long. ---------------------------------------------------------- JUMPER: First worked back and forth, then in the round from top down. When yoke has been worked, work a bottom edge back and forth. Work entire piece in STRIPES - see explanation above. YOKE: Work first back and forth as follows: Cast on 7 sts on circular needle size 3.5 mm with Fabel/Flora - see explanation above. Work 1 ridge in GARTER ST - see explanation above. Work as follows from RS: 2 sts in garter st, 1 YO, 1 st in garter st (insert 1 marker in this st), 1 YO, 1 st in garter st (= mid st, insert 1 marker in this st), 1 YO, 1 st in garter st (insert 1 marker in this st), 1 YO, 2 sts in garter st (= 4 sts inc) = 11 sts. Repeat inc on each side of mid st and inside 2 edge sts in garter st in each side of piece on every row from RS 5-7-7-8-8-9 more times = 31-39-39-43-43-47 sts (= 13-17-17-19-19-21 sts between mid st and markers in each side). K 1 row from WS. K 1 row from RS as follows: Work in garter st until mid st AT THE SAME TIME inc 0-0-0-1-1-1 st, 1 YO, 1 st in garter st (= mid st), 1 YO, work in garter st the rest of row AT THE SAME TIME inc 0-0-0-1-1-1 st, cast on 73-81-81-87-87-91 loose sts (= sleeves and front piece) at the end of row (= 2-2-2-4-4-4 sts inc) = 106-122-122-134-134-142 sts. Join piece tog and work the next 2 sts in garter st, round is displaced to that next round beg here. Now work in the round in GARTER ST - see explanation above and stripes as before as follows: P first round. Work next round as follows: Work 14-18-18-21-21-23 sts and inc 0-0-4-0-2-7 sts evenly (= half back piece), 1 YO, insert 1st marker in next st, 1 YO, work 14-18-18-21-21-23 and inc 0-0-4-0-2-7 sts evenly (= half back piece), 1 YO, insert 2nd marker in next st, work 22 sts in garter st and inc 0-0-2-2-0-0 sts evenly, insert 3rd marker in next st, 1 YO, work 14-18-18-21-21-23 sts and inc 0-0-4-0-2-7 sts evenly (= half front piece), 1 YO, insert 4th marker in next st, 1 YO, work 14-18-18-21-21-23 sts and inc 0-0-4-0-2-7 sts evenly (= half front piece), 1 YO, insert 5th marker in next st, work 22 sts in garter st and inc 0-0-2-2-0-0 sts evenly, insert 6th marker in next st, 1 YO = 114-130-150-146-150-178 sts. Work DOMINO SQUARE – see explanation above, beg to work 3rd round. REMEMBER THE KNITTING TENSION Work 3rd to 10th-10th-10th-10th-12th-12th round 1 time, then repeat 1st to 10th-10th-10th-10th-12th-12th round 7-7-8-8-7-7 times in total. Then work the first 0-6-0-4-4-8 rounds 1 more times = 62-70-76-78-90-100 sts between 1st and 2nd marker/3rd and 4th marker/4th and 5th marker/6th and 7th marker (= front/back piece), 1 st with each of markers (= 6 sts), 70-74-78-80-88-90 sts between 2nd and 3rd marker/5th and 6th marker (= sleeves) = 394-434-466-478-542-586 sts in total. Piece now measures approx. 18-19-20-21-22-23 cm measured along the shoulder. Work next round as follows: Continue with garter st and stripes as before. Work the first 2 sts tog, work in garter st until 1st marker, 1 YO, work st with marker, 1 YO, work in garter st until 2 sts remain before 2nd marker, work 2 sts tog, slip the next 72-76-80-82-90-92 sts (incl sts with 2nd and 3rd marker) on a stitch holder for sleeve, cast on 8-8-8-12-12-12 sts under sleeve (insert 1 marker in the middle of the new sts), work 2 sts tog, work in garter st until 4th marker, 1 YO, work st with marker, 1 YO, work in garter st until 2 sts remain before 5th marker, work 2 sts tog, insert the next 72-76-80-82-90-92 sts (incl sts with 5th and 6th marker) on a stitch holder for sleeve, cast on 8-8-8-12-12-12 sts under sleeve (insert 1 marker in the middle of the new sts), work in garter st the rest of round = 266-298-322-338-386-426 sts. SIZE S-M-L: ROUND 1 (= all uneven numbered rounds): P all sts, do not work YOs twisted; they should make holes. ROUND 2: Continue with stripes and in garter st as before, work until 1st marker (= mid back), 1 YO, K 1 (= st with marker), 1 YO (= 2 sts inc), work until 4 sts remain before marker under sleeve, K the next 2 tog (= 1 st dec), work 4 sts (marker is in the middle of these sts), K the next 2 tog (= 1 st dec), work until 4th marker (= mid front), 1 YO (= 1 st inc), K 1 (= st with marker), 1 YO (= 1 st inc), work until 4 sts remain before marker under sleeve, K the next 2 tog (= 1 st dec), work 4 sts (marker is in the middle of these sts), K the next 2 tog (= 1 st dec), work the rest of round. ROUND 4: Work as 2nd round. ROUND 6: Work until 1st marker (= mid back), 1, YO, K 1 (= st with marker), 1 YO (= 2 sts inc), work until 6 sts remain before marker under sleeve, * K the next 2 tog (= 1 st dec) *, repeat from *-* 1 more time (= 2 sts dec), work 4 sts (marker is in the middle of these sts), * K the next 2 tog (= 1 st dec) *, repeat from *-* 1 more times (= 2 sts dec), work until 4th marker (= mid front), 1 YO (= 1 st inc), K 1 (= st with marker), 1 YO (= 1 st inc), work until 6 sts remain before marker under sleeve, * K the next 2 tog (= 1 st dec) *, repeat from *-* 1 more time (= 2 sts dec), work 4 sts (marker is in the middle of these sts), * K the next 2 tog (= 1 st dec) *, repeat from *-* 1 more time (= 2 sts dec), work the rest of round (= 4 sts dec in total on round). Repeat 1st-6th round 4 times in total = 250-282-306 sts. ALL SIZES: = 250-282-306-338-386-426 sts. Leave sts on circular needle. They should be worked tog with an edge worked from side to side. Displace sts so that st with 1st marker is beg of round. KNIT TOGETHER: Now work from mid back to the left side to mid front piece to right side, back to mid back. Cast on 34-28-20-20-20-20 sts on circular needle size 3.5 mm with off white. Now work back and forth as follows: LEFT BACK PIECE (bottom edge): Piece should now be worked tog with sts from needle from 1st marker and to marker under sleeve, from mid back on tip of domino to the left side. ROW 1 (= RS): K 1, 1 YO and K rest of row (= 1 st inc). ROW 2 (= WS): K until 1 st remains on row, do not work YOs twisted on this row, they should make holes, slip the first 2 sts from yoke back on needle, K 3 tog. Switch to rose mist / pink. ROW 3 (= RS): K 1, 1 YO and K rest of row (= 1 st inc). ROW 4 (= WS): K until 6 sts remain on row, turn piece. ROW 5 (= RS): K all sts. ROW 6 (= WS): K until 4 sts remain on row, turn piece. ROW 7 (= RS): K all sts. ROW 8 (= WS): K until 1 st remains on row, slip the first 2 sts from yoke back on needle, K 3 tog. Switch to off white. Repeat 1st-8th row until all sts before marker in the side (= from left back piece) is worked tog with edge. LEFT FRONT PIECE (bottom edge): Piece is worked tog with sts from half front piece, i.e. from marker in the side and down to tip of domino mid front. ROW 1 (= RS): K 1, 1 YO, K 2 twisted tog, K 2 twisted tog, K the rest of row (= 1 st dec). ROW 2 (= WS): K until 1 st remains on row, do not work YOs twisted on this row, they should make holes, slip the first 2 sts from yoke back on needle, K 3 tog. Switch to rose mist / pink. ROW 3 (= RS): As 1st row. ROW 4 (= WS): K until 6 sts remain on row, turn piece. ROW 5 (= RS): K all sts. ROW 6 (= WS): K until 4 sts remain on row, turn piece. ROW 7 (= RS): K all sts. ROW 8 (= WS): K until 1 st remains on row, slip the first 2 sts from yoke back on needle, K 3 tog. Switch to off white. Repeat 1st-8th row down to tip mid front, on last repetition of 8th or 2nd row slip the first 3 sts from stitch holder back on needle, K 4 tog. RIGHT FRONT PIECE (bottom edge): Piece is worked tog with sts from the tip of domino mid front and up to the marker in the side. Work as left back piece. RIGHT BACK PIECE (bottom edge): Work piece tog with sts from the side i.e. marker, to mid back i.e. tip of domino. Work as left front piece. Cast off when all sts from yoke have been worked tog with edge, adjust so that last stripe is with rose mist / pink. SLEEVE: Worked in the round on double pointed needles in GARTER ST - see explanation above and stripes. Slip sts from stitch holder in one side of piece on double pointed needles size 3.5 mm = 72-76-80-82-90-92 sts. Cast on 8-8-8-12-12-12 sts at the end of first round = 80-84-88-94-102-104 sts. Then work stripes. Insert 1 marker in the middle of the new sts (= mid under sleeve) – NOW MEASURE PIECE FROM HERE - READ MEASURING TIP. When piece measures 2 cm, dec 1 st on each side of marker (= 2 sts dec) - READ DECREASE TIP, repeat dec every 1 cm 6-6-10-12-17-17 times, then every 2 cm 4-5-2-2-0-0 times = 60-62-64-66-68-70 sts. Cast off when piece measures 23 cm. Work the other sleeve the same way. ASSEMBLY: Sew the opening under the sleeves. Sew cast-on edge tog (i.e. the first 7 sts). |
|||||||
Diagram explanations |
|||||||
|
|||||||
 |
|||||||
Have you finished this pattern?Tag your pictures with #dropspattern #crayonssweater or submit them to the #dropsfan gallery. Do you need help with this pattern?You'll find 18 tutorial videos, a Comments/Questions area and more by visiting the pattern on garnstudio.com. © 1982-2026 DROPS Design A/S. We reserve all rights. This document, including all its sub-sections, has copyrights. Read more about what you can do with our patterns at the bottom of each pattern on our site. |
|||||||


With over 40 years in knitting and crochet design, DROPS Design offers one of the most extensive collections of free patterns on the internet - translated to 17 languages. As of today we count 324 catalogues and 12267 patterns translated into English (UK/cm). 12267
We work hard to bring you the best knitting and crochet have to offer, inspiration and advice as well as great quality yarns at incredible prices! Would you like to use our patterns for other than personal use? You can read what you are allowed to do in the Copyright text at the bottom of all our patterns. Happy crafting!
Post a comment to pattern DROPS 167-36
We would love to hear what you have to say about this pattern!
If you want to leave a question, please make sure you select the correct category in the form below, to speed up the answering process. Required fields are marked *.