
Popular categories
Looking for a yarn?


Comments / Questions (168)
![]() Cindy wrote:
Cindy wrote:
I am working on the body section and have completed the row with the chains for the under arm. On the next instruction for S-M-L-XL, it says to work sts under each sleeve as 1st st in A.6. Not quite sure what this means. Am I working the first row of A6 (3 chs, 4dcs)? Thx for your help!
31.07.2021 - 01:23DROPS Design answered:
Dear Cindy, diagram A, starts (depending on the size) a number of chainstitches and a treble(UK). That is what you should start your row with. Happy Stitching!
02.08.2021 - 00:57
![]() Elsa wrote:
Elsa wrote:
Leider keine Antwort!
24.06.2021 - 16:49
![]() Elsa wrote:
Elsa wrote:
Die Perlmuttknöpfe sehen sehr gross aus. Sie passen bei mir nie und nimmer zwischen 2 Stäbchen durch. Sind Sie vielleicht nur als Zierde angenäht und die Jacke zugenäht oder wie wurden die Knopflöcher angebracht? Besten Dank!
11.06.2021 - 16:47DROPS Design answered:
Liebe Elsa, Sie können vielleicht etwas "erzwingen" das erste Mal, so daß das Knopfloch wird etwas größer und die Knöpfe schön fest halten - oder dann lieber die kleinere Knöpfe wählen. Viel Spaß beim häkeln!
28.06.2021 - 08:14
![]() Elsa wrote:
Elsa wrote:
Ich bin in der letzten Reihe des Passe Gr. M. Es heisst am Ende 9-6-9-9-6 Stb. 1-2-3-4-4 R von A.7 häkeln (siehe Pfeil im Diagramm A.7). Muss ich noch eine ganze Reihe in A7 häkeln? Ich kann leider keinen Pfeil in A.7 finden. Warum beginnt dann der Rumpf mit der Rückreihe wenn doch die letzte Reihe des Passe eine Hinreihe ist + zusätzliche Reihe A.7 die Rückreihe? Was heißt - wie zuvor ? Muss ich das beachten oder kann ich das ignorieren? Besten Dank für die Mühe!
28.05.2021 - 18:39DROPS Design answered:
Liebe Elsa, in M häkeln Sie 1 Reihe in A.7 wie beschrieben (das mit dem Pfeil wird gelöscht) = Hinreihe, und bei der nächsten Reihe = Rückreihe wird die Arbeit verteilt, dh die Maschen für die Ärmel werden übersprungen und durch Luftmaschen ersetzt. Viel Spaß beim häkeln!
31.05.2021 - 07:10
![]() Pia Rasmussen wrote:
Pia Rasmussen wrote:
Jeg har endnu ikke købt garnet til Seashore Bliss cardigan, men jeg kan ikke finde hjælpe videoen til dette mønster. Hvor finder jeg den. Kan du sende et link. Tak
27.05.2021 - 09:17
![]() Sandhya Kulkarni wrote:
Sandhya Kulkarni wrote:
I would appreciate a clear image of project done. For people like me who are more visual, this will be a great visual clue.
09.05.2021 - 11:00DROPS Design answered:
Dear Sandhya , you can always look for a pattern on Ravelry, and see if others done it. In this case there are more than a dozen different projects, with pictures there. Happy Crafting!
09.05.2021 - 13:55
![]() Cecilia wrote:
Cecilia wrote:
La realizzazione del modello è difficile in quanto le spiegazioni non sono chiare
06.05.2021 - 13:45DROPS Design answered:
Buonasera Cecilia, a quale punto del modello sta facendo riferimento? Buon lavoro!
06.05.2021 - 21:17
![]() Elsa wrote:
Elsa wrote:
Hallo, was bedeutet das: je 1 Stb in die nächsten 0-0-4-4-1-3 Lm? In welche Luftmasche muss ich die Stäbchen häkeln, in die Nullte? Ich bitte um eine kleine Erklärung. Herzlichen Dank für die Hilfe! VG Elsa
22.04.2021 - 23:34DROPS Design answered:
Liebe Elsa, in die 2 ersten Grössen häkeln Sie hier das nicht, nur in die anderen Grössen sollen Sie diese Stäbchen häkeln, dh in beiden ersten 2 Grössen häkeln Sie zuerst 1 Stäbchen in die 4. Lm (= 2 Stb) dann die ganze Runde: * 1 Lm überspringen, je 1 Stb in die nächsten 6 Lm *, von *-* wdh = 104-104 Stäbchen. Viel Spaß beim häkeln!
23.04.2021 - 08:06
![]() Atbin wrote:
Atbin wrote:
Angaben der Maschenprobe und Anleitung differieren bei Anleitung des Modells (18x9 ) und der Wolle ,die man kaufen kann (28x21) erheblich. Bitte Angabe präzisieren. Danke
25.03.2021 - 01:56DROPS Design answered:
Siehe vorrige Antwort :) Viel Spaß beim häkeln!
25.03.2021 - 08:46
![]() Irene Atbin wrote:
Irene Atbin wrote:
Bei dieser Anleitung wird eine Machenprobe von 18 Stäbchen und 9 Reihen angegeben bei Nadelstärke 4! In der Angabe der Wolle, die man dafür kaufen kann, wird für 10 cm aber 28 Stäbchen und 21 Reihen angegeben . Wie passt das zusammen? Danke für die Aufklärung
25.03.2021 - 01:52DROPS Design answered:
Liebe Frau Atbin, für dieses Modell sollen Sie 18 Stb x 9 R = 10 x 10 cm, die Häkelnadelgröße ist nur als Information gegeben, wenn Sie fester oder eher locker häkeln, dann sollen Sie entweder eine grössere oder eine kleinere Häkelnadel - mehr lesen Sie hier. Viel Spaß beim häkeln!
25.03.2021 - 08:45
|
||||||||||||||||||||||||||||
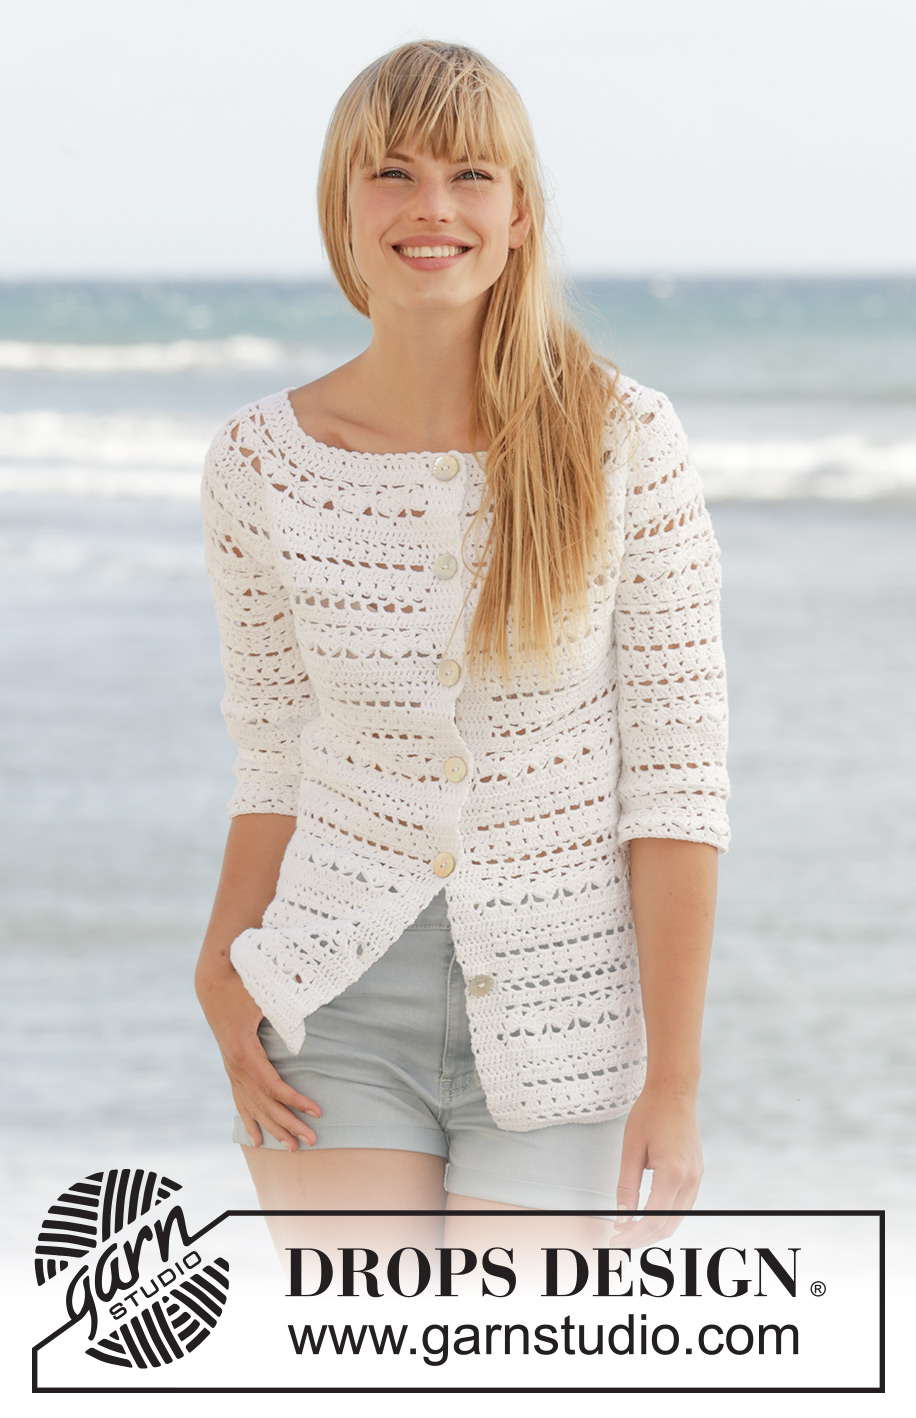
Seashore Bliss Cardigan#seashoreblisscardigan |
||||||||||||||||||||||||||||
|
|
||||||||||||||||||||||||||||
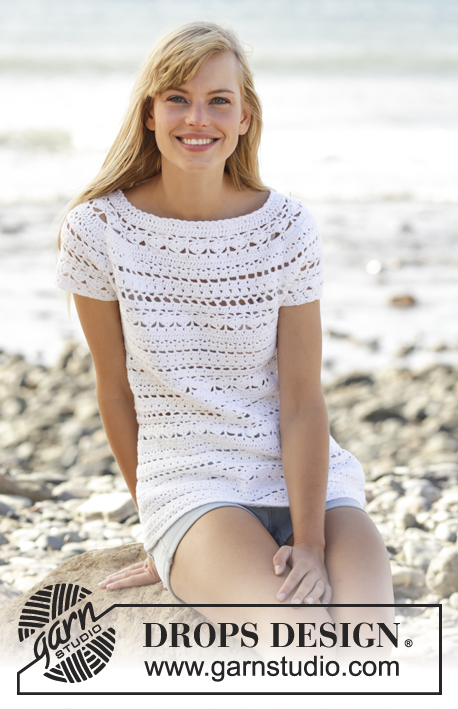
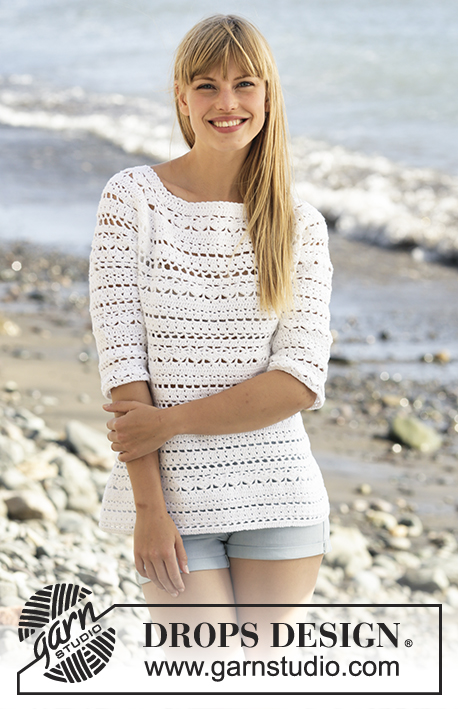
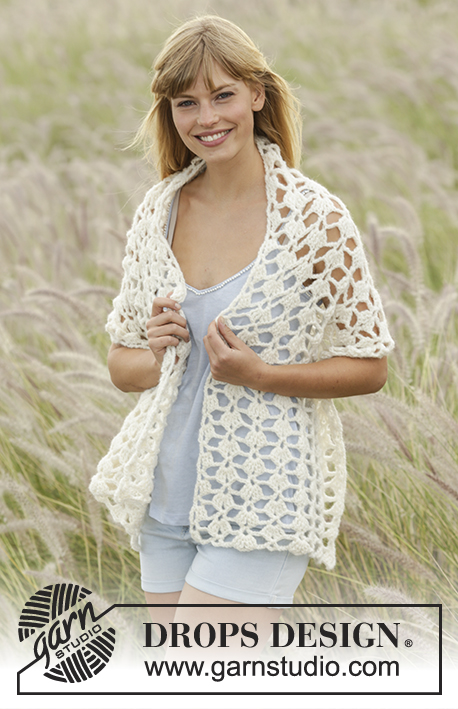
Crochet DROPS jacket with lace pattern and round yoke in ”Cotton Light”. The piece is worked top down. Size: S - XXXL.
DROPS 169-16 |
||||||||||||||||||||||||||||
|
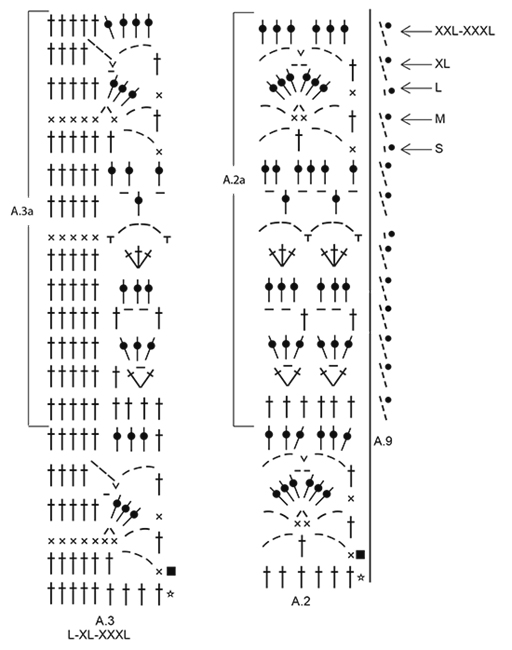
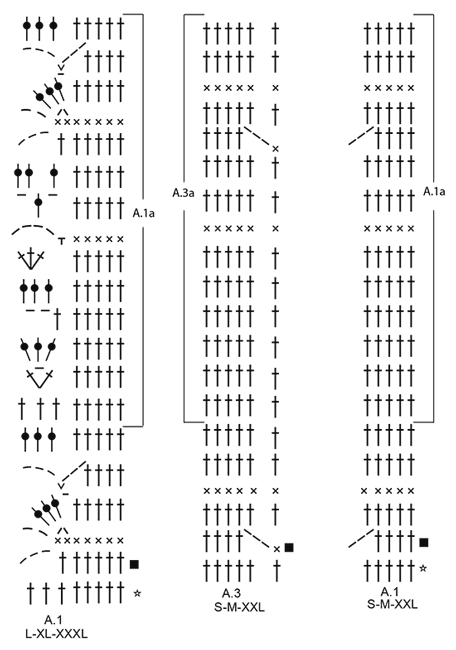
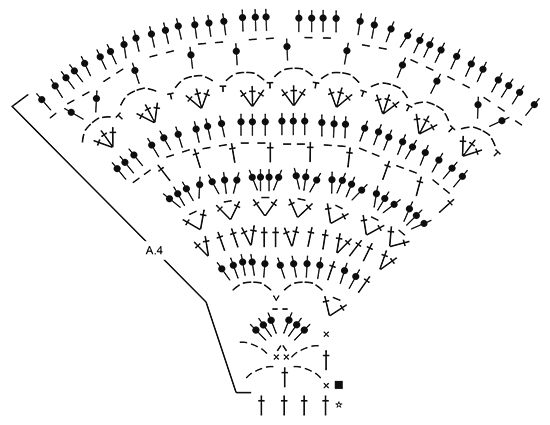
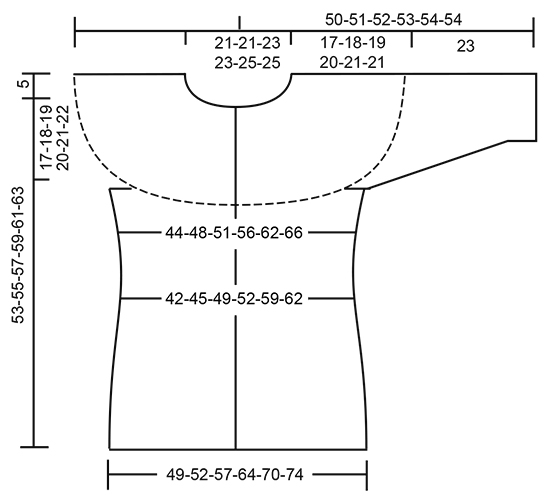
PATTERN: See diagrams A.1 to A.9. Choose diagram for correct size. Diagram A.9 show how to start and end when working in the round. CROCHET INFO: Replace first tr at beg of every tr row with 3 ch. Replace first dc at beg of every dc row with 1 ch. Replace first tr at beg of every tr round with 3 ch, finish the round with 1 sl st in 3rd ch from beg of round. At beg of every dc round, replace first dc with 1 ch and finish round with 1 sl st in 1st ch from beg of round. INCREASE TIP: Inc 1 tr by working 2 tr in same tr. DECREASE TIP: Dec 1 tr by working 2 tr tog as follows: Work 1 tr but wait with last pull through (= 2 sts on hook), then work next tr but on last pull through, pull yarn through all 3 sts on hook. TIP ARMHOLE: Size S, M and XL: In the last repeat of A.2 before marker 1 and marker 3 (= beginning of armhole), replace the last chain stitch with a treble crochet in the last stitch of the same repeat on previous row. ---------------------------------------------------------- JACKET: Worked back and forth, top down. NOTE: It is important to keep the crochet tension vertically so that the measurements on yoke will be correct. YOKE: Work 123-123-134-134-138-140 ch on hook size 4 mm with Cotton Light. Work 1 tr in 4th ch from hook (= 2 tr) - READ CROCHET INFO, 1 tr in each of the next 0-0-4-4-1-3 ch, * skip 1 ch, 1 tr in each of the next 6 ch *, repeat from *-* the entire row = 104-104-114-114-117-119 tr. Work 1 row with 1 tr in every tr and inc 19-19-21-21-30-40 tr evenly - READ INCREASE TIP = 123-123-135-135-147-159 tr. Work next row and insert 8 markers in the piece as follows: Work A.1 (= 5-5-8-8-5-8 sts), repeat A.2 over the next 18-18-18-18-24-24 tr (= 3-3-3-3-4-4 times in width), insert 1st marker, A.4 over the first 4 tr, insert 2nd marker, A.2 over the next 12 tr (= 2 times in width), insert 3rd marker, A.4 over the next 4 tr, insert 4th marker, work A.2 over the next 36-36-42-42-48-54 tr (= 6-6-7-7-8-9 times in width), insert 5th marker, A.4 over the next 4 tr, insert 6th marker, A.2 over the next 12 tr (= 2 times in width), insert 7th marker, A.4 over the next 4 tr, insert 8th marker, A.2 over the next 18-18-18-18-24-24 tr (= 3-3-3-3-4-4 times in width), finish with A.3 (= 6-6-9-9-6-9 tr). REMEMBER THE CROCHET TENSION! SIZE XXL-XXXL: On 5th row (row with tr from RS) in A.2 inc evenly as follows: Between 2nd and 3rd marker and 6th and 7th marker: Inc 6-6 tr. 12-12 tr have been inc in total on row (= 18-18 tr between 2nd and 3rd marker and 6th and 7th marker). Repeat A.2 3-3 times between 2nd and 3rd marker and between 6th and 7th marker: ALL SIZES: On 6th row (row with tr from WS) in A.2 inc evenly as follows: Before 8th marker: Inc 0-3-3-3-6-6 tr (= 24-27-30-30-36-39 tr before 8th marker). Between 7th and 6th marker and 3rd and 2nd marker: Inc 0-0-6-6-6-6 tr (= 12-12-18-18-24-24 tr between these markers). Between 5th and 4th marker: Inc 0-6-6-6-12-12 tr (= 36-42-48-48-60-66 tr between each of these markers). After 1st marker: Inc 0-3-3-3-6-6 tr (= 23-26-29-29-35-38 tr after 1st marker). There are now 179-191-215-215-251-263 tr in total on row. Work next row as follows from RS: Work A.1 over the first 5-5-8-8-5-8 tr as before, A.5 over the next 0-3-3-3-0-0 tr, repeat A.2 over the next 18-18-18-18-30-30 tr (= 3-3-3-3-5-5 times in width), A.4 as before, repeat A.2 over the next 12-12-18-18-24-24 tr (= 2-2-3-3-4-4 times in width), A.4 as before, repeat A.2 over the next 36-42-48-48-60-66 tr (= 6-7-8-8-10-11 times in width), A.4 as before, repeat A.2 over the next 12-12-18-18-24-24 tr (= 2-2-3-3-4-4 times in width), A.4 as before, repeat A.2 over the next 18-18-18-18-30-30 tr as before (= 3-3-3-3-5-5 times in width), A.5 over the next 0-3-3-3-0-0 tr, finish with A.3 over the last 6-6-9-9-6-9 tr as before. SIZE XL-XXL-XXXL: On 8th row (row with tr from WS) in A.2 inc evenly as follows: Before 8th marker: Inc 3-3-3 tr (= 33-39-42 tr before 8th marker). Between 4th and 5th marker: Inc 6-6-6 tr (= 54-66-72 tr between 4th and 5th marker). After 1st marker: Inc 3-3-3 tr (= 32-38-41 tr after 1st marker). Work next row as follows from RS: Work A.1 over the first 8-5-8 tr as before, A.5 over the next 0-3-3 tr, repeat A.2 over the next 24-30-30 tr (= 4-5-5 times in width), A.4 as before, repeat A.2 over the next 18-24-24 tr (= 3-4-4 times in width), A.4 as before, repeat A.2 over the next 54-66-72 tr (= 9-11-12 times in width), A.4 as before, repeat A.2 over the next 18-24-24 tr (= 3-4-4 times in width), A.4 as before, repeat A.2 over the next 24-30-30 tr as before (= 4-5-5 times in width), A.5 over the next 0-3-3 tr, finish with A.3 over the first 9-6-9 tr as before. ALL SIZES: On last row in A.4 (= from WS) insert 1 new marker in the middle of every A.4 (i.e. 18 tr on each side of marker in A.4 = 4 markers). Remove the old markers (= 4 markers remain in piece). Sts between markers are for sleeves (= 48-48-54-54-60-60 tr on each sleeve). When A.4 has been worked 1 time vertically, there are 251-263-287-299-335-347 tr on row. Yoke is now done in size S. SIZE M-L-XL-XXL-XXXL: Work next row from RS as follows: Work A.6 over the first 8-5-8-8-5 tr, continue with A.2 over the next 18-24-24-30-36 tr (= 3-4-4-5-6 times in width), * A.7 over the next 36 tr (= 2 times in width, marker is in the middle of these repetitions), A.2 over the next 12-18-18-24-24 tr (= 2-3-3-4-4 times in width), A.7 over the next 36 tr (= 2 times in width, marker is in the middle of these repetitions) *, A.2 over the next 42-48-54-66-72 tr as before, repeat from *-*, A.2 over the next 18-24-24-30-36 tr (= 3-4-4-5-6 times in width), finish with A.8 over the last 9-6-9-9-6 tr. Work 1-2-3-4-4 rows of A.7 ALL SIZES: Piece now measures 17-18-19-20-21-21 cm vertically. BODY: SIZE M-XL: Work as follows from WS: Work A.8 as before, repeat A.2a (see arrow on where pattern beg in the different sizes) 6-7 times in total in width until 1st marker (= right front piece) - SEE ARMHOLE TIP, work 8-10 ch, skip sts between 1st and 2nd marker (= sleeve), work A.2a 13-15 times in total in width until next marker (= back piece), work 8-10 ch, skip sts between 3rd and 4th marker (= sleeve), work A.2a 6-7 times in total in width, finish with A.6. Insert 1 marker in piece, NOW MEASURE PIECE FROM HERE. SIZE S-L-XXL-XXXL: Work as follows from RS: Work A.6, repeat A.2a (see arrow on where pattern beg in the different sizes) 6-7-8-9 times in total in width until 1st marker (= left front piece) - SEE ARMHOLE TIP, work 8-8-10-10 ch, skip sts between 1st and 2nd marker (= sleeve), work A.2a 12-14-17-18 times in total in width until 3rd marker (= back piece), work 8-8-10-10 ch, skip sts between 3rd and 4th marker (= sleeve), work A.2a 6-7-8-9 times in total in width, finish with A.8. Insert 1 marker in piece, NOW MEASURE PIECE FROM HERE. SIZE S-M-L-XL: Work A.6/A.2a/A.8 as before, work the 8-8-8-10 sts under each sleeve as 1st st in A.6. On last row in A.6 and A.8 (row with tr) dec 4-4-4-2 tr evenly on entire row – READ DECREASE TIP = 167-179-191-209 tr. When A.6 and A.8 have been worked 1 time vertically, work next row as follows from WS: Work A.3a over the first 6-6-9-9 tr, repeat A.2a 26-28-29-32 times in total in width, finish with A.1a over the last 5-5-8-8 tr. SIZE XXL-XXXL: Work from WS: A.3a over the first 6-9 tr, repeat A.2a 37-38 times in total AT THE SAME TIME dec 2-2 tr evenly – READ DECREASE TIP, finish with A.1a over the last 5-8 tr = 233-245 tr. ALL SIZES: Repeat A.1a to A.3a vertically. When piece measures 12 cm, adjust so that next row is with tr, dec 6 tr evenly = 161-173-185-203-227-239 tr. Now repeat A.2a 25-27-28-31-36-37 times in width. SIZE XL-XXL-XXXL: Repeat dec when piece measures 16 cm from marker = 197-221-233 tr. Now repeat A.2a 30-35-36 times in width. ALL SIZES: When piece measures 20-21-22-23-24-25 cm from marker – adjust so that next row is with tr, inc 6 tr evenly. Repeat inc every 3½-3½-2½-2-2-2 cm 3-3-4-6-6-6 more times = 185-197-215-239-263-275 tr. Repeat A.2a 1 more in width on every inc. When all inc are done, repeat A.2a 29-31-33-37-42-43 times in width. Work until piece measures 36-37-38-39-40-41 cm from marker, adjust to finish nicely according to pattern. Fasten off. SLEEVE: SIZE S: Worked in the round. Beg by working mid under armhole as follows: Work 1 sl st in 4th ch of the 8 ch worked in armhole on body. Work 1 ch (= 1 dc). Then work 1 dc in each of the next 4 ch, work A.7 over the next 18 tr, work A.2a (adjust pattern according to A.7) 2 times in total in width, work A.7 over the next 18 tr, finish with 1 dc in each of the last 3 ch. Work the 8 sts under sleeve as 1st st in A.7. When A.7 has been worked 1 time vertically, there are 56 tr on last round. SIZE M-XL-XXL-XXXL: Worked in the round. Beg by working mid under sleeve as follows: Work 1 sl st in 4th ch of the 8-10-10-10 ch worked in armhole on body. Work 3 ch (= 1 tr). Then work 1 tr in each of the next 4-6-6-6 ch, work A.7 as before, work A.2a (adjust pattern according to A.7) 2-3-4-4 times in total in width as before, work A.7, finish with 1 tr in each of the last 3 ch. Work the 8-10-10-10 sts under sleeve as 1st st in A.7. When A.7 has been worked 1 time vertically, there are 56-64-70-70 tr on last round. SIZE L: Worked in the round. Beg by working mid under sleeve as follows: Work 1 sl st in 4th ch of the 8 ch worked in armhole on body. Work 1 ch (= 1 dc). Then work 1 dc in each of the next 4 ch, work A.7 as before, work A.2a (adjust pattern according to A.7) 3 times in total in width as before, work A.7, finish with 1 dc in each of the last 3 ch. Work the 8 sts under sleeve as 1st st in A.7. When A.7 has been worked 1 time vertically, there are 62 tr on last round. ALL SIZES: = 56-56-62-64-70-70 tr. Repeat A.2a 9-9-10-10-11-11 times in total in width while AT THE SAME TIME on first round with tr dec 2-2-2-4-4-4 tr evenly = 54-54-60-60-66-66 tr. When piece measures 10 cm, adjust so that next round is with tr, dec 6 tr evenly = 48-48-54-54-60-60 tr. Then repeat A.2a 8-8-9-9-10-10 times in width. When piece measures 23 cm, adjust to finish nicely according to pattern, fasten off. Work another sleeve the same way. NECK EDGE: Crochet an edge around the neck. Beg mid front. Work * 1 dc in first tr, 3 ch, skip approx. 1 cm *, repeat from *-* around the entire neck. Make sure to avoid a tight neck edge, adjust to finish with 1 dc in last tr on row. Fasten off. ASSEMBLY: Fasten the buttons on left front piece, fasten the top button approx. 2 cm from neck edge, fasten the remaining buttons approx. 8-9-9-8-8-9 cm apart. Button between 2 tr on right front piece. |
||||||||||||||||||||||||||||
Diagram explanations |
||||||||||||||||||||||||||||
|
||||||||||||||||||||||||||||
 |
||||||||||||||||||||||||||||
 |
||||||||||||||||||||||||||||
 |
||||||||||||||||||||||||||||
 |
||||||||||||||||||||||||||||
 |
||||||||||||||||||||||||||||
Have you finished this pattern?Tag your pictures with #dropspattern #seashoreblisscardigan or submit them to the #dropsfan gallery. Do you need help with this pattern?You'll find 13 tutorial videos, a Comments/Questions area and more by visiting the pattern on garnstudio.com. © 1982-2026 DROPS Design A/S. We reserve all rights. This document, including all its sub-sections, has copyrights. Read more about what you can do with our patterns at the bottom of each pattern on our site. |
||||||||||||||||||||||||||||


With over 40 years in knitting and crochet design, DROPS Design offers one of the most extensive collections of free patterns on the internet - translated to 17 languages. As of today we count 324 catalogues and 12245 patterns translated into English (UK/cm). 12245
We work hard to bring you the best knitting and crochet have to offer, inspiration and advice as well as great quality yarns at incredible prices! Would you like to use our patterns for other than personal use? You can read what you are allowed to do in the Copyright text at the bottom of all our patterns. Happy crafting!
Post a comment to pattern DROPS 169-16
We would love to hear what you have to say about this pattern!
If you want to leave a question, please make sure you select the correct category in the form below, to speed up the answering process. Required fields are marked *.