
Popular categories
Looking for a yarn?


Comments / Questions (45)
![]() Yena wrote:
Yena wrote:
Så söt! Jag beställde garn direkt! :-)
25.01.2016 - 08:18
![]() ALMENDROS wrote:
ALMENDROS wrote:
Erreur sur la quantité de fournitures : 125g pour S, 150g pour M....? pouvez-vous régulariser au plus tot MERCI
23.01.2016 - 20:38DROPS Design answered:
Bonjour Mme Almendros, les quantités sont justes, il faut bien 125 g soit 5 pelotes de 25g Brushed Alpaca Silk en taille S, 150 g en taille M (soit 6 pelotes) .. Bon tricot!
25.01.2016 - 11:43
![]() Daggi wrote:
Daggi wrote:
Traumhaft schöne Jacke für den Übergang.
20.01.2016 - 11:28
![]() BELLOT ROSELYNE wrote:
BELLOT ROSELYNE wrote:
Raffiné et chic réalisée avec ma qualité préférée brushed alpaga silk meme s'il n'est pas retenu puis-je avoir les explications de cette "merveille" merci d'avance
15.12.2015 - 00:12
![]() Doris wrote:
Doris wrote:
Sehr hübsch!
13.12.2015 - 10:55
|
|||||||||||||||||||||||||||||||
Pink Connection Cardigan#pinkconnectioncardigan |
|||||||||||||||||||||||||||||||
|
|
|||||||||||||||||||||||||||||||
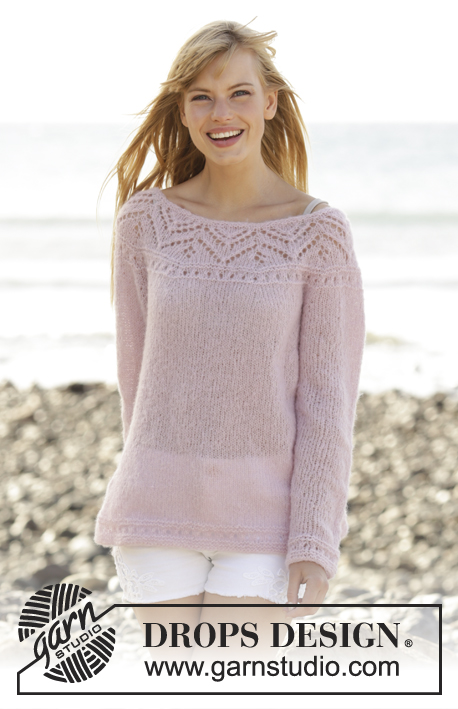
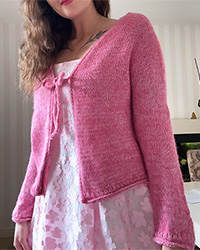
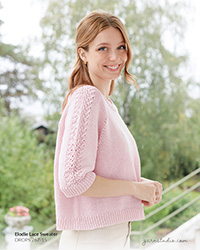
Knitted DROPS jacket with lace pattern, round yoke and vents in the side ”Brushed Alpaca Silk”. Worked top down. Size: S - XXXL.
DROPS 167-12 |
|||||||||||||||||||||||||||||||
|
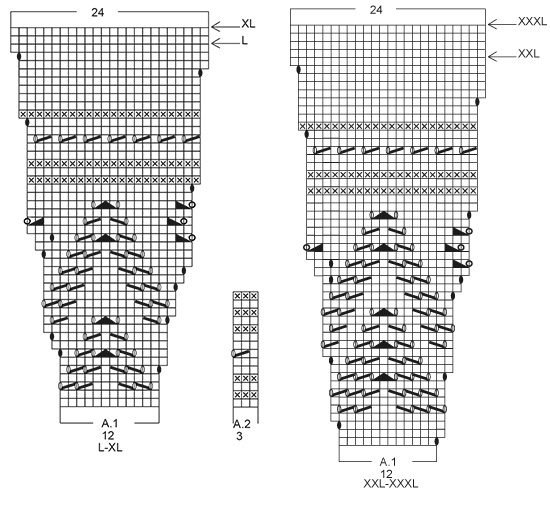
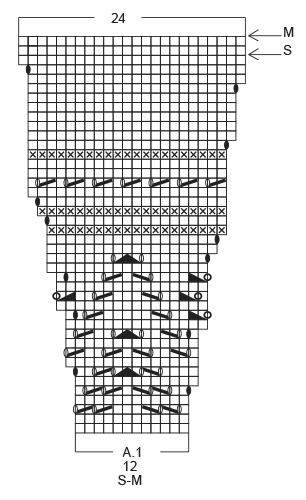
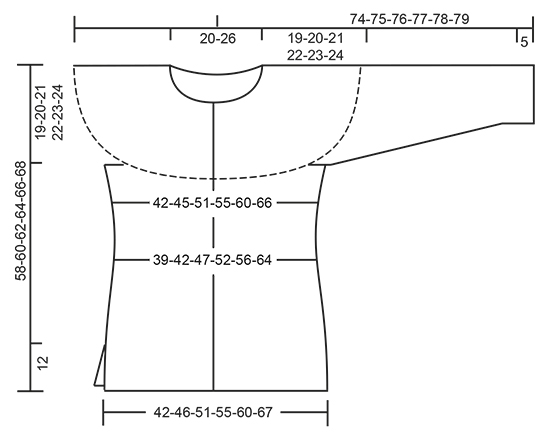
PATTERN: See diagram A.1 and A.2 (choose diagram for correct size). The diagrams show all rows in pattern seen from RS. GARTER ST (back and forth): K all rows. 1 ridge = 2 rows K. INCREASE TIP: Inc 1 st by making 1 YO, on next row work YO twisted to avoid holes. DECREASE TIP: Always dec from RS. Dec as follows before marker: Work until 4 sts remain before marker, K 2 tog, K 2. Dec as follows after marker: K 2, slip 1 st as if to K, K 1, psso BUTTONHOLES: Dec for buttonholes on right band. 1 buttonhole = K tog third and fourth st from edge and make 1 YO. Dec for buttonholes when piece measures: SIZE S: 2, 10, 18, 26, 34 and 42 cm SIZE M: 2, 10, 18, 27, 36 and 45 cm SIZE L: 2, 11, 20, 29, 38 and 47 cm SIZE XL: 2, 11, 20, 29, 38 and 48 cm SIZE XXL: 2, 10, 18, 26, 34, 42 and 50 cm SIZE XXXL: 2, 10, 18, 26, 34, 42 and 51 cm ---------------------------------------------------------- YOKE: Worked top down, back and forth. Cast on 103-115-119-131-137-149 sts (incl 5 band sts in each side of piece) on circular needle size 4 mm with Brushed Alpaca Silk. Work 2 ridges in GARTER ST - see explanation above and inc 16-16-24-24-30-30 sts evenly on last row - READ INCREASE TIP = 119-131-143-155-167-179 sts. Switch to circular needle size 5 mm. Work as follows from RS: 5 band sts in garter st, repeat A.1 (= 12 sts) over the next 108-120-132-144-156-168 sts (= 9-10-11-12-13-14 times in width), work first st in A.1 (this is done to make the pattern the same in both sides of piece), finish with 5 band sts in garter st. REMEMBER THE KNITTING TENSION Dec for BUTTONHOLES - see explanation above. When A.1 has been worked 1 time vertically, there are 227-251-275-299-323-347 sts on needle. Piece measures approx. 19-20-21-22-23-24 cm. K 1 row from RS with 5 band sts in garter st in each side and inc 12-4-4-4-4-4 sts evenly (NOTE: Do not inc over band sts) = 239-255-279-303-327-351 sts. Work next row as follows from WS: Work 5 band sts in garter st, 33-35-40-44-48-53 sts in stocking st, slip the next 50-54-56-60-64-66 sts on a stitch holder for sleeve, cast on 8 new sts under sleeve (insert 1 marker in the middle of these 8 sts), work 64-68-78-86-94-104 sts in stocking st (= back piece), slip the next 50-54-56-60-64-66 sts on a stitch holder for sleeve, cast on 8 new sts under sleeve (insert 1 marker in the middle of these 8 sts), work 32-34-39-43-47-52 sts in stocking st, finish with 5 band sts in garter st = 155-163-183-199-215-235 sts. BODY: Insert 1 marker in piece, NOW MEASURE PIECE FROM HERE. Now work piece in stocking st. When piece measures 4 cm, dec 1 st on each side of each marker in the sides (= 4 sts dec) - READ DECREASE TIP, repeat dec every 6-12-6-7-7-18 cm 2-1-2-2-2-1 more time = 143-155-171-187-203-227 sts. When piece measures 20-21-22-23-24-25 cm, inc 1 st on each side of each marker in the sides (= 4 sts inc), repeat inc every 3 cm 2 more times = 155-167-183-199-215-239 sts. When piece measures 27-28-29-30-31-32 cm from marker, work as follows from RS: 5 band sts in garter st, stocking st until 4 sts remain before marker, 8 sts in garter st, stocking st until 4 sts remain before next marker, 8 sts in garter st, stocking st until 5 sts remain, finish with 5 band sts in garter st. When 1 ridge has been worked over the 4 sts on each side of each marker, finish back and front pieces separately (i.e. divide piece at the markers). LEFT FRONT PIECE: = 41-44-48-52-56-62 sts. Work as follows from RS: 5 band sts in garter st, stocking st until 4 sts remain, finish with 4 sts in garter st. When piece measures 34-35-36-37-38-40 cm (approx. 5 cm remain) from marker, work as follows from RS: Work 5 band sts in garter st, repeat A.2 (= 3 sts) until 5 sts remain AT THE SAME TIME inc 2-2-1-0-2-2 sts evenly on first row, finish with 1 st in stocking st and 4 sts in garter st = 43-46-49-52-58-64 sts. Cast off when A.2 has been worked 1 time vertically. Piece measures approx. 58-60-62-64-66-68 cm in total. BACK PIECE: = 72-78-86-94-102-114 sts. Work in stocking st with 4 sts in garter st in each side. When piece measures 34-35-36-37-38-40 cm from marker, work as follows from RS: 4 sts in garter st, repeat A.2 until 5 sts remain AT THE SAME TIME inc 0-0-1-2-0-0 sts evenly on first row, finish with 1 st in stocking st and 4 sts in garter st = 72-78-87-96-102-114 sts. Cast off when A.2 has been worked 1 time vertically. Piece measures approx. 58-60-62-64-66-68 cm in total. RIGHT FRONT PIECE: = 42-45-49-53-57-63 sts. Work as follows from RS: 4 sts in garter st, stocking st until 5 sts remain, finish with 5 band sts in garter st. When piece measures 34-35-36-37-38-40 cm from marker, work as follows from RS: 4 sts in garter st, work A.2 until 6 sts remain AT THE SAME TIME adjust no of sts to 43-46-49-52-58-64 in total, finish with 1 st in stocking st and 5 band sts in garter st = 43-46-49-52-58-64 sts. Cast off when A.2 has been worked 1 time vertically. Piece measures approx. 58-60-62-64-66-68 cm in total. SLEEVE: Work sleeves in the round on double pointed needles. Slip the 50-54-56-60-64-66 sts from stitch holder back on double pointed needles size 5 mm. Cast on 8 new sts under sleeve, insert a marker in the middle of these 8 sts = 58-62-64-68-72-74 sts. Insert 1 marker in piece, NOW MEASURE PIECE FROM HERE. Work in stocking st. When piece measures 3 cm from marker, dec 1 st on each side of marker, repeat dec every 3-3-3-2½-2-2 cm 10-10-10-12-13-14 more times = 36-40-42-42-44-44 sts on needle. When piece measures 41-41-40-39-39-38 cm (NOTE: Shorter measurements in the larger sizes because of longer yoke), adjust no of sts to 36-39-42-42-45-45 in total on next round. Then work A.2 12-13-14-14-15-15 times in total on round. Cast off when A.2 has been worked 1 time vertically. Work the other sleeve the same way. ASSEMBLY: Sew the opening under the sleeve. Sew the buttons on to the left band. |
|||||||||||||||||||||||||||||||
Diagram explanations |
|||||||||||||||||||||||||||||||
|
|||||||||||||||||||||||||||||||
 |
|||||||||||||||||||||||||||||||
 |
|||||||||||||||||||||||||||||||
 |
|||||||||||||||||||||||||||||||
Have you finished this pattern?Tag your pictures with #dropspattern #pinkconnectioncardigan or submit them to the #dropsfan gallery. Do you need help with this pattern?You'll find 23 tutorial videos, a Comments/Questions area and more by visiting the pattern on garnstudio.com. © 1982-2026 DROPS Design A/S. We reserve all rights. This document, including all its sub-sections, has copyrights. Read more about what you can do with our patterns at the bottom of each pattern on our site. |
|||||||||||||||||||||||||||||||

With over 40 years in knitting and crochet design, DROPS Design offers one of the most extensive collections of free patterns on the internet - translated to 17 languages. As of today we count 324 catalogues and 12220 patterns translated into English (UK/cm). 12220
We work hard to bring you the best knitting and crochet have to offer, inspiration and advice as well as great quality yarns at incredible prices! Would you like to use our patterns for other than personal use? You can read what you are allowed to do in the Copyright text at the bottom of all our patterns. Happy crafting!
Post a comment to pattern DROPS 167-12
We would love to hear what you have to say about this pattern!
If you want to leave a question, please make sure you select the correct category in the form below, to speed up the answering process. Required fields are marked *.