
Popular categories
Looking for a yarn?


Comments / Questions (112)
![]() Doreen Ryan wrote:
Doreen Ryan wrote:
As I Began the Yoke I ended finishing on the RS . But then the directions say to start Next Row on The RS . What do I do here, tie off the last row? Or?
03.06.2020 - 00:33DROPS Design answered:
Dear Mrs Ryan, the dividing row on yoke is a row worked from RS (with double crochets/US-term.) on first row on body you crochet from WS 1 row with sc and continue the texture rows as before. Happy crocheting!
03.06.2020 - 07:19
![]() Gina wrote:
Gina wrote:
Hei. Jeg forstår ikke hvordan jeg skal hekle armene. Når jeg skal begynne har jeg 52 masker og ikke 46 og ender opp med 57 masker når jeg har heklet de to første radene oppskriften i (12/18mnd) dette går ikke opp med fellingen av masker for å få til 40 masker til slutt. og skal jeg begynne med en rad med å hekle en rad med fm over den raden med fm som er der fra før? og skal den hekles sammen eller syes sammen når armen er ferdig heklet?
07.04.2020 - 22:21
![]() Carla wrote:
Carla wrote:
Thank you! its an adorable pattern!
16.02.2020 - 21:24
![]() Marianne Clemmensen wrote:
Marianne Clemmensen wrote:
Jeg forstår ikke hvor jeg skal begynder at lave ærmer de 4 lm?, hvor skal jeg hækle fm ? Efter ... når jeg prøversom der står får jeg et stort hul og en flap af de 6 lm . Jeg håber du kan hjælpe mig . Mvh Marianne
28.01.2020 - 19:37DROPS Design answered:
Hei Marianne. Usikker på hvilken størrelse du hekler, men i f.eks størrelse 2 år har du 50 masker, nå startes det med 4 luftmasker, deretter 1 fastmaske i hver av de neste 50 masker, så hekles det 6 luftmasker. Snu arbeidet og hekle 1 stav i 4. luftmaske fra nålen, hekle 1 stav i hver av de 2 neste luftmaskene (i de 6 luftmaskene er det heklet 3 staver, de 3 luftmaskene som er igjen = 1 stav), 1 stav i hver fastmaske fra forrige rad og 1 stav i hver av de 4 luftmaskene fra begynnelsen av forrige rad (ingen luftmasker igjen) = 58 masker på raden. Videre hekles det STRUKTURRADER frem og tilbake som før med fastmasker fra vrangen og staver fra retten. God Fornøyelse!
10.02.2020 - 14:24
![]() Jennie wrote:
Jennie wrote:
När man gör kragen och kommer till A.2, ska man bara göra stolpar på alla varv då?
16.09.2019 - 15:03DROPS Design answered:
Hej Jennie, ja A.2 är bara stolpar, men på varv 1 virkar du 2 stolpar i de 2 mittersta maskorna i diagrammet . Och på varv 2 virkar du 2 stolpar i mitten på diagrammet igen. Lycka till :)
17.09.2019 - 15:47
![]() Susan Wols wrote:
Susan Wols wrote:
Fins det en fullstending instruksjonsvideo av denne oppskriften? Synes forklaringene er litt rotete hos dere, lettere å følge en video..
15.08.2019 - 20:14DROPS Design answered:
Hej Susan, nej vi har ikke hele jakken på video. Du starter der hvor der står BÆRESTYKKE og følger opskriften række for række i din størrelse. Vi har en video som viser hvordan man hækler raglanudtagninger, se til venstre i opskriften under billedet. God fornøjelse!
06.09.2019 - 10:40
![]() Vianca wrote:
Vianca wrote:
Hola! En el canesú cuando se terminan las 6 vueltas con aumentos en la talla 6/9 quedan 182 puntos en total, pero dice que deberían quedar 198. Mi pregunta es si en realidad son 7 vueltas de aumentos y no 6??
22.06.2019 - 06:29DROPS Design answered:
Hola Vianca. Primero hacemos unos aumentos según el patrón: Trabajar 1 p.a. en cada p.b. pero en cada p.b. con MP trabajar 2 p.a. + 2 p.de cad. + 2 p.a. = 94-98-102-102 (102-106) p.a. en la fila. Ahora trabajar un total de 6 veces los aumentos, es decir, en cada fila con aumentos tenemos 16 puntos más ( 6x16= 96 puntos aumentados). 102 + 96 = quedan 198 puntos.
27.06.2019 - 23:15
![]() Bethina wrote:
Bethina wrote:
Efter mærkningerne skal jeg hækle 2 st, 2 lm, 2 st i hver fm ved mærkningerne, som så kun giver 12 ekstra masker. Det regnestykke forstår jeg simpelthen ikke. Kan se at andre har spurgt om det samme, men jeg forstår ikke svaret
05.06.2019 - 11:30DROPS Design answered:
Hej Bethina, hvilken størrelse er det du ikke kan få til at stemme?
05.06.2019 - 12:09
![]() Helena Hammarberg wrote:
Helena Hammarberg wrote:
Jag förstår mig inte på början av armen. Ska man plocka upp maskorna från fram/bakstycket eller hur har ni tänkt
04.05.2019 - 19:38DROPS Design answered:
Hei Helena. De maskene du hoppet over på slutten av bærestykket = ermene. Du hekler altså luftmasker (= under ermet) også fortsetter du å hekle over de maskene du hoppet over, og avslutter omgangen med luftmasker. Så fortsetter du å hekle frem og tilbake med strukturrader som forklart. God fornøyelse
07.05.2019 - 15:01
![]() Sabine wrote:
Sabine wrote:
Zwischenzeitlich habe ich mich entschieden, alle 4 Raglanlinien mit Stäbchen zu umhäkeln und bin entsprechend fortgefahren. Beim Häkeln des Kragens taucht jedoch leider dieselbe Frage für mich erneut auf: Häkel ich das Muster A2 über allen 4 Raglanlinien, habe also am Ende des Kragens 4x3 Maschen = 12 Maschen zugenommen? Dank vorab für Ihre Hilfe! :-)
27.04.2019 - 09:42DROPS Design answered:
Liebe Sabine, Ihre Frage über die Erhöhung wurde unser Designteam weitergeleitet (siehe vorrige Antwort) - am Kragen häkeln Sie A.2 an jeden Markierungen (siehe Pfeil = Markierung) = 4 Markierer am Kragen = A.2 wird 4 Mal gearbeitet. Viel Spaß beim häkeln!
29.04.2019 - 08:40
|
|||||||||||||
Little Lady Rose#littleladyrosecardigan |
|||||||||||||
|
|
|||||||||||||
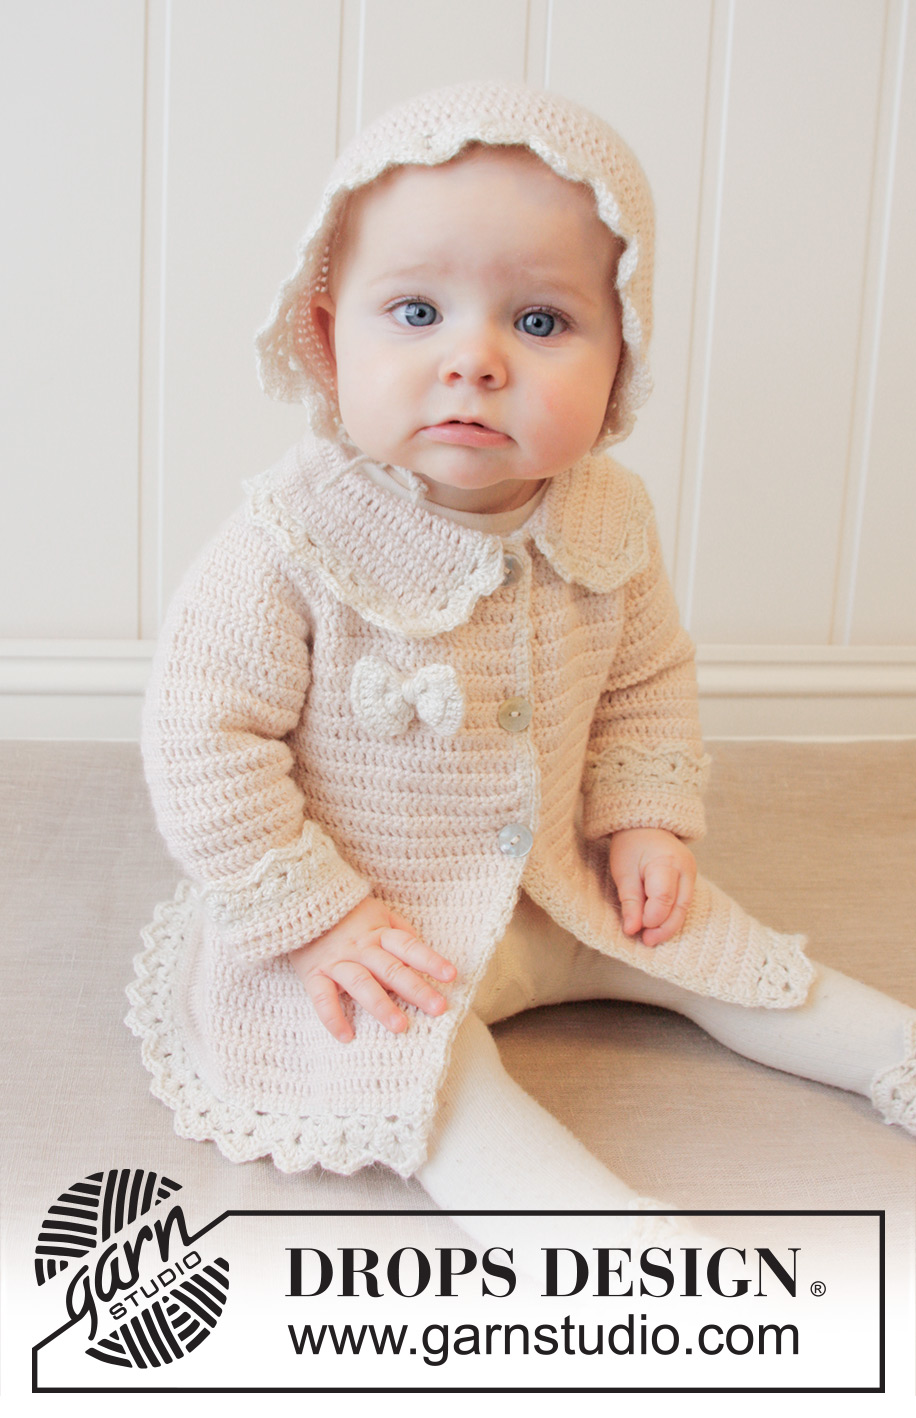
Crochet baby jacket with raglan and fan edges, worked top down in DROPS BabyAlpaca Silk. Size 0-4 years.
DROPS Baby 25-12 |
|||||||||||||
|
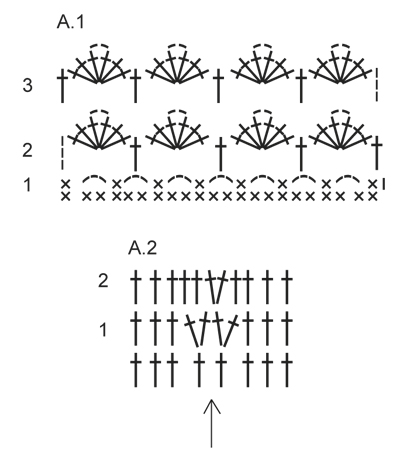
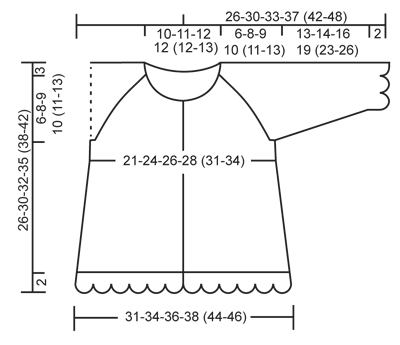
CROCHET INFO: Replace first dc at beg of every dc row with 1 ch, finish row with 1 dc in 3rd ch from beg of previous row. Replace first tr at beg of every tr row with 3 ch, finish row with 1 tr in ch from beg of previous row. TEXTURE ROWS: * 1 row dc (worked from WS), 1 row tr (worked from RS) *, repeat from *-* (1 row dc + 1 row tr = 1 texture row). INCREASE TIP: Inc 1 dc/tr by working 2 dc/tr in same st. DECREASE TIP: Work 1 dc/tr but wait with last pull through (= 2 sts on hook), then work next dc/tr but on last pull through, pull yarn through all sts on hook = 1 dc/tr dec. PATTERN: See diagram A.1. (A.2 applies to inc on collar). ---------------------------------------------------------- JACKET: The piece is worked top down. Worked back and forth from mid front. YOKE: Work 83-87-91-91 (91-95) ch (incl 1 ch to turn with) on hook size 3.5 mm with powder. Work 1 dc in 2nd ch from hook, then work 1 dc in every ch the entire row = 82-86-90-90 (90-94) dc on row (incl 5 band sts in each side towards mid front). Now insert 4 markers in piece for raglan as follows (beg mid front – NOTE: Do NOT work while inserting markers): Skip 15-16-17-17 (17-18) dc (= left front piece), insert 1 marker in next dc, skip 14 dc (= sleeve), insert 1 marker in next dc, skip 20-22-24-24 (24-26) dc (= back piece), insert 1 marker in next dc, skip 14 dc (= sleeve) and insert last marker in next dc (there are now 15-16-17-17 (17-18) dc on right front piece after last marker). READ ALL OF THE FOLLOWING SECTION BEFORE CONTINUING: READ CROCHET INFO and work next row as follows from RS: Work 1 tr in every dc but in every dc with marker work 2 tr + 2 ch + 2 tr = 94-98-102-102 (102-106) tr on row. Then work TEXTURE ROWS - see explanation above (work back and forth with 1 dc/tr in every st from previous row – but on every row with dc from WS work 2 ch over the 2 ch from previous row in raglan lines. On row with tr work 2 tr + 2 ch + 2 tr in both ch-spaces). AT THE SAME TIME on first row from RS (i.e. on row with tr) inc for raglan as follows: Work 2 tr + 2 ch + 2 tr in every ch-space in every raglan line (= 16 tr inc on row – note: work around both ch-spaces). Repeat inc on every row from RS 3-4-5-6 (7-8) more times (= 4-5-6-7 (8-9) times in total) = 158-178-198-214 (230-250) sts. REMEMBER THE CROCHET TENSION! After last inc for raglan work 1 row with dc from WS as before. Work next row as follows from RS: Work 1 tr in each of the first 25-28-31-33 (35-38) dc (= left front piece), skip the next 34-38-42-46 (50-54) dc (= sleeve), work 6-6-6-6 (8-8) ch, work 1 tr in each of the next 40-46-52-56 (60-66) dc (= back piece), skip the next 34-38-42-46 (50-54) dc (= sleeve), work 6-6-6-6 (8-8) ch and work 1 tr in each of the last 25-28-31-33 (35-38) dc (= right front piece). Then finish body and sleeves separately. BODY: NOW MEASURE PIECE FROM HERE! Work 1st row from WS – work 1 dc in every tr from previous row and 1 dc in each of the 6-6-6-6 (8-8) ch under each armhole = 102-114-126-134 (146-158) dc on row. Insert 1 marker 28-31-34-36 (39-42) sts in from each side (= 46-52-58-62 (68-74) sts on back piece). Continue back and forth with TEXTURE ROWS. AT THE SAME TIME when piece measures 2-2-2-3 (2-3) cm, inc 1 st on each side of both markers – READ INCREASE TIP (= 4 sts inc). Repeat inc approx. every 1-1½-1½-1½ (1½-1½) cm 10-10-10-10 (13-13) more times (= 11-11-11-11 (14-14) times in total) = 146-158-170-178 (202-214) sts. When piece measures approx. 15-17-18-20 (22-24) cm from armhole – adjust so that inc are done, work 1 row dc from WS AT THE SAME TIME inc 2-2-2-0 (0-0) dc evenly – READ INCREASE TIP = 148-160-172-178 (202-214) dc. Fasten off. Switch to off white and work 1 row dc from WS with 1 dc in every dc from previous row. Then work Fan pattern according to diagram A.1, i.e. work as follows: ROW 1 (= RS): 1 ch, 1 dc in first st, * 3 ch, skip 2 dc, 1 dc in next st *, repeat from *-* the entire row = 49-53-57-59 (67-71) ch-spaces, turn. ROW 2 (= WS): Work 3 ch (= 1 tr), 3 tr + 2 ch + 3 tr in first ch-space, * 1 tr in next ch-space, 3 tr + 2 ch + 3 tr in next ch-space *, repeat from *-* the entire row and finish with 1 tr in first dc from beg of previous row = 25-27-29-30 (34-36) tr-groups with 1 tr between every tr-group, turn piece. ROW 3 (= RS): Work 3 ch (= 1 tr), 3 tr + 2 ch + 3 tr in ch-space in the mid of first tr-group, * 1 tr in next tr, 3 tr + 2 ch + 3 tr in ch-space in the mid of next tr-group *, repeat from *-* the entire row and finish with 1 tr in 3rd ch from beg of previous row = 25-27-29-30 (34-36) tr-groups with 1 tr between every tr-group. Fasten off. SLEEVE: = 34-38-42-46 (50-54) sts. Insert 1 marker here – NOW MEASURE PIECE FROM HERE. Work 1st row from RS with powder as follows: work 3-3-3-3 (4-4) ch, work 1 tr in each stitch and work 3-3-3-3 (4-4) ch. Turn piece, work 1 dc in 2nd ch from hook, work 1 dc in each of the next 1-1-1-1 (2-2) ch, 1 dc in every tr from previous row and 1 tr in each of the 3-3-3-3 (4-4) ch from beg of previous row = 40-44-48-52 (58-62) sts on row. Then work TEXTURE ROWS back and forth as before with tr from RS and dc from WS. AT THE SAME TIME when sleeve measures 2-2-3-3(3-3) cm from marker, dec 1 st in each side - SEE DECREASE TIP! Repeat dec every 8-5-3-3 (2½-2½) cm 1-2-4-5 (7-8) more times (= 2-3-5-6 (8-9) times in total in each side) = 36-38-38-40 (42-44) sts. When sleeve measures approx. 13-14-16-19 (23-26) cm from marker – finish after 1 row with dc from WS, fasten off. Switch to off white. Work 1 row dc from WS AT THE SAME TIME inc 4-2-2-6 (4-2) dc evenly = 40-40-40-46 (46-46) dc. Then work Fan pattern according to diagram A.1, beg from RS, the same way as on bottom of jacket. After 1st row there are 13-13-13-15 (15-15) ch-spaces on row and after 2nd row there are 7-7-7-8 (8-8) tr-groups with 1 tr between every tr-group. ASSEMBLY: Sew underarm seams tog edge to edge in front loop of outermost sts. Sew the openings under the sleeves. Sew the buttons on to left front piece. Upper button should be approx. 1 cm from neckline and there should be approx. 5 to 7 cm between each button. Button through tr in texture pattern. ELEVATION IN BACK OF NECK: For better fit work a small elevation at the back of neck. Insert 1 marker in st in each corner in neck, i.e. at beg of every raglan line. Work on hook size 3.5 mm with powder as follows: Beg in 11th st from mid front, work 1 dc in every st until 1 st remains before st with marker, work 1 htr in next st, 1 tr in st with marker and 1 htr in next st, then work 1 dc in every st until 1 st remains before next st with marker, 1 htr in next st, 1 tr in st with marker and 1 htr in next st. Continue like this until 10 sts remain before mid front in the other side. Turn piece and work 1 dc in every dc but at every marker work 3 dc tog, i.e. work 1 dc in htr but wait with last YO and pull through, work 1 dc in st with marker but wait with last YO and pull through, work 1 dc in next htr but now pull last YO through all 4 sts on hook (= 2 dc dec). Fasten off. COLLAR: Work on hook size 3.5 mm with powder as follows: Beg in 4th st from mid front and work 1 dc in every dc around the neck until 3 dc remain on row AT THE SAME TIME work 5th and 6th st tog – READ DECREASE TIP = approx. 57-60-64-64 (64-67) dc remain. Make sure that markers at each raglan line moves upwards - remove the markers from the sts they are in and place them between the st they were in and the next st toward the sleeve.Then work texture rows back and forth as on body with 1 st in every st. AT THE SAME TIME after 3-3-3-4 (4-4) cm, inc on the next 2 rows as shown in A.2. After last inc, collar measures approx. 5-5-5-6 (6-6) cm. Fasten off. CROCHET EDGE ALONG MID FRONT: Work with off white as follows: Beg from WS at the bottom on left front piece and work 1 row dc up along mid front and then over the 3 sts at the top of neck before collar beg - work approx. 2 dc in every tr-row and 1 dc in every dc-row. Turn piece and work as follows: * 3 ch, skip 2 dc, 1 dc in next st *, repeat from *-* the entire row to bottom of band. Fasten off and repeat along right front piece, beg from WS at the top by neck. CROCHET EDGE AROUND COLLAR: Work with off white as follows: Beg from RS where collar beg after the 3 sts at the top of neck and work 1 row dc around the entire collar until where collar ends before the top 3 sts in neck in the other side. Turn piece and work as follows: * 3 ch, skip approx. 2 sts, 1 dc in next dc *, repeat from *-*, NOTE: Adjust so that no of ch-spaces can be divided by 2 + 1. Turn piece and work a finishing edge with fans as follows from RS: Work sl sts until mid of first ch-space, 3 ch (= 1 tr), * 3 tr + 2 ch + 3 tr in next ch-space, 1 tr in next ch-space *, repeat from *-* the entire row. Fasten off. BOW: Work 11 ch on hook size 3.5 mm with off white. Work first row as follows: 1 tr in 4th ch from hook, 1 tr in each of the next 7 ch = 9 tr on row. Turn piece and work TEXTURE ROWS back and forth until piece measures approx. 10 cm – finish after 1 row with dc. Fasten off. Sew short sides tog to form a ring and twine some yarn around the mid of bow to tighten it neatly in the middle. Fasten bow at the top on right front piece. |
|||||||||||||
Diagram explanations |
|||||||||||||
|
|||||||||||||
 |
|||||||||||||
 |
|||||||||||||
Have you finished this pattern?Tag your pictures with #dropspattern #littleladyrosecardigan or submit them to the #dropsfan gallery. Do you need help with this pattern?You'll find 9 tutorial videos, a Comments/Questions area and more by visiting the pattern on garnstudio.com. © 1982-2026 DROPS Design A/S. We reserve all rights. This document, including all its sub-sections, has copyrights. Read more about what you can do with our patterns at the bottom of each pattern on our site. |
|||||||||||||


With over 40 years in knitting and crochet design, DROPS Design offers one of the most extensive collections of free patterns on the internet - translated to 17 languages. As of today we count 324 catalogues and 12245 patterns translated into English (UK/cm). 12245
We work hard to bring you the best knitting and crochet have to offer, inspiration and advice as well as great quality yarns at incredible prices! Would you like to use our patterns for other than personal use? You can read what you are allowed to do in the Copyright text at the bottom of all our patterns. Happy crafting!
Post a comment to pattern DROPS Baby 25-12
We would love to hear what you have to say about this pattern!
If you want to leave a question, please make sure you select the correct category in the form below, to speed up the answering process. Required fields are marked *.