
Popular categories
Looking for a yarn?


Comments / Questions (67)
![]() Grandchamp Céline wrote:
Grandchamp Céline wrote:
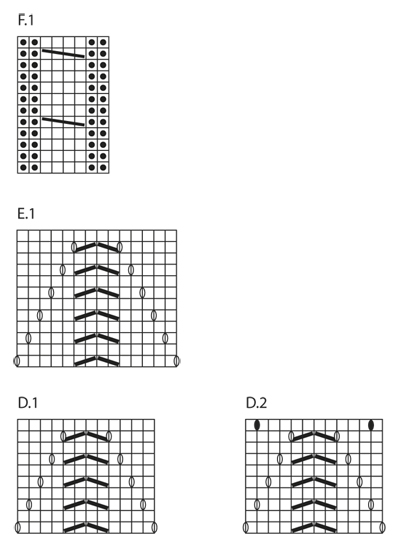
Dans le modèle:DROPS 149-12 DROPS design: Modèle n° me-062, il y a une série d'augmentation sur un rang envers, en fin de schéma A2 sur les mailles envers des cotes sur le rang retour; Or, il y a 44 mailles au départ et 58 à l'arrivée.Cela fait donc théoriquement 56 mailles....je ne comprends pas; Ppourriez vous m'expliquer différément? Merci
15.09.2014 - 22:43DROPS Design answered:
Bonjour Mme Grandchamp, au dernier rang de A.2, on augmente 2 m dans chaque motif A.2 (soit 3 x 2 augm = 6 augm), et au dernier rang de A.2, on augmente 2 m env dans toutes les sections env des côtes (soit 4 x 2 augm = 8 augm), on avait 44 m + 6 + 8 = 58 m. Bon tricot!
16.09.2014 - 09:11
![]() Julia wrote:
Julia wrote:
Hallo, ich verstehe nicht, wie ich bei A.1 die Rückreihe stricken muss. Irgendwie sieht da bei mir komisch aus. Hab die Randmasche gestrickt und dann 2 re, 2 li im Wechsel gestrickt. Jetzt bin ich ratlos. Danke vorab.
16.07.2014 - 19:47DROPS Design answered:
Liebe Julia, die Rück-R in A.1 stricken Sie einfach links. In den Diagrammen sind ja immer alle R verzeichnet, die mit den Umschlägen und dem Zusammenstricken der M sind immer die Hin-R. Die erste Rück-R vom Muster stricken Sie also so: 1 Rand-M, 2 re, 2 li, 2 re, li (= Muster A.1) bis zu den letzten 7 M, 2 re, 2 li, 2 re, 1 Rand-M.
16.07.2014 - 23:06
![]() Manuela wrote:
Manuela wrote:
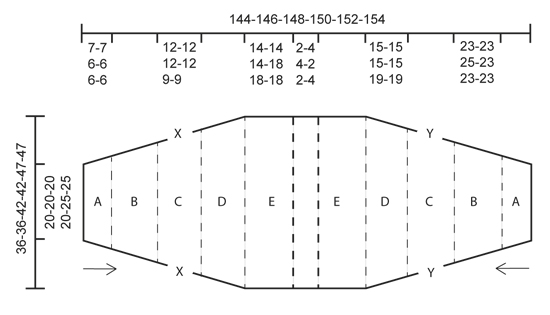
Hallo! Muss ich die Ärmel bei diesem Modell über die gesamte "schräge" Strecke zusammennähen oder nur bis zu den durch die Buchstaben X bzw Y angedeuteten Punkten? Das wären ja nur 37 cm! Aber wenn ich über die gesamte schräge Strecke zusammennähe, dann ist der Rückenausschnitt viel zu eng! Die Anleitung ist für mich nicht eindeutig. Danke, Manuela
08.07.2014 - 11:49DROPS Design answered:
Liebe Manuela, am besten stecken Sie sich die Ärmel mit Sicherheitsnadeln zusammen und probieren den Bolero an, so können Sie ausprobieren, wie weit sie die Ärmelnähte schließen müssen, damit Ihnen der Bolero gut passt.
14.07.2014 - 22:16
![]() Bianca Hartjesveld wrote:
Bianca Hartjesveld wrote:
Bij de gegevens van het materiaal staat voor de boordsteek naald nr. 4mm. Bij de gegevens voor de bolero staat :opzetten met naald 4,5mm en verder breien in boordsteek. Moet dat met naald 4mm of met 4.5?
13.05.2014 - 14:50DROPS Design answered:
Hoi Bianca. Op de wikkel van het garen staat de standaard, maar je moet de naalden gebruiken aangegeven in het patroon OF de naald die je nodig hebt voor de juiste stekenverhouding. Brei dus eerst een proeflapje om zeker te zijn dat je de juiste maat naald gebruikt.
13.05.2014 - 16:05
![]() Tina wrote:
Tina wrote:
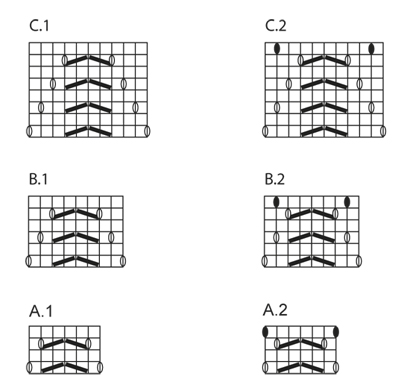
Hallo! Ist es richtig, dass in A.1 in der ersten Reihe und in A.2 in der letzten Reihe 2 Umschläge gearbeitet werden? Vielen Dank!
27.04.2014 - 12:17DROPS Design answered:
Liebe Tina, in A.1 machen Sie in der 1. und 3. R je 2 Umschläge (d.h. die Umschläge gleichen die zusammengestrickten M wieder aus, Sie nehmen ja in der 1. und 3. R auch je 2 M durch Zusammenstricken ab), in A.2 machen Sie die gleichen Umschläge in der 1. und 3. R und zusätzlich als Zunahmen 2 Umschläge in der 4. R (= Rück-R).
28.04.2014 - 00:12
![]() Corinne wrote:
Corinne wrote:
Ich bin jetzt am zweiten Ärmel und bin mir nicht sicher, wie weit ich diese zusammennähen muss, wenn ich mit dem Teil fertig bin. Bis und mit Musterteil C oder bis und mit D? Vielen Dank für die Hilfe.
30.03.2014 - 22:12DROPS Design answered:
Liebe Corinne, Sie nähen die Ärmel über die gesamte schräge Linie zusammen, also bis einschließlich Musterteil D. Weiterhin gutes Gelingen!
31.03.2014 - 23:46
![]() Dorthe wrote:
Dorthe wrote:
Spændende bolero at strikke og et meget flot færdigt resultat!
14.02.2014 - 19:17Mary wrote:
After casting the stitches, next row is the WS. How do we start from the RS? Do we consider the back side of the stitches as RS? Thank you.
08.01.2014 - 12:39DROPS Design answered:
Dear Mary, after casting on the sts, 1st row worked will be on RS and 2nd row on WS. Happy knitting!
08.01.2014 - 14:14
![]() Iris wrote:
Iris wrote:
Het is klaar, en het is mooi!!
08.11.2013 - 20:07
![]() Mara wrote:
Mara wrote:
Buongiorno, alla fine ho ripreso 260 maglie e il modello è riuscito bene. Sono soddisfatta!!! :) Grazie mille
03.11.2013 - 14:13
|
|||||||||||||||||||||||||
Valkyrie#valkyriebolero |
|||||||||||||||||||||||||
 |
 |
||||||||||||||||||||||||
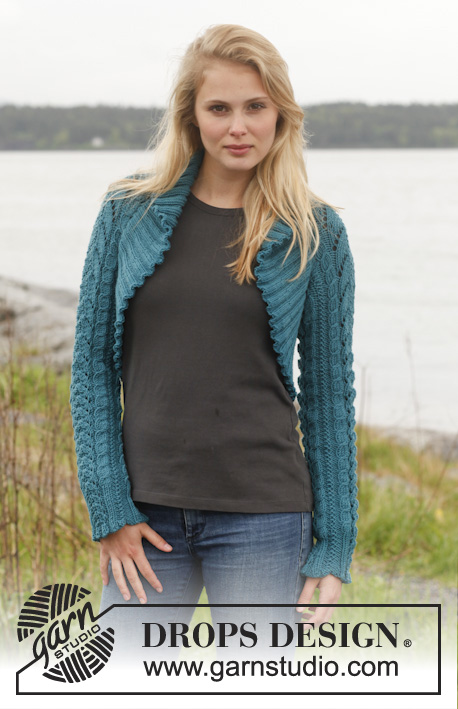
Knitted DROPS bolero with cables and lace pattern in ”Merino Extra Fine”. Size: S - XXXL.
DROPS 149-12 |
|||||||||||||||||||||||||
|
GARTER ST (back and forth on needle): K all rows. 1 ridge = 2 rows K. PATTERN: See diagram A, B, C, D, E and F. The diagrams show all rows in pattern seen from RS. INCREASE TIP 1: Inc on last row (= WS) in every repetition (A.2), and inc as follows in every P-section (from WS): * K 2, 1 YO, P 2, 1 YO, K 2 *. On next row (i.e. 1st row = RS in F.1) K YOs twisted to avoid holes. INCREASE TIP 2: Inc 1 st by making a YO before first P st in every section with P sts in rib. P this twisted on next round. INCREASE TIP 3: Inc 1 st by making a YO before first K st in every section with K sts in rib. K this twisted on next round. ---------------------------------------------------------- BOLERO: Piece is worked in 2 parts from sleeve and over shoulder and sewn tog mid back. Worked back and forth on circular needle. Cast on 55-55-55-55-70-70 sts (incl 1 edge st in garter st in each side) on circular needle size 4.5 mm with Merino Extra Fine. Work RIB as follows from RS: 1 edge st in GARTER ST – see explanation above, * P 3, K 2 *, repeat from *-* over the next 50-50-50-50-65-65 sts, P 3, 1 edge st in garter st. Work rib back the same way (= WS). On next row from RS work as follows: 1 edge st in garter st, * P 2 tog, P 1, K 2 *, repeat from *-* until 4 sts remain and finish with P 2 tog, P 1, 1 edge st in garter st = 44-44-44-44-56-56 sts on row. Work 1 row rib back the same way. Then work as follows from RS: 1 edge st in garter st, * P 2, K 2, P 2, PATTERN according to diagram A.1 (= 6 sts)*, repeat from *-* 2-2-2-2-3-3 more times (= 3-3-3-3-4-4 times in total), P 2, K 2, P 2, 1 edge st in garter st. Continue back and forth the same way with 1 edge st in garter st, rib and A.1 until A.1 has been worked 3-3-2-2-2-2 times vertically. Then work as follows from RS: 1 edge st in garter st, * P 2, K 2, P 2, PATTERN according to diagram A.2 (= 6 sts)*, repeat from *-* 2-2-2-2-3-3 more times (= 3-3-3-3-4-4 times in total), P 2, K 2, P 2, 1 edge st in garter st. Continue back and forth the same way with 1 edge st in garter st, rib and A.2 until A.2 has been worked 1-1-1-1-1-1 time vertically, AT THE SAME TIME on last row inc 2 sts in every rib section – see INCREASE TIP 1! There are now 58-58-58-58-74-74 sts on row and piece measures approx. 7-7-6-6-6-6 cm. Then work as follows: 1 edge st in garter st, * F.1 (= 8 sts), B.1 (= 8 sts) *, repeat from *-* 2-2-2-2-3-3 more times (= 3-3-3-3-4-4 times in total), F.1, 1 edge st in garter st. Continue the same way until B.1 has been worked 8-8-9-8-8-8 times vertically. Then work the same way but with B.2 instead of B.1. Work B.2 a total of 1-1-1-1-1-1 times vertically. Piece now measures approx. 30-30-31-29-29-29 cm and there are 64-64-64-64-82-82 sts on needle. Then work as follows: 1 edge st in garter st, * F.1 (= 8 sts), C.1 (= 10 sts) *, repeat from *-* 2-2-2-2-3-3 more times (= 3-3-3-3-4-4 times in total), F.1, 1 edge st in garter st. Continue the same way until C.1 has been worked 2-2-2-2-1-1 times vertically. Then work the same way but with C.2 instead of C.1. Work C.2 1-1-1-1-1-1 time vertically, AT THE SAME TIME on last row inc 0-0-1-1-0-0 P sts on each side of every repetition of F.1 by picking up a st from row below = 70-70-78-78-90-90 sts on needle. NOTE! These new sts on each side of F.1 are worked P until cast-off. Piece now measures 42-42-43-41-38-38 cm. Then work as follows: 1 edge st in garter st, * P 0-0-1-1-0-0, F.1 (= 8 sts), P 0-0-1-1-0-0, D.1 (= 12 sts) *, repeat from *-* 2-2-2-2-3-3 more times (= 3-3-3-3-4-4 times in total), P 0-0-1-1-0-0, F.1, P 0-0-1-1-0-0, 1 edge st in garter st. Continue the same way until D.1 has been worked 3-3-3-3-4-4 times vertically. Then work the same way but with D.2 instead of D.1. Work D.2 1-1-1-1-1-1 time vertically = 76-76-84-84-98-98 sts on needle. Piece now measures 57-57-58-56-57-57 cm. Then work as follows: 1 edge st in garter st, * P 0-0-1-1-0-0, F.1 (= 8 sts), P 0-0-1-1-0-0, E.1 (= 14 sts) *, repeat from *-* 2-2-2-2-3-3 more times (= 3-3-3-3-4-4 times in total), P 0-0-1-1-0-0, F.1, P 0-0-1-1-0-0, 1 edge st in garter st. Continue the same way until E.1 has been worked 3-3-3-4-4-4 times vertically. Work 2-4-4-2-2-4 ridges in garter st. Loosely cast off. Piece now measures 72-73-74-75-76-77 cm. Knit another part. ASSEMBLY: Sew the 2 parts tog mid back. Sew sleeve seam in the outermost edge st as follows: Sew edge X and X tog, sew edge Y and Y tog – see diagram. EDGE: Pick up 280-288-312-336-360-368 sts evenly from RS along the opening on bolero - i.e. up along right front piece, back of neck, down along left front piece and then along back piece on circular needle size 4 mm with Merino Extra Fine. Work rib in the round on circular needle as follows: K 2/P 2. When edge measures 5-5-5-5-5-5 cm, inc 1 st in every P section = K 2/P 3 - Read INCREASE TIP 2. When edge measures 10-10-11-11-12-12 cm, inc 1 st in every K section = K 3/P 3 - Read INCREASE TIP 3. Continue with K 3/P 3 until edge measures 15-15-16-16-17-17 cm. Loosely cast off sts with K over K and P over P. NOTE: To avoid a tight cast-off edge make 1 YO before every P section. Cast off YO as st. |
|||||||||||||||||||||||||
Diagram explanations |
|||||||||||||||||||||||||
|
|||||||||||||||||||||||||
 |
|||||||||||||||||||||||||
 |
|||||||||||||||||||||||||
 |
|||||||||||||||||||||||||
Have you finished this pattern?Tag your pictures with #dropspattern #valkyriebolero or submit them to the #dropsfan gallery. Do you need help with this pattern?You'll find 19 tutorial videos, a Comments/Questions area and more by visiting the pattern on garnstudio.com. © 1982-2026 DROPS Design A/S. We reserve all rights. This document, including all its sub-sections, has copyrights. Read more about what you can do with our patterns at the bottom of each pattern on our site. |
|||||||||||||||||||||||||


With over 40 years in knitting and crochet design, DROPS Design offers one of the most extensive collections of free patterns on the internet - translated to 17 languages. As of today we count 324 catalogues and 12267 patterns translated into English (UK/cm). 12267
We work hard to bring you the best knitting and crochet have to offer, inspiration and advice as well as great quality yarns at incredible prices! Would you like to use our patterns for other than personal use? You can read what you are allowed to do in the Copyright text at the bottom of all our patterns. Happy crafting!
Post a comment to pattern DROPS 149-12
We would love to hear what you have to say about this pattern!
If you want to leave a question, please make sure you select the correct category in the form below, to speed up the answering process. Required fields are marked *.