
Popular categories
Looking for a yarn?


Comments / Questions (34)
![]() Anneke wrote:
Anneke wrote:
De armsgaten zo als ik lees moet ik de eerste 3 keer dan1keer 2 ste dan 2keer 1 st Eerst 0-0-0-1-1-1 keer 3st 0-1-1-1-3-4- keer 2st 2-2-3-3-3-4 keer 1 ? In heb de tweede maat mv groet anneke
12.12.2019 - 14:33DROPS Design answered:
Dag Anneke,
Voor maat M moet je 1 keer 2 steken en 2 keer 1 steek afkanten voor de armsgaten.
16.12.2019 - 15:42
![]() Sabine wrote:
Sabine wrote:
Hallo, sehe ich das richtig, dass mit doppeltem Faden gestrickt wird, also JE ein Faden von jeder Farbe???
30.11.2019 - 10:45DROPS Design answered:
Liebe Sabine, ja genau, Sie stricken hier entweder mit 2 Fäden Fabel (= 1 Farbe Nr 800 + 1 Farbe Nr 804) oder mit 2 Fäden Flora (= 1 Farbe Nr 07 + 1 Farbe Nr 14). Viel Spaß beim stricken!
02.12.2019 - 08:56
![]() Wetzel wrote:
Wetzel wrote:
"Se tricotent en allers et retours sur aiguille circulaire à partir du milieu devant." vous pouvez m'expliqué comment faire merci
24.05.2019 - 13:27DROPS Design answered:
Bonjour Mme Wetzel, merci de bien vouloir nous indiquer si la réponse précédente ne vous a pas aidé. Bon tricot!
24.05.2019 - 14:04
![]() Wetzel wrote:
Wetzel wrote:
Bonjour que veut dire "Se tricotent en allers et retours sur aiguille circulaire à partir du milieu devant." c'est la 1ere fois que je lis sa et je ne comprend pas comment faire merci
24.05.2019 - 13:26DROPS Design answered:
Bonjour Mme Wetzel, on tricote le dos et les deux devants en une seule pièce en commençant par un devant (= devant droit, sur l'endroit) et en terminant par l'autre (= devant gauche, sur l'endroit). On utilise une aiguille circulaire pour avoir suffisamment de place pour y loger toutes les mailles - vous trouverez ici plus d'infos sur les aiguilles circulaires. Bon tricot!
24.05.2019 - 14:03Johana wrote:
Hola porfavor me explicas a que se refiere cuando en la explicación aparece rem. (Casi siempre es cuando habla de los ojales) Gracias
08.06.2018 - 16:03DROPS Design answered:
Hola Johana. rem = rematar, cerrar. Normalmente usamos este termino al finalizar el trabajo ( cerrar los puntos y asegurar los hilos) y a veces para trabajar los ojales.
10.06.2018 - 10:05
![]() Alice De Bellis wrote:
Alice De Bellis wrote:
I'm running into a problem at the beginning of the shaping of the front of the cardigan. The pattern says, "On the beg of the next 2 rows, bind off the first 19 sts ..." Is this right? It looks blocky and angular. I've studied the pattern, and the only thing that makes sense is that the disconnected bands are sewn together when the sweater is finished. In the photo, it looks like that might be the case, but I can't find it in the pattern directions either. Please help me!
14.03.2018 - 01:51DROPS Design answered:
Dear Mrs De Bellis, yes that's right you will bind off the first 19 sts at the beg of next 2 rows (= 19 sts on right front piece and 19 sts on left front piece). You will then afterwards knit collar (picking up sts along neck) then sew it on each side at the bottom of these 19 sts bound off, see at the end of SHAWL COLLAR. Happy knitting!
14.03.2018 - 09:49
![]() Thérèse wrote:
Thérèse wrote:
Bonjour, après les 14 augmentations (encolure dos) faut il continuer en côtes 1 et 1 ou 2 et 1 ? Merci. Salutations. Thérèse.
02.05.2016 - 07:58DROPS Design answered:
Bonjour Thérèse, après les 14 augmentations au milieu de l'encolure dos, continuez en côtes 1 m end/2 m env (vu sur l'endroit) au milieu et continuez les côtes comme avant de chaque côté. Bon tricot!
02.05.2016 - 10:26Tineke wrote:
Goedemiddag, Bedankt voor uw reactie. De steken zouden in principe moeten passen op de naald. Het zijn naalden van 40 cm. Dat zou moeten lukken.... Waar het betreft de zak mij is bekend dat er meerdere manieren zijn om deze te beien. Mij gaat het echt om de beste manier om een zak, onzichtbaar, op te naaien. Kunt u mij een tip geven? Groetjes, Tineke
23.02.2015 - 15:32DROPS Design answered:
Hoi Tineke. Nee, niet echt. Je kan ze opnaaien met de steken die je zelf het mooist en beste vindt.
24.02.2015 - 12:06Tineke wrote:
Goedemiddag, Is dit vest ook te doen op rechte naalden? (Ondanks de vele steken) Groetjes, Tineke
21.02.2015 - 13:13DROPS Design answered:
Hoi Tineke. Ja, als je alle st kwijt kan op de nld.
23.02.2015 - 14:35
![]() Lineke Siteur Den Houdijker wrote:
Lineke Siteur Den Houdijker wrote:
Op 05-01-2015 heb ik de opmerking geplaatst dat de knoopsgaten in dit stoere vest op de rechterbies worden gemaakt, dit is een dames sluiting. Ik ga hem overnieuw maken en ik zie dat er niets met mijn reactie is gedaan. Dit is jammer voor al degene die de opmerkingen niet lezen!
08.02.2015 - 19:39DROPS Design answered:
Hoi Lineke. Wij passen het patroon niet aan omdat wij dit niet als een fout beschouwen - het model is zo ontworpen. Het staat in het patroon dat de knoopsgaten op de rechter bies worden gemaakt, wilt men dat op de linker, dan mag men dat natuurlijk zelf aanpassen.
09.02.2015 - 11:16
|
|
Beren#berenjacket |
|
 |
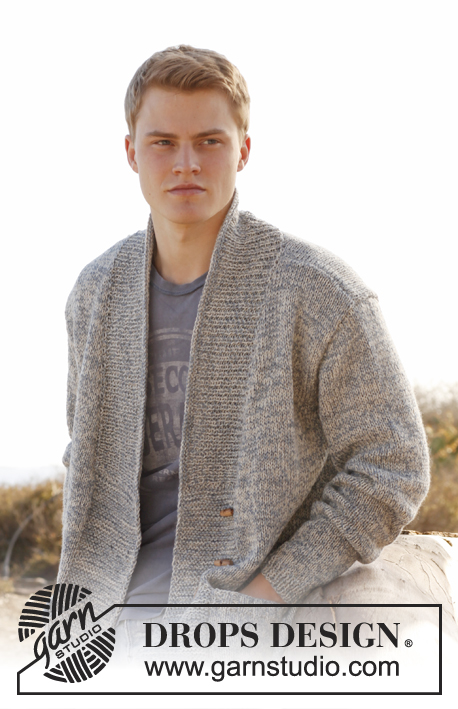 |
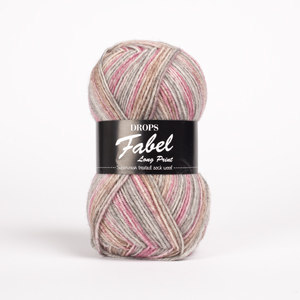
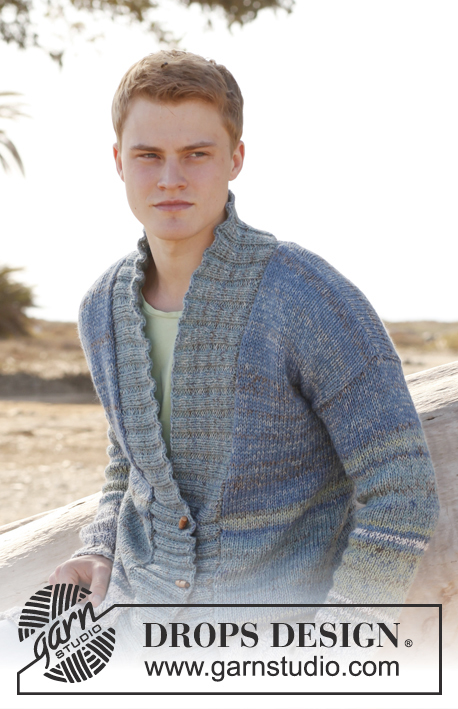
Men's jacket, knitted in 2 threads DROPS Fabel or DROPS Flora, with with shawl collar. Size: S to XXXL.
DROPS Extra 0-897 |
|
|
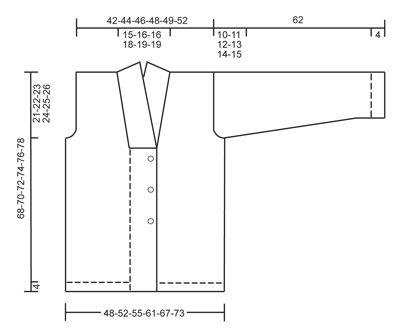
GARTER ST: K back and forth on all rows. SHORT ROWS: Work short rows every 5 cm vertically until finished measurements as follows: Work 20 band sts in garter st from RS, turn piece, tighten thread and K back from WS. Then work over all sts as before from RS, turn piece and work 20 band sts in garter st from WS, turn piece, tighten thread and K back from RS. Then work over all sts from WS as before. BUTTONHOLES: Cast off for 3 buttonholes from RS on right band. 1 buttonhole = work the first 4 sts from mid front, cast off next st and cast on 1 new st over this st on next row. Cast off for buttonholes when piece measures: SIZE S: 26, 33 and 40 cm SIZE M: 27, 34 and 41 cm SIZE L: 28, 35 and 42 cm SIZE XL: 29, 36 and 43 cm SIZE XXL: 30, 37 and 44 cm SIZE XXXL: 31, 38 and 45 cm 1 cm should remain before casting off on band. DECREASE TIP (applies to neck dec mid front): Dec from RS inside 1 edge st in garter st. Dec AFTER 1 edge st as follows: Slip 1 st as if to K, K 1, psso. Dec BEFORE 1 edge st as follows: K 2 tog. INCREASE TIP: Inc 1 st by making 1 YO inside 1 edge st in each side. On next row work YO twisted to avoid holes. ---------------------------------------------------------- BODY: Worked back and forth on circular needle from mid front. Cast on 205-217-229-249-269-289 sts (incl 20 band sts in each side towards mid front) on circular needle size 4.5 mm with 1 thread of each colour in Fabel or Flora. Work rib as follows (1st row = RS): 20 band sts in GARTER ST - see explanation above - * K 1, P 1 *, repeat from *-* until 20 sts remain, work these band sts in garter st. Continue with rib and 20 band sts in garter st in each side. When piece measures 4 cm, switch to circular needle size 5 mm, work next row from RS as follows: Work the first 20 band sts in garter st, in stocking st over the middle sts - at the same time dec 1 st, finish with 20 band sts in garter st = 204-216-228-248-268-288 sts on row. Continue in stocking st with 20 band sts in garter st in each side. When piece measures 5 cm, work SHORT ROWS - see explanation above. When piece measures 26-27-28-29-30-31 cm, cast off for BUTTONHOLE on right band - Read explanation above. REMEMBER THE KNITTING TENSION! READ ALL OF THE FOLLOWING 2 SECTIONS BEFORE CONTINUING. When piece measures 41-42-43-44-45-46 cm, insert 1 marker 61-64-67-72-77-82 sts in from each side ( = 82-88-94-104-114-124 sts between each marker on back piece), move the marker upwards when working. On the beg of the next 2 rows, cast off the first 19 sts = 166-178-190-210-230-250 sts remain, then insert 1 marker at beg and end of row (marks where to start knitting up the collar). On next row from RS, dec 1 st from neck in each side - SEE DECREASE TIP! Repeat dec every 4th row 13-14-14-15-16-16 more times (14-15-15-16-17-17 times in total) - AT THE SAME TIME when piece measures 47-48-49-50-51-52 cm, cast off 3 sts on each side of each marker (= 6 dec sts in each side) for armholes. Now divide the piece and finish each part separately. LEFT FRONT PIECE: Continue in stocking st and with neck dec mid front - AT THE SAME TIME cast off for armhole at the beg of every row from RS as follows: 3 sts 0-0-0-1-1-1 times, 2 sts 0-1-1-1-3-4 times and 1 st 2-2-3-3-3-4 times. After all cast offs and dec are done, 23-23-25-26-26-28 sts remain on shoulder. Cast off all sts when piece measures 68-70-72-74-76-78 cm. RIGHT FRONT PIECE: Work as left front piece but reversed. BACK PIECE: = 76-82-88-98-108-118 sts. Continue in stocking st while at the same time casting off for armholes at the beg of every row in each side as on front piece = 72-74-78-82-84-88 sts. When piece measures 66-68-70-72-74-76 cm, cast off the middle 22-24-24-26-28-28 sts for neck and finish each shoulder separately. At beg of next row from neck, cast off 2 sts = 23-23-25-26-26-28 sts remain on shoulder. Cast off all sts when piece measures 68-70-72-74-76-78 cm. SLEEVE: Worked back and forth on needle. Cast on 40-42-44-46-48-50 sts (incl 1 edge st in each side) on circular needle size 4.5 mm with 1 thread of each colour in Fabel or Flora. Work rib as follows (1st row = RS): 1 edge st in garter st, * K 1, P 1 *, repeat from *-* and finish with 1 edge st in garter st. When piece measures 4 cm, switch to circular needle size 5 mm, work in stocking st with 1 edge st in garter st in each side. When piece measures 8 cm, inc 1 st in each side - READ INCREASE TIP! Repeat inc every 3½-3½-3-2½-2½-2 cm 11-11-13-14-15-16 more times (12-12-14-15-16-17 times in total) = 64-66-72-76-80-84 sts. When piece measures 52-51-50-49-48-47 cm (shorter measurements in the larger sizes because of longer sleeve cap and broader shoulder width) cast off for sleeve cap at beg of every row in each side: 3 sts 1-1-1-2-2-2 times, 2 sts 1-2-2-2-4-4 times and 1 st 1-2-2-3-3-4 times. Then cast off 2 sts in each side until piece measures 61 cm, then cast off 3 sts 1 time in each side. Cast off all sts, piece measures approx. 62 cm in all sizes. ASSEMBLY: Sew the shoulder seams. Sew in sleeves and sew sleeve seams inside 1 edge st. SHAWL COLLAR: Worked back and forth on needle. Knit up inside 1 edge st on circular needle size 4.5 mm with 1 thread of each colour in Fabel or Flora: Beg mid front at the marker on right front piece, knit up approx. 60 to 70 sts up to shoulder, then approx. 40 to 50 sts around the neck, and approx. 60 to 70 sts down along left front piece until marker = approx. 160 to 190 sts. K 1 row from WS while AT THE SAME TIME adjusting no of sts to 153-159-163-169-175-181. On next row from RS work rib as follows: 1 st in garter st, * K 1, P 1 *, repeat from *-* and finish with K 1 and 1 st in garter st. Continue rib until collar measures approx. 6 cm. On next row from RS inc 1 P st in each of the middle 12-13-13-14-13-14 P-sections (= back of neck) = 165-172-176-183-188-195 sts. Continue rib until collar measures approx. 10 cm (finish with 1 row from RS). K 3 rows over all sts, then loosely cast off all sts with K from RS. Neatly fasten collar at the bottom in each side towards band with stitches – sew edge to edge to avoid a chunky seam. Sew the buttons on to the left band. POCKET: Cast on 30 sts with 1 thread of each colour in Fabel or Flora on needle size 5 mm, work in stocking st until pocket measures 16 cm. Then switch to needle size 4.5 mm and work rib as follows: * K 2, P 2 *, repeat from *-*. Continue rib until pocket measures 18 cm, loosely cast off with K over K and P over P. Knit another pocket the same way. Sew pockets on jacket towards band mid front and down to rib at the bottom. |
|
 |
|
Have you finished this pattern?Tag your pictures with #dropspattern #berenjacket or submit them to the #dropsfan gallery. Do you need help with this pattern?You'll find 16 tutorial videos, a Comments/Questions area and more by visiting the pattern on garnstudio.com. © 1982-2026 DROPS Design A/S. We reserve all rights. This document, including all its sub-sections, has copyrights. Read more about what you can do with our patterns at the bottom of each pattern on our site. |
|


With over 40 years in knitting and crochet design, DROPS Design offers one of the most extensive collections of free patterns on the internet - translated to 17 languages. As of today we count 324 catalogues and 12267 patterns translated into English (UK/cm). 12267
We work hard to bring you the best knitting and crochet have to offer, inspiration and advice as well as great quality yarns at incredible prices! Would you like to use our patterns for other than personal use? You can read what you are allowed to do in the Copyright text at the bottom of all our patterns. Happy crafting!
Post a comment to pattern DROPS Extra 0-897
We would love to hear what you have to say about this pattern!
If you want to leave a question, please make sure you select the correct category in the form below, to speed up the answering process. Required fields are marked *.