
Popular categories
Looking for a yarn?


Comments / Questions (272)
![]() Lotta Söderlund wrote:
Lotta Söderlund wrote:
Hej! Angående förkortade varv - har jag förstått rätt om jag stickar först 24 m rätstickning från mittenlaget, vänder o stickar tillbaka och sen stickar 12 m därefter vänder och stickar tillbaka? Det är väldigt otydligt i mönstret, ni borde lägga till ordet ”vänd” i förklaringen och från vilken ände av arbetet man börjar . Eller är de 12 maskorna inte de yttersta?
13.10.2020 - 21:34DROPS Design answered:
Hej Lotta. Ja det stämmer. Du börjar från kanten och stickar 24 m, vänder och stickar tillbaka. Sedan stickar du 12 m, vänder och stickar tillbaka och efter det stickar du hela varvet. Detta gör du i varje cm på varannan cm. Se gärna denna video om hur man stickar förkortade varv. Mvh DROPS Design
15.10.2020 - 10:33
![]() Camilla wrote:
Camilla wrote:
Er fortsatt interessert i å vite hvordan dere får 24 masker på 10 cm på 3mm pinner (10cm/3mm=ca 33masker) med dette garnet. Nå har jeg prøvd å strikke så dvaskt/slapt/slakt som jeg kan klare på både pinne 3,25mm og 3,5 mm. På 3,25 får jeg 29 masker (10/3,25= 30,7) på 3,5 kommer jeg ned på 27-28 m (10/3,5=28,6) og da er det allerede mer hullete enn jeg tolererer i et profesjonelt strikket plagg.
07.10.2020 - 02:36DROPS Design answered:
Hej Camilla, Vi har valgt at strikke DROPS Baby Merino på 24 masker på 10 cm på langt de fleste af vores modeller, da bliver tøjet blødt og dejligt. Søger du på Baby Merino så får du alle modellerne op og kan se på billederne hvordan det ser ud med 24 masker. Det er naturligvis en smagssag :)
07.10.2020 - 09:53
![]() Camilla wrote:
Camilla wrote:
Hvordan får dere 24m på 10 cm med 3mm pinner? Alle Drops' oppskrifter er helt håpløse for meg å bruke. Poeng 1: Drops Baby Merino anbefales å "heller strikke for stramt enn for løst". Poeng 2: 3mm pinner bør gi ca 3mm brede masker. Dvs minst 30m per 10 cm. Jeg havner på 33m, som gir en forskjell på 3 cm(!) per 10 cm. Blåser dere garnet gjennom maskene? Jeg strikker ikke spesielt stramt, men ALDRI for løst, spesielt ikke med merino-garn. Hadde hjulpet dersom det var mål underveis.
04.10.2020 - 21:29
![]() Frustrated wrote:
Frustrated wrote:
Never seen anyone manage to make even the simplest of patterns so complicated as Drops studio. Even for an experienced knitter, it feels like it takes more time to unscramble their word salads of confusion than to knit the actual item. Every pattern I've seen so far has page upon page of people asking for clarifications. This won't happen with well-written patterns. Another common theme is instructions open to interpretation. Perhaps time to got help from professional pattern writers?
04.10.2020 - 16:42DROPS Design answered:
Hi, The DROPS patterns are knitted and crocheted by thousands and thousands of people around the world. We understand however that in certain countries, with different knitting/crochet traditions than Scandinavia, our patterns might be written in a way that differs from what some are used to. But of course we want everyone to understand our patterns, so that’s why we have created an extensive library of tutorial videos as well as step by step lessons that explain how to follow the techniques we use and how to read the diagrams in our patterns. Give them a try!
05.10.2020 - 11:57
![]() Donna Mosberger wrote:
Donna Mosberger wrote:
Thank you for your response for pattern 21-1. So if I understand your answer correctly I am supposed to now have a rim of purled stitches every 1 1/2 inches because I’ve garter stitched the short row on the body and the band of the garment. Wish I could send you a picture
16.09.2020 - 16:39DROPS Design answered:
Dear Mrs Mosberger, the short rows are only worked in the front band stitches = the sts worked in garter stitch , all other stitches are worked in stocking stitch. But on every 4", you will owrk 2 short rows over the sts towards mid front, on left front piece, start from WS: work 24-28 sts, work and work the return row, turn and work 12-14 sts, turn and work return row. Work now all stitches as before. You can show your work to your store (even per mail) and/or get helped from other knitters in our group DROPS Workshop. Happy knitting!
17.09.2020 - 09:39
![]() Donna Mosberger wrote:
Donna Mosberger wrote:
I'm struggling with the Left Front Piece where I'm to start the short rows. 2 rows in garter stitch for the band work just fine, but then I'm confused on how to then work the 2 garter stitch rows over the outermost stitches.
16.09.2020 - 02:56DROPS Design answered:
Dear Mrs Mosberger, work *2 rows over the first 24-28 sts, 2 rows over the first 12-13-14 sts (see size)* then continue working as before = garter stitch and stocking stitch. The short rows in garter stitch will compensate the difference of height between number of rows in garter stitch and in stocking stitch for the same height. Happy knitting!
16.09.2020 - 08:56
![]() CG wrote:
CG wrote:
Hallo. 1 Krausrippe (je rechts) über die Blenden entspricht Glatt(Vorderseite rechts Rückseite links) und dazwischen die verkürzten Reihen alle 4 cm oder? .... wenn ich das so stricke ist die Arbeit am Übergang zur Krausrippe schmäler als im Bereich vom glatt Gestrickten. Stimmt das so ?
31.08.2020 - 21:59DROPS Design answered:
Liebe CG, Sie stricken die verkürzten Reihen so in jede 4. cm: *1 Krausrippe über die ersten 24-28 M, 2 Krausrippe über die eresten 12-14 M*, dazwischen werden die Blendemaschen krausrechts gestrickt und die anderen glatt rechts, dh diese 2 Krausrippen stricken Sie nur in jeder 4. cm beidseitig. Viel Spaß beim stricken!
01.09.2020 - 09:20
![]() Birgit Best wrote:
Birgit Best wrote:
Ich habe Probleme mit den verkürzten Reihen im linken Vorderteil von Drops Baby 21-1. Warum wird die verkürzte Reihen nicht über die komplette Blende gestrickt. So habe ich die Anleitung verstanden: ich stricke die 24 Maschen der Blende rechts. Statt jetzt die linken Maschen zu stricken, wende ich und stricke 12 Maschen der Blende rechts zurück. Nun wende ich mitten in der Blende und stricke die 12 Maschen zurück und stricke dann die restlichen 23Maschen des glatt rechten Gestricks.
03.08.2020 - 16:31DROPS Design answered:
Liebe Frau Best, es stimmt so, so werden die verkürzten Reihen gestrickt, dh 2 Reihen extra über die Hälfte von den Blendemaschen und beidseitig. Viel Spaß beim stricken!
04.08.2020 - 09:57
![]() Sy wrote:
Sy wrote:
Ich muss leider sagen, das ich diese Anleitung sehr verwirrend finde. Die Anleitung macht für mich keinen Sinn. Z.B. verkürzte Reihe, warum und wie? Wird die Jacke in einen Stück gestrickt? Wird beim Halsausschnitt Maschen abgenommen ? Danke
30.07.2020 - 14:04DROPS Design answered:
Liebe Sy, die Arbeit wird auf einer Rundnadel hin und zurück gestrickt. Am Vorderteil anfangen, für den Ärmel aufnehmen und bis zur Schultern stricken. Danach das zweite Vorderteil stricken. Die Teile zusammenhängen und das Rückenteil nach unten stricken. Wenn man kraus rechts strickt, braucht mann mehr Reihen in der Höhe als für glatt rechts, deshalb wird man die VERKÜRZTE REIHEN stricken. Viel Spaß beim stricken!
30.07.2020 - 15:43
![]() Christina Peeters wrote:
Christina Peeters wrote:
Wat een leuke babypatronen... Ik ga ze eerst uitgebreid bestuderen , kiezen en materiaal bestellen. Sper....
18.07.2020 - 10:49
|
|
Buttercup#buttercupset |
|
 |
 |
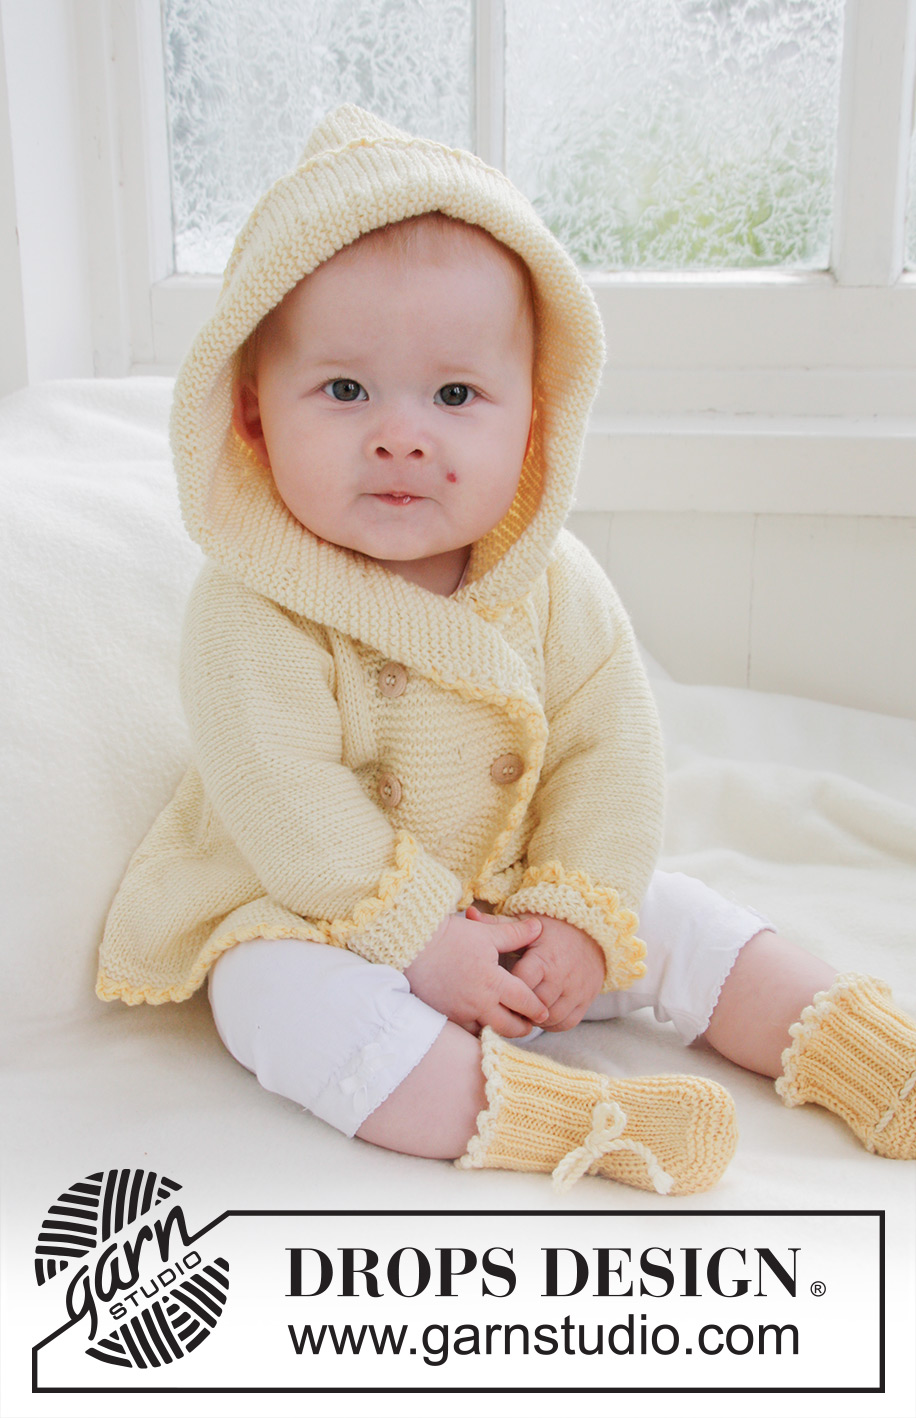
Knitted jacket with hood and slippers for baby and children in DROPS BabyMerino
DROPS Baby 21-1 |
|
|
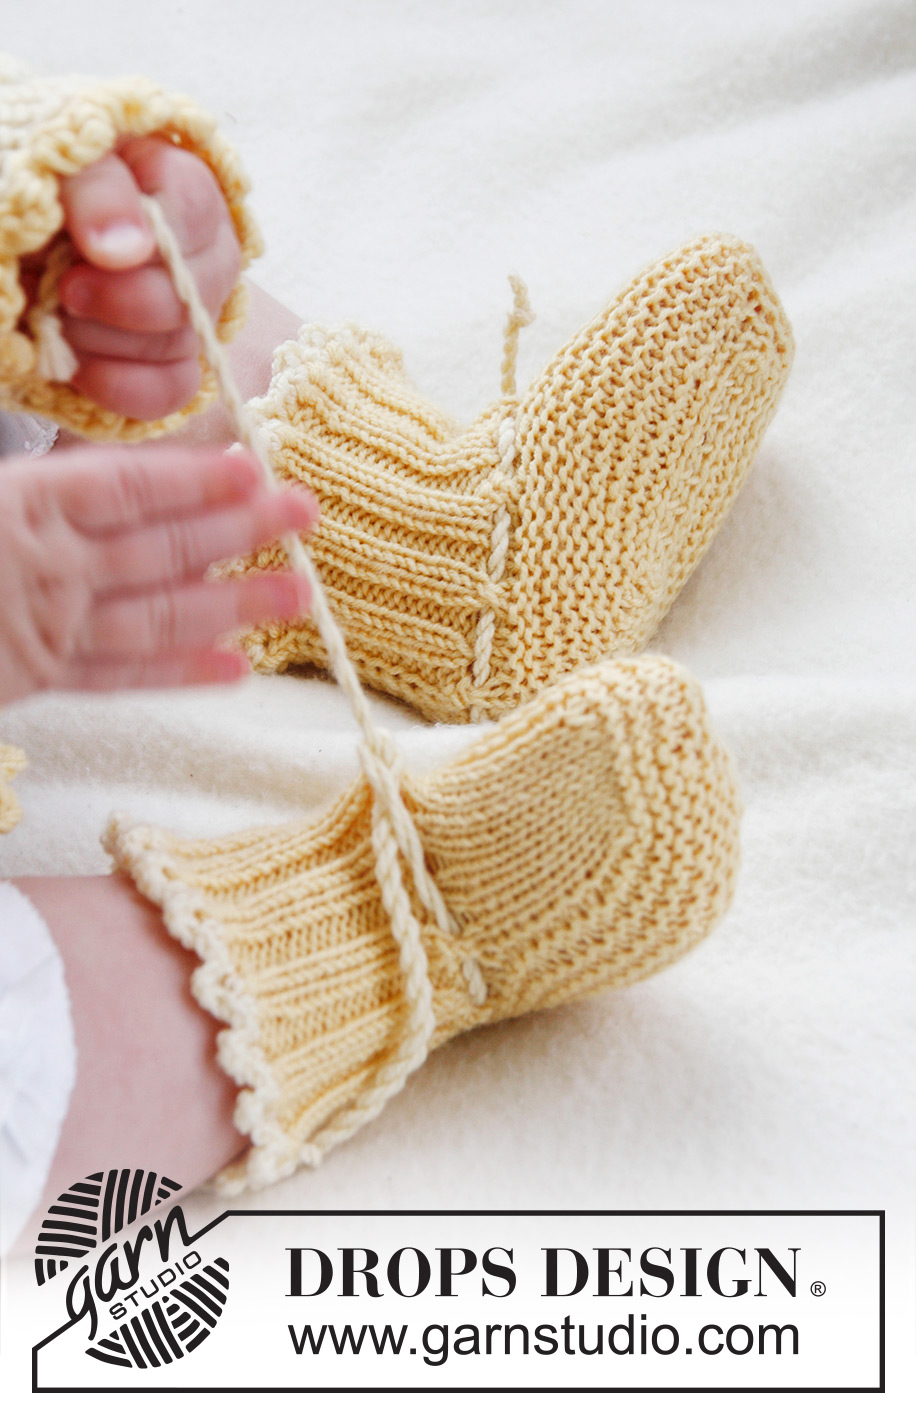
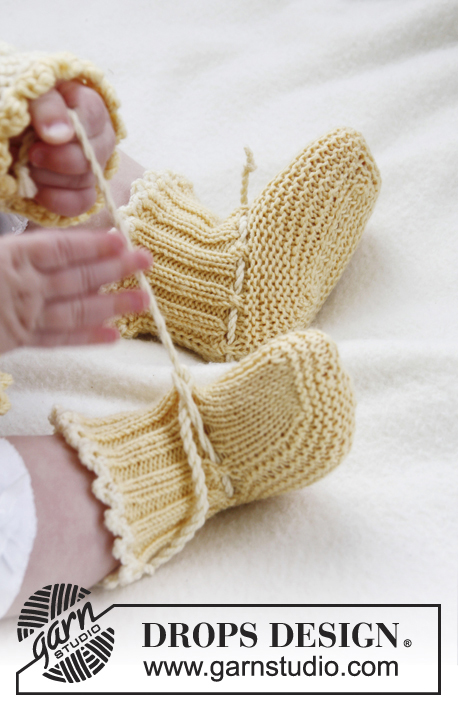
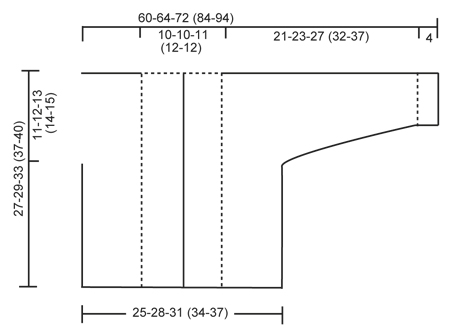
GARTER ST (back and forth on needle): K all rows. SHORT ROWS: * Work 2 rows in garter st over the 24-24-26 (28-28) band sts, work 2 rows in garter st only over the outermost 12-12-13 (14-14) sts. NOTE: When turning mid piece, slip first st. Tighten thread and continue as before. This is done to avoid holes in the transitions *. BUTTON HOLES: The jacket is double-breasted. Cast off for 4 button holes on right band. 1 BUTTON HOLE = K tog fourth and fifth st from edge and make 1 YO. On same row also K tog fourth and fifth LAST st on band, make 1 YO. Cast off for 2 button holes when piece measures: SIZE 1/3 MONTHS: 14 and 19 cm SIZE 6/9 MONTHS: 16 and 21 cm SIZE 12/18 MONTHS: 18 and 24 cm SIZE 2 YEARS: 20 and 27 cm SIZE 3/4 YEARS: 22 and 30 cm ---------------------------------------------------------- JACKET: Worked back and forth on circular needle. Beg on front piece, cast on sts for sleeve and work up to the shoulder. Knit the other front piece, place both front pieces tog and work down the back piece. LEFT FRONT PIECE: Read all of the following section before continuing! Cast on 43-47-51 (56-59) sts (incl 1 edge st in the side and 24-24-26 (28-28) band sts towards mid front) on needle size 2.5 mm with Baby Merino. Work 6 rows in GARTER ST - see explanation above. Switch to circular needle size 3 mm and work in stocking st but continue to work the 24-24-26 (28-28) band sts towards mid front in Garter st. When piece measures 4 cm, work SHORT ROWS - see explanation above (1st row = from WS). Repeat from *-* 1 time every 4 cm until piece measures 19-21-24 (27-30) cm, then repeat from *-* 1 time every other cm until finished measurements. AT THE SAME TIME when piece measures 16-17-20 (23-25) cm, cast on new sts at the end of every row from WS (towards the side of sleeve): 6 sts 2-2-3 (3-3) times, 8 sts 1-1-1 (2-3) times and 21-22-22 (25-26) sts 1 time = 84-89-99 (115-127) sts for shoulder/sleeve. Work inc sts in stocking st. When all sts have been cast on, continue in stocking st and Garter st as before while AT THE SAME TIME also working the outermost 10 sts on sleeve in garter st. When piece measures 27-29-33 (37-40) cm, insert a marker = mid on top of shoulder. Now slip the 24-24-26 (28-28) band sts towards mid front on a stitch holder. Then cast on 2 new sts at the end of row from RS (towards neck), repeat inc on next row towards neck = 64-69-77 (91-103) sts on needle. Work 1 row from WS. Put all sts on a stitch holder. RIGHT FRONT PIECE: Cast on and work as left front piece but reversed. In addition cast off for BUTTON HOLES on band - see explanation above. NOTE! Slip sts on a stitch holder after the last row with inc (i.e. last row = from WS). BACK PIECE: Work left front piece on to circular needle, cast on 16-16-18 (20-20) new sts (= back of neck) and work right front piece on to circular needle = 144-154-172 (202-226) sts. NOW MEASURE PIECE FROM MARKERS ON SHOULDERS. Continue in stocking st and Garter st at the end on each sleeve back and forth on needle. When piece measures 8½-9½-10 (10-11) cm, beg to cast off sleeve sts. Cast off at beg of every row in each side as follows: 21-22-22 (25-26) sts 1 time, 8 sts 1-1-1 (2-3) times and 6 sts 2-2-3 (3-3) times = 62-70-76 (84-90) sts on needle. Continue in stocking st with 1 edge st in each side. When piece measures approx. 26-28-32 (36-39) cm – fold the piece double at the markers on shoulders and make sure that the back piece is as long as front piece down to rows in garter st, switch to needle size 2.5 mm and work 6 rows in garter st, then cast off. ASSEMBLY: Sew the sleeve and side seams inside 1 edge st. Sew on buttons. HOOD: Knit up approx. 102-106-112 (118-122) sts (incl sts from stitch holders at the front – NOTE: If more/fewer sts have been knitted up, dec/inc evenly on 1st row. Continue in garter st over all sts while AT THE SAME TIME working short rows in each side every other cm – SEE EXPLANATION ABOVE. Cast off when hood measures approx. 21-23-25 (27-28) cm. Sew hood neatly tog at the top - sew in front loop of outermost st to avoid a chunky seam. CROCHET BORDER: Crochet a border around the entire jacket. Beg at the bottom on right front piece and crochet with 2 threads yellow Baby Merino and hook size 3 mm as follows: Work 1 dc, * 3 ch, 1 tr in 1st ch, skip approx. ½ cm, 1 dc in next st *, repeat from *-*. Crochet the same way around the openings on sleeves. ----------------------------------------------------------------- SLIPPER: The slipper is worked back and forth from mid back. Cast on 48-52-56 (56) sts on needle size 2.5 mm with 2 threads yellow Baby Merino. Remove 1 thread and work rib (= K 2/P 2) for 5-6-6 (7) cm – adjust so that next row is worked from WS. P 1 row from WS while at the same time dec 14-14-18 (14) sts evenly = 34-38-38 (42) sts. On next row work eyelet holes as follows from RS: K 1, *K 2 tog, 1 YO *, repeat from *-* and finish with K 1. P 1 row from WS. Now slip the outermost 12-13-13 (15) sts in each side on a stitch holder. Work 4 - 4½ - 5½ (6½) cm in stocking st over the middle 10-12-12 (12) sts. Slip sts from stitch holders back on needle and knit up 10-11-13 (16) sts on each side of mid piece = 54-60-64 (74) sts on needle. K every row over all sts for 3-4-5 (5) cm while at the same time after 1½ - 2 - 2½ (3) cm, dec on every other row as follows until completed: Dec 1 st at the beg and the end of row and K 2 tog on each side of the 2 mid sts. Cast off and sew tog mid under foot and continue up mid back in front loop of outermost sts to avoid a chunky seam. Knit another slipper the same way. TIES: Cut 3 threads light yellow of approx. 1 metres, twine them tightly tog, fold them double and they will twine again, tie a knot in each end. Thread tie up and down through the eyelet holes on slipper. CROCHET BORDER: Crochet a border at the top of slipper on hook size 2 mm with light yellow as follows: 1 dc in first st, * 3 ch, 1 tr in 1st ch, skip approx. ½ cm, 1 dc in next st *, repeat from *-* and finish with 1 sl st in dc from beg of round. |
|
 |
|
Have you finished this pattern?Tag your pictures with #dropspattern #buttercupset or submit them to the #dropsfan gallery. Do you need help with this pattern?You'll find 21 tutorial videos, a Comments/Questions area and more by visiting the pattern on garnstudio.com. © 1982-2026 DROPS Design A/S. We reserve all rights. This document, including all its sub-sections, has copyrights. Read more about what you can do with our patterns at the bottom of each pattern on our site. |
|


With over 40 years in knitting and crochet design, DROPS Design offers one of the most extensive collections of free patterns on the internet - translated to 17 languages. As of today we count 324 catalogues and 12245 patterns translated into English (UK/cm). 12245
We work hard to bring you the best knitting and crochet have to offer, inspiration and advice as well as great quality yarns at incredible prices! Would you like to use our patterns for other than personal use? You can read what you are allowed to do in the Copyright text at the bottom of all our patterns. Happy crafting!
Post a comment to pattern DROPS Baby 21-1
We would love to hear what you have to say about this pattern!
If you want to leave a question, please make sure you select the correct category in the form below, to speed up the answering process. Required fields are marked *.