
Popular categories
Looking for a yarn?


Comments / Questions (272)
![]() Maria, Themel wrote:
Maria, Themel wrote:
Hallo zusammen, Ich habe zwei Fragen. 1.was passiert mit den Blendenmaschen nachdem das vorderteil fertig ist.In der Anleitung steht das die nach 33 cm auf einen Hilfsfaden geschoben werden und danach werden diese Maschen aber nie wieder erwähnt.
19.01.2013 - 21:09DROPS Design answered:
Liebe Frau Themel, lesen Sie bitte unter "Kapuze", dort werden die stillgelegten Maschen wieder aktiviert.
20.01.2013 - 19:10
![]() Cindy Swoveland wrote:
Cindy Swoveland wrote:
I am about to start the hood. I don't understand the instructions for the short rows. A diagram of what the hood is supposed to look like before seaming would be a great help. Thanks.
11.01.2013 - 20:25DROPS Design answered:
Dear Mrs Swoveland, you continue on the hood the short rows you worked before on front bands each side. Happy knitting !
16.01.2013 - 15:06
![]() SaraMy wrote:
SaraMy wrote:
Hej! Jag har en fråga ang. Förkortade varv, som jag förstår minskar man på framkantsmadkorna, men sen ska man även sticka tolv maskor och sen minska, är det på slätstickningen då?
06.01.2013 - 09:08DROPS Design answered:
Hej, Nej du minskar inte på framkantsmaskorna, du stickar bara förkortade varv enligt beskrivningen i den sidan. Se även frågor och svar nedan i Bloggen. Lycka till!
17.01.2013 - 07:50
![]() Kim wrote:
Kim wrote:
I have just started knitting this fab jacket but need advice from short rows. am i supposed to knit all stitches or just garter stitch? if so when do I knit up the stocking stitch stitches?? please help. thanks?
30.12.2012 - 17:27DROPS Design answered:
Dear Kim, the short rows are worked in garter sts in the sts for the front borders each side, and the remaining sts for the jacket should be worked as before in stocking st. Happy knitting!
02.01.2013 - 11:35
![]() Sarah wrote:
Sarah wrote:
Außerdem habe ich noch eine 2. Frage: Frage. Das linke bzw. rechte Vorderteil wird aus welcher Ansicht gestrickt? Aus der Draufsicht oder aus der Ansicht wenn man es selbst tragen würde?
19.12.2012 - 16:19DROPS Design answered:
Hallo Sarah, das re Vorderteil ist bei Tragen rechts, das linke links.
20.12.2012 - 08:42
![]() Sarah wrote:
Sarah wrote:
Also ich muss jetzt trotzdem nochmal nachfragen wegen den verkürzten Reihen. In der Anleitung steht 1 krausrippe über 24 blendenmaschen und 1 krausrippe über die äußersten 12 blendenmaschen. d.h. 4 cm blende+glatt dann 1 krausrippe 24 blendenmaschen, 1 krausrippe 12 blenden maschen (4 reihen glatt werden NICHT gestrickt) und dann wieder "normal" weiterstricken?
19.12.2012 - 16:19DROPS Design answered:
Hallo Sarah, ja genau wie Sie es beschreiben, aber es wird alle 4 cm und dann alle 2 cm wdh.
20.12.2012 - 08:41
![]() Carla wrote:
Carla wrote:
Betreft de capuchon: verkorte toeren op dezelfde manier als in de bies? De gehele capuchon breien in ribbelsteek?
12.12.2012 - 17:50DROPS Design answered:
Ja, doorgaan met de verkorte toeren en de ribbelsteken over alle st
13.12.2012 - 16:38
![]() Carla wrote:
Carla wrote:
Het betreft hier een vraag over het breien van de verkorte toeren. Als je dit midden in de bies doet, blijf je dit altijd zien. Moet dit zo, of aan het einde van de bies tussen ribbel en trico in?
05.12.2012 - 19:29DROPS Design answered:
Zie mijn antwoord hieronder.
06.12.2012 - 17:09
![]() Carla wrote:
Carla wrote:
Doe je de verkorte toeren midden in de bies, aan het einde of tussen de bies en het tricotgedeelte in. Midden in de bies, ziet het er niet zo mooi uit
05.12.2012 - 19:27DROPS Design answered:
Ja, de verkorte toeren komen langs het middenvoor. De overgang kan in het begin duidelijker uitkomen, maar vaak wordt dat veel minder na het wassen van de jas.
06.12.2012 - 12:33
![]() Ellen Randi wrote:
Ellen Randi wrote:
Takk for svar. De 24 stolpemaskene inngår så vidt jeg kan se iflg. mønsteret ikke i de 89 m til skulder/erm. Så for meg ender jeg opp med 89 m til forstykket.
29.11.2012 - 15:05DROPS Design answered:
Det er inkl. Det staar ogsaa i begyndelsen af mönstret: (inkl 1 kantm i siden og 24-24-26 (28-28) stolpem mot midt foran)
29.11.2012 - 15:46
|
|
Buttercup#buttercupset |
|
 |
 |
Knitted jacket with hood and slippers for baby and children in DROPS BabyMerino
DROPS Baby 21-1 |
|
|
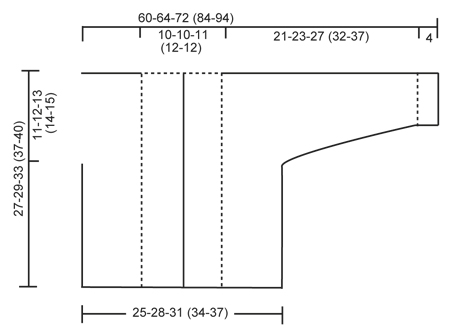
GARTER ST (back and forth on needle): K all rows. SHORT ROWS: * Work 2 rows in garter st over the 24-24-26 (28-28) band sts, work 2 rows in garter st only over the outermost 12-12-13 (14-14) sts. NOTE: When turning mid piece, slip first st. Tighten thread and continue as before. This is done to avoid holes in the transitions *. BUTTON HOLES: The jacket is double-breasted. Cast off for 4 button holes on right band. 1 BUTTON HOLE = K tog fourth and fifth st from edge and make 1 YO. On same row also K tog fourth and fifth LAST st on band, make 1 YO. Cast off for 2 button holes when piece measures: SIZE 1/3 MONTHS: 14 and 19 cm SIZE 6/9 MONTHS: 16 and 21 cm SIZE 12/18 MONTHS: 18 and 24 cm SIZE 2 YEARS: 20 and 27 cm SIZE 3/4 YEARS: 22 and 30 cm ---------------------------------------------------------- JACKET: Worked back and forth on circular needle. Beg on front piece, cast on sts for sleeve and work up to the shoulder. Knit the other front piece, place both front pieces tog and work down the back piece. LEFT FRONT PIECE: Read all of the following section before continuing! Cast on 43-47-51 (56-59) sts (incl 1 edge st in the side and 24-24-26 (28-28) band sts towards mid front) on needle size 2.5 mm with Baby Merino. Work 6 rows in GARTER ST - see explanation above. Switch to circular needle size 3 mm and work in stocking st but continue to work the 24-24-26 (28-28) band sts towards mid front in Garter st. When piece measures 4 cm, work SHORT ROWS - see explanation above (1st row = from WS). Repeat from *-* 1 time every 4 cm until piece measures 19-21-24 (27-30) cm, then repeat from *-* 1 time every other cm until finished measurements. AT THE SAME TIME when piece measures 16-17-20 (23-25) cm, cast on new sts at the end of every row from WS (towards the side of sleeve): 6 sts 2-2-3 (3-3) times, 8 sts 1-1-1 (2-3) times and 21-22-22 (25-26) sts 1 time = 84-89-99 (115-127) sts for shoulder/sleeve. Work inc sts in stocking st. When all sts have been cast on, continue in stocking st and Garter st as before while AT THE SAME TIME also working the outermost 10 sts on sleeve in garter st. When piece measures 27-29-33 (37-40) cm, insert a marker = mid on top of shoulder. Now slip the 24-24-26 (28-28) band sts towards mid front on a stitch holder. Then cast on 2 new sts at the end of row from RS (towards neck), repeat inc on next row towards neck = 64-69-77 (91-103) sts on needle. Work 1 row from WS. Put all sts on a stitch holder. RIGHT FRONT PIECE: Cast on and work as left front piece but reversed. In addition cast off for BUTTON HOLES on band - see explanation above. NOTE! Slip sts on a stitch holder after the last row with inc (i.e. last row = from WS). BACK PIECE: Work left front piece on to circular needle, cast on 16-16-18 (20-20) new sts (= back of neck) and work right front piece on to circular needle = 144-154-172 (202-226) sts. NOW MEASURE PIECE FROM MARKERS ON SHOULDERS. Continue in stocking st and Garter st at the end on each sleeve back and forth on needle. When piece measures 8½-9½-10 (10-11) cm, beg to cast off sleeve sts. Cast off at beg of every row in each side as follows: 21-22-22 (25-26) sts 1 time, 8 sts 1-1-1 (2-3) times and 6 sts 2-2-3 (3-3) times = 62-70-76 (84-90) sts on needle. Continue in stocking st with 1 edge st in each side. When piece measures approx. 26-28-32 (36-39) cm – fold the piece double at the markers on shoulders and make sure that the back piece is as long as front piece down to rows in garter st, switch to needle size 2.5 mm and work 6 rows in garter st, then cast off. ASSEMBLY: Sew the sleeve and side seams inside 1 edge st. Sew on buttons. HOOD: Knit up approx. 102-106-112 (118-122) sts (incl sts from stitch holders at the front – NOTE: If more/fewer sts have been knitted up, dec/inc evenly on 1st row. Continue in garter st over all sts while AT THE SAME TIME working short rows in each side every other cm – SEE EXPLANATION ABOVE. Cast off when hood measures approx. 21-23-25 (27-28) cm. Sew hood neatly tog at the top - sew in front loop of outermost st to avoid a chunky seam. CROCHET BORDER: Crochet a border around the entire jacket. Beg at the bottom on right front piece and crochet with 2 threads yellow Baby Merino and hook size 3 mm as follows: Work 1 dc, * 3 ch, 1 tr in 1st ch, skip approx. ½ cm, 1 dc in next st *, repeat from *-*. Crochet the same way around the openings on sleeves. ----------------------------------------------------------------- SLIPPER: The slipper is worked back and forth from mid back. Cast on 48-52-56 (56) sts on needle size 2.5 mm with 2 threads yellow Baby Merino. Remove 1 thread and work rib (= K 2/P 2) for 5-6-6 (7) cm – adjust so that next row is worked from WS. P 1 row from WS while at the same time dec 14-14-18 (14) sts evenly = 34-38-38 (42) sts. On next row work eyelet holes as follows from RS: K 1, *K 2 tog, 1 YO *, repeat from *-* and finish with K 1. P 1 row from WS. Now slip the outermost 12-13-13 (15) sts in each side on a stitch holder. Work 4 - 4½ - 5½ (6½) cm in stocking st over the middle 10-12-12 (12) sts. Slip sts from stitch holders back on needle and knit up 10-11-13 (16) sts on each side of mid piece = 54-60-64 (74) sts on needle. K every row over all sts for 3-4-5 (5) cm while at the same time after 1½ - 2 - 2½ (3) cm, dec on every other row as follows until completed: Dec 1 st at the beg and the end of row and K 2 tog on each side of the 2 mid sts. Cast off and sew tog mid under foot and continue up mid back in front loop of outermost sts to avoid a chunky seam. Knit another slipper the same way. TIES: Cut 3 threads light yellow of approx. 1 metres, twine them tightly tog, fold them double and they will twine again, tie a knot in each end. Thread tie up and down through the eyelet holes on slipper. CROCHET BORDER: Crochet a border at the top of slipper on hook size 2 mm with light yellow as follows: 1 dc in first st, * 3 ch, 1 tr in 1st ch, skip approx. ½ cm, 1 dc in next st *, repeat from *-* and finish with 1 sl st in dc from beg of round. |
|
 |
|
Have you finished this pattern?Tag your pictures with #dropspattern #buttercupset or submit them to the #dropsfan gallery. Do you need help with this pattern?You'll find 21 tutorial videos, a Comments/Questions area and more by visiting the pattern on garnstudio.com. © 1982-2026 DROPS Design A/S. We reserve all rights. This document, including all its sub-sections, has copyrights. Read more about what you can do with our patterns at the bottom of each pattern on our site. |
|


With over 40 years in knitting and crochet design, DROPS Design offers one of the most extensive collections of free patterns on the internet - translated to 17 languages. As of today we count 324 catalogues and 12245 patterns translated into English (UK/cm). 12245
We work hard to bring you the best knitting and crochet have to offer, inspiration and advice as well as great quality yarns at incredible prices! Would you like to use our patterns for other than personal use? You can read what you are allowed to do in the Copyright text at the bottom of all our patterns. Happy crafting!
Post a comment to pattern DROPS Baby 21-1
We would love to hear what you have to say about this pattern!
If you want to leave a question, please make sure you select the correct category in the form below, to speed up the answering process. Required fields are marked *.