
Popular categories
Looking for a yarn?


Comments / Questions (272)
![]() Christin wrote:
Christin wrote:
Hi. Ab welcher Reihe werden die ersten 4cm gemessen? Ab dem Nadelwechsel?
01.03.2013 - 14:01DROPS Design answered:
Liebe Christin, das ist in 4 cm Gesamthöhe. Wir werden das zum besseren Verständnis in der Anleitung ergänzen.
04.03.2013 - 08:11
![]() Barbara wrote:
Barbara wrote:
Bonjour, grace a votre aide, je suis enfin arrivee a la capuche ! Par contre j'ai un nouveau doute : pour la capuche, on tricote tout en point mousse et on fait les rangs raccourcis de chaques cotes. Mais alors, les bords de la capuche sont bien plus grands que le milieu. D'ou mesure-t-on les 23cm de hauteur pour finir la capuche ? Merci
18.02.2013 - 22:47DROPS Design answered:
Bonjour Barbara, mesurez la capuche au milieu, là où toutes les mailles sont tricotées au point mousse, sans rangs raccourcis. Bon tricot !
19.02.2013 - 10:29
![]() Louise wrote:
Louise wrote:
Hej ;) jeg har prøvet at strikke de forkortede pinde de gir ingen mening og ser grimt ud jeg gør som på videoen men det er fra ret siden i opskriften står der vrang :( er det muligt at få en mindre forklaring på hvordan man gør sådan mere skåret ud i pap end i opskriften ? ;)
14.02.2013 - 20:12DROPS Design answered:
Du strikker da en ekstra pind over de yderste 12 m mod midt foran. Stram tråden når du vender midt i arbejdet.
18.02.2013 - 16:13
![]() Eugenia wrote:
Eugenia wrote:
Hallo! Ich wüsste gerne ob in den 47 ... Maschen, um anzufangen die 24 ... Von der blende bereits mit drin sind. Der teil wirk dann so schmal ... Oder sind 47m glatt und 27m kraus gemeint? Danke
14.02.2013 - 00:12DROPS Design answered:
Liebe Eugenia, in den 47 Maschen sind die Blendenmaschen enthalten.
14.02.2013 - 10:08
![]() Barbara wrote:
Barbara wrote:
Je poursuis ma question ici : Le marqueur est 4 rangs "en dessous" du rang "irrégulier" donc il y aura une asymétrie lorsqu'on repliera le tricot au niveau du marqueur, non ? Je ne sais pas si je suis très claire. Merci d'avance pour votre aide.
10.02.2013 - 08:20DROPS Design answered:
Bonjour Barbara, À la moitié de l'ouvrage en hauteur, vous placez un marqueur et continuez sur les mailles restantes en montant 2 fois 2 m à la fin du rang côté encolure, en terminant par 1 rang sur l'env. Pour le dos, vous reprenez les 2 devants et montez les mailles restantes de l'encolure dos. J'espère que ces indications complémentaires pourront vous aider. Bon tricot !
11.02.2013 - 09:49
![]() Barbara wrote:
Barbara wrote:
Bonjour, j'ai besoin d'aide pour le haut des deux bords et les mesures à partir du marqueur : On place le marqueur avant de faire les 2x2 augmentations. On fait donc encore au moins 4 rangs puis on finit par un rang endroit sur l'envers. Mais du coup, ce dernier rang crée une sorte d'irrégularité que je ne distingue pas sur la photo du modèle.
10.02.2013 - 08:19
![]() Iris wrote:
Iris wrote:
Kapuze? ich habe 24 Blendenm + aufgenommen + 24 Blendenm soll jetzt 'Krausrippe über alle M. stricken und GLEICHZEITIG auf beiden Seiten alle 2 cm die verkürzten Reihen stricken' aber wie? Welche Maschen stricke ich nicht? wie ich die Anleitung verstehe, wird die ganze Kapuze in Krausrippe gestrickt. Danke
04.02.2013 - 12:41DROPS Design answered:
Liebe Iris, ja, die ganze Kapuze wird in Krausrippe gestrickt. Man strickt die verkürzten R über die äußersten 12-12-13 (14-14) M (auf beiden Seiten) und dann Krausrippe über die ganze Kapuze - damit zum Rand zu mehr Weite ist).
05.02.2013 - 15:19Barbara wrote:
Bonjour, je voulais vérifier qu'il n'y avait bien que la bordure en crochet qui était en jaune "foncé". J'ai imprimer les explications en noir et blanc et je n'étais pas sure. Merci
02.02.2013 - 02:58DROPS Design answered:
Bonjour Barbara, la bordure au crochet se fait bien en Baby Merino jaune,et la veste en Baby Merino jaune clair. Bon tricot !
02.02.2013 - 09:47
![]() Martina wrote:
Martina wrote:
Kann das sein, dass die Anleitung zu den Hausschuhen irgendwie nicht zu dem Bild der Hausschuhe passt? In der Anleitung steht glatt gestrickt, auf dem Bild sieht es an den Füsschen eher nach Krausrippe aus?
25.01.2013 - 18:45DROPS Design answered:
Liebe Martina, der obere Teil des Schuhs wird glatt rechts gestrickt. Wenn Sie das zweite Foto anklicken können Sie es deutlich sehen.
26.01.2013 - 23:25
![]() Maria, Themel wrote:
Maria, Themel wrote:
Meine zweite Frage bezieht sich auch auf diese Maschen.Wenn man sie auf einen Hilfsfaden zieht befindet sich ja der Faden noch am Anfang der Reihe.Wie bekomme ich den dann über die 26 Blendenmaschen um nach diesen weiterstricken zu können? Ich hoffe ich konnte es irgendwie verständlich formulieren ;)
19.01.2013 - 21:09DROPS Design answered:
Sie legen die M still, nachdem Sie sie gestrickt haben (um den Faden an der richtigen Stelle zu haben).
20.01.2013 - 19:12
|
|
Buttercup#buttercupset |
|
 |
 |
Knitted jacket with hood and slippers for baby and children in DROPS BabyMerino
DROPS Baby 21-1 |
|
|
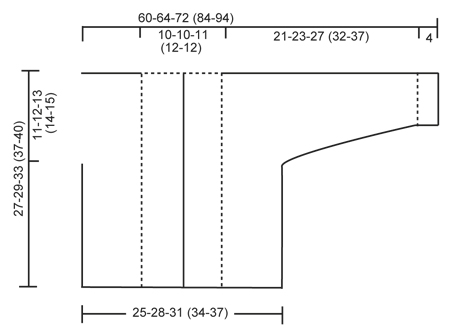
GARTER ST (back and forth on needle): K all rows. SHORT ROWS: * Work 2 rows in garter st over the 24-24-26 (28-28) band sts, work 2 rows in garter st only over the outermost 12-12-13 (14-14) sts. NOTE: When turning mid piece, slip first st. Tighten thread and continue as before. This is done to avoid holes in the transitions *. BUTTON HOLES: The jacket is double-breasted. Cast off for 4 button holes on right band. 1 BUTTON HOLE = K tog fourth and fifth st from edge and make 1 YO. On same row also K tog fourth and fifth LAST st on band, make 1 YO. Cast off for 2 button holes when piece measures: SIZE 1/3 MONTHS: 14 and 19 cm SIZE 6/9 MONTHS: 16 and 21 cm SIZE 12/18 MONTHS: 18 and 24 cm SIZE 2 YEARS: 20 and 27 cm SIZE 3/4 YEARS: 22 and 30 cm ---------------------------------------------------------- JACKET: Worked back and forth on circular needle. Beg on front piece, cast on sts for sleeve and work up to the shoulder. Knit the other front piece, place both front pieces tog and work down the back piece. LEFT FRONT PIECE: Read all of the following section before continuing! Cast on 43-47-51 (56-59) sts (incl 1 edge st in the side and 24-24-26 (28-28) band sts towards mid front) on needle size 2.5 mm with Baby Merino. Work 6 rows in GARTER ST - see explanation above. Switch to circular needle size 3 mm and work in stocking st but continue to work the 24-24-26 (28-28) band sts towards mid front in Garter st. When piece measures 4 cm, work SHORT ROWS - see explanation above (1st row = from WS). Repeat from *-* 1 time every 4 cm until piece measures 19-21-24 (27-30) cm, then repeat from *-* 1 time every other cm until finished measurements. AT THE SAME TIME when piece measures 16-17-20 (23-25) cm, cast on new sts at the end of every row from WS (towards the side of sleeve): 6 sts 2-2-3 (3-3) times, 8 sts 1-1-1 (2-3) times and 21-22-22 (25-26) sts 1 time = 84-89-99 (115-127) sts for shoulder/sleeve. Work inc sts in stocking st. When all sts have been cast on, continue in stocking st and Garter st as before while AT THE SAME TIME also working the outermost 10 sts on sleeve in garter st. When piece measures 27-29-33 (37-40) cm, insert a marker = mid on top of shoulder. Now slip the 24-24-26 (28-28) band sts towards mid front on a stitch holder. Then cast on 2 new sts at the end of row from RS (towards neck), repeat inc on next row towards neck = 64-69-77 (91-103) sts on needle. Work 1 row from WS. Put all sts on a stitch holder. RIGHT FRONT PIECE: Cast on and work as left front piece but reversed. In addition cast off for BUTTON HOLES on band - see explanation above. NOTE! Slip sts on a stitch holder after the last row with inc (i.e. last row = from WS). BACK PIECE: Work left front piece on to circular needle, cast on 16-16-18 (20-20) new sts (= back of neck) and work right front piece on to circular needle = 144-154-172 (202-226) sts. NOW MEASURE PIECE FROM MARKERS ON SHOULDERS. Continue in stocking st and Garter st at the end on each sleeve back and forth on needle. When piece measures 8½-9½-10 (10-11) cm, beg to cast off sleeve sts. Cast off at beg of every row in each side as follows: 21-22-22 (25-26) sts 1 time, 8 sts 1-1-1 (2-3) times and 6 sts 2-2-3 (3-3) times = 62-70-76 (84-90) sts on needle. Continue in stocking st with 1 edge st in each side. When piece measures approx. 26-28-32 (36-39) cm – fold the piece double at the markers on shoulders and make sure that the back piece is as long as front piece down to rows in garter st, switch to needle size 2.5 mm and work 6 rows in garter st, then cast off. ASSEMBLY: Sew the sleeve and side seams inside 1 edge st. Sew on buttons. HOOD: Knit up approx. 102-106-112 (118-122) sts (incl sts from stitch holders at the front – NOTE: If more/fewer sts have been knitted up, dec/inc evenly on 1st row. Continue in garter st over all sts while AT THE SAME TIME working short rows in each side every other cm – SEE EXPLANATION ABOVE. Cast off when hood measures approx. 21-23-25 (27-28) cm. Sew hood neatly tog at the top - sew in front loop of outermost st to avoid a chunky seam. CROCHET BORDER: Crochet a border around the entire jacket. Beg at the bottom on right front piece and crochet with 2 threads yellow Baby Merino and hook size 3 mm as follows: Work 1 dc, * 3 ch, 1 tr in 1st ch, skip approx. ½ cm, 1 dc in next st *, repeat from *-*. Crochet the same way around the openings on sleeves. ----------------------------------------------------------------- SLIPPER: The slipper is worked back and forth from mid back. Cast on 48-52-56 (56) sts on needle size 2.5 mm with 2 threads yellow Baby Merino. Remove 1 thread and work rib (= K 2/P 2) for 5-6-6 (7) cm – adjust so that next row is worked from WS. P 1 row from WS while at the same time dec 14-14-18 (14) sts evenly = 34-38-38 (42) sts. On next row work eyelet holes as follows from RS: K 1, *K 2 tog, 1 YO *, repeat from *-* and finish with K 1. P 1 row from WS. Now slip the outermost 12-13-13 (15) sts in each side on a stitch holder. Work 4 - 4½ - 5½ (6½) cm in stocking st over the middle 10-12-12 (12) sts. Slip sts from stitch holders back on needle and knit up 10-11-13 (16) sts on each side of mid piece = 54-60-64 (74) sts on needle. K every row over all sts for 3-4-5 (5) cm while at the same time after 1½ - 2 - 2½ (3) cm, dec on every other row as follows until completed: Dec 1 st at the beg and the end of row and K 2 tog on each side of the 2 mid sts. Cast off and sew tog mid under foot and continue up mid back in front loop of outermost sts to avoid a chunky seam. Knit another slipper the same way. TIES: Cut 3 threads light yellow of approx. 1 metres, twine them tightly tog, fold them double and they will twine again, tie a knot in each end. Thread tie up and down through the eyelet holes on slipper. CROCHET BORDER: Crochet a border at the top of slipper on hook size 2 mm with light yellow as follows: 1 dc in first st, * 3 ch, 1 tr in 1st ch, skip approx. ½ cm, 1 dc in next st *, repeat from *-* and finish with 1 sl st in dc from beg of round. |
|
 |
|
Have you finished this pattern?Tag your pictures with #dropspattern #buttercupset or submit them to the #dropsfan gallery. Do you need help with this pattern?You'll find 21 tutorial videos, a Comments/Questions area and more by visiting the pattern on garnstudio.com. © 1982-2026 DROPS Design A/S. We reserve all rights. This document, including all its sub-sections, has copyrights. Read more about what you can do with our patterns at the bottom of each pattern on our site. |
|


With over 40 years in knitting and crochet design, DROPS Design offers one of the most extensive collections of free patterns on the internet - translated to 17 languages. As of today we count 324 catalogues and 12245 patterns translated into English (UK/cm). 12245
We work hard to bring you the best knitting and crochet have to offer, inspiration and advice as well as great quality yarns at incredible prices! Would you like to use our patterns for other than personal use? You can read what you are allowed to do in the Copyright text at the bottom of all our patterns. Happy crafting!
Post a comment to pattern DROPS Baby 21-1
We would love to hear what you have to say about this pattern!
If you want to leave a question, please make sure you select the correct category in the form below, to speed up the answering process. Required fields are marked *.