
Popular categories
Looking for a yarn?


Comments / Questions (272)
![]() Barbara wrote:
Barbara wrote:
I'm just starting the pattern. I'm at the short rows . "Work 2 rows garter st over 24 band sts, work 2 rows in garter st only over the outermost 12 sts. At exactly what point do I do the short rows? Thanks
10.06.2014 - 23:16DROPS Design answered:
Dear Barbara, the short rows on band sts start when piece measures 4 cm and repeat from *-* (see short rows) every 4 cm until finished measurements (see under left front piece). Happy knitting!
11.06.2014 - 10:20
![]() Birgit wrote:
Birgit wrote:
Wenn ich die Jacke in baby Alpaka silk stricke, muss ich etwas bei den Anschlags- und Höhenräuschen beachten?
30.05.2014 - 11:40DROPS Design answered:
Liebe Birgit, das von Ihnen gewünschte Garn BabyAlpaca Silk ist in derselben Garngruppe wie Baby Merino, daher können Sie es gut austauschen. Wichtig ist, dass Ihre Maschenprobe stimmt, Sie müssen also auch mit BabyAlpaca Silk auf die erforderlichen 24 M x 32 R pro 10 x 10 cm kommen.
31.05.2014 - 00:21
![]() Birgit wrote:
Birgit wrote:
Wenn ich die Jacke in baby Alpaka silk stricke, ändern sich dann die anschlagsmaschen?
30.05.2014 - 11:36DROPS Design answered:
Antwort siehe oben! :-)
31.05.2014 - 00:21
![]() KIM wrote:
KIM wrote:
Bonjour pour nouveau né combein de laine dois-je commander? merci d'avance
26.05.2014 - 15:18DROPS Design answered:
Bonjour Kim, les explications de ce modèle commencent en taille 1/3 mois ( = 56/62 cm), il faut 150 g de Baby Merino jaune clair, soit 3 pelotes de 50 g, et 1 pelote en coloris jaune. Bon tricot!
26.05.2014 - 15:50
![]() Camilla wrote:
Camilla wrote:
Kan denne modellen også benyttes til guttebaby?
24.04.2014 - 10:56DROPS Design answered:
Hei Camilla. Ja, det ville jeg godt mene du kan. Hvad synes du selv
24.04.2014 - 17:39
![]() Lena wrote:
Lena wrote:
Wenn ich das Rückenteil stricken soll, steht das ich 16 Maschen im Nacken zunehmen soll. Wie soll ich diese in einem Stück zunehmen, wenn die Strickarbeit von Hals bis zum Handgelenk geht?
01.04.2014 - 20:51DROPS Design answered:
Liebe Lena, Sie haben die 64 M des linken Vorderteils auf die Nadel genommen, die nächste R sollte eine Hin-R sein. Jetzt stricken Sie diese Hin-R des linken Vorderteils und schlagen am Ende der R (also an der Halsseite) zusätzlich 16 neue M an, so, als ob Sie einen neuen Maschenanschlag machen. Sie nehmen die M also nicht zu, sondern schlagen sie neu an. Dann stricken Sie die M des rechten Vorderteils auf die Nadel.
02.04.2014 - 11:00
![]() Lena wrote:
Lena wrote:
Wenn ich das Rückenteil stricken soll, steht das ich 16 Maschen im Nacken zunehmen soll. Wie soll ich diese in einem Stück zunehmen, wenn die Strickarbeit von Hals bis zum Handgelenk geht?
01.04.2014 - 20:51DROPS Design answered:
Antwort siehe oben. :-)
02.04.2014 - 11:05
![]() Louise B Nelson wrote:
Louise B Nelson wrote:
Pattern 21-1. I do not understand when the left front side is finished and you end with 77stitches.What makes up this # of stitches?
12.03.2014 - 19:14DROPS Design answered:
Dear Mrs Nelson, jacket is worked from bottom left front piece to bottom back piece. When left front piece is finished, you have sts from left front + sts for left sleeve on needle. Happy knnitting!
13.03.2014 - 09:13
![]() Romana wrote:
Romana wrote:
Ich glaube, ich bin ein klein wenig begriffsstutzig. Dem Video würde ich entnehmen, dass ich nur die 12 M "einschiebe", auf die Frage von Sarah vom 19.12.2012 haben Sie geantwortet, dass auch eine zusätzliche Krausrippe mit den 24 M, "eingeschoben" wird - soweit ich das verstanden habe. Kenn mich nicht mehr aus. Tut mir leid!!! Danke!
03.02.2014 - 21:05DROPS Design answered:
Liebe Romana, man strickt wie beschrieben: * 1 Krausrippe über die 24 Blendenm, 1 Krausrippe nur über die äussersten 12 M.* und wiederholt dies wie im Anleitungstext angegeben.
05.02.2014 - 10:17
![]() Romana wrote:
Romana wrote:
Nochmal zu den verkürzten Reihen. Stricke ich 24 M. hin, dann wenden, 24 zurück + 12 hin, wenden, 12 zurück ODER einfach nur 12 hin, wenden, 12 zurück, dann normal weiter? Danke!
03.02.2014 - 08:45DROPS Design answered:
Liebe Romana, dies erklären wir in unseren Tutorialvideos, die Ihnen kostenlos zur Verfügung stehen. Die Links finden Sie im graune Balken oben neben der Anleitung.
03.02.2014 - 09:10
|
|
Buttercup#buttercupset |
|
 |
 |
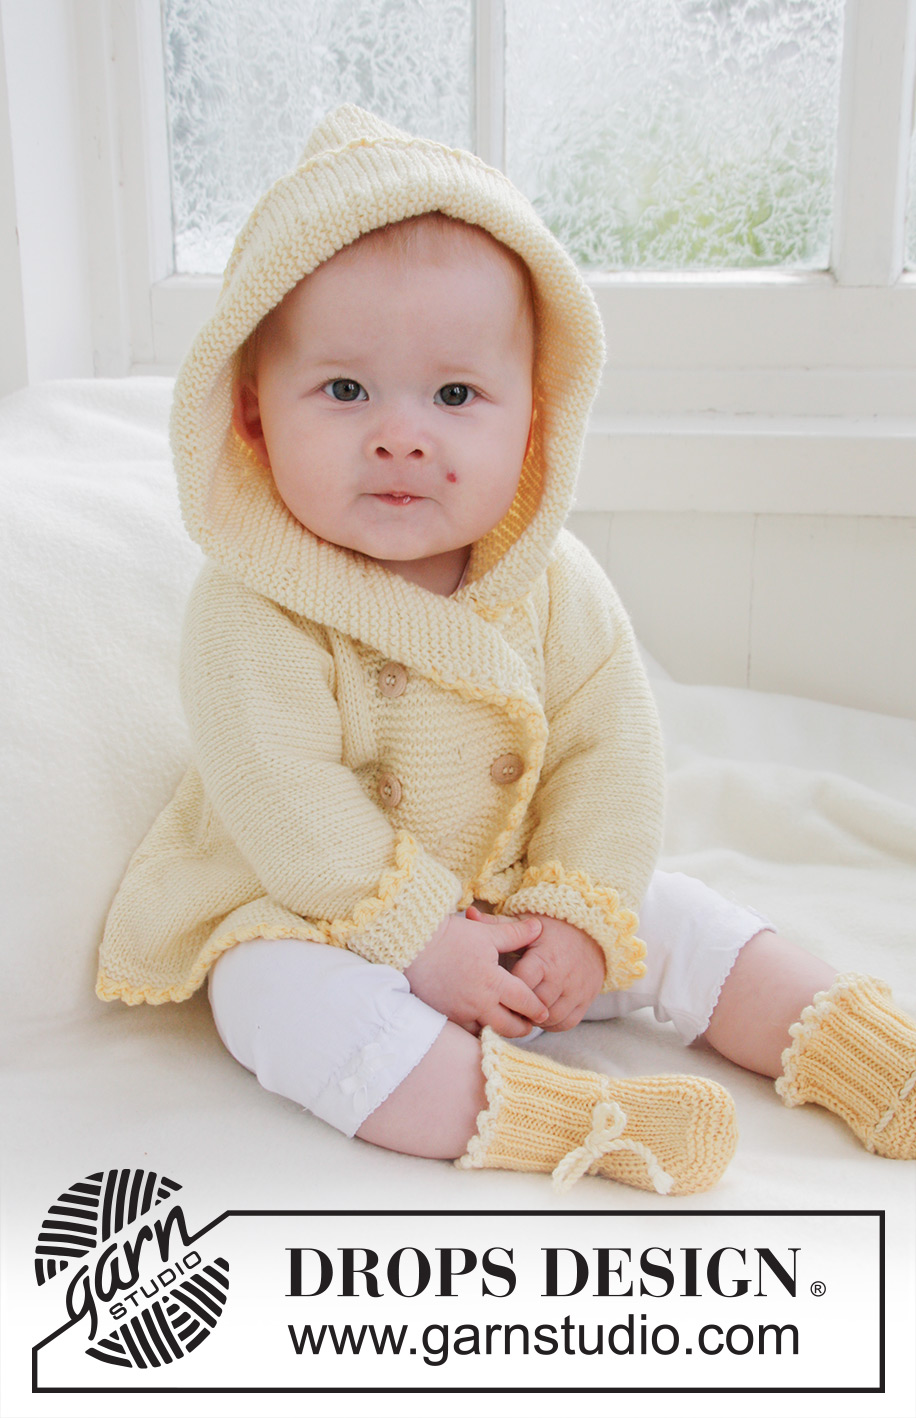
Knitted jacket with hood and slippers for baby and children in DROPS BabyMerino
DROPS Baby 21-1 |
|
|
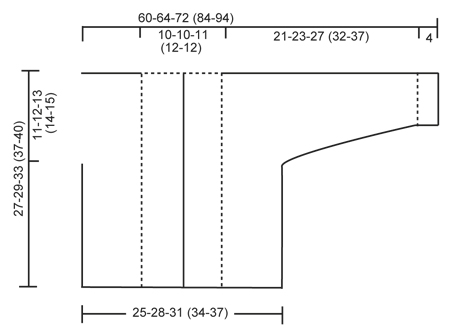
GARTER ST (back and forth on needle): K all rows. SHORT ROWS: * Work 2 rows in garter st over the 24-24-26 (28-28) band sts, work 2 rows in garter st only over the outermost 12-12-13 (14-14) sts. NOTE: When turning mid piece, slip first st. Tighten thread and continue as before. This is done to avoid holes in the transitions *. BUTTON HOLES: The jacket is double-breasted. Cast off for 4 button holes on right band. 1 BUTTON HOLE = K tog fourth and fifth st from edge and make 1 YO. On same row also K tog fourth and fifth LAST st on band, make 1 YO. Cast off for 2 button holes when piece measures: SIZE 1/3 MONTHS: 14 and 19 cm SIZE 6/9 MONTHS: 16 and 21 cm SIZE 12/18 MONTHS: 18 and 24 cm SIZE 2 YEARS: 20 and 27 cm SIZE 3/4 YEARS: 22 and 30 cm ---------------------------------------------------------- JACKET: Worked back and forth on circular needle. Beg on front piece, cast on sts for sleeve and work up to the shoulder. Knit the other front piece, place both front pieces tog and work down the back piece. LEFT FRONT PIECE: Read all of the following section before continuing! Cast on 43-47-51 (56-59) sts (incl 1 edge st in the side and 24-24-26 (28-28) band sts towards mid front) on needle size 2.5 mm with Baby Merino. Work 6 rows in GARTER ST - see explanation above. Switch to circular needle size 3 mm and work in stocking st but continue to work the 24-24-26 (28-28) band sts towards mid front in Garter st. When piece measures 4 cm, work SHORT ROWS - see explanation above (1st row = from WS). Repeat from *-* 1 time every 4 cm until piece measures 19-21-24 (27-30) cm, then repeat from *-* 1 time every other cm until finished measurements. AT THE SAME TIME when piece measures 16-17-20 (23-25) cm, cast on new sts at the end of every row from WS (towards the side of sleeve): 6 sts 2-2-3 (3-3) times, 8 sts 1-1-1 (2-3) times and 21-22-22 (25-26) sts 1 time = 84-89-99 (115-127) sts for shoulder/sleeve. Work inc sts in stocking st. When all sts have been cast on, continue in stocking st and Garter st as before while AT THE SAME TIME also working the outermost 10 sts on sleeve in garter st. When piece measures 27-29-33 (37-40) cm, insert a marker = mid on top of shoulder. Now slip the 24-24-26 (28-28) band sts towards mid front on a stitch holder. Then cast on 2 new sts at the end of row from RS (towards neck), repeat inc on next row towards neck = 64-69-77 (91-103) sts on needle. Work 1 row from WS. Put all sts on a stitch holder. RIGHT FRONT PIECE: Cast on and work as left front piece but reversed. In addition cast off for BUTTON HOLES on band - see explanation above. NOTE! Slip sts on a stitch holder after the last row with inc (i.e. last row = from WS). BACK PIECE: Work left front piece on to circular needle, cast on 16-16-18 (20-20) new sts (= back of neck) and work right front piece on to circular needle = 144-154-172 (202-226) sts. NOW MEASURE PIECE FROM MARKERS ON SHOULDERS. Continue in stocking st and Garter st at the end on each sleeve back and forth on needle. When piece measures 8½-9½-10 (10-11) cm, beg to cast off sleeve sts. Cast off at beg of every row in each side as follows: 21-22-22 (25-26) sts 1 time, 8 sts 1-1-1 (2-3) times and 6 sts 2-2-3 (3-3) times = 62-70-76 (84-90) sts on needle. Continue in stocking st with 1 edge st in each side. When piece measures approx. 26-28-32 (36-39) cm – fold the piece double at the markers on shoulders and make sure that the back piece is as long as front piece down to rows in garter st, switch to needle size 2.5 mm and work 6 rows in garter st, then cast off. ASSEMBLY: Sew the sleeve and side seams inside 1 edge st. Sew on buttons. HOOD: Knit up approx. 102-106-112 (118-122) sts (incl sts from stitch holders at the front – NOTE: If more/fewer sts have been knitted up, dec/inc evenly on 1st row. Continue in garter st over all sts while AT THE SAME TIME working short rows in each side every other cm – SEE EXPLANATION ABOVE. Cast off when hood measures approx. 21-23-25 (27-28) cm. Sew hood neatly tog at the top - sew in front loop of outermost st to avoid a chunky seam. CROCHET BORDER: Crochet a border around the entire jacket. Beg at the bottom on right front piece and crochet with 2 threads yellow Baby Merino and hook size 3 mm as follows: Work 1 dc, * 3 ch, 1 tr in 1st ch, skip approx. ½ cm, 1 dc in next st *, repeat from *-*. Crochet the same way around the openings on sleeves. ----------------------------------------------------------------- SLIPPER: The slipper is worked back and forth from mid back. Cast on 48-52-56 (56) sts on needle size 2.5 mm with 2 threads yellow Baby Merino. Remove 1 thread and work rib (= K 2/P 2) for 5-6-6 (7) cm – adjust so that next row is worked from WS. P 1 row from WS while at the same time dec 14-14-18 (14) sts evenly = 34-38-38 (42) sts. On next row work eyelet holes as follows from RS: K 1, *K 2 tog, 1 YO *, repeat from *-* and finish with K 1. P 1 row from WS. Now slip the outermost 12-13-13 (15) sts in each side on a stitch holder. Work 4 - 4½ - 5½ (6½) cm in stocking st over the middle 10-12-12 (12) sts. Slip sts from stitch holders back on needle and knit up 10-11-13 (16) sts on each side of mid piece = 54-60-64 (74) sts on needle. K every row over all sts for 3-4-5 (5) cm while at the same time after 1½ - 2 - 2½ (3) cm, dec on every other row as follows until completed: Dec 1 st at the beg and the end of row and K 2 tog on each side of the 2 mid sts. Cast off and sew tog mid under foot and continue up mid back in front loop of outermost sts to avoid a chunky seam. Knit another slipper the same way. TIES: Cut 3 threads light yellow of approx. 1 metres, twine them tightly tog, fold them double and they will twine again, tie a knot in each end. Thread tie up and down through the eyelet holes on slipper. CROCHET BORDER: Crochet a border at the top of slipper on hook size 2 mm with light yellow as follows: 1 dc in first st, * 3 ch, 1 tr in 1st ch, skip approx. ½ cm, 1 dc in next st *, repeat from *-* and finish with 1 sl st in dc from beg of round. |
|
 |
|
Have you finished this pattern?Tag your pictures with #dropspattern #buttercupset or submit them to the #dropsfan gallery. Do you need help with this pattern?You'll find 21 tutorial videos, a Comments/Questions area and more by visiting the pattern on garnstudio.com. © 1982-2026 DROPS Design A/S. We reserve all rights. This document, including all its sub-sections, has copyrights. Read more about what you can do with our patterns at the bottom of each pattern on our site. |
|


With over 40 years in knitting and crochet design, DROPS Design offers one of the most extensive collections of free patterns on the internet - translated to 17 languages. As of today we count 324 catalogues and 12245 patterns translated into English (UK/cm). 12245
We work hard to bring you the best knitting and crochet have to offer, inspiration and advice as well as great quality yarns at incredible prices! Would you like to use our patterns for other than personal use? You can read what you are allowed to do in the Copyright text at the bottom of all our patterns. Happy crafting!
Post a comment to pattern DROPS Baby 21-1
We would love to hear what you have to say about this pattern!
If you want to leave a question, please make sure you select the correct category in the form below, to speed up the answering process. Required fields are marked *.