
Popular categories
Looking for a yarn?


Comments / Questions (427)
![]() Aileen wrote:
Aileen wrote:
Hallo liebes Drops-Team Ich bin gerade mit der Abnahme für die Ärmel beschäftigt und die Erklärung ist für mich nicht schlüssig was die Kettmaschen betrifft. Und wann muss ich abdrehen? Danke für die Antwort Grüße von Aileen
23.02.2015 - 13:23DROPS Design answered:
Wenn Sie am Anfang der R Maschen abnehmen wollen, häkeln Sie für die M, die Sie abnehmen möchten, Kett-Maschen. Diese sind ja besonders flach und fallen daher nicht ins Gewicht. Dann häkeln Sie die angegebene Zahl M und lassen am Ende der R einfach die Anzahl Maschen aus, die Sie abnehmen möchten, d.h. Sie wenden dann einfach vorher. Am Ende der R müssen Sie also keine Kett-M häkeln, das machen Sie immer nur am R-Anfang, damit der Faden nicht dauernd neu angesetzt werden muss.
06.03.2015 - 10:11
![]() Petra Lindberg wrote:
Petra Lindberg wrote:
Hej! Ska man börja med "avmaskning" på vänster framstycke eller ska man börja varvet med 4 lm och sen dubbelstolpar till slutet av raden och där göra första avmaskningen. Eller ska första varvet bestå av 79 dst + 2 ökade? Och var börjar man på höger framstycke? Upp mot halsen på "avig-sidan"? Tack på förhand!
19.02.2015 - 07:12
![]() Laura wrote:
Laura wrote:
Liebes Drops-Team, ich habe eine Frage zur 3.Runde: Wie ist die Gesamt-Maschen Zahl dieser Runde? Wenn ich es ausrechne komme ich auf 49 M (wenn man von 24 fm ausgeht. Und dann hätte ich noch gerne gewusst, ob jede Masche der vorherigen Reihe bedient wird, d.h. jeweils eine fm in die M der vorherigen Reihe und dazwischen jeweils LM? Oder heißt es, man häkelt eine fm in eine M der vorherigen Reihe, lässt dann eine M aus und macht stattdessen eine LM? Danke für Eure Hilfe!!!
18.02.2015 - 11:27DROPS Design answered:
Ja, Sie müssten insgesamt auf 49 M kommen, mit den Lm zwischen den fM und der Anfangs-Lm. In welche M der Vor-R gehäkelt wird, ist immer in der Anleitung beschrieben, wenn Sie sich daran halten, sollte es klappen. In der 2. Rd häkeln Sie z.B. in jede feste M, durch die 2 Lm wird keine fM übersprungen. In der 3. Rd häkeln Sie nur um die Lm-Bögen, d.h. Sie häkeln um die 2 Lm der 2. Rd 1 fM + 1 Lm + 1 fM + 1 Lm. In das Stb der 2. Rd wird nicht gehäkelt.
22.02.2015 - 21:58
![]() Monique Graulus wrote:
Monique Graulus wrote:
Hoi, heb voor dit leuke vest de cirkel klaar. Heb dan voor maat s/m toer 13 gemaakt. Is het de bedoeling dat de 30 lossen zijn om je arm door te steken ? Lijkt me toch klein ?
17.02.2015 - 12:26DROPS Design answered:
Hoi Monique. De ene kant van het armsgat is de 30 l, je hebt ook de st aan de andere kant van de lossen (de 27 dbl-stk overgeslagen).
17.02.2015 - 14:17
![]() Lia wrote:
Lia wrote:
Beste Drops Ben nu klaar met haken tot toer 22 maar het werk is maar 33cm i.p.v. 37. Kan ik nu doorhaken tot 37 cm. zonder te meerderen? Kan ik het werk dubbelvouwen om mv. te vinden? Vriendelijk bedankt Lia
17.01.2015 - 21:40
![]() Septfondesetoiles wrote:
Septfondesetoiles wrote:
Bonjour! j'ai terminé la 1ere manche et commence les diminutions mais j'ai un souci de compréhension. selon les explications diminutions 2 (arrondi des manches) , le rendu fait des diminutions en escalier et non en arrondi. cela ne semble pas cohérent. je suis bloquée et ne trouve pas de réponse sur le forum; pouvez-vous m'aider svp??? merci!
16.01.2015 - 19:08DROPS Design answered:
Bonjour Septfondesetoiles, les diminutions pour l'arrondi de la manche sont ainsi faites, et on les assemble ensuite le long des emmanchures - épinglez avant si vous préférez pour bien placer les manches. Bon crochet!
19.01.2015 - 09:51
![]() Lia Reijnen wrote:
Lia Reijnen wrote:
IK ben met dit leuke patroon bezig maar er staat in toer 17 dat je 6 dubbele stokjes in totaal moet meerderen ,moet dat ook over de kop van de mouw de 36 lossen .ik heb op deze toer ook 36 dubbele stokje gehaakt in totaal heb ik 222 dubbele stokjes. Moet je dus alleen meerderen over de 56 en 94 dubbele stokjes? Groetje Lia
13.01.2015 - 23:47DROPS Design answered:
Hoi Lia. Je meerdert 6 dubbele stokjes in totaal over alle stokjes op de toer - dus ook over de stokjes van de mouw.
14.01.2015 - 15:07
![]() Cheryl wrote:
Cheryl wrote:
The Drops store told me to contact you for adjustments to the pattern.
09.01.2015 - 20:30
![]() Cheryl wrote:
Cheryl wrote:
I am asking you how to adjust the pattern?
09.01.2015 - 16:06DROPS Design answered:
Dear Cheryl. I am sorry, but we don't make individual adjustments on the free patterns. This is a mistake by the store.
23.01.2015 - 16:17
![]() Cheryl Fialko wrote:
Cheryl Fialko wrote:
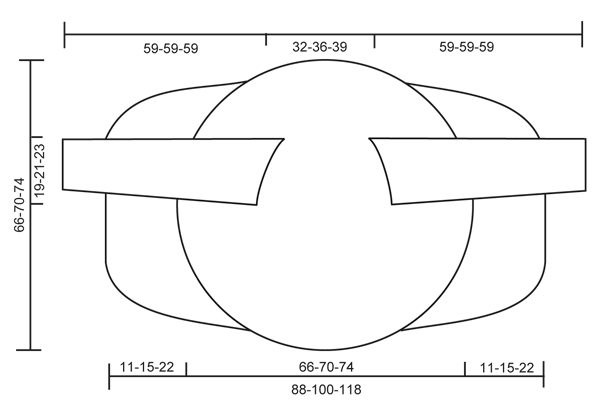
I crocheted the small, but it is very big on me. I used about 12.5 skeins. I am 5'3" and 118 lbs. my finished measurements are in line with your diagram. I would like to make this smaller. Where the sleeve joins at the shoulder is 2 inches down my arm rather than at the top of my shoulder on both sides. Hopefully this makes sense and your can tell me where to adjust. Thank you!
07.01.2015 - 21:34DROPS Design answered:
Dear Mrs Fialko, you are welcome to adjust the pattern to your own measurement, calculate where you rather get the sleeve to adjust armholes. Your DROPS store may help you if you need further assistance. Happy crocheting!
08.01.2015 - 10:02
|
|
Wild Flower#wildflowercardigan |
|
 |
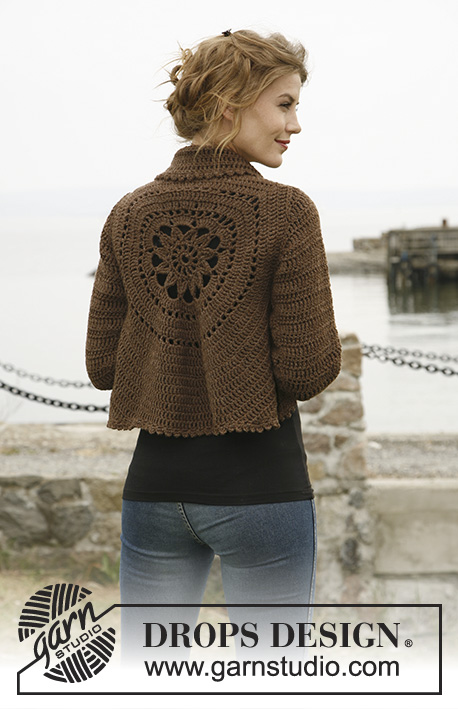 |
Crochet DROPS jacket worked in a circle in ”Nepal”. Size: S to XXXL
DROPS 132-2 |
|
|
CROCHET TIP: Replace first dtr on every round/row with 4 ch. DECREASE TIP 1 (applies to the body): Dec as follows: Work dtr until 3 dtr remain, * in the first of these work 1 tr, in the next 1 htr and in the last 1 dc, turn with 1 ch, skip dc, work 1 sl st in htr and 1 sl st in tr, then 1 dc in first dtr, 1 htr in next dtr and 1 tr in next dtr, work dtr until 3 dtr remain at end of row *, repeat from *-* until a total of 6-8-12 rows have been worked. DECREASE TIP 2 (applies to sleeve cap): Dec at beg of row by working sl st over the no of dtr to be dec. Dec at end of row by working until same no of sts to be dec remains, turn piece. -------------------------------------------------------- -------------------------------------------------------- BODY: Worked in the round in a circle from mid back. Crochet 8 ch on hook size 5 mm with Nepal and form a ring with 1 sl st in first ch. ROUND 1: Work 12 dc in ch-ring, finish with 1 sl st in first dc. ROUND 2: 5 ch (= 1 tr + 2 ch), * 1 tr in next dc, 2 ch *, repeat from *-* the entire round and finish with 1 sl st in 3rd ch from beg of round = 12 tr with 2 ch between each. ROUND 3: 1 ch, continue to crochet as follows in every ch-loop the entire round: 1 dc + 1 ch + 1 dc + 1 ch, finish round with 1 sl st in first ch = 24 dc with 1 ch between each. ROUND 4: 1 sl st in first dc, 1 sl st in first ch, 5 ch, 1 triple tr in same ch, * 7 ch, then work 4 triple tr tog as follows: Work 2 triple tr in same ch as last triple tr but wait with last YO and pull through on both triple tr, skip 1 dc + 1 ch + 1 dc, work 1 triple tr in next ch but wait with last YO and pull through, then work last triple tr in same ch and pull last YO through all 5 sts on hook *, repeat from *-* a total of 11 times, 7 ch, work 2 triple tr tog in same ch (but wait with last YO and pull through on both), work 1 sl st in 5th ch from beg of round and pull thread through all 3 sts on hook. ROUND 5: 1 sl st in first ch-loop, 4 ch (= 1 dtr), 7 dtr in same ch-loop, then work 8 dtr in every ch-loop, finish with 1 sl st in 4th ch from beg of round = a total of 96 dtr. ROUND 6: 5 ch (= 1 tr + 2 ch), * skip 1 dtr, 1 tr in next dtr, 2 ch *, repeat from *-* the entire round and finish with 1 sl st in 3rd ch from beg of round = 48 ch-loops. ROUND 7 – READ CROCHET TIP: Work 1 dtr in every tr and work 1 and 2 dtr alternately in every ch-loop the entire round = 120 dtr. ROUND 8: Work 1 dtr in every dtr but work 2 dtr in every 10th dtr = 132 dtr. ROUND 9: 5 ch (= 1 tr + 2 ch), * skip 1 dtr, 1 tr in next dtr, 2 ch *, repeat from *-* the entire round and finish with 1 sl st in 3rd ch from beg of round = 66 ch-loops. ROUND 10: Work 1 dtr in every tr and work 1 and 2 dtr alternately in every ch-loop the entire round = 165 dtr. ROUND 11: Work 1 dtr in every dtr but work 2 dtr in every 15th dtr = 176 dtr. ROUND 12: Work 1 dtr in every dtr but work 2 dtr in every 16th dtr = 187 dtr. Piece measures approx. 20 cm from centre and outwards. SIZE S/M: ROUND 13: 1 ch, then work 1 dc in each of the first 45 dtr (= up towards neck), work 30 loose ch, skip the next 27 dtr (= armhole), then work 1 dc in each of the next 88 dtr (= down towards back), work 30 loose ch, skip the next 27 dtr (= armhole) and fasten with 1 sl st in first dc on round. ROUND 14: Work 1 dtr in every dc - but inc 2 dtr evenly over the first 45 dc (= 47 dtr), then work 30 dtr in ch-row over armhole, work 1 dtr in every dc – but inc 3 dtr evenly over the bottom 88 dc (= 91 dtr), and work 30 dtr in ch-row over armhole = 198 dtr. ROUND 15 to 19: Continue with dtr – while at the same time inc 6 dtr evenly on every round. After 19th round there are 228 dtr on the round and piece measures approx. 33 cm from centre and outwards. Continue working only over 79 dtr in each side – i.e. do not work over 35 dtr at top by neck or 35 dtr at bottom of back. Continue with explanation under FRONT PIECE. SIZE L/XL: ROUND 13: Work 1 dtr in every dtr but work 2 dtr in every 17th dtr = 198 dtr. ROUND 14: 1 ch, then work 1 dc in each of the first 50 dtr (= up towards neck), work 32 loose ch, skip the next 29 dtr (= armhole), then work 1 dc in each of the next 90 dtr (= down towards back), work 32 loose ch, skip the next 29 dtr (= armhole) and fasten with 1 sl st in first dc on round. ROUND 15: Work 1 dtr in every dc - but inc 3 dtr evenly over the first 50 dc (= 53 dtr), then work 32 dtr in ch-row over armhole, work 1 dtr in every dc – but inc 3 dtr evenly over the bottom 90 dc (= 93 dtr), and work 32 dtr in ch-row over armhole = 210 dtr. ROUND 16 to 20: Continue with dtr – while at the same time inc 6 dtr evenly on every round. After 20th round there are 240 dtr on the round and piece measures approx. 35 cm from centre and outwards. Continue working only over 81 dtr in each side – i.e. do not work over 39 dtr at top by neck or 39 dtr at bottom of back. Continue with explanation under FRONT PIECE. SIZE XXL and XXXL: ROUND 13: Work 1 dtr in every dtr but work 2 dtr in every 17th dtr = 198 dtr. ROUND 14: Work 1 dtr in every dtr but work 2 dtr in every 18th dtr = 209 dtr. ROUND 15: 1 ch, then work 1 dc in each of the first 54 dtr (= up towards neck), work 36 loose ch, skip the next 32 dtr (= armhole), then work 1 dc in each of the next 91 dtr (= down towards back), work 36 loose ch, skip the next 32 dtr (= armhole) and fasten with 1 sl st in first dc on round. ROUND 16: Work 1 dtr in every dc - but inc 2 dtr evenly over the first 54 dc (= 56 dtr), then work 36 dtr in ch-row over armhole, work 1 dtr in every dc – but inc 3 dtr evenly over the bottom 91 dc (= 94 dtr), and work 36 dtr in ch-row over armhole = 222 dtr. ROUND 17 to 22: Continue with dtr – while at the same time inc 6 dtr evenly on every round. After 22nd round there are 258 dtr on the round and piece measures approx. 37 cm from centre and outwards. Continue working only over 89 dtr in each side – i.e. do not work over 40 dtr at top by neck or 40 dtr at bottom of back. Continue with explanation under FRONT PIECE. LEFT FRONT PIECE - ALL SIZES: = 79-81-89 dtr. Insert a marker after 23-24-27 sts in from each side (= 33-33-35 sts between markers). Then work dtr back and forth over these sts while at the same time inc 1 st at every marker on every row (i.e. inc 2 sts on row, inc alternately before and after marker) and dec 3 sts at beg and end of every row in each side – SEE DECREASE TIP 1 until a total of 6-8-12 rows back and forth have been worked. RIGHT FRONT PIECE: Work same way as on left piece over 79-81-89 dtr in right side. SLEEVE (worked sleeve back and forth): Work 46-48-53 loose ch (incl 4 ch to turn with) on hook size 5 mm with Nepal. ROW 1: 1 dtr in 5th ch from hook, 1 dtr in each of the next 2-4-2 ch, * skip 1 ch, 1 dtr in each of the next 6 ch *, repeat from *-* until 4 ch remain, skip 1 ch and work 1 dtr in each of the last 3 ch = 37-39-43 dtr. ROW 2: 1 dtr in every dtr – READ CROCHET TIP! ROW 3: 6 ch (= 1 dtr + 2 ch), skip 1 dtr, 1 dtr in next dtr, * 2 ch, skip 1 dtr, 1 dtr in next dtr *, repeat from *-* the entire row = 18-19-21 ch-loops. ROW 4: Work 1 dtr in every dtr and 1 dtr in every ch-loop = 37-39-43 dtr. Repeat row 2-4 a total of 3 times. Piece measures approx. 18 cm. Then work dtr on all rows until finished measurements, while at the same time inc as follows: SIZE S/M: * Inc 1 dtr in one side by working 2 dtr in next to last dtr. On next row inc 1 dtr in the other side the same way. Inc 1 more time the same way in each side, then work 1 row without inc *, repeat from *-* a total of 3 times = 12 inc = 49 dtr. SIZE L/XL + XXL/XXXL: * Inc 1 dtr in one side by working 2 dtr in next to last dtr. On next row inc 1 dtr in the other side the same way *, repeat from *-* a total of 8 times = 16 inc = 55-59 dtr. ALL SIZES: Continue to work until piece measures 49 cm in all sizes. Now dec on every row in each side for sleeve cap – SEE DECREASE TIP 2: 3 dtr 1 time, 2 dtr 3 times and 3 dtr 1 time = 25-31-35 dtr remain at the top. Cut the thread. ASSEMBLY: Sew sleeve seams tog edge to edge to avoid a chunky seam. Work 1 round around the entire body and at bottom of sleeves as follows: * 5 ch, 1 tr in first ch, skip 1 st, fasten with 1 dc in next st *, repeat from *-* the entire round and finish with 1 sl st in first ch. Sew in the sleeves. If desired, close the jacket with a pin or sew on a button on to left front piece (try the jacket on to see where button should be) and button it in crochet border. |
|
 |
|
Have you finished this pattern?Tag your pictures with #dropspattern #wildflowercardigan or submit them to the #dropsfan gallery. Do you need help with this pattern?You'll find 9 tutorial videos, a Comments/Questions area and more by visiting the pattern on garnstudio.com. © 1982-2026 DROPS Design A/S. We reserve all rights. This document, including all its sub-sections, has copyrights. Read more about what you can do with our patterns at the bottom of each pattern on our site. |
|


With over 40 years in knitting and crochet design, DROPS Design offers one of the most extensive collections of free patterns on the internet - translated to 17 languages. As of today we count 324 catalogues and 12260 patterns translated into English (UK/cm). 12260
We work hard to bring you the best knitting and crochet have to offer, inspiration and advice as well as great quality yarns at incredible prices! Would you like to use our patterns for other than personal use? You can read what you are allowed to do in the Copyright text at the bottom of all our patterns. Happy crafting!
Post a comment to pattern DROPS 132-2
We would love to hear what you have to say about this pattern!
If you want to leave a question, please make sure you select the correct category in the form below, to speed up the answering process. Required fields are marked *.