
Popular categories
Looking for a yarn?


Comments / Questions (22)
![]() Vanessa wrote:
Vanessa wrote:
Can u explain what is mean by "the edge behind the thumb" in round 1 of the thumb instructions?
30.07.2014 - 23:31DROPS Design answered:
Dear Vanessa, the edge behind the thumb is the ch worked on the mitten when making hole for thumb. Happy crocheting!
31.07.2014 - 10:05
![]() Pam wrote:
Pam wrote:
I'm stumped by the last two rows of the mitten. It says to ROUND 2: work 2 dc tog across the round = 9-10 st. ROUND 3: 1 sc in each dc AT THE SAME TIME work 2 sc tog across the round. Cut the thread, pull it through remaining sts, tighten tog and fasten. It's the 'across' part I don't get. Does that mean to actually work both sides at the same time; across? Otherwise I would think it would say 'around.' Help!
01.12.2013 - 03:40DROPS Design answered:
Dear Pam, on last round mitten, you will dec all the round working alls tog 2 by 2 around. Happy crocheting!
01.12.2013 - 21:20
![]() Sofia wrote:
Sofia wrote:
Hej! Jag har problem med stickfastheten. 16 stolpar (st) blir 10 cm på bredden men inte på höjden? Redan efter 6 v mäter det 9,5 cm. Hur gör jag nu? Mindre virknål fubkar inte heller, då stämmer det inte på bredden.
30.10.2013 - 23:15DROPS Design answered:
Om inte ½ nummer mindre virknål fungerar men du är nöjd med strukturen, så får du följa måttet i höjden enligt beskrivningen och det blir då inte lika många varv att virka.
01.11.2013 - 09:12
![]() Leena wrote:
Leena wrote:
Hei, mistä tämä mallivirkkauksen ohje löytyy? En löytänyt numerolla 126-22 tai X-362 mitään ohjeita sivuilta. Enkö vain osannut etsiä oikeasta paikasta vai mistä on kyse?
23.09.2013 - 18:43DROPS Design answered:
Ohje on julkaistu sivuillamme. Löydät sen klikkaamalla lehden 126 mallia 22.
24.09.2013 - 16:00
![]() Trixie wrote:
Trixie wrote:
Har kommet til tomlen og forstår ingenting. Noen som forstår problemet vi ikke forstår? Mine forvirrede tanker: - Man øker først 2m pr runde til enten 9 eller 11 flere masker som skal være tommel... altså.- Neste omgang hekler man... 1kjm i de første 6 eller 7 stavene, og så staver rundt... og så 1lm og 1kjm i 3.luftmaske.. Den 3.luftmaska er jo etter de 6-7 fastmaskene.... og da blir jo det området dratt sammen med 1lm som gjør tommelhullet rimelig trangt.
04.08.2013 - 21:25DROPS Design answered:
Luftmasken er inden for tommelfingerkilen og der bør være masker nok til at de skal nå rundt om tommelfingeren. Hækl gerne en ekstra luftm hvis du føler at det er nødvendigt :)
15.11.2013 - 09:27
![]() Tonje wrote:
Tonje wrote:
Jeg lurer veldig det med hekleinfo-1 helt på førsten; hvor man skal erstatte 1. halvstav med 2 lm.. vil det si at man skal starte første halvstav i maske nr 2. At man hopper over første maske pga luftmaskene?
12.02.2013 - 14:34DROPS Design answered:
Nej, du skal bare begynde med at haekle 2 lm i stedet for 1 halvstav. Du starter med 2 lm da een halvstav ville traekke arbejdet skaevt.
14.02.2013 - 11:44
![]() Kyla wrote:
Kyla wrote:
Hi I was wondering at what intervals should you dc2tog to keep the 30 stitches around the start of the mitten?
22.01.2013 - 07:25DROPS Design answered:
Dear Kyla, if you got 33 sts on previous row, repeat 9 dc, 2 dc tog a total of 3 times = 30 sts. Happy crocheting!
22.01.2013 - 09:53
![]() Janne wrote:
Janne wrote:
Hei. Jeg lurer på om det er mulig å bruke denne oppskriften til toving bare jeg velger ett annet garn? Må jeg legge opp mange ekstra masker i såfall?
10.12.2012 - 21:34DROPS Design answered:
Hvis du vil tove dette mönster, da skal du beregne mönster paa nyt og det antal masker du skal bruge. Se i vores tovingskole (Tips & Hjelp) og hekle först en pröve som du tover og kan se resultatet.
11.12.2012 - 14:09Audrey wrote:
Pour la mouffle, au départ ils dise de faire des bride, en meme temps de diminuer 27-30.... doit ton diminuer de 3 bride sur les 3 rang au total ou 3 bride sur chacun des 3 rang, en fait toute la section diminuer et augmenter est floue pour moi, merci de m'aider
10.11.2012 - 01:00DROPS Design answered:
Bonjour Audrey, au 1er rang de la moufle, on a 30-33 ms environ. On continue ensuite en brides en répartissant des diminutions sur le 1er rang de brides pour avoir un total de 27-30 brides. On fait ainsi 3 rangs de brides au total puis on augmente. Bon crochet !
10.11.2012 - 09:31MONICA wrote:
Can you please explain how to crochet the rib-structure? Thank you very much.
17.09.2012 - 21:21DROPS Design answered:
In the pattern it says: work first row as follows: 1 hdc in 3rd ch from hook, 1 hdc in each of the next 11 ch = 13 hdc, turn piece. See CROCHET INFO-1. Continue with 1 hdc in each hdc but work each hdc in the back loop of st (in.e. not through the whole st) = rib-structure. Check out our video's for the hdc's.
18.09.2012 - 14:36
|
|
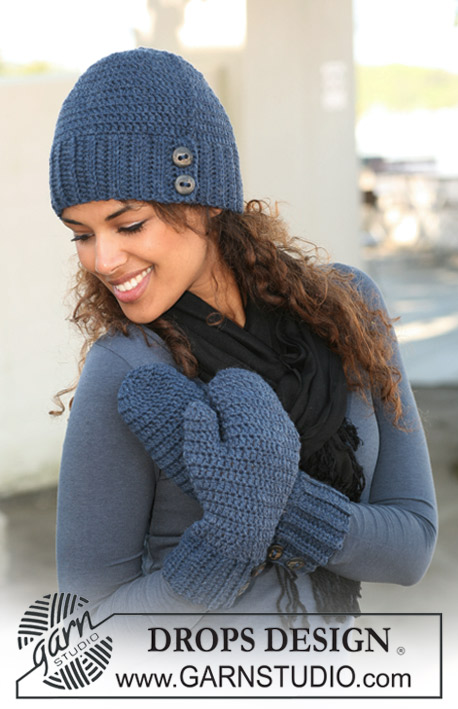
Winter Classic Mittens#winterclassicmittens |
|
|
|
|
Crochet DROPS mittens in ”Alaska” eller "Nepal"
DROPS 126-22 |
|
|
CROCHET INFO-1: Replace first htr on row with 2 ch, finish row with 1 htr in 2nd ch from beg of previous row. CROCHET INFO-2: Replace first tr on round with 3 ch and finish round with 1 sl st in 3rd ch from beg of round. Replace first dc on round with 1 ch and finish round with 1 sl st in ch from beg of round. CROCHET TR TOG: Work 1 tr, but wait with the last pull-through (= 2 sts on hook), work next tr, but when doing the last pull-through pull thread through all sts on hook = 1 dec tr. CROCHET DC TOG: Work 1 dc, but wait with the last pull-through, work next dc and pull thread through both sts on hook. -------------------------------------------------------- MITTEN: Crochet the cuffs first back and forth in rib-structure, then form a ring, pick up new sts round the ring and crochet the mitten in the round towards the fingertips. CUFF: Work 14 ch with crochet hook size 4 mm with Alaska or Nepal and work first row as follows: 1 htr in 3rd ch from hook, 1 htr in each of the next 11 ch = 13 htr, turn piece. See CROCHET INFO-1. Continue with 1 htr in each htr but work each htr in the back loop of st (in.e. not through the whole st) = rib-structure. When piece measures 20-22 cm make 2 buttonholes as follows: work 3 htr, 2 ch, skip 2 sts, 3 htr, 2 ch, skip 2 sts, 1 htr in each of the last 3 sts, turn piece. Work 1 htr in each htr and 2 htr in each ch-loop = 13 htr, cut and fasten thread. Insert a marker in the middle of the edge of cuff. MITTEN: Slip the cuff tog to a ring with the 2 rows on the side with buttonholes sitting over the 2 rows the opposite side = buttonhole split. See CROCHET INFO-2. Beg by marker and crochet alternately 1 and 2 dc in each row all the way round – NOTE: by buttonhole split crochet through both layers = approx 30-33 dc. Continue with 1 tr in each st, AT THE SAME TIME adjust no of sts to 27-30 tr by crochet 2 tr tog with regular intervals – see above. AT THE SAME TIME after 3 rounds with tr inc 1 tr for thumb each side of first st on round - inc 1 tr by working 2 tr in the same st. Repeat the inc each side of this st on every round a total of 4-5 times = 35-40 tr on round (thumb sts = 9-11 tr). Work next round as follows: 1 sl st in each of the 6-7 first tr on beg of round, 3 ch (= 1 tr), then 1 tr in each of the next 25-28 tr, 1 ch and finish with 1 sl st in 3rd ch from beg of round = 26-29 tr and 1 ch on round. On next round work 1 tr in each tr and 1 tr in ch at the end of round = 27-30 tr. Continue with tr in the round until mitten measures 17-20 cm from cuff (3 cm remain, try mitten on for correct measurements). Continue as follows: ROUND 1: 1 tr in each tr AT THE SAME TIME work every 2nd and 3rd tr tog = 18-20 tr. ROUND 2: work 2 tr tog across the round = 9-10 st. ROUND 3: 1 dc in each tr AT THE SAME TIME work 2 dc tog across the round. Cut the thread, pull it through remaining sts, tighten tog and fasten. THUMB: Round 1: Crochet 1 sl st in the first of the 9-11 thumb sts, 3 ch (= 1 tr), then 1 tr in each of the 8-10 tr, then 6 tr in the edge behind thumb, AT THE SAME TIME work these 6 tr tog 2 by 2 – see above = 12-14 tr. Round 2 + 3: 1 tr in each tr = 12-14 tr. Approx 1 cm now remain – try mitten on for right measurement, if needed work an extra round here. NEXT ROUND: Work 2 tr tog all the way round = 6-7 tr. LAST ROUND: Work 2 tr tog all the way round. Cut the thread, pull through remaining sts, tighten and fasten. Crochet the other mitten in the same way, but mirrored, i.e. make buttonhole split the opposite side and inc for thumb each side of the last st on round instead of the first. Sew on buttons. |
|
Have you finished this pattern?Tag your pictures with #dropspattern #winterclassicmittens or submit them to the #dropsfan gallery. Do you need help with this pattern?You'll find 10 tutorial videos, a Comments/Questions area and more by visiting the pattern on garnstudio.com. © 1982-2026 DROPS Design A/S. We reserve all rights. This document, including all its sub-sections, has copyrights. Read more about what you can do with our patterns at the bottom of each pattern on our site. |


With over 40 years in knitting and crochet design, DROPS Design offers one of the most extensive collections of free patterns on the internet - translated to 17 languages. As of today we count 325 catalogues and 12298 patterns translated into English (UK/cm). 12298
We work hard to bring you the best knitting and crochet have to offer, inspiration and advice as well as great quality yarns at incredible prices! Would you like to use our patterns for other than personal use? You can read what you are allowed to do in the Copyright text at the bottom of all our patterns. Happy crafting!
Post a comment to pattern DROPS 126-22
We would love to hear what you have to say about this pattern!
If you want to leave a question, please make sure you select the correct category in the form below, to speed up the answering process. Required fields are marked *.