
Popular categories
Looking for a yarn?


Comments / Questions (35)
![]() Sharon Hunt wrote:
Sharon Hunt wrote:
Hello How do I decrease 3 stitches?
15.11.2023 - 11:23DROPS Design answered:
Dear Mrs Hunt, could you please tell us which are the 3 stitches you need to decrease, which piece and the size you are working? Thanks for your comprehension.
16.11.2023 - 09:13
![]() Sharon Hunt wrote:
Sharon Hunt wrote:
Hi, Thanks for responding. Will do two swatches yes. 3 more questions.🤔 do I work the armholes up to the shoulder and then join before I do the front section, is M1 the pattern used for the upper front? Also, am doing size xxl which cast on 122 sts and then decrease to 121. I would like to keep the edge stitches throughout the body as am going to unravel to make a seam. My question 🙋 is do I still have to decrease the one stitch as instructed in the pattern. Thanks 🙏 Sharon
28.10.2023 - 10:13DROPS Design answered:
Dear Sharon, the stitch decreased is so that the chart will fit correctly (which needs an odd number) coming from the rib, which requires an even number of stitches. So you need to decrease that stitch. To work in the round, you can work up until the armhole in the round and then work the front piece and back piece separately. Finally, you will sew the shoulders. M.1 is used for the whole front piece, but it's not used in the back piece. Happy knitting!
29.10.2023 - 22:51
![]() Sharon Hunt wrote:
Sharon Hunt wrote:
I preparing to make this sweater. Am doing the swatch in the round because I would like to knit it in the round up to the armholes. Reading instructions for the shoulders am having second thought. My question if this is doable or should I do this back and forth? Thanks for your response. Sharon
27.10.2023 - 22:36DROPS Design answered:
Dear Mrs Hunt, if your tension might be different when working in the round and when working in rows, then you might have to make 2 swatches: one in the round and another one in rows as you will work in rows after dividing for armholes. Happy knitting!
28.10.2023 - 09:09
![]() Brita wrote:
Brita wrote:
Det går åt mer garn än vad som står i beskrivningen!
04.02.2023 - 00:02
![]() Malluainen wrote:
Malluainen wrote:
Ihmettelen: Miksi kirjoitetussa ohjeessa on eri senttimetrit kuin kuvallisessa ohjeessa? Siis esim. helmasta kainaloon eroa on tosi paljon. Kirjallisessa ohjeessa aletaan kavennukset kainalossa 47cm kohdalla, mutta kuvallisessa ohjeessa kyseinen kohta on 72cm! Outoa?
09.03.2022 - 10:13DROPS Design answered:
Hei, 72 cm on koko puseron pituus. Kainalon silmukat päätetään, kun työn pituus on 47 cm.
09.03.2022 - 16:45
![]() Bachelet wrote:
Bachelet wrote:
Très original vraiment j'adore
07.03.2021 - 09:58
![]() Jessica Poty wrote:
Jessica Poty wrote:
Bonjour je suis en train de faire la taille L j'aurais une question pour les manches il faut rabattre 1×4 mailles, 3×3mailles, 2×2 mailles, 4×1 maille puis il y a marqué 2mailles jusqu'à 58 cm ça veut dire 1× 2 mailles ou plusieurs fois jusqu'à 58cm? Avant 1×3 mailles et rabattre les mailles restantes? Du coup il reste combien de mailles à la fin ? Merci pour votre réponse bonne journée
30.11.2019 - 09:44DROPS Design answered:
Bonjour Mme Poty, en taille L, vous rabattez ensuite 2 m en début de rang de chaque côté jusqu'à ce que la manche mesure 58 cm (en fonction de votre tension en hauteur, le nombre de mailles rabattues peut varier, veillez à bien avoir rabattu autant de mailles sur l'endroit que sur l'envers), puis 1 x 3 m de chaque côté pour terminer. Le nombre de mailles restant n'est pas indiqué car il dépend du nombre de fois que vous aurez rabattu 2 m de chaque côté jusqu'à la bonne hauteur, la hauteur est ici bien plus importante que le nombre de mailles. Bon tricot!
02.12.2019 - 08:52
![]() Johanna wrote:
Johanna wrote:
Ik wil dit patroon gaan breien in Lima. Kan ik deze op een rondbreinaald breien om dikke zijnaden te voorkomen?
07.12.2018 - 11:46DROPS Design answered:
Dag Johanna,
Jazeker, dat kan! Je zet dan de steken van het voor- en achterpand beide op de rondbreinaald (zonder de kantsteken). De mouwen zul je nog wel in de panden moeten naaien. Voor het in elkaar naaien zou je ook een restant van een dunnere draad in dezelfde kleur kunnen gebruiken, zodat de naad iets minder dik wordt.
09.12.2018 - 17:00Ann Litchfield wrote:
Not understanding the Neck Opening part of the pattern, you have 125 sts for the Large size, bind off the center 17sts which would leave you 108sts. It states for the first side knit 42 sts but you will have 54 left on each side!!! Just don't add up?
23.10.2018 - 06:40DROPS Design answered:
Dear Mrs Lichtfield, you have 125 sts for the front piece, then bind off for armholes 12 sts on each side = 125-24= 101 sts remain, slip the middle 17 sts on a thread for neck = 84 sts / 2 sides = 42 sts for each shoulder and bind off a total of 9 sts for neck = 33 sts remain for each shoulder. Happy knitting!
23.10.2018 - 10:06
![]() Eva Olsson wrote:
Eva Olsson wrote:
Kanske en länk från "Barn" vore bra!
22.10.2017 - 16:34
|
|||||||
Granite Ridge |
|||||||
|
|
|||||||
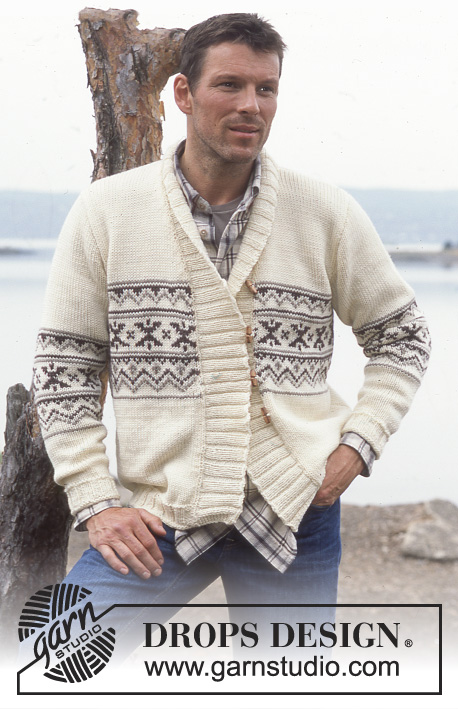
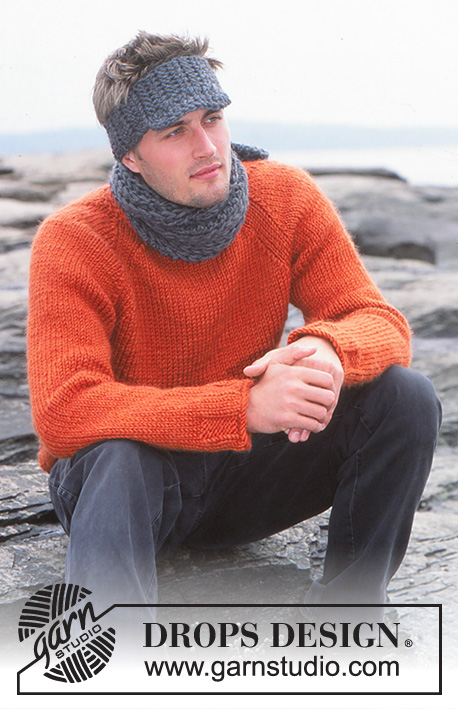
Knitted sweater or vest / slipover for men, in DROPS Karisma
DROPS 85-16 |
|||||||
|
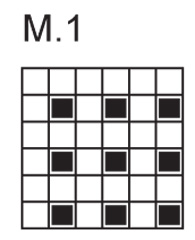
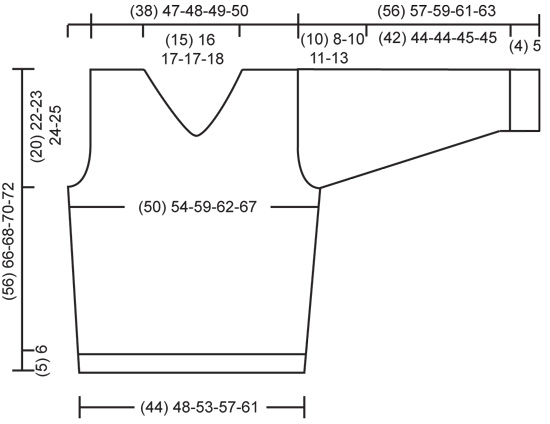
Gauge: 21 sts x 28 rows on larger needles in stockinette st = 10 x 10 cm. Rib: *K 1, P 2*, repeat from *-*. Pattern: See the chart below. The pattern is seen from the right side. Decreasing tips (for armhole on vest): All decs are made on the right side. Dec inside 7 sts knit as follows from edge (seen from the right side): K 1 (edge st knit in garter st), K 1, P 2, K 1 and P 2. Dec 1 st as follows: After 7 edge sts: Sl 1 as if to knit, K 1, psso. Before 7 edge sts: K 2 tog. FRONT Cast on 95-104-113-122-131 sts on smaller needles. P 3 rows (row 1 = wrong side), then knit rib, keeping 1 edge st at each side in garter st (see instructions above). When the piece measures 5-6-6-6-6 cm – adjust so that the next row is a right side row – K 2 rows, adjusting (inc/dec) to 95-103-113-121-131 sts on the first row. Change to larger needles and continue as follows: K 1 (edge st knit in garter st), 25-28-32-36-40 sts stockinette st, Pattern 1 over the following 43-45-47-47-49 sts, 25-28-32-36-40 sts stockinette st and K 1 (edge st knit in garter st). When the piece measures 10 cm inc 1 st at each side every 4-5-5-5-5 cm a total of 6 times = 107-115-125-133-143 sts. Read the entire section before knitting: Armhole (Vest): When the piece measures 34-42-43-44-45 cm knit as follows over the outermost 13 sts at each side (as seen from the right side): K 1 (edge st knit in garter st), *K 1, P 2*, repeat from *-* a total of 4 times (knit the remaining sts as before). When the piece measures 36-44-45-46-47 cm bind off the outermost 6 sts at each side for armhole. Continue to dec 1 st at each armhole every other row 8-2-6-9-13 times – see Decreasing tips above. Armhole (Pullover): When the piece measures 36-44-45-46-47 cm bind off for armhole at each side every other row: 3 sts 1 time, 2 sts 3-1-2-4-5 times and 1 st 5-3-5-4-6 times. Neck opening: At the same time when the piece measures 36-44-44-46-46 cm bind off the center 17 sts for the neck opening. Knit each side separately. 1st side: = (31) 41-42-43-44 sts. Continue with stockinette st and Pattern 1 over the 13-14-15-15-16 sts at the center front. When the piece measures 45-53-55-56-57 cm dec 1 st at neck edge every 4 rows 7-8-9-9-10 times. After all armhole and neck shaping is complete 24-33-33-34-34 sts remain on shoulder. Continue with stockinette st and pattern (for Vest: and 7 sts rib at armhole). Bind off when the piece measures 56-66-68-70-72 cm. 2nd side: Knit the same as the 1st, reversing all shaping. BACK: Cast on and knit the same as the front, but do not knit Pattern 1. Bind off for armhole as on front = 79-99-101-103-105 sts. When the piece measures 54-64-66-68-70 cm bind off the center 27-29-31-31-33 sts for the neck. Then dec 1 st at each neck edge every other row 2 times = 24-33-33-34-34 sts remain on each shoulder. Bind off when the piece measures 56-66-68-70-72 cm. SLEEVES(Pullover): Cast on 47-50-50-53-53 sts on smaller needles. P 3 rows (row 1 = wrong side), then knit rib, keeping 1 edge st at each side – see instructions above. When the piece measures 4-5-5-5-5 cm – adjust so that the next row is a right side row – K 2 rows. Change to larger needles and stockinette st. When the piece measures 9-13-9-9-13 cm inc 1 st at each side every 2.5-2-2-2-1.5 cm a total of 15-17-20-20-23 times = 77-84-90-93-99 sts. When sleeve measures 46-49-49-50-50 cm bind off for sleeve cap at each side every other row: 4 sts 1 time, 3 sts 2-3-3-3-3 times, 2 sts 1-1-2-2-2 times and 1 st 7-2-4-5-8 times, then bind off 2 sts at each side until the piece measures 55-56-58-60-62 cm, then bind off 3 sts at each side 1 time. Bind off the remaining sts, the piece measures approx. 56-57-59-61-63 cm. Assembly: Sew shoulder seams. Collar: Starting at the left side of the 17 bound-off sts at center front, pick up approx. 127-163 sts (divisible by 3 + 1) on smaller circular needles around the neck, ending at the right side of the 17 bound off sts. Knit back and forth on needles as follows: K 1 row from wrong side, casting on 1 new sts at each side (= edge st) = 129-165 sts. Then knit as follows (seen from the right side): K 1 (edge st knit in garter st), K 1, *P 2, K 1*, repeat from *-* and finish with K 1 (edge st knit in garter st). Put a marker in the 23-23-26-26-29th st in from each side (= K 1 as seen from the right side). When neckband measures 3.5 cm inc the P 2 at each side of sts with markers to P 3 = 133-169 sts. K 2 rows over all sts and bind off. Sew neckband at center front up to the markers – sew edge to edge from right side with small sts. Sew neckband edges to the 17 bound off sts. Pullover: Sew in sleeves. Sew sleeve and side seams using edge sts as a seam allowance. Vest: Sew side seams using edge sts as seam allowance. |
|||||||
Diagram explanations |
|||||||
|
|||||||
 |
|||||||
 |
|||||||
Have you finished this pattern?Tag your pictures with #dropspattern or submit them to the #dropsfan gallery. Do you need help with this pattern?You'll find 19 tutorial videos, a Comments/Questions area and more by visiting the pattern on garnstudio.com. © 1982-2026 DROPS Design A/S. We reserve all rights. This document, including all its sub-sections, has copyrights. Read more about what you can do with our patterns at the bottom of each pattern on our site. |
|||||||


With over 40 years in knitting and crochet design, DROPS Design offers one of the most extensive collections of free patterns on the internet - translated to 17 languages. As of today we count 325 catalogues and 12298 patterns translated into English (UK/cm). 12298
We work hard to bring you the best knitting and crochet have to offer, inspiration and advice as well as great quality yarns at incredible prices! Would you like to use our patterns for other than personal use? You can read what you are allowed to do in the Copyright text at the bottom of all our patterns. Happy crafting!
Post a comment to pattern DROPS 85-16
We would love to hear what you have to say about this pattern!
If you want to leave a question, please make sure you select the correct category in the form below, to speed up the answering process. Required fields are marked *.