
Looking for a yarn?


Comments / Questions (27)
![]() Kerstin wrote:
Kerstin wrote:
Hallo zusammen, ich habe schon direkt am Anfang ein Problem. Ich stricke Größe S und habe 100 Maschen angeschlagen. Nach der ersten Runde in rechts geht es nun weiter mit dem Rippenmuster der Halsblende. Ich komme aber insgesamt nur auf 96 Maschen, die beschrieben werden. Heißt, nach dem zweiten Mal 30 Maschen im A1-Muster habe ich statt 10 noch 14 Maschen übrig. Wo ist der Fehler? Viele Grüße, Kerstin
11.02.2024 - 16:28DROPS Design answered:
Liebe Kerstin, so stricken Sie diese 100 Maschen: (2 Maschen rechts / 2 Maschen links) über die ersten 8 Maschen, (Markierungsfaden), A.1 über die nächsten 30 Maschen, die ersten 2 Maschen von A.1, (Markierungsfaden), ( 2 Maschen links / 2 Maschen rechts) über die nächsten 16 Maschen, 2 Maschen links, (Markierungsfaden), A.1 über die nächsten 30 Maschen, die ersten 2 Maschen von A.1, ( Markierungsfaden) , ( 2 Maschen links / 2 Maschen rechts) über die letzten 10 Maschen = 8+(30+2)+(16+2)+(30+2)+10= 100 Maschen. Viel Spaß beim stricken!
12.02.2024 - 08:57
![]() Sabine Woelk wrote:
Sabine Woelk wrote:
Danke für diese schöne Anleitung. Der Pulli läßt sich gut stricken. Ich habe ein Problem beim befestigen der Ärmel. Verstehe ich es richtig, dass ich die Kanten der Ärmel an die 10 zusätzlichen Maschen am Rumpfteil nähen soll? Vielen Dank
29.01.2024 - 17:32DROPS Design answered:
Liebe Frau Woelk, die Ärmelblenden werden nicht zusammengenäht, einfach weiter gestrickt und abgekettet, das ist ein Fehler in die deutsche Anleitung, sorry. Viel Spaß beim stricken!
30.01.2024 - 07:55
![]() Emilie wrote:
Emilie wrote:
Er der kropsmål der afgør, hvilken størrelse man skal vælge?
27.01.2024 - 10:07DROPS Design answered:
Hej Emilie, ja, du finder måleskitsen på blusen nederst i opskriften, vælg størrelsen med de mål som passer dig. Vil du have hjælp med at læse måleskitsen, har vi en lavet en god lektion so du finder nederst i opskriften :)
02.02.2024 - 12:22
![]() Tina Mikkelsen wrote:
Tina Mikkelsen wrote:
Er det meningen at ærmekanten bare skal hænge løs?
01.09.2023 - 02:13DROPS Design answered:
Hej Tina. Ja, men du kan syet den sammen om du ønsker det. mvh DROPS Design
08.09.2023 - 15:26
![]() Ria Edam-Dekker wrote:
Ria Edam-Dekker wrote:
Moeten de mouwranden nog aan het voor- of achterland vastgenaaid worden? Het zijn nu van die losse flapjes!
26.07.2023 - 11:34
![]() Gitte wrote:
Gitte wrote:
Skal der samles masker op til ærmer, i de 10 masker der blev slået op?
09.07.2023 - 19:06DROPS Design answered:
Hei Gitte. Ermene strikkes frem og tilbake over det maskeantallet det er i den str. du strikker, men det burde ha vært en forklaring på hvordan ermene og de maskene som ble lagt opp under ermene skal sys sammen. Oppskriften er videresendt til Design avd. slik at de kan skrive en avsluttning på hvordan. mvh DROPS Design
24.07.2023 - 13:24
![]() Géraldine wrote:
Géraldine wrote:
Re-bonjour, J'ai finalement compris mon erreur, c'est 10x8 + 1x4 ( et pas 21 !!!). Merci pour votre site où je trouve de nombreux modèles très jolis et gratuits ! Grâce à vous, je tricote en rond et j'adore ! Bien cordialement
17.06.2023 - 22:46
![]() Géraldine wrote:
Géraldine wrote:
Bonjour, Je ne comprends pas pourquoi après les augmentations du raglan on arrive à 204 mailles (taille S) et pas 284 mailles (120+10×8+21×4). Est-ce que quelqu'un peut m'aider ? Merci d'avance.
17.06.2023 - 21:52DROPS Design answered:
Bonjour Géraldine, on augmente effectivement 10 x 8 m (4 m pour le devant + 4 m pour le dos), on va ainsi avoir: 120 + 80 = 200 mailles; on augmente ensuite 1 seule maille, 1 fois en taille S soit 4 mailles au total (2 m pour le devant, 2 pour le dos) - on a ainsi bien 204 mailles. Et vous avez ainsi augmenté au total 21 mailles au début + 21 m à la fin du devant et du dos. Bon tricot!
19.06.2023 - 08:51
![]() Liv Marit Thomassen wrote:
Liv Marit Thomassen wrote:
Jeg striker str med 114 m. 12-33-20-33-10. Dette blir kun 108m.
02.06.2023 - 08:14
![]() Lorenza wrote:
Lorenza wrote:
É possibile avere le istruzioni senza usare i ferri circolari? Sarebbe un gran regalo per me. Grazie
14.03.2023 - 18:03DROPS Design answered:
Buonasera Lorenza, questo modello è stato progettato per essere lavorato in tondo: ci sono diversi tutorial gratuiti sul nostro sito per imparare a lavorare con in tondo. Buon lavoro!
14.03.2023 - 20:49
|
|||||||||||||||||||
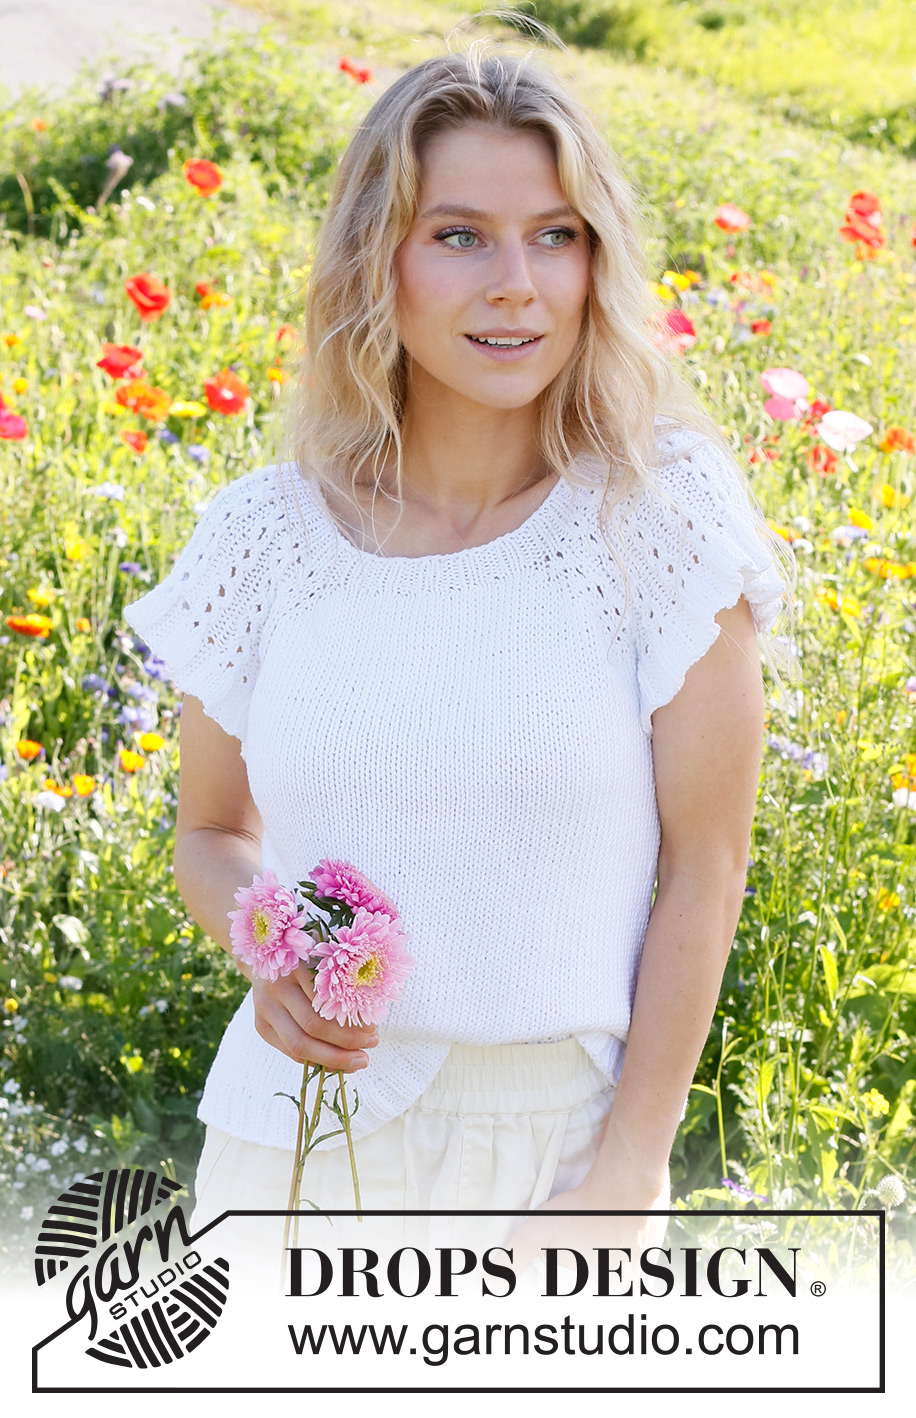
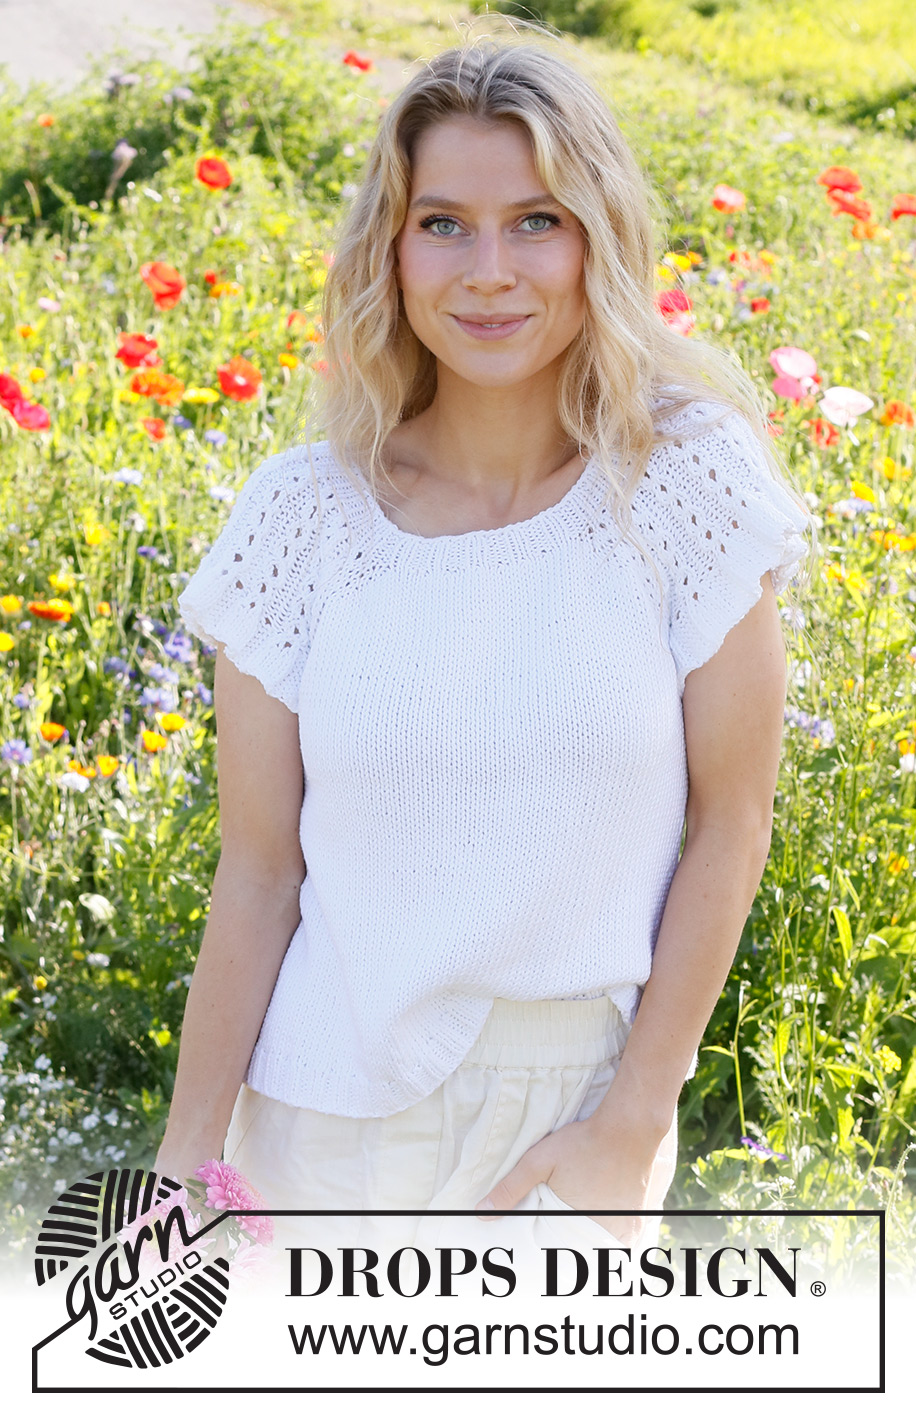
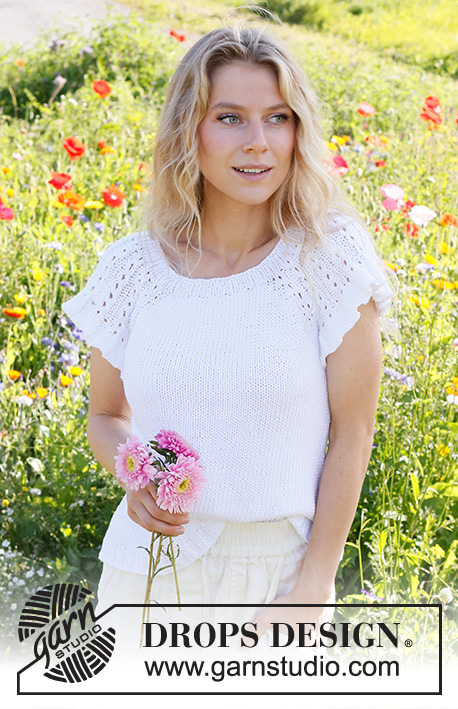
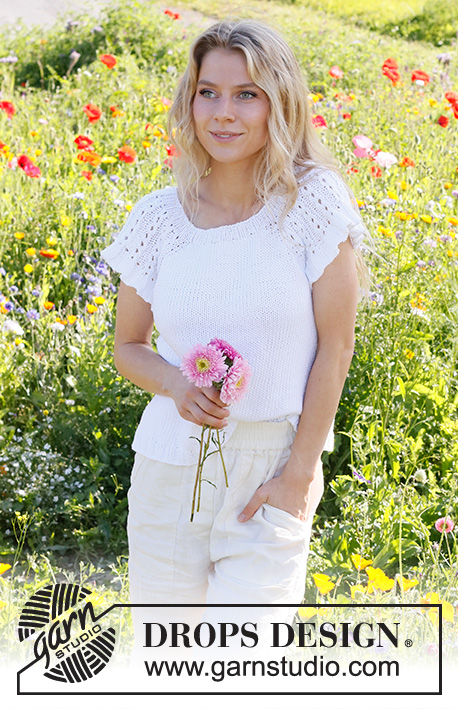
White Roses Top#whiterosestop |
|||||||||||||||||||
 |
 |
||||||||||||||||||
Knitted top in DROPS Paris. Piece is knitted top down with raglan, cables and flounce on sleeves. Size: S - XXXL
DROPS 231-25 |
|||||||||||||||||||
|
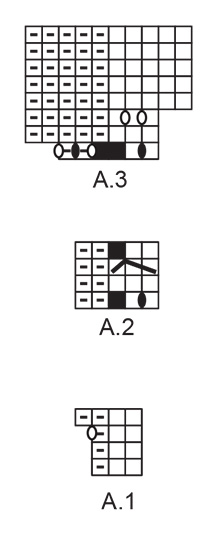
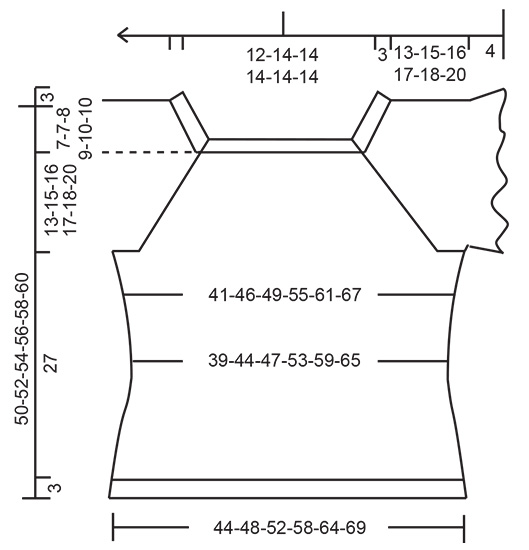
---------------------------------------------------------- EXPLANATION FOR THE PATTERN: ---------------------------------------------------------- GARTER STITCH (worked in the round): 1 ridge vertically = 2 rounds, i.e. knit 1 round and purl 1 round. GARTER STITCH (back and forth): Knit all rows. 1 ridge vertically = knit 2 rows. PATTERN: See diagrams A.1 to A.3. Diagrams show all rows in pattern seen from the right side. RAGLAN: All increases are done on front and back piece (do not increase on sleeves). First increase 2 stitches towards every raglan on front and back piece (= 8 stitches increased on round), then increase 1 stitch towards every raglan on front and back piece (= 4 stitches increased on round). Increase 2 stitches before 1st and 3rd marker thread as follows: Work until 2 stitches remain before marker thread: Make 1 yarn over, knit 1, make 1 yarn over, knit 1, marker thread is here. Increase 2 stitches after 2nd and 4th marker thread as follows: Knit 1, make 1 yarn over, knit 1, make 1 yarn over. Increase 1 stitch before 1st and 3rd marker thread as follows: Work until 1 stitch remains before marker thread, make 1 yarn over, knit 1, marker thread is here. Increase 1 stitch after 2nd and 4th marker thread as follows: Knit 1, make 1 yarn over. On next round knit yarn overs twisted to avoid holes. Then work the new stitches in stocking stitch. DECREASE TIP: Decrease 1 stitch on each side of marker thread as follows: Work until 3 stitches remain before marker thread, knit 2 together, knit 2 stitches (marker thread is between these 2 stitches), slip 1 stitch knitwise, knit 1, pass slipped stitch over stitch worked (= 2 stitches decreased). INCREASE TIP-1 (applies to sides of body): Work until 2 stitches remain before marker thread, make 1 yarn over, knit 4 (marker thread is in the middle of these stitches), make 1 yarn over (= 2 stitches increased). Repeat in the other side (= 4 stitches increased on round). On next round knit yarn overs twisted to avoid holes. Then work the new stitches in stocking stitch. INCREASE TIP-2 (evenly): To calculate how to increase evenly, count the number of stitches to be increased (e.g. 148 stitches) and divide number by stitches of increases to be done (e.g. 28) = 5.2. In this example increase by making 1 yarn over after approx. every 5th stitch. On next round work yarn overs twisted to avoid holes. CAST-OFF TIP: To avoid a tight cast-off edge when casting off, you may use a larger needle. If this still is too tight make 1 yarn over after approx. every 4th stitch while casting off (cast off yarn overs as stitches). ---------------------------------------------------------- START THE PIECE HERE: ---------------------------------------------------------- TOP - SHORT OVERVIEW OF THE PIECE: Work neck edge and yoke in the round on circular needle from approx. mid back, top down. Now divide yoke for body and sleeves. Work the body in the round on circular needle. Work sleeve edges back and forth on circular needle. NECK EDGE: Cast on 100-108-114-120-126-126 stitches on circular needle size 4 mm with DROPS Paris. Knit 1 round. Now work rib as follows: Work (knit 2/purl 2) over the first 8-12-12-12-12-12 stitches, insert 1st marker thread here, work A.1 over the next 30-30-33-36-39-39 stitches, work the first 2 stitches in A.1, insert 2nd marker thread here, work (purl 2/knit 2) over the next 16-20-20-20-20-20 stitches, purl 2, insert 3rd marker thread here, work A.1 over the next 30-30-33-36-39-39 stitches, work the first 2 stitches in A.1, insert 4th marker thread here, work (purl 2/knit 2) over the last 10-10-10-10-10-10 stitches on round. Continue like this and repeat the first 2 rounds in A.1 until piece measures 3 cm. Work next round as follows: Work in stocking stitch until 1st marker thread, work 3rd round in A.1 until 2nd marker (= 10-10-11-12-13-13 stitches increased), work in stocking stitch until 3rd marker thread, work 3rd round in A.1 until 4th marker thread (= 10-10-11-12-13-13 stitches increased), work in stocking stitch the rest of round = 120-128-136-144-152-152 stitches. Work 1 more round with last round in A.1 and stocking stitch over the remaining stitches. Insert a marker at beginning of round mid back. Now measure piece from here. YOKE: Switch to circular needle size 5 mm. Now work pattern, at the same time increase for raglan. Read all of the following section before continuing. PATTERN: Work in stocking stitch until 1st marker thread, work A.2 over the next 40-40-44-48-52-52 stitches (= 10-10-11-12-13-13 repetitions), work the first 2 stitches in A.2, 2nd marker thread is here, work in stocking stitch until 3rd marker thread, work A.2 over the next 40-40-44-48-52-52 stitches (= 10-10-11-12-13-13 repetitions), work the first 2 stitches in A.2, 4th marker thread is here, work in stocking stitch the rest of round. REMEMBER THE KNITTING TENSION! RAGLAN: At the same time on first round begin increases for RAGLAN – read explanation above. Increase 2 stitches every other round 10-10-11-14-16-19 times in total, then increase 1 stitch every other round 1-3-3-2-2-1 times in total = 21-23-25-30-34-39 stitches increased in each side of front and back piece. When all increases for raglan are done, there are 204-220-236-264-288-308 stitches on round. Work until piece measures 13-15-16-17-18-20 cm from marker – adjust to finish after 3rd round in A.2 – i.e. next round to be worked is 4th round in A.2. Now divide piece for body and sleeve edges as follows (the outermost part of cables in each side are now worked on body): Work as before over the first 31-37-39-44-48-53 stitches (= approx. half back piece), slip the next 38-38-42-46-50-50 stitches on a thread for sleeve edge, cast on 6-6-8-8-10-10 new stitches on needle (= in the side under sleeve), work as before over the next 64-72-76-86-94-104 stitches (= front piece), slip the next 38-38-42-46-50-50 stitches on a thread for sleeve edge, cast on 6-6-8-8-10-10 new stitches on needle (= in the side under sleeve), and work as before over the next 33-35-37-42-46-51 stitches. Now finish body and sleeves separately. NOW MEASURE PIECE FROM HERE! BODY: = 140-156-168-188-208-228 stitches. Insert 1 marker thread in each side, in the middle of the new stitches cast-on under sleeve (= 3-3-4-4-5-5 new stitches on each side of marker thread). Move the marker threads upwards when working; they should be used for increase and decrease in the sides later. Work in stocking stitch with 6-6-8-8-10-10 stitches in GARTER STITCH – read explanation above, over the new stitches cast on under sleeve in each side. When 2 ridges have been worked over the 6-6-8-8-10-10 stitches in each side, work in stocking stitch over all stitches. When piece measures 4 cm from division, decrease 1 stitch on each side of marker threads - read DECREASE TIP. Decrease like this approx. every 4 cm 2 times in total = 132-148-160-180-200-220 stitches. When piece measures 14 cm from division, increase 1 stitch on each side of marker threads - read INCREASE TIP-1. Increase like this approx. every 3 cm 4 times in total = 148-164-176-196-216-236 stitches. Work until piece measures approx. 27 cm from division. Approx. 3 cm rib remain until finished measurements. Try the top and work to desired length before rib. To stop the rib from contracting increase 28-32-36-40-44-48 stitches evenly - read INCREASE TIP-2 = 176-196-212-236-260-284 stitches. Switch to circular needle size 4 mm. Work rib (knit 2/purl 2) in the round for 3 cm. Cast off with knit over knit and purl over purl - read CAST-OFF TIP. Top measures approx. 50-52-54-56-58-60 cm from shoulder and down. SLEEVE EDGE: Slip the 38-38-42-46-50-50 stitches from thread in one side on circular needle size 5 mm. Begin from wrong side and work as follows: 2 stitches in GARTER STITCH - read explanation above, work last row in A.2 as before until 2 stitches remain, work 2 stitches in garter stitch. Then work as follows from right side: Work 2 stitches in garter stitch, A.3 until 4 stitches remain on needle, work the first 2 stitches in A.3, 2 stitches in garter stitch. When all increases in A.3 are done, there are 89-89-99-109-119-119 stitches on row. Continue back and forth until A.3 has been worked. Cast off with knit over knit and purl over purl - remember CAST-OFF TIP. Work the other sleeve edge the same way. |
|||||||||||||||||||
Diagram explanations |
|||||||||||||||||||
|
|||||||||||||||||||
 |
|||||||||||||||||||
 |
|||||||||||||||||||
Have you finished this pattern?Tag your pictures with #dropspattern #whiterosestop or submit them to the #dropsfan gallery. Do you need help with this pattern?You'll find 29 tutorial videos, a Comments/Questions area and more by visiting the pattern on garnstudio.com. © 1982-2025 DROPS Design A/S. We reserve all rights. This document, including all its sub-sections, has copyrights. Read more about what you can do with our patterns at the bottom of each pattern on our site. |
|||||||||||||||||||


With over 40 years in knitting and crochet design, DROPS Design offers one of the most extensive collections of free patterns on the internet - translated to 17 languages. As of today we count 320 catalogues and 12094 patterns translated into English (UK/cm). 12094
We work hard to bring you the best knitting and crochet have to offer, inspiration and advice as well as great quality yarns at incredible prices! Would you like to use our patterns for other than personal use? You can read what you are allowed to do in the Copyright text at the bottom of all our patterns. Happy crafting!
Post a comment to pattern DROPS 231-25
We would love to hear what you have to say about this pattern!
If you want to leave a question, please make sure you select the correct category in the form below, to speed up the answering process. Required fields are marked *.