
Popular categories
Looking for a yarn?


Comments / Questions (28)
![]() Werner wrote:
Werner wrote:
Wie mache ich das im Rapport 1 randmasche und dann mit Rapport beginnen und 3.Reihe 1randmasche ,1blau ,Umschlag und 11 Maschen und dann wie weiter.?zum nächsten Rapport? Werden da auch noch 1masche ,1umschlag und 11maschen?
30.10.2023 - 09:48DROPS Design answered:
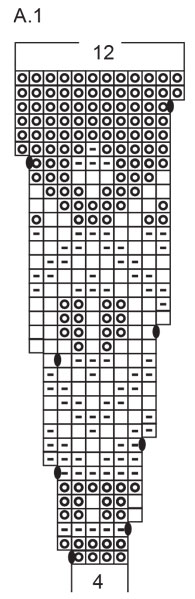
Liebe Frau Werner, A.1 lesen Sie von unten nach oben und das Diagram wird über 4 Maschen wiederholt, bei der 1. Reihe stricken Sie z.B. (4 Maschen Jeansblau, 1 Umschlag), dann wiederholen Sie von (bis) und dann stricken Sie die 1. Masche A.1. Wenn A.1 fertig ist, sind es 12 Maschen in jedem A.1. Viel Spaß beim stricken!
30.10.2023 - 18:00
![]() Sommerfeld wrote:
Sommerfeld wrote:
Ich stricke in XXXL diese Jacke wieviel muss ich nach dem oberen Bündchen zunehmen und nach welcher Masche ich verstehe das nicht \r\nAbketten verstehe ich ja noch und dann wie muss ich zunehmen\r\nUnd im Rapport wie muss ich da zunehmen?
27.10.2023 - 11:16DROPS Design answered:
Liebe Frau Sommerfeld, hier wird es erklärt wie man regelmäßig verteilt abnimmt, in diesem Video zeigen wir, wie so eine Halsblende strickt. Für die Passe wird es im Diagram A.1 zugenommen (mit Umschläge - siehe letztes Symbol). Viel Spaß beim stricken!
28.10.2023 - 08:19
![]() Corrie Schild wrote:
Corrie Schild wrote:
Bij de meerderingen in de mouw 38 + 8 = 44, dit klopt uiteraard niet,. 6 steken meerderen?
10.10.2023 - 18:46
![]() Eva Almstrand wrote:
Eva Almstrand wrote:
Då jag börjar med mönstret skall jag börja så som mönstret visar A1 eller skall jag justera så att det blir lika på början och slutet . Stickar storlek medium
25.09.2023 - 20:20
![]() Fay wrote:
Fay wrote:
Hallo Drops Design. I am 1,70 cm Height with 97cm chest circumference. Wich size is for me? Size M maybe?
27.09.2022 - 17:36DROPS Design answered:
Dear Fay, from your measurements, you would need to work size L. You can see in the chart below the pattern instructions the measurements of the jacket. Since size M has a 94 cm chest, it won't fit you, so you need to work the next size. Happy knitting!
02.10.2022 - 23:27
![]() Rebekka wrote:
Rebekka wrote:
Ich verstehe die Anweisungen beim Muster A1 bezüglich der Zunahme vor den letzten (zwei? ) Maschen nicht.
18.03.2022 - 14:05DROPS Design answered:
Liebe Rebekka, so strickekn Sie A.1: 1 Randmasche, dann wiederholen Sie A.1 (12 bis 17 Mal je nach der Grösse), jetzt stricken Sie die erste Masche in A.1 (so wird das Muster symmetrisch), und 1 Randmasche krausrechts. Wenn vor der 1. Masche 1 Umschlag gestrickt wird, stricken Sie diesen Umschlag am Ende der Reihe nichts. Viel Spaß beim stricken!
18.03.2022 - 15:45
![]() Inge wrote:
Inge wrote:
Ik wil graag dat jullie bij mijn opmerking van 12-12 over dit patroon mijn achternaam weghalen i.v.m. mijn privacy. Omdat ik geen mailadres kan vinden op jullie website, stuur ik deze opmerking. Graag deze opmerking NIET plaatsen, alleen mijn achternaam bij mijn eerdere opmerking weghalen of mijn totale eerdere opmerking van 12-12 weghalen zodat deze niet meer zichtbaar is. Ik vertrouw op jullie medewerking in deze. Vriendelijke groet, Inge
02.01.2022 - 13:35
![]() Inge wrote:
Inge wrote:
Ik wil graag dat jullie bij mijn opmerking van 12-12 over dit patroon mijn achternaam weghalen i.v.m. mijn privacy. Omdat ik geen mailadres kan vinden op jullie website, stuur ik deze opmerking. Graag deze opmerking NIET plaatsen, alleen mijn achternaam bij mijn eerdere opmerking weghalen of mijn totale eerdere opmerking van 12-12 weghalen zodat deze niet meer zichtbaar is. Ik vertrouw op jullie medewerking in deze. Vriendelijke groet, Inge
27.12.2021 - 11:55
![]() Hoffmann Annette wrote:
Hoffmann Annette wrote:
Meine Maschenprobe ist identisch!!! Vergleichen sie die Maschenzahl mit dem Sailor Blues Jacket, dann sehen sie den Unterschied. Die Aufnahmen in der Passe sind zu wenig. Ich habe bereits die Passe aufgetrennt, und habe bald keine Lust mehr, diese Wolle zu verarbeiten.
20.12.2021 - 13:58DROPS Design answered:
Liebe Frau Hoffmann, bei der Sailor Blues Jacket haben Sie mehr Maschen, stimmt, aber die Maßen sind auch unterschiedlich: 56 cm in M - und nur 47 cm für diese Jacke, deshalb sind es hier weniger Maschen, den Brustumfang ist auch kürzer. Diese Lektion kann Ihnen helfen, die passende Größe zu wählen. Viel Spaß beim stricken!
20.12.2021 - 14:53
![]() Annet Meijer wrote:
Annet Meijer wrote:
Kan dit patroon ook op 2 pennen gebreid worden?
19.12.2021 - 18:13DROPS Design answered:
Dag Annet,
Nee, dit patroon is niet geschikt voor op 2 naalden omdat de pas met het patroon er in in zijn geheel heen en weer gebreid wordt, van midden voor naar midden voor. Je hebt dan veel steken op de naald en dat past niet op rechte naalden.
20.12.2021 - 16:13
|
|||||||||||||
North Gate#northgatejacket |
|||||||||||||
 |
 |
||||||||||||
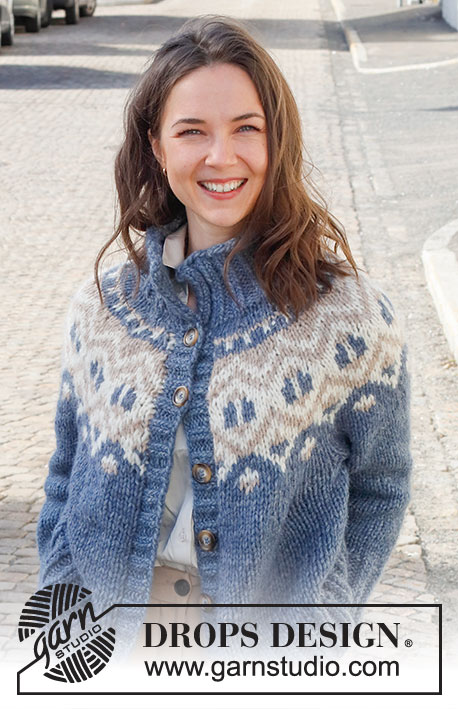
Knitted jacket in DROPS Wish. Piece is knitted top down with round yoke, multi-coloured pattern and high collar. Size: S - XXXL
DROPS 228-13 |
|||||||||||||
|
---------------------------------------------------------- EXPLANATION FOR THE PATTERN: ---------------------------------------------------------- GARTER STITCH (back and forth): Knit all rows. 1 ridge vertically = knit 2 rows. INCREASE/DECREASE TIP (evenly): To calculate how to increase/decrease evenly, use the total number of stitches increases/decreases are done over (e.g. 54 stitches) and divide by number of increases/decreases to be done (e.g. 5) = 10.8. In this example increase by making 1 yarn over after approx. every 11th stitch. Do not increase over edge stitches. On next row work yarn overs twisted to avoid holes. To decrease in this example knit every 10th and 11th stitch together. PATTERN: See diagram A.1. Work the entire pattern in stocking stitch. KNITTING TIP: To avoid the garment losing elasticity when working pattern, it is important not to tighten the strands on back side of piece. Switch to a higher needle number when working pattern if the pattern is somewhat tight. DECREASE TIP (applies to sleeves): Decrease 1 stitch on each side of marker thread as follows: Work until 3 stitches remain before marker thread, knit 2 together, knit 2 stitches (marker thread is between these 2 stitches), slip 1 stitch knitwise, knit 1, pass slipped stitch over stitch worked (= 2 stitches decreased). BUTTONHOLES: Decrease for 6-7-7-7-7-7 button holes on right front band. 1 buttonhole = work 2 stitches together, make 1 yarn over – NOTE: Decrease for buttonholes will look better by purling 2 together in a section with 2 purl stitches (seen from right side). On next row knit yarn over to make holes. Bottom buttonhole should be placed approx. 4-6 cm from bottom edge and top buttonhole approx. 1 cm from neck edge. Place the remaining 4-5-5-5-5-5 evenly between top and bottom hole. CAST-OFF TIP: To avoid a tight cast-off edge when casting off, you may use a larger needle. If this still is too tight make 1 yarn over after approx. every 6th stitch while casting off (cast off yarn overs as stitches). ---------------------------------------------------------- START THE PIECE HERE: ---------------------------------------------------------- JACKET - SHORT OVERVIEW OF THE PIECE: Work neck edge and yoke back and forth on circular needle from mid front, work top down. Cast off stitches for band and work the rest of yoke back and forth with 1 edge stitch in each side towards mid front. Now divide yoke for body and sleeves. Work body back and forth on circular needle from mid front, work top down. Work sleeves in the round on double pointed needles/short circular needle, top down. Then pick up band on front pieces. NECK EDGE: Cast on 60-64-64-68-68-72 stitches (including 5 band stitches in each side towards mid front) on circular needle size 7 mm with colour denim blue in DROPS Wish. Purl 1 row (= wrong side). Work next row as follows from right side: 1 edge stitch in GARTER STITCH – read explanation above - * knit 2 twisted, purl 2 *, work from *-* until 3 stitches remain, knit 2 twisted, and finish with 1 edge stitch in garter stitch. Work from wrong side as follows: 1 edge stitch in garter stitch, * purl 2 twisted, knit 2 *, repeat from *-* until 3 stitches remain on needle, purl 2 twisted, and finish with 1 edge stitch in garter stitch. Continue rib like this for 10 cm. When rib has been worked, work next row as follows from right side: Cast off the first 5 stitches (fasten band here later), knit the next 50-54-54-58-58-62 stitches, AT THE SAME TIME increase 1-1-5-5-13-13 stitches evenly - read INCREASE/DECREASE TIP, work rib as before over the next 4 stitches and finish with 1 edge stitch in garter stitch. Switch to circular needle size 8 mm. Turn piece, cast off the first 5 stitches, purl until 1 stitch remains on row (purl yarn overs twisted), and finish with 1 edge stitch in garter stitch = 51-55-59-63-71-75 stitches on needle. Insert 1 marker after edge stitch at beginning of row mid front, measure yoke from this marker! YOKE: Read KNITTING TIP and then work next row as follows from right side: 1 edge stitch in garter stitch, work A.1 until 2 stitches remain (= 12-13-14-15-17-18 repetitions of 4 stitches), work first stitch in A.1 (so that pattern begins and ends the same in each side towards mid front - NOTE! Do not increase as shown in diagrams before this stitch), and finish with 1 edge stitch in garter stitch. Continue pattern like this. Work edge stitches in same colour as first/last stitch in pattern. When A.1 has been worked one time vertically, there are 147-159-171-183-207-219 stitches on round. Then work piece in stocking stitch with colour denim blue. On next row adjust number of stitches to 146-158-178-186-206-222. When piece measures 25-25-25-27-29-31 cm, divide yoke for body and sleeves, i.e. work next row as follows: Work 22-24-27-28-32-35 stitches as before (= front piece), slip the next 30-32-36-38-40-42 stitches on 1 thread for sleeve, cast on 6-6-6-8-8-8 new stitches on row (= in the side under sleeve), work 42-46-52-54-62-68 stitches as before (= back piece), slip the next 30-32-36-38-40-42 stitches on 1 thread for sleeve, cast on 6-6-6-8-8-8 new stitches on row (= in the side under sleeve) and work the 22-24-27-28-32-35 stitches as before (= front piece). Finish body and sleeves separately. NOW MEASURE PIECE FROM HERE! BODY: = 98-106-118-126-142-154 stitches. Continue with colour denim blue, work in stocking stitch with 1 edge stitch in garter stitch in each side. Work until piece measures 15-17-19-19-19-19 cm. Knit 1 row from right side and increase AT THE SAME TIME 10-10-10-10-14-14 stitches evenly = 108-116-128-136-156-168 stitches. Increase stitches to avoid the rib from contracting. Switch to circular needle size 7 mm. Work first row as follows from wrong side: 1 edge stitch in garter stitch, * purl 2 twisted, knit 2 *, repeat from *-* until 3 stitches remain on needle, purl 2 twisted, and finish with 1 edge stitch in garter stitch. Work as follows from right side: 1 edge stitch in garter stitch, * knit 2 twisted, purl 2 *, repeat from *-* until 3 stitches remain on needle, knit 2 twisted, and finish with 1 edge stitch in garter stitch. Continue rib like this for 10 cm, cast off with garter stitch over garter stitch, knit over twisted knit and purl over purl - read CAST-OFF TIP. Jacket measures approx. 54-56-58-60-62-64 cm from shoulder. SLEEVES: Slip the 30-32-36-38-40-42 stitches from thread in one side on a short circular needle/double pointed needles size 8 mm and pick in addition up 1 stitch in each of the 6-6-6-8-8-8 stitches cast on in the side under sleeve stitch with colour denim blue = 36-38-42-46-48-50 stitches. Insert a marker thread in the middle of the new stitches (= 3-3-3-4-4-4 new stitches on each side of marker thread). Move the marker thread upwards when working; it should be used for decrease mid under sleeve. Begin at the marker thread, and work stocking stitch in the round. When sleeve measures 4 cm from division, decrease 1 stitch on each side of marker thread - read DECREASE TIP. Decrease like this approx. every 11-10-7-6-4-4 cm 3-3-4-4-5-5 times in total = 30-32-34-38-38-40 stitches. Work until sleeve measures 27-26-28-26-25-23 cm from division – or desired length (approx. 10 cm remain until finished measurements). Now increase 10-8-10-8-10-8 stitches evenly = 40-40-44-44-48-48 stitches. Switch to double pointed needles size 7 mm. Work rib (= knit 2 twisted/purl 2) for 10 cm. Cast off with knit over twisted knit and purl over purl – remember CAST-OFF TIP. Sleeve measures approx. 37-36-38-36-35-33 cm from division. Work the other sleeve the same way. RIGHT BAND: Pick up from right side along front piece inside 1 edge stitch in garter stitch approx. 68-80 stitches on circular needle size 7 mm with denim blue (number of stitches should be divisible by 4). Work first row as follows from wrong side: 1 edge stitch in garter stitch, * purl 2 twisted, knit 2 *, repeat from *-* until 3 stitches remain on needle, purl 2 twisted, and finish with 1 edge stitch in garter stitch. Work as follows from right side: 1 edge stitch in garter stitch, * knit 2 twisted, purl 2 *, repeat from *-* until 3 stitches remain on needle, knit 2 twisted, and finish with 1 edge stitch in garter stitch When piece measures approx. 2 cm, decrease for BUTTONHOLES - see explanation above. Continue until rib measures 4 cm, adjust so that band is the same width as the 5 stitches cast off on neck edge. Cast off with knit over knit and purl over purl - remember CAST-OFF TIP. LEFT BAND: Work the same way as right band but do not decrease for buttonholes. ASSEMBLY: Sew neck edge neatly to edge on bands with seam in towards wrong side. Sew the buttons on to the left band. |
|||||||||||||
Diagram explanations |
|||||||||||||
|
|||||||||||||
|
|||||||||||||

|
|||||||||||||
Have you finished this pattern?Tag your pictures with #dropspattern #northgatejacket or submit them to the #dropsfan gallery. Do you need help with this pattern?You'll find 36 tutorial videos, a Comments/Questions area and more by visiting the pattern on garnstudio.com. © 1982-2025 DROPS Design A/S. We reserve all rights. This document, including all its sub-sections, has copyrights. Read more about what you can do with our patterns at the bottom of each pattern on our site. |
|||||||||||||


With over 40 years in knitting and crochet design, DROPS Design offers one of the most extensive collections of free patterns on the internet - translated to 17 languages. As of today we count 314 catalogues and 11820 patterns translated into English (UK/cm). 11820
We work hard to bring you the best knitting and crochet have to offer, inspiration and advice as well as great quality yarns at incredible prices! Would you like to use our patterns for other than personal use? You can read what you are allowed to do in the Copyright text at the bottom of all our patterns. Happy crafting!
Post a comment to pattern DROPS 228-13
We would love to hear what you have to say about this pattern!
If you want to leave a question, please make sure you select the correct category in the form below, to speed up the answering process. Required fields are marked *.