


Komentarze / Pytania (77)
![]() Sharon Hunt napisała::
Sharon Hunt napisała::
Hi after working and completing the round with the misplaced stitch. The round above begins with knit st. Where as on my work the beg. starts with a purl. Thanks for your help with this problem. Not sure what am doing wrong.
10.03.2026 - 17:05Odpowiedź DROPS Design :
Dear Mrs Hunt, when displacing the round 1 st, this is done at the beginning of the round as this first stitch of the round will be worked together with the last stitch last repeat in the round; and as you work the last stitch each A.1 is worked together with the first stitch next A.1 = this stitch (the decrease), is now the first stitch next repeat, so the next round starts with the decrease, then P1, the round is displaced just there where there is the black square at the beg of the row, afterwards, you just start the rounds as before. Happy knitting!
11.03.2026 - 07:27
![]() Sharon Hunt napisała::
Sharon Hunt napisała::
Hi worked the increase from one to 2 stitches. Thinking back because it seems like this is a hole from the base of the stitch. Are the inc. sts knitted twisted. Thanks
09.03.2026 - 06:52Odpowiedź DROPS Design :
Hi Sharon, Yes, the yarn overs are worked twisted on the next round as described in the Increase Tip at the top of the pattern. Regards, Drops Team.
09.03.2026 - 06:58
![]() Lene napisała::
Lene napisała::
Har læst kommentarerne vedr. pind 23 og 24 og forstår at jeg skal strikke den sidste maske og den første maske som er taget løst af. Men nu er spørgsmålet så er denne maske nu den først på næste pind og ses som retmasken på pind 24? Og betyder det at vrangmaskerne stadigvæk skal følge hinanden ? Jeg strikker størrelse xxl
15.02.2026 - 10:08Odpowiedź DROPS Design :
Hei Lene. Ja, vrangmaskerne skal stadigvæk skal følge hinanden. Om du forstørrer bildet av toppen, ser du det også tydelig :) mvh DROPS Design
16.02.2026 - 11:07
![]() Christine napisała::
Christine napisała::
I hope you can assist. We do not have access to Drops Yarn in South Africa. I would like to knit this with a cotton/acrylic blend with a gauge of about 24sts on 4mm.....which size should I knit? On a lucky note, a friend brought me some Belle yarn and I am looking forward to trying the patterns using Belle.
02.11.2025 - 20:45
![]() Josette napisała::
Josette napisała::
In het telpatoon staan er maar vijf steken en in de beschrijving staat dat je zes steken moet breien, sorry dat versta ik niet, graag een antwoord groeten Josette
04.10.2025 - 16:17
![]() Diana Follett napisała::
Diana Follett napisała::
I could not find measurements for the sizes. Am I just overlooking them? Thank you and I love the patterns and can't wait to try your yarn.
29.09.2025 - 16:55Odpowiedź DROPS Design :
Hi Diana, There is a size chart at the bottom of the pattern, with all the measurements for the different sizes. Regards, Drops team.
30.09.2025 - 06:39
![]() Luhaib napisała::
Luhaib napisała::
I am not understanding this (on the first repeat of A.1, the round is displaced by 1 stitch as follows: Slip the first stitch onto the right needle without working it, then work A.1 in the round). Does it mean we do this slip stitch only on the first stitch at the beginning of the round or always when we reach the first stitch of the repeated round? I have worked this round with only the first stitch to be slipped then didn’t repeat it again but afterwards the stitches don’t align.
22.08.2025 - 19:00Odpowiedź DROPS Design :
Dear Mme Luhaib, this round should be displaced by 1 stitch as follows: slip the first stitch onto the right needle without working it, then work A.1 in the round, at the end of round knit the last stitch together with the first stitch in this round. You have to slip 1 stitch only once, at the beginning of the round. Happy knitting!
22.10.2025 - 09:57
![]() Luhaib napisała::
Luhaib napisała::
I didn’t quite understand the explanation for the stitch (work 3 stitches in stitch as follows: Knit the stitch but wait to drop the stitch off the needle, make 1 yarn over on right needle and knit the stitch 1 more time, then drop the stitches of the needle = 3 stitches (= 2 stitches increased). Is there a video tutorial for this stitch? Or a name for it I could search YouTube maybe?
17.08.2025 - 19:54Odpowiedź DROPS Design :
Hi Mrs Luhaib, please see the video HERE. Happy knitting!
17.08.2025 - 21:03
![]() Kathrin napisała::
Kathrin napisała::
Ich bin gerade dabei den Pulli von oben nach unten zu stricken. Das Muster A 1 habe ich nun bis zur 12 Runde gestrickt. In der letzten Reihe sind durch Umschläge nochmal 2 Maschen dazu gekommen. In der nächsten Runde tauchen diese nicht mehr auf und dafür am Rand jeweils 1 Masche mehr. Nehme ich am Anfang der Runde eine Masche zu komme ich trotzdem nicht auf eine Übereinstimmung der Runde vorher mit den Maschen in der neuen Runde. Und was ist mit den Umschlägen? Wie geht's weiter?
12.07.2025 - 22:17Odpowiedź DROPS Design :
Liebe Kathrin, denken Sie daran, eine Markierung zwischen jedem Rapport in der Breite einzusetzen, so können Sie jeweils die Maschenanzahl prüfen. Wenn Sie eine unterschiedliche Maschenanzahl in jedem A.1 haben, teilen Sie bitte gerne die gestrickte Größe, so können wir auch mal weiter schauen. Viel Spaß beim Stricken!
24.07.2025 - 14:14
![]() Michelle Dumas napisała::
Michelle Dumas napisała::
Désolée j’ai oublier de vous dire la grandeur , c’est xxl
22.04.2025 - 19:44
|
|||||||||||||||||||||||||||||||
Lavender Charm Top#lavendercharmtop |
|||||||||||||||||||||||||||||||
 |
 |
||||||||||||||||||||||||||||||
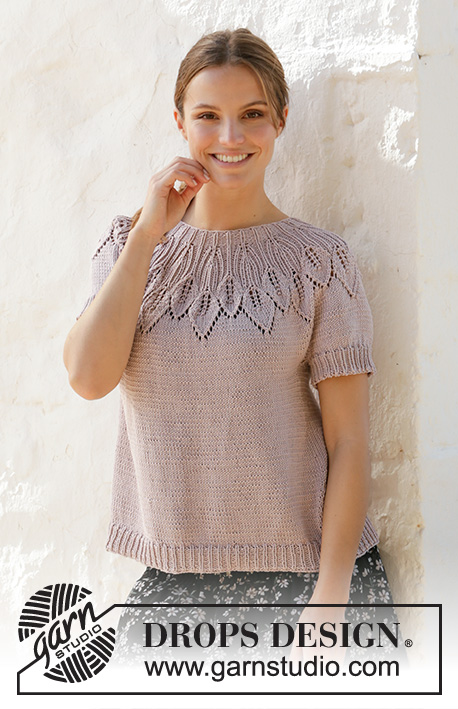
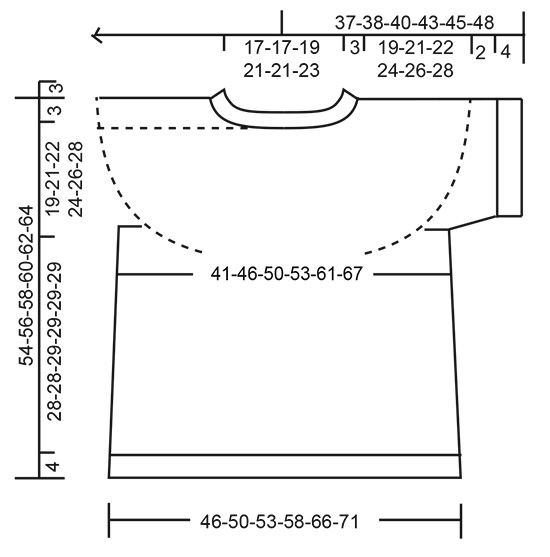
Top na drutach, przerabiany od góry do dołu z włóczki DROPS Muskat, z zaokrąglonym karczkiem, wzorem liści, ściegiem ażurowym. Od S do XXXL.
DROPS 213-22 |
|||||||||||||||||||||||||||||||
|
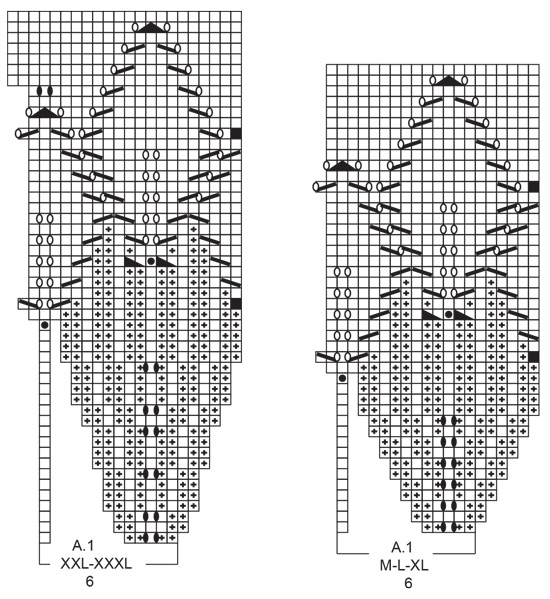
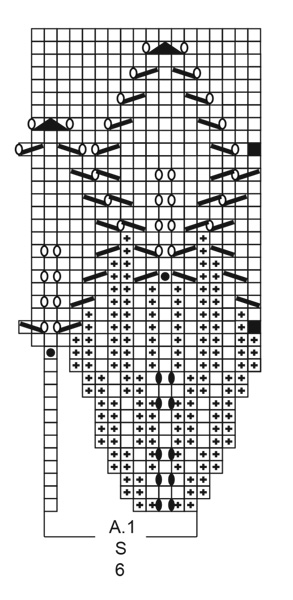
WYKORZYSTYWANE TECHNIKI: ------------------------------------------------------- ŚCIEG FANTAZYJNY: Patrz schemat A.1. Patrz schemat odpowiedni dla rozmiaru. DODAWANIE OCZEK (boki topu): Przerabiać aż zostaje 2 oczka przed nitką markerem, wykonać 1 narzut, przerobić 4 oczka prawe (nitka marker znajduje się między tymi 4 oczkami), wykonać 1 narzut. W następnym okrążeniu przerobić oczka przekręcone w miejscu narzutów na prawo, aby uniknąć dziur. Dalej przerabiać nowe oczka dżersejem. ZAMYKANIE OCZEK (rękawy): Zamknąć 1 oczko z każdej strony nitki markera następująco: przerabiać aż zostaje 3 oczka przed nitką markerem, przerobić 2 oczka razem na prawo, 2 oczka prawe (nitka marker znajduje się między tymi 2 oczkami), zdjąć 1 oczko jak do przerobienia na prawo, 1 oczko prawe i przełożyć oczko zdjęte nad przerobionym oczkiem. WSKAZÓWKA DO ZAMYKANIA OCZEK: Aby zamykane oczka nie ściągały robótki, do zamykania można użyć grubszych drutów. Jeżeli brzeg dalej jest zbyt ścisły, wykonać 1 narzut za ok. każdym 4-tym oczkiem i zamykać narzuty jak zwykłe oczka. ------------------------------------------------------- ROBÓTKĘ ROZPOCZYNAMY TUTAJ: ------------------------------------------------------- TOP – SKRÓCONY OPIS ROBÓTKI: Wykończenie dekoltu i karczek są przerabiane od góry do dołu, na okrągło na drutach z żyłką, zaczynając od środka tyłu. Następnie dzielimy karczek na tył/przód i obszycia rękawów i dalej przerabiamy tył/przód na okrągło na drutach z żyłką. Obszycia rękawów są przerabiane na okrągło na drutach pończoszniczych, od góry do dołu. WYKOŃCZENIE DEKOLTU: Na drutach z żyłką nr 3 nabrać 96-96-102-114-114-120 oczek włóczką Muskat. Przerobić 1 okrążenie na prawo. Przerabiać ściągaczem (= 2 oczka lewe / 1 oczko prawe). Gdy długość robótki wynosi 3 cm zacząć przerabiać na drutach z żyłką nr 4. Umieścić 1 marker na początku okrążenia, na środku tyłu; długość karczku będzie mierzona od tego markera! KARCZEK: Przerabiać schemat A.1 (= 6 oczek) na okrągło ponad wszystkimi oczkami (= 16-16-17-19-19-20 razy na szerokość). ZACHOWAĆ TAKIE SAMO NAPRĘŻENIE NICI JAK W PRZYPADKU PRÓBKI! Gdy schemat A.1 zostanie przerobiony 1 raz na wysokość jest 288-320-340-380-418-440 oczek, a długość robótki od markera wynosi ok. 14-16-16-16-18-18 cm. Przerabiać na okrągło, na prawo, aż długość robótki od markera wynosi 19-21-22-24-26-28 cm. Podzielić teraz robótkę na tył/przód i rękawy następująco: przerobić 40-45-49-53-60-65 pierwszych oczek (= połowa tyłu), zdjąć 63-69-72-84-89-90 następnych oczek na nitkę na brzeg/obszycie rękawa i nabrać 6-6-6-6-8-10 nowych oczek pod rękawem, przerobić 81-91-98-106-120-130 następnych oczek (= przód), zdjąć 63-69-72-84-89-90 następnych oczek na nitkę na brzeg/obszycie rękawa i nabrać 6-6-6-6-8-10 nowych oczek pod rękawem, przerobić 41-46-49-53-60-65 ostatnich oczek (= połowa tyłu). TYŁ & PRZÓD: = 174-194-208-224-256-280 oczek. Umieścić 1 nitkę marker na środku 6-6-6-6-8-10 oczek pod każdym rękawem (= boki topu). Jest 87-97-104-112-128-140 oczek między nitkami na przód i tył. Przesuwać nitki w miarę postępu robótki; wskazują miejsca, gdzie będą dodawane oczka na bokach. Przerabiać na prawo. Gdy długość robótki od jej podziału wynosi 4 cm, dodać 1 oczko z każdej strony 2 nitek markerów – patrz DODAWANIE OCZEK (= dodane 4 oczka). Dodawać tak samo w sumie 5-4-4-5-5-5 razy co 4 cm = 194-210-224-244-276-300 oczek. Gdy długość robótki od jej podziału wynosi 28-28-29-29-29-29 cm, równomiernie dodać 13-12-13-14-15-15 oczek = 207-222-237-258-291-315 oczek. Wziąć teraz druty z żyłką nr 3 i przerabiać ściągaczem (= 1 oczko prawe / 2 oczka lewe) przez 4 cm. Zamykać na prawo – patrz WSKAZÓWKA DO ZAMYKANIA OCZEK. Długość robótki od jej podziału wynosi 32-32-33-33-33-33 cm. OBSZYCIA RĘKAWÓW: Wziąć z powrotem 63-69-72-84-89-90 oczek z nitki z jednej strony robótki i przełożyć je na druty pończosznicze nr 4 oraz nabrać 1 oczko w każde z 6-6-6-6-8-10 oczek nabranych pod rękawem = 69-75-78-90-97-100 oczek. Przerabiać dżersejem na okrągło przez 2 cm. Dalej przerabiać na drutach pończoszniczych nr 3 ściągaczem (= 1 oczko prawe / 2 oczka lewe), W TYM SAMYM CZASIE w pierwszym okrążeniu zamykając 0-0-0-0-1-1 oczko = 69-75-78-90-96-99 oczek. Zakończyć, gdy wysokość ściągacza wynosi 4 cm, przerabiając oczka prawe na prawo, a oczka lewe na lewo. Obszycie drugiego rękawa wykonać w taki sam sposób. |
|||||||||||||||||||||||||||||||
Objaśnienia do schematu |
|||||||||||||||||||||||||||||||
|
|||||||||||||||||||||||||||||||
 |
|||||||||||||||||||||||||||||||
 |
|||||||||||||||||||||||||||||||
 |
|||||||||||||||||||||||||||||||
Skończyłaś ten wzór?Otaguj swoje zdjęcia #dropspattern #lavendercharmtop lub prześlij je do #dropsfan gallery. Potrzebujesz pomocy w związku z tym wzorem?Zobacz 27 instrukcje video, sekcję Komentarze/Pytania i jeszcze więcej, wchodząc na stronę wzoru na garnstudio.com © 1982-2026 DROPS Design A/S. Wszelkie prawa zastrzeżone. Ten dokument, w całości, jest chroniony prawem. Zobacz co możesz robić z naszymi wzorami na dole każdego wzoru na naszej stronie. |
|||||||||||||||||||||||||||||||


Posiadając 40 lat doświadczenia w projektowaniu wzorów na druty i szydełko, DROPS Design oferuje jedną z największych kolekcji bezpłatnych wzorów w internecie – przetłumaczonych na 17 języków. Obecnie jest dostępnych 324 katalogów i 12239 wzorów w języku polskim.
Dokładamy wszelkich starań, aby oferować Wam druty i szydełka, inspiracje, fachowe porady oraz doskonałej jakości włóczki w najlepszych cenach! Zamierzasz wykorzystać nasze wzory inaczej niż tylko do osobistego użytku? Przeczytaj jakie masz prawa w Copyright, który znajdziesz na końcu każdego wzoru. Miłej pracy!
Dodaj komentarz do modelu DROPS 213-22
Chcielibyśmy się dowiedzieć co masz do powiedzenia o tym wzorze!
Jeśli chcesz zadać pytanie i szybko uzyskać odpowiedź, upewnij się, że została wybrana właściwa kategoria w formularzu poniżej. Pola obowiązkowe są oznaczone *.