


Komentarze / Pytania (44)
![]() Margarita napisała::
Margarita napisała::
Moin, ich verstehe die Maschenprobe nicht richtig. Bedeutet 24 Maschen in der Breite auch, dass nur die rechten Maschen gezählt werden? Also i. Wirklichkeit 48 Maschen auf der Nadel sind und 10 cm ergeben?
23.07.2025 - 18:01Odpowiedź DROPS Design :
Liebe Margarita, die Maschenprobe soll 24 Maschen auf der Nadel 10 cm messen und 48 Reihen in der Höhe = 24 sichtbare rechte Maschen 10 cm messen. Viel Spaß beim Stricken!
24.07.2025 - 16:31
![]() Catharina napisała::
Catharina napisała::
Jeg strikkede nederdelen i uld i efteråret og har først lige færdigmontet den. Superflot og så lækker at have på. Vil nu strikke den i flere nuancer. 🤗
13.01.2025 - 20:13
![]() Ghita Forelius napisała::
Ghita Forelius napisała::
Förstår ej ur stickas varv A1
03.12.2024 - 15:33Odpowiedź DROPS Design :
Hej, du börjar nederst till höger i diagrammet och stickar första varvet så här: *2 aviga maskor tillsammans, 1 omslag, lyft 1 maska som om den skulle stickas avig*, upprepa *-* (= de tre rutorna i diagrammet) hela varvet runt. Fortsätt sedan med följande varv i diagrammet (läs diagrammet från höger till vänster).
03.12.2024 - 18:18
![]() Cecilie napisała::
Cecilie napisała::
Der er en video om hvordan man folder kanten og syr den, men hvad gør man, når den foldede kant skal sys på noget, der er meget mere elastisk? Lige efter kanten tager man jo ud og begynder at strikke rib - hvordan undgår man at miste elasticiteten, når der kommer sting på tværs af ribbene?
14.09.2022 - 12:29Odpowiedź DROPS Design :
Hej Cecilie, ja du har helt ret, da er det vigtigt at du syr løst, så kanten ikke mister elasticiteten :)
15.09.2022 - 15:46
![]() Elvira Eger napisała::
Elvira Eger napisała::
Guten Tag, ich bin gerade dabei, den Rock zu stricken und hätte da eine Frage zu dem Muster Diagramm. Es gibt das Muster A. 1 mit der ersten Reihe mit Abnahme und dann noch das Muster A. 1a, das bis zum Ende gestrickt werden soll. Ich sehe aber keinen Unterschied zwischen A. 1 und A.. 1a. Bitte melden Sie sich bald, damit ich weiter machen kann. Vielen Dank für die Bemühungen Elvira Eger
17.02.2022 - 13:16Odpowiedź DROPS Design :
Liebe Frau Eger, bei der 1. Reihe in A.1a stricken Sie *2 Maschen links zusammen, 1 Umschlag, 1 Maschen wie zum Linksstricken abheben*, und diese 3 Maschen von *bis* wiederholen (Umschläge werden nicht als Maschen gezählt), so haben Sie abgenommen. Dann stricken Sie die 2. und 3. Reihe in A.1 und stricken Sie so weiter, dh die 2 Reihen in A.1a sind die gleichen als die 2. und die 3. Reihe in A.1. Kann das Ihnen helfen?
17.02.2022 - 13:42
![]() Carol MacDonald napisała::
Carol MacDonald napisała::
Hi I have pattern Drops 196-37. Can you please tell me what the measurements are for the sizes
16.10.2021 - 07:37Odpowiedź DROPS Design :
Dear Carol, you can find all the relevant measurements of the finished piece on the shcematic drawing just below the pattern description. Happy Stitching!
17.10.2021 - 00:23
![]() Lara napisała::
Lara napisała::
Does anyone else find A1 not working for them? It works when I do rows, and does not when I try in rounds. Shouldn't it be "purl in one round, then knit in the next?" I watched a few videos of false English rib, it usually starts with "knit one " - not purl. Could this be an issue?
02.01.2021 - 05:50
![]() Lara napisała::
Lara napisała::
Dear Drops Design, Kristen seems to be right, the pattern appears to give the wrong side as "right side" when switching to false English rib. I looked up a video explaining false English rib, it appears that A1 diagram is somehow wrong, I am still trying to figure out what exactly the problem is. Maybe it has something to do with translation from Norwegian? Was anyone able to get it right using this pattern? Thank you.
01.01.2021 - 05:36
![]() Emma napisała::
Emma napisała::
Jeg har svært ved at forstå overgangen fra de 8 cm rib til det nye mønster. Bliver forvirret over strikkediagrammet og den vejledende video for falsk patent. Prøver de at forklare den samme ting?
18.11.2020 - 23:30Odpowiedź DROPS Design :
Hej Emma, første pind i diagrammet er anderledes end i videoen da du strikker 2 masker vrang sammen, men herefter strikkes de to omgange skiftevis som i videoen. God fornøjelse!
23.11.2020 - 16:00
![]() Lisia napisała::
Lisia napisała::
Dit was de eerste keer dat ik in aanraking kwam met valse patentsteek en patentsteken überhaupt, na veel gepuzzel en googlen ontdekte ik een fout in het telpatroon. De averechtste steken in de tour van de dichte bolletjes (de toer met de extra omslagen) moeten rechtste steken zijn!
14.11.2020 - 16:42
|
||||||||||||||||
See You In Dublin#seeyouindublinskirt |
||||||||||||||||
 |
 |
|||||||||||||||
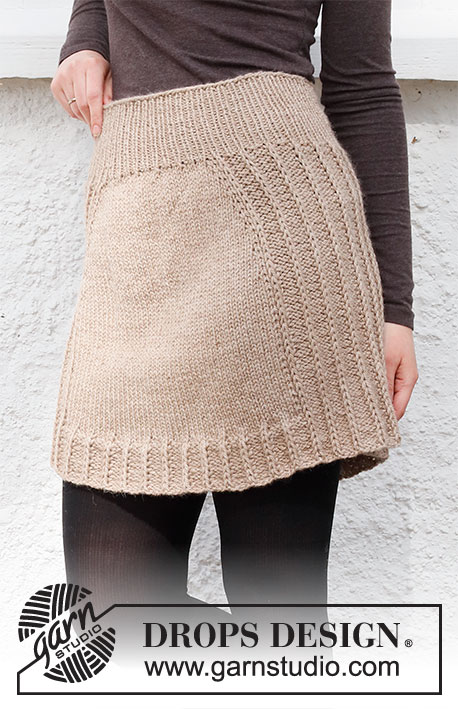
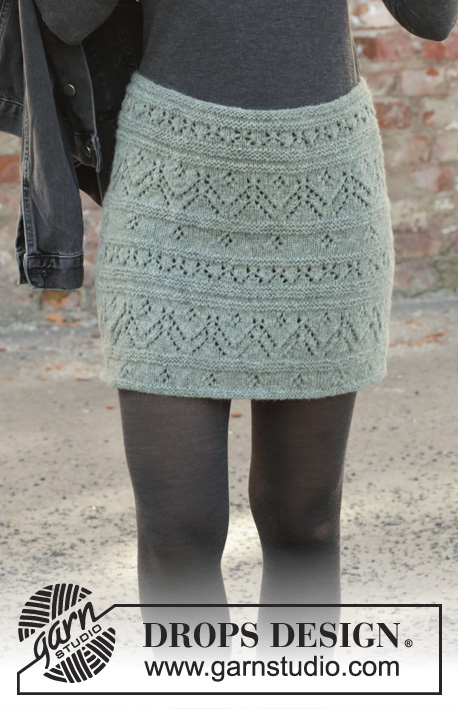
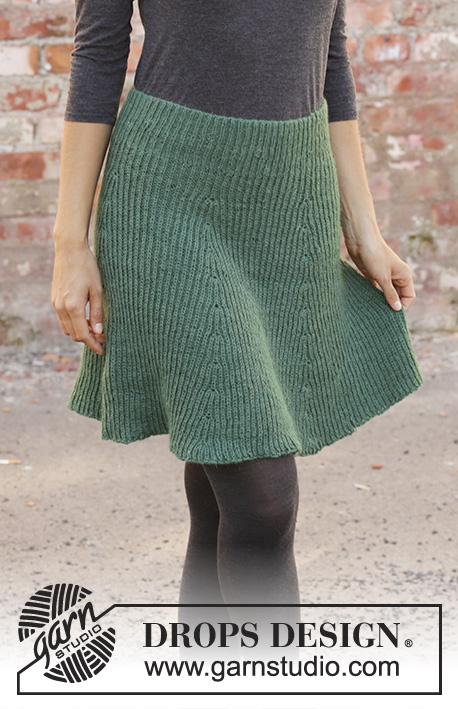
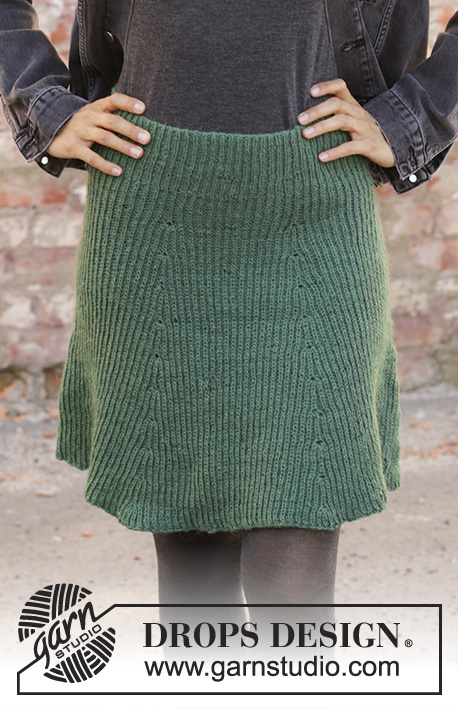
Spódnica na drutach z włóczki DROPS Nord, przerabiana od góry do dołu, fałszywym ściegiem angielskim. Od S do XXXL
DROPS 196-37 |
||||||||||||||||
|
WYKORZYSTYWANE TECHNIKI: ---------------------------------------------------------- PRÓBKI: Robótka rozciągnie się podczas noszenia, dlatego podajemy 2 rodzaje próbek. Próbka-1: podczas wykonywania spódnicy, mierzyć gdy jest rozłożona na płasko. Próbka-2 : mierzona w pasie, po założeniu spódnicy. Próbka na wysokość jest podana wg oczek prawych, które są przerabiane na liczbie okrążeń mniejszej o 1 w stosunku do oczek lewych, ponieważ oczka prawe są zdejmowane luźno co 2 okrążenia. To znaczy, że 24 rzędy na wysokość liczone w oczkach prawych na 10 cm = 48 rzędom liczonym w oczkach lewych na 10 na wysokość. Miary w schemacie są podane w cm, gdy spódnica jest nałożona. DODAWANIE OCZEK-1 (w regularnych odstępach): Aby obliczyć, gdzie dodawać oczka, należy wziąć ogólną liczbę oczek (np. 172 oczka) i podzielić ją przez liczbę oczek jaka ma być dodana (np. 26) = 6,6. W tym przykładzie będziemy dodawać oczka wykonując 1 narzut na przemian za ok. każdym 6-tym i 7-mym oczkiem. W następnym okrążeniu przerobić oczka przekręcone w miejscu narzutów, aby uniknąć dziur. DODAWANIE OCZEK-2: Wszystkie oczka są dodawane w okrążeniu, gdzie narzut i oczko prawe są przerabiane razem na prawo. Przerobić 5 razy oczko prawe i narzut następująco: przerobić razem na prawo narzut i oczko prawe, ale zostawić te oczka na lewym drucie, * wykonać 1 narzut na prawym drucie i przerobić razem na prawo narzut i oczko prawe*, powtórzyć od *-* w sumie 2 razy = 5 oczek (= dodane 4 oczka). ŚCIEG FANTAZYJNY: Patrz schemat A.1. ---------------------------------------------------------- ROBÓTKĘ ROZPOCZYNAMY TUTAJ: ---------------------------------------------------------- SPÓDNICA – SKRÓCONY OPIS ROBÓTKI: Przerabiana od góry do dołu, na okrągło na drutach z żyłką. Najpierw wykonać zakładkę na wciągnięcie gumki w talii. Dalej przerabiać ściągaczem i fałszywym ściegiem angielskim. Spódnica rozciągnie się podczas noszenia – patrz PRÓBKA. ZAKŁADKA: Na drutach z żyłką nr 2,5 nabrać 172-188-202-228-250-292 oczka włóczką Nord. Przerobić 1 okrążenie oczkami lewymi. Dalej przerobić 4 okrążenia dżersejem. Przerobić 1 okrążenie oczkami lewymi, równomiernie dodając 26-28-32-36-38-44 oczka (= rząd zagięcia) – PATRZ DODAWANIE OCZEK-1 = 198-216-234-264-288-336 oczek. Umieścić 1 nitkę marker. OD TEGO MOMENTU MIERZYĆ STĄD! SPÓDNICA: Przerabiać ściągaczem (2 oczka lewe/1 oczko prawe) przez 8 cm. Dalej przerabiać na drutach z żyłką nr 3 i przerabiać schemat A.1 ponad wszystkimi oczkami (= 66-72-78-88-96-112 razy przez całe okrążenie). Gdy 1-sze okrążenie schematu A.1 zostanie wykonane, jest 132-144-156-176-192-224 oczka – nie wliczać narzutów do liczby oczek. Gdy schemat A.1 zostanie przerobiony 1 raz na wysokość, powtarzać schemat A.1a do końca. ZACHOWAĆ TAKIE SAMO NAPRĘŻENIE NICI JAK W PRZYPADKU PRÓBKI! Gdy dł. robótki od nitki markera wynosi 10 cm, umieścić 1 marker w każde 11te-12te-13te-11te-12te-14te oczko prawe (= 6-6-6-8-8-8 markerów). Następnie dodać 4 oczka w każde z oczek z markerem – PATRZ DODAWANIE OCZEK-2 (= dodane 24-24-24-32-32-32 oczka). Dalej przerabiać na okrągło ŚCIEGIEM FANTAZYJNYM i dodawać oczka w ściegu fantazyjnym. Dodawać tak samo co 4-4-4-4½-4½-4½ cm, aż długość robótki od nitki markera wynosi 48-50-52-54-56-58 cm – jest ok. 348-384-396-464-512-544 oczka – dopasować, aby ostatnie okrążenie było okrążeniem z narzutami. Następnie zamykać oczka prawe na prawo, a oczka lewe na lewo, ALE zamykać narzuty jak oczka prawe, aby zamykane oczka nie ściągały robótki. WYKOŃCZENIE: Zagiąć zakładkę na lewą stronę robótki i przyszyć pozostawiając mały otwór na wciągnięcie gumki. |
||||||||||||||||
Objaśnienia do schematu |
||||||||||||||||
|
||||||||||||||||
 |
||||||||||||||||
Skończyłaś ten wzór?Otaguj swoje zdjęcia #dropspattern #seeyouindublinskirt lub prześlij je do #dropsfan gallery. Potrzebujesz pomocy w związku z tym wzorem?Zobacz 18 instrukcje video, sekcję Komentarze/Pytania i jeszcze więcej, wchodząc na stronę wzoru na garnstudio.com © 1982-2026 DROPS Design A/S. Wszelkie prawa zastrzeżone. Ten dokument, w całości, jest chroniony prawem. Zobacz co możesz robić z naszymi wzorami na dole każdego wzoru na naszej stronie. |
||||||||||||||||


Posiadając 40 lat doświadczenia w projektowaniu wzorów na druty i szydełko, DROPS Design oferuje jedną z największych kolekcji bezpłatnych wzorów w internecie – przetłumaczonych na 17 języków. Obecnie jest dostępnych 324 katalogów i 12239 wzorów w języku polskim.
Dokładamy wszelkich starań, aby oferować Wam druty i szydełka, inspiracje, fachowe porady oraz doskonałej jakości włóczki w najlepszych cenach! Zamierzasz wykorzystać nasze wzory inaczej niż tylko do osobistego użytku? Przeczytaj jakie masz prawa w Copyright, który znajdziesz na końcu każdego wzoru. Miłej pracy!
Dodaj komentarz do modelu DROPS 196-37
Chcielibyśmy się dowiedzieć co masz do powiedzenia o tym wzorze!
Jeśli chcesz zadać pytanie i szybko uzyskać odpowiedź, upewnij się, że została wybrana właściwa kategoria w formularzu poniżej. Pola obowiązkowe są oznaczone *.