
Popularne kategorie
Szukasz włóczki?


Komentarze / Pytania (75)
![]() Ana napisała::
Ana napisała::
I've just finished knitting the 10cm on the mid back, but I fear I may have done it wrong, as now there's a 10 cm height difference between one side of the work and the other, which doesn't make sense as we're not casting off just yet. Should I have been knitting all the stitches and not just the 28+62?
22.10.2022 - 15:28Odpowiedź DROPS Design :
Boa tarde, Now divide the piece mid back to work back and forth from mid back (this is done so that the seam is mid back). Work in garter stitch back and forth until piece measures 10 cm from the 28 stitches cast on mid front. Deve dividir as 152 malhas em 2 partes que tricota separadamente. até ter 10 cm medidos a partir da carreira em que montou a28 malhas, Bons tricôs!
23.10.2022 - 17:21
![]() Ana napisała::
Ana napisała::
I've just finished knitting the first 24cm and I'm already confused, what do you mean "cast on 1 stitch 2 times and 2 stitches 5 times"? I need a better explanation, please!
09.10.2022 - 16:36Odpowiedź DROPS Design :
Dear Ana, cast on 1 stitch at the end of each row from each side. Cast on 1 stitch at the end of the first row from the RS and WS. Repeat this once more on the next row from the RS and WS. Then, cast on 2 stitches at the end of each row from each side, but repeat this 5 times (so you increase 2 stitches at the end of the next 5 rows from the RS and 5 rows from the WS). Happy knitting!
09.10.2022 - 19:48
![]() Anna napisała::
Anna napisała::
Dzień dobry, czy jest dostępny szkic/schemat do tego projektu?
09.10.2022 - 11:54Odpowiedź DROPS Design :
Witaj Aniu, niestety nie. Napisz jeśli masz jakiś problem. Pozdrawiamy!
10.10.2022 - 10:09
![]() Jutta napisała::
Jutta napisała::
Hallo, wir haben mit der Anleitung angefangen, befinden uns aber grade in einer Sackgasse und kommen auch mit vereinten Denkkräften nicht weiter...Nach dem einseitige Anschlagen der 28 Maschen und dem Teilen an der hinteren Mitte können wir uns so langsam nicht mehr vorstellen wie es weiter geht und wie daraus die Kapuze entstehen soll. Hat jemand vielleicht eine Zeichnung? Was genau ist die hintere / vordere Mitte? Wie wird alles zusammengenäht? Ich hoffe jemand kann helfen
06.08.2022 - 15:54Odpowiedź DROPS Design :
Liebe Jutta, die Arbeit wird zuerst in Reihen von der vorderen Mitte gestrickt, dann wenn die neuen Maschen für die Öffnung für Gesicht angeschlagen wurden, soll die Arbeit von der hinteren Mitte gestrickt werden (so gibt es keine Naht an der vorderen Mitte). Am Ende nähen Sie die Kapuze oben zusammen und die unteren Reihen in der hinteren Mitte (ab den neuen Maschen bis zur Abketterand). Viel Spaß beim stricken!
08.08.2022 - 08:07
![]() Tiko napisała::
Tiko napisała::
First time I got confused with your pattern 😊1. the whole piece is in gaeter stitch except for the 158 stitches around face? 2. Is the piece worked inthe round at any stage? 3. Is it possible to send or add to the pattern a drawing fo what the finished piece looks like prior to been assambled? Thanks for the answerrs 💚
13.03.2022 - 19:12Odpowiedź DROPS Design :
Dear Tiko, 1. correct, only the ribbing edge around face is worked in rib, the whole work is then worked in garter stitch. 2. Piece is only worked in rows, but first from mid front (until opening for face is done), then from mid back (after you have increased/cast on the stitches for under face). 3. we have no chart for this sorry. Happy knitting!
14.03.2022 - 12:06
![]() Ana napisała::
Ana napisała::
Could I do the whole pattern in rib instead of garter stitch? How could I adapt from one to the other? Thank you so much!
24.02.2022 - 19:10Odpowiedź DROPS Design :
Dear Ana, your tension would be then different and your would have to re-calculate the whole pattern. You might find another pattern among these ones. Happy knitting!
25.02.2022 - 08:59
![]() Ayra napisała::
Ayra napisała::
Plz explain when you pick up 158 stitches around face opening do you have to pick up all of the stitches or you have to pick up 3 and skip one. Thanks
13.02.2022 - 20:44Odpowiedź DROPS Design :
Hi Ayra, you have to distribute new stitches evenly to have 158 stitches around face opening in total. Happy knitting!
14.02.2022 - 08:18
![]() Ayra napisała::
Ayra napisała::
Plz explain for mid back seam after working on 28 new cast on stitches and 62 stitches when you turn your work do you have to do the purl stitch from that side and also you have to work on 28 stitches.again so the mid back seam is done. Now you have to do garter stitch for all of the stitches. Thanks
04.02.2022 - 01:51Odpowiedź DROPS Design :
Dear Ayra, when you cut the yarn after the hood part, you start again piece from mid back (= approx. middle of previous rows), and will then cast on new stitches for face opening, ending rows on mid back. The seam on mid back will start here and will be sewn to the bottom edge; the 28 sts are cast on on mid front, there won't be any seam here. Hope it will help. Happy knitting!
04.02.2022 - 09:16
![]() Ayra napisała::
Ayra napisała::
Plz explain how you sew the hood in the end? Thanks
03.02.2022 - 02:10Odpowiedź DROPS Design :
Dear Ayra, fold the cast on edge double and sew cast on sts together; and then sew on mid back from the beginning of row worked from mid back (after face opening) towards the cast off edge. Happy knitting!
03.02.2022 - 08:47
![]() Marta napisała::
Marta napisała::
One follow up if I may. If there is a seam mid-back, where is the face opening. I'm really confused as you can tell.
02.02.2022 - 14:18Odpowiedź DROPS Design :
Dear Marta, you first work the hood, back and forth from mid front, then cut the yarn and start on mid back to work now from the mid back, increasing stitches on mid front and working the 2nd half of sts to mid back. The seam will be on mid back from this part. Hope it will help. Happy knitting!
02.02.2022 - 14:29
|
|
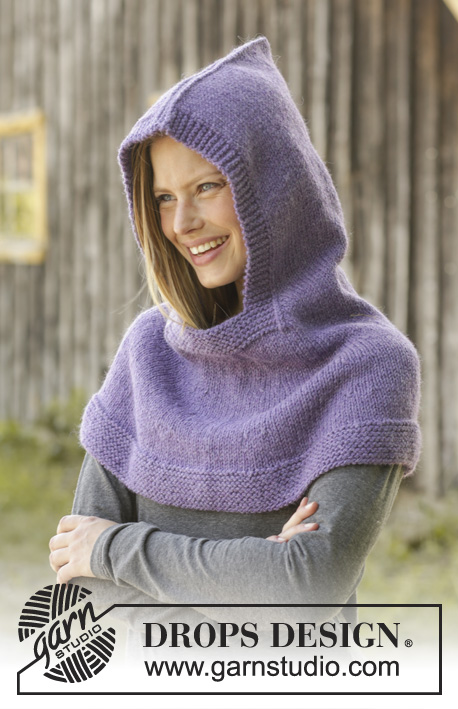
Lawless#lawlesshood |
|
 |
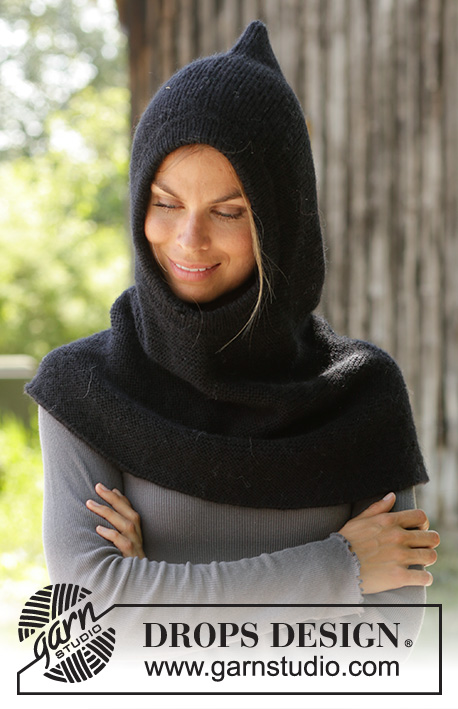 |
Kominiarka na drutach / balaclava, z włóczki DROPS Merino Extra Fine lub DROPS Karisma. Przerabiana od góry do dołu, ściegiem francuskim. Od S do XXXL
DROPS 192-2 |
|
|
WYKORZYSTYWANE TECHNIKI: ---------------------------------------------------------- ŚCIEG FRANCUSKI (w tę i z powrotem): 1 ściągacz francuski = przerobić 2 rzędy na prawo. DODAWANIE OCZEK: Przerabiać aż zostaje 1 oczko przed nitką markerem, 1 narzut, przerobić 2 oczka prawe (nitka marker jest na środku tych oczek), 1 narzut. W następnym okrążeniu przerabiać oczka przekręcone w miejscu narzutów, aby uniknąć dziur. ---------------------------------------------------------- ROBÓTKĘ ROZPOCZYNAMY TUTAJ: ---------------------------------------------------------- KOMINIARKA – SKRÓCONY OPIS ROBÓTKI: Przerabiana w tę i z powrotem na drutach z żyłką, od góry do dołu, zszywana z tyłu i na górze kaptura. KOMINIARKA: Na drutach z żyłką nr 3 nabrać 100 oczek włóczką Merino Extra Fine lub Karisma. Przerabiać ŚCIEGIEM FRANCUSKIM – patrz powyżej, w tę i z powrotem, zaczynając od środka przodu. ZACHOWAĆ TAKIE SAMO NAPRĘŻENIE NICI JAK W PRZYPADKU PRÓBKI! Gdy dł. robótki wynosi 24 cm nabrać na końcu każdego rzędu z każdej strony (w kierunku środka przodu – czyli w stronę twarzy) następująco: 2 razy 1 oczko i 5 razy 2 oczka (= dodane 12 oczek z każdej strony) = 124 oczka. Na końcu następnego rzędu nabrać 28 oczek (w kierunku środka przodu – czyli pod otworem na twarz) = 152 oczka. Przerabiać na prawo do środka tyłu: przerobić 62 oczka prawe za 28 oczkami nabranymi na środku przodu. Teraz podzielić robótkę i przerabiać w tę i z powrotem od tego miejsca – środek tyłu (robimy to po to, aby szew był na środku tyłu). Przerabiać ściegiem francuskim w tę i z powrotem, aż długość robótki wynosi 10 cm od 28 oczek nabranych na środku przodu. Umieścić teraz 8 nitek markerów następująco: zaczynając na środku tyłu, umieścić 1-szą nitka marker za 10 oczkami, kolejnych 7 nitek markerów rozmieścić co 19 oczek, zostaje teraz 9 oczek za ostatnią nitką markerem. Dalej przerabiać ściegiem francuskim. W następnym rzędzie, na prawej stronie robótki, dodać 1 oczko z każdej strony każdej nitki markera - PATRZ DODAWANIE OCZEK. Dodawać tak samo w sumie 6-7-8 razy co ok. 3 cm = 248-264-280 oczek. Przerabiać, aż całkowita długość robótki wynosi 58-60-62 cm. Zamykać 2 nitkami. WYKOŃCZENIE: Zszywać kominiarkę wkłuwając igłę w skrajne pętelki oczek wzdłuż środka tyłu i wzdłuż rzędu nabierania oczek na górze kominiarki. BRZEG/ WYKOŃCZENIE WOKÓŁ TWARZY Na krótkich drutach z żyłką 2,5 nabrać na prawej stronie robótki 158 oczek wokół otworu na twarz. Przerobić 1 okrążenie na lewo, 1 okrążenie na prawo, 1 okrążenie na lewo, 1 okrążenie na prawo. Dalej przerabiać ściągaczem (= 1 oczko prawe/1 oczko lewe) przez 6 cm. Zamknąć oczka tak jak schodzą z drutu. Zagiąć brzeg na lewą stronę robótki i przyszyć. |
|
Skończyłaś ten wzór?Otaguj swoje zdjęcia #dropspattern #lawlesshood lub prześlij je do #dropsfan gallery. Potrzebujesz pomocy w związku z tym wzorem?Zobacz 17 instrukcje video, sekcję Komentarze/Pytania i jeszcze więcej, wchodząc na stronę wzoru na garnstudio.com © 1982-2026 DROPS Design A/S. Wszelkie prawa zastrzeżone. Ten dokument, w całości, jest chroniony prawem. Zobacz co możesz robić z naszymi wzorami na dole każdego wzoru na naszej stronie. |
|


Posiadając 40 lat doświadczenia w projektowaniu wzorów na druty i szydełko, DROPS Design oferuje jedną z największych kolekcji bezpłatnych wzorów w internecie – przetłumaczonych na 17 języków. Obecnie jest dostępnych 324 katalogów i 12290 wzorów w języku polskim.
Dokładamy wszelkich starań, aby oferować Wam druty i szydełka, inspiracje, fachowe porady oraz doskonałej jakości włóczki w najlepszych cenach! Zamierzasz wykorzystać nasze wzory inaczej niż tylko do osobistego użytku? Przeczytaj jakie masz prawa w Copyright, który znajdziesz na końcu każdego wzoru. Miłej pracy!
Dodaj komentarz do modelu DROPS 192-2
Chcielibyśmy się dowiedzieć co masz do powiedzenia o tym wzorze!
Jeśli chcesz zadać pytanie i szybko uzyskać odpowiedź, upewnij się, że została wybrana właściwa kategoria w formularzu poniżej. Pola obowiązkowe są oznaczone *.