
Popularne kategorie
Szukasz włóczki?


Komentarze / Pytania (17)
![]() Monica Panera napisała::
Monica Panera napisała::
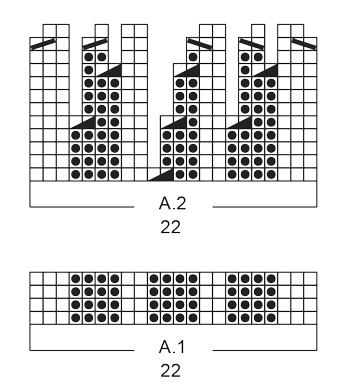
Buongiorno, ho difficoltà a capire lo schema A2 della fascia per capelli che sto facendo Warm Lavender modello:ee-536 Quando nello schema non vi sono quadratini che spiegano il punto da fare ma c'è il vuoto cosa significa? Che il punto è da passare sull'altro ferro senza lavorarlo? Aspetto una vostra gentile risposta.Grazie
12.12.2018 - 16:49Odpowiedź DROPS Design :
Buongiorno Monica. Trova un vuoto perchè al ferro precedente è stata diminuita una maglia. Quando incontra il vuoto, deve lavorare la maglia come indicato nel quadratino successivo. Quindi per es., alla riga 6 del diagramma A2 (riga lavorata sul rovescio, quindi si legge da sinistra verso destra), lavora: 3 m rovescio, 3 m diritto, 2 maglie rovescio e così via. Buon lavoro!
12.12.2018 - 17:02
![]() Alva napisała::
Alva napisała::
Hur många masker ska man lägga upp om man har 4mm stickor och garn till stickorna?
23.02.2018 - 21:35Odpowiedź DROPS Design :
Hei Alva. Oppskriften er skrevet til pinne 7 og Eskimo ... et garn som er tykkere og koster ca 15 kr for 50 gr ... kanske du skulle bytte garn - da blir den myk og fin og du kan bruke oppskriften :) Go Fornøyelse.
24.02.2018 - 09:34
![]() Sandra napisała::
Sandra napisała::
What is meant by: K YO twisted on next row & P YO twisted on next row?
25.11.2017 - 22:47Odpowiedź DROPS Design :
Hi Sandra, To avoid a hole after increasing by making a yarn over (YO) you need to work them twisted. Either this will be knitted twisted or purled twisted depending on the pattern. To work twisted you need to insert the needle in the back loop of the stitch, rather than the front. I hope this helps. Happy knitting!
26.11.2017 - 06:49
![]() Sandra napisała::
Sandra napisała::
Part 2: I am so confused! YouTube person says that when you are reading charts in the round, everything is always read from Right to Left. So what is the right way?
23.11.2017 - 01:03Odpowiedź DROPS Design :
Dear Sandra, that's right, diagrams will be read here from the right towards the left every round (= you are working here in the round, ie from RS) starting on the bottom corner on the right side. Read more here. Happy knitting!
23.11.2017 - 08:35
![]() Sandra napisała::
Sandra napisała::
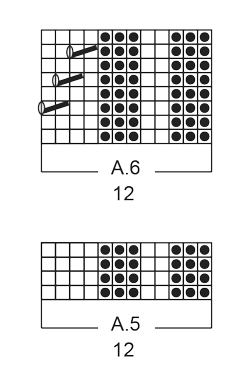
Part 1: A friend of mine read chart A.6 as this: "I'm looking at that exact pattern and this particular chart A6 is just k2tog, yo, k, k. The cable is worked in chart A3. In laments terms this would read: R1: p4, k3, p2, k3 R2: p3, k2, p3, k2tog, yo, k2 R3: p4, k3, p2, k3 R4: p3, k2, p3, k1, k2tog, yo, k1 R5: p4, k3, p2, k3 R6: p3, k2, p3, k2, k2tog, yo R7: p4, k3, p2, k3 R8: p3, k2, p3, k4" Is this correct?
23.11.2017 - 01:02Odpowiedź DROPS Design :
Dear Sandra, start reading diag. from the bottom corner on the right side towards the left on every round (from RS), so that on row 3 in A.3 work the cable (previous and next rows are K from RS) and work row 3 in A.6 as follows: P3, K2, P3, K2, K2 tog, YO. When diagrams are done in height, repeat from row 1. Happy knitting!
23.11.2017 - 08:33
![]() Sandra napisała::
Sandra napisała::
Hi again...sorry for bugging you. In chart A6 of the neck warmer pattern - 1 slant from Right to Left over 2 squares then a yarn over is a cable (right?). How does this work? Slip 2 sts onto a cable needle (to the front or back yarn over then yarn over then knit from the cable?
22.11.2017 - 01:33Odpowiedź DROPS Design :
Dear Sandra, the symbol used in A.6 with a slant line is 3rd symbol under diagram text, ie Knit 2 stitches together (and then make a YO (= 5th symbol) to compensate this dec). Happy knitting!
22.11.2017 - 09:10
![]() Sandra Delamont napisała::
Sandra Delamont napisała::
I have just finished the headband successfully after numerous attempts. I am very new to knitting and reading charts in patterns - so this is my first. When I look at the picture the neck warmer I see cable patterns. However, when I read the chart and words there is no mention of slipping stitches onto cable needles. What am I missing in the chart/directions? Can you please help me? Thanks. Sandra
11.11.2017 - 20:19Odpowiedź DROPS Design :
Hi Sandra, The diagram A6 has the cables - just 2 this time (the sloping lines over 2 squares) and A6 is worked after you have worked A5 for 4 cm. You work A6 until the neck warmer measures 20-22 cm and then A5 for another 4 cm. I hope this helps and happy knitting!
12.11.2017 - 06:33
|
|||||||||||||||||||||||||
Warm Lavender |
|||||||||||||||||||||||||
|
|
|||||||||||||||||||||||||
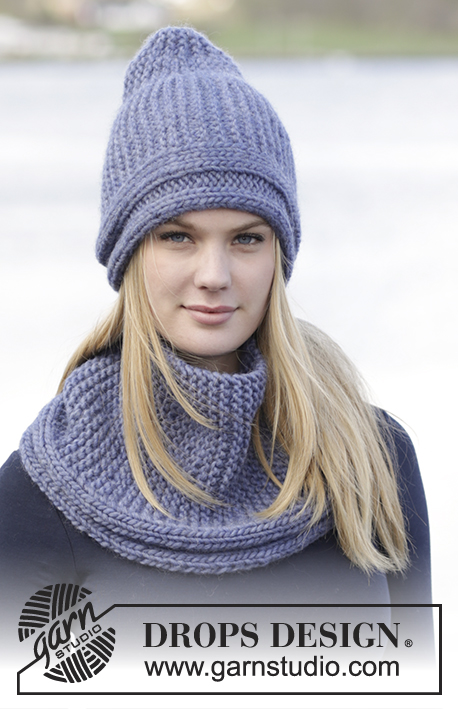
Komplet: opaska i komin DROPS ze ściągaczami, z włóczki „Snow”.
DROPS Extra 0-1234 |
|||||||||||||||||||||||||
|
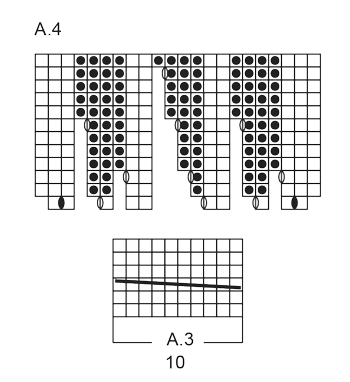
ŚCIEG FRANCUSKI (w tę i z powrotem): Przer. wszystkie rzędy na prawo. 1 „ściągacz” francuski = 2 rz. na prawo. ŚCIEG FANTAZYJNY: Patrz schematy A.1-A.6. Schematy przedstawiają wszystkie rzędy ściegu fantazyjnego, widok na prawej stronie robótki. ---------------------------------------------------------- OPASKA: Przerabiana w tę i z powrotem. Na drutach nr 7 nabrać 22 o. włóczką Snow. Przer. 1 ściągacz ściegiem francuskim - patrz powyżej. Dalej przer. schemat A.1 (= 22 o.). ZACHOWAĆ TAKIE SAME NAPRĘŻENIE NICI JAK W PRZYPADKU PRÓBKI! Powt. schemat A.1, aż dł. robótki wynosi 14-15-16 cm (dopasować, aby kolejny rząd był na prawej stronie robótki). Dalej przer. schemat A.2 ponad schematem A.1. Gdy schemat A.2 zostanie przerobiony 1 raz na wysokość zostaje 10 o. Przer. 1 raz schemat A.3 na wysokość. Dalej przer. schemat A.4 ponad A.3. Przer. narzuty przekręcone (= wkłuwając drut z tyłu robótki zamiast z przodu) wg schematu. Gdy schemat A.4 zostanie przerobiony 1 raz na wysokość jest 22 o. Przer. schemat A.1, aż dł. robótki wynosi 48-50-52 cm. Przer. 1 ściągacz francuski. Zakończyć. Pierwszy rząd doszyć do ostatniego rzędu. ---------------------------------------------------------- KOMIN: Przerabiany na okrągło na drutach z żyłką. Na drutach z żyłką nr 8 nabrać 72-84 o. włóczką Snow. Przer. w sumie 6-7 razy schemat A.5 (= 12 o.) na szerokość. Na wys. 4 cm od dołu robótki przer. schemat A.6 ponad A.5. ZACHOWAĆ TAKIE SAME NAPRĘŻENIE NICI JAK W PRZYPADKU PRÓBKI! Na wys. 20-22 cm od dołu robótki, dopasować za jednym całym motywem A.6, przer. schemat A.5 ponad A.6. Zakończyć, gdy dł. robótki wynosi 24-26 cm. |
|||||||||||||||||||||||||
Objaśnienia do schematu |
|||||||||||||||||||||||||
|
|||||||||||||||||||||||||
 |
|||||||||||||||||||||||||
 |
|||||||||||||||||||||||||
 |
|||||||||||||||||||||||||
Skończyłaś ten wzór?Otaguj swoje zdjęcia #dropspattern lub prześlij je do #dropsfan gallery. Potrzebujesz pomocy w związku z tym wzorem?Zobacz 19 instrukcje video, sekcję Komentarze/Pytania i jeszcze więcej, wchodząc na stronę wzoru na garnstudio.com © 1982-2026 DROPS Design A/S. Wszelkie prawa zastrzeżone. Ten dokument, w całości, jest chroniony prawem. Zobacz co możesz robić z naszymi wzorami na dole każdego wzoru na naszej stronie. |
|||||||||||||||||||||||||


Posiadając 40 lat doświadczenia w projektowaniu wzorów na druty i szydełko, DROPS Design oferuje jedną z największych kolekcji bezpłatnych wzorów w internecie – przetłumaczonych na 17 języków. Obecnie jest dostępnych 324 katalogów i 12290 wzorów w języku polskim.
Dokładamy wszelkich starań, aby oferować Wam druty i szydełka, inspiracje, fachowe porady oraz doskonałej jakości włóczki w najlepszych cenach! Zamierzasz wykorzystać nasze wzory inaczej niż tylko do osobistego użytku? Przeczytaj jakie masz prawa w Copyright, który znajdziesz na końcu każdego wzoru. Miłej pracy!
Dodaj komentarz do modelu DROPS Extra 0-1234
Chcielibyśmy się dowiedzieć co masz do powiedzenia o tym wzorze!
Jeśli chcesz zadać pytanie i szybko uzyskać odpowiedź, upewnij się, że została wybrana właściwa kategoria w formularzu poniżej. Pola obowiązkowe są oznaczone *.