
Popularne kategorie
Szukasz włóczki?


Komentarze / Pytania (173)
![]() Ginny Trueman napisała::
Ginny Trueman napisała::
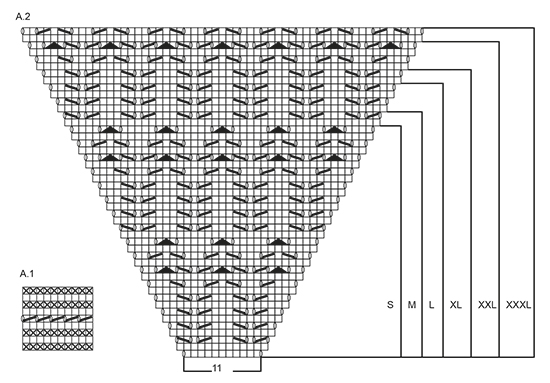
The pattern states continue this pattern, and Inc for raglan as explained above, FIRST INC IS NOW DONE. Do I then start the bottom row of A2 or is the bottom row what I start after the first detailed increase row. Not sure if this first increase row is the first row of A2 or not?
29.05.2016 - 23:04Odpowiedź DROPS Design :
Dear Mrs Trueman, this row explains first row on raglan, ie inc on body + work 1st row in A.2, ie on next round, work row 2 in A.2 and repeat the inc every other round. Happy knitting!
30.05.2016 - 10:19
![]() Ginny Trueman napisała::
Ginny Trueman napisała::
Is the first and last YO on every other design row in A2 the increase mentioned in the pattern? The first row beginning the pattern shows a yo is the slipped knit (i.e. Split the first and last 2 k with marker) at the beginning and end of the yoke/body) the increase for this first row?or do I need to do a YO which ends this row with 15 stitches. Need more clarity as to whether I keep moving the marker every other row or not. Confused!
29.05.2016 - 22:52Odpowiedź DROPS Design :
Dear Mrs Trueman, the markers should be always at the beg of sleeve (before 1st YO in diagram) and after the last st in sleeve (last YO in diagram), the number of sts between markers will inc due to to these YOs worked every other round (= number of sts on sleeve will then inc every other round). Read more about diagrams here. Happy knitting!
30.05.2016 - 10:17Christine Weir napisała::
I have just finished this design... I have however to mention that throughout the pattern there seems to be 1 stitch too less ..the sleeves needed 56 sts not 55 since the pattern is multiples of 8 &I didn't decrease the 6 sleeve sts during the pattern but rather all 6 on the last k row before starting A1 that way there are only complete patterns .....looks really great !!!once again thanks
27.05.2016 - 22:42Odpowiedź DROPS Design :
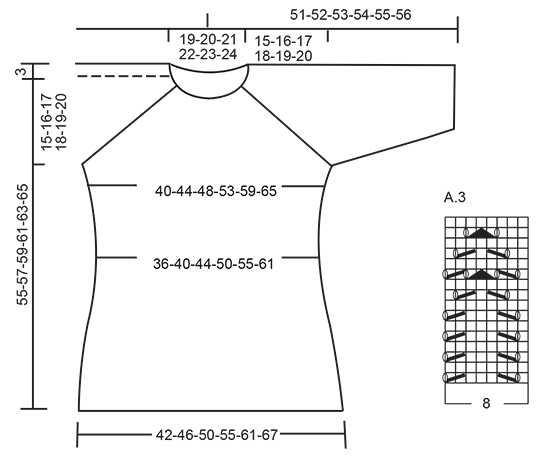
Dear Mrs Weir, when working the sleeves, you work diagram on the 40-56 sts (see size) on mid upper sleeve only, ie 6-7 repeats in width, sts under sleeves are worked in stocking st: "6-7-1-2-4-6 sts in stocking st, A.3 over the next 40-40-56-56-56-56 sts (beg A.3 where A.2 ends for your size), 7-8-2-3-5-7 sts in stocking st." Happy knitting!
30.05.2016 - 08:48
![]() Kerry Hullett napisała::
Kerry Hullett napisała::
The bottom edge is curling and I note that this is also the case on the model. Do you have an alternative to prevent this?
25.05.2016 - 18:23Odpowiedź DROPS Design :
Dear Mrs Hullett, you can block it, add a crocheted edge ... Your DROPS store" will have some tips and advices for you. Happy knitting!
26.05.2016 - 08:23Christine Weir napisała::
Hi I'm at the sleaves & having difficulty at understanding what to do there should be a row of K as it ended on a pattern when work was divided & the A3 is to join the new 8 sts onto pattern but i can't work it out plz help!
22.05.2016 - 00:43Odpowiedź DROPS Design :
Dear Mrs Weir, start sleeve picking up 1 st in each of the 8 sts cast on under sleeve on body, then knit all sts from sleeves, knit the first 4 sts under sleeve, inser a marker and then work in pattern as explained. Happy knitting!
23.05.2016 - 09:18
![]() Clare napisała::
Clare napisała::
I am starting the yoke patterns but on a1 if you follow the pattern on the first row what do you do ??? I would end up with too many stitches as there is only one knit 2 together row . Please advise thanks
06.05.2016 - 23:22Odpowiedź DROPS Design :
Dear Clare, in 5th row in A.1 you are working eyelets, ie work *K2 tog, YO*, all the round, number of sts will keep constant, dec are compensated with a YO. Happy knitting!
09.05.2016 - 11:40
![]() Jj napisała::
Jj napisała::
Please can you explain the 5th row of A1, i cast on 95stitches so how does the k2tog work? i am left with an odd stitch. this pattern looks lovely but i am really having problems
05.05.2016 - 00:23Odpowiedź DROPS Design :
Dear Jj, at the end of 5th row in A.1, just K the last st to keep correct number of sts. Happy knitting!
06.05.2016 - 08:44
![]() Debora napisała::
Debora napisała::
Buongiorno un informazione... nella spiegazione dice che gli aumenti delle maniche sono riportati nello schema, quindi un giro si e uno no... anche nella parte avanti e dietro gli aumenti sono un giro si e uno no? Grazie mille
03.05.2016 - 13:20Odpowiedź DROPS Design :
Buongiorno Debora. Anche gli aumenti sul davanti e dietro sono un giro sì e uno no. Buon lavoro!
03.05.2016 - 13:27Caroline napisała::
I'm having trouble following the pattern in the YOKE section after: "Continue this pattern, and inc for RAGLAN as explained above, first inc is now done." What should the next round be? Is it knit 1 round? Then a raglan increase round? Thanks, Caroline
27.04.2016 - 20:02Odpowiedź DROPS Design :
Dear Caroline, you continue then working A.2 on sleeve and inc for raglan as explained under "RAGLAN", ie first inc every other round then every round - see size. Happy knitting!
28.04.2016 - 08:17
![]() Terese Svenke napisała::
Terese Svenke napisała::
Hei! Her er det noe jeg virkelig ikke skjønner. Jeg strikker i størrelse XL og legger opp 103 masker. Men når jeg strikker A1 er jo 5. omgang at jeg skal strikke 2 og 2 masker sammen og vil jo derfor ha halvparten så mange masker etter 5. omgang? Så når jeg så skal øke med 15 masker blir det jo ikke mer enn (103/2)+15? Hva er det jeg misforstår? Veldig glad for svar...
17.04.2016 - 21:47Odpowiedź DROPS Design :
Hej Terese. Nej, der er ogsaa kast imellem hver gang du strikker sammen i 5e pind: 2 r samen, 1 kast (cirklen), dit antal masker forbliver det samme. Og naar du saa öger 15 m faar du de 118 m.
22.04.2016 - 17:35
|
|||||||||||||||||||
Sea Nymph#seanymphsweater |
|||||||||||||||||||
 |
 |
||||||||||||||||||
Sweter z reglanem DROPS z ażurowymi rękawami ¾, z włóczki „Muskat”. Przerabiany z góry na dół. Od S do XXXL.
DROPS 168-1 |
|||||||||||||||||||
|
ŚCIEG FRANCUSKI (na okrągło): 1 ściągacz francuski = 2 okr. Przer.: * 1 okr. na prawo, 1 okr. na lewo*, powt. od *-*. ŚCIEG FANTAZYJNY: Patrz schematy A.1-A.3. Patrz schemat odpowiedni dla rozmiaru! REGLAN: Dodawać co 2 okr. następująco: dodać 4 o. na tył, 4 o. na przód i 2 o. na każdy rękaw (= 12 dodanych o., dodane o. rękawów figurują w schemacie) – zacząć 3 o. przed każdym schematem A.2 i przer. następująco: 1 narzut, 1 o.p., 1 narzut, 2 o.p. (marker znajduje się między tymi o.), A.2, 2 o.p. (marker znajduje się między tymi o.), 1 narzut, 1 o.p., 1 narzut. W nast. rzędzie przer. narzuty obok markerów na prawo, powstaną otwory/dziurki, przer. narzuty na przodzie/tyle przekręcone na prawo (= wkłuwając drut z tyłu robótki zamiast z przodu) aby uniknąć dziur. Dodawać tak samo 12 o. jeszcze 0-2-3-7-10-14 razy (= w sumie 1-3-4-8-11-15 razy, dodawanie o. po raz 1-szy jest wyjaśniony poniżej). Następnie dodawać o. co 2 okr. następująco: dodać 2 o. na tył, 2 o. na przód i 2 o. na każdy rękaw (= 8 dodanych o., dodane o. rękawów figurują w schemacie) – zacząć 2 o. przed każdym schematem A.2 i przer. następująco: 1 narzut, 2 o.p. (marker znajduje się między tymi o.), A.2, 2 o.p. (marker znajduje się między tymi o.), 1 narzut. W nast. okrążeniu przer. narzuty na prawo, powstaną otwory/dziurki. Dodawać w ten sposób 8 o. w sumie 16-15-16-13-12-9 razy. ---------------------------------------------------------- SWETER: Przerabiany na okrągło na drutach z żyłką, z góry na dół. KARCZEK: Na drutach z żyłką nr 4 nabrać 87-91-95-99-103-107 o. włóczką Muskat. Przer. 1 okr. na prawo, dalej przer. schemat A.1, W TYM SAMYM CZASIE w ost. okrążeniu schematu A.1 równomiernie dodać 15 o. = 102-106-110-114-118-122 o. Dalej przer. zaczynając od środka tyłu następująco: 17-18-19-20-21-22 o.p., 1 narzut, 1 o.p., 1 narzut, 2 o.p. (umieścić marker między tymi o.), A.2 (= 11 o.), 2 o.p. (umieścić marker między tymi o.), 1 narzut, 1 o.p., 1 narzut, 34-36-38-40-42-44 o.p., 1 narzut, 1 o.p., 1 narzut, 2 o.p. (umieścić marker między tymi o.), A.2, 2 o.p. (umieścić marker między tymi o.), 1 narzut, 1 o.p., 1 narzut, 17-18-19-20-21-22 o.p. Dalej przer. tak samo i dodawać o. na reglan jak w opisie powyżej, o. zostały dodane 1-szy raz. ZACHOWAĆ TAKIE SAME NAPRĘŻENIE NICI JAK W PRZYPADKU PRÓBKI! Gdy schemat A.2 zostanie przerobiony 1 raz na wysokość – patrz oznaczenie właściwe da rozmiaru - jest 242-262-286-314-346-374 o., dodawanie o. jest zakończone. Przer. kolejne okrążenie następująco: przer. 38-42-46-52-58-64 o. (= połowa tyłu), zdjąć 45-47-51-53-57-59 nast. o. na drut pomocniczy (= 1-szy rękaw), nabrać 8 o. pod rękawem, przer. 76-84-92-104-116-128 nast. o. (= przód), zdjąć 45-47-51-53-57-59 nast. o. na drut pomocniczy (= 2-gi rękaw), nabrać 8 nowych o. pod rękawem, przer. 38-42-46-52-58-64 ost. o. (= połowa tyłu). TYŁ & PRZÓD: Jest teraz 168-184-200-224-248-272 o. Dalej przer. dżersejem. Umieścić marker z każdej strony, na środku 8 nowych o. OD TEGO MOMENTU MIERZYĆ STĄD. Po przerobieniu 4 cm zamknąć 1 o. z każdej strony markera (= 4 zamknięte o.), powt. zamykanie o. jeszcze 3 razy co 4-4-4-5-5-5 cm = 152-168-184-208-232-256 o. Po przerobieniu 22-23-24-25-26-27 cm dodać 1 o. z każdej strony każdego markera (= 4 dodane o.), powt. dodawanie o. jeszcze 5 razy co 2 cm = 176-192-208-232-256-280 o. Po przerobieniu 36-37-38-39-40-41 cm przer. 2 ściągacze ściegiem francuskim - patrz powyżej, przez wszystkie oczka. Zamykać o. ściągaczem 1 o.p./1 o.l. (aby zamykane oczka nie utworzyły falującego brzegu), dł. robótki wynosi ok. 55-57-59-61-63-65 cm od rzędu nabierania oczek. RĘKAWY: Przerabiane na okrągło. Przełożyć o. rękawa na druty pończosznicze nr 4, nabrać 1 o. w każde z 8 o. pod rękawem = 53-55-59-61-65-67 o. Umieścić 1 marker na środku pod rękawem = początek okrążeń. OD TEGO MOMENTU MIERZYĆ STĄD! Dalej przer. następująco: 6-7-1-2-4-5 o. dżersejem, A.3 ponad 40-40-56-56-56-56 nast. o. (zacząć schemat A.3, gdzie zakończył się schemat A.2 w zależności od rozmiaru), 7-8-2-3-5-6 o. dżersejem. Gdy dł. rękawa wynosi 4 cm zamknąć 1 o. z każdej strony markera. Przer. dżersejem o., które nie mogą być przerabiane ściegiem fantazyjnym, pamiętać aby liczba o. w ściegu fantazyjnym była odpowiednia (liczba narzutów = liczbie zamykanych o.). Powt. zamykanie o. jeszcze 2-2-3-3-4-4 razy co 7-7-5-5-3-3 cm = 47-49-51-53-55-57 o. Po przerobieniu 24-23-23-22-22-21 cm przer. schemat A.1 przez wszystkie o., następnie zakończyć. Przer. drugi rękaw tak samo. |
|||||||||||||||||||
Objaśnienia do schematu |
|||||||||||||||||||
|
|||||||||||||||||||
 |
|||||||||||||||||||
 |
|||||||||||||||||||
Skończyłaś ten wzór?Otaguj swoje zdjęcia #dropspattern #seanymphsweater lub prześlij je do #dropsfan gallery. Potrzebujesz pomocy w związku z tym wzorem?Zobacz 25 instrukcje video, sekcję Komentarze/Pytania i jeszcze więcej, wchodząc na stronę wzoru na garnstudio.com © 1982-2026 DROPS Design A/S. Wszelkie prawa zastrzeżone. Ten dokument, w całości, jest chroniony prawem. Zobacz co możesz robić z naszymi wzorami na dole każdego wzoru na naszej stronie. |
|||||||||||||||||||


Posiadając 40 lat doświadczenia w projektowaniu wzorów na druty i szydełko, DROPS Design oferuje jedną z największych kolekcji bezpłatnych wzorów w internecie – przetłumaczonych na 17 języków. Obecnie jest dostępnych 324 katalogów i 12290 wzorów w języku polskim.
Dokładamy wszelkich starań, aby oferować Wam druty i szydełka, inspiracje, fachowe porady oraz doskonałej jakości włóczki w najlepszych cenach! Zamierzasz wykorzystać nasze wzory inaczej niż tylko do osobistego użytku? Przeczytaj jakie masz prawa w Copyright, który znajdziesz na końcu każdego wzoru. Miłej pracy!
Dodaj komentarz do modelu DROPS 168-1
Chcielibyśmy się dowiedzieć co masz do powiedzenia o tym wzorze!
Jeśli chcesz zadać pytanie i szybko uzyskać odpowiedź, upewnij się, że została wybrana właściwa kategoria w formularzu poniżej. Pola obowiązkowe są oznaczone *.