
Popularne kategorie
Szukasz włóczki?


Komentarze / Pytania (69)
![]() KTY napisała::
KTY napisała::
Bonsoir, très joli modèle. Est-il possible de rallonger les manches de quelques centimètres sans avoir à recalculer? Merci pour votre réponse
23.03.2021 - 21:29Odpowiedź DROPS Design :
Bonjour Kty, probablement, vous trouverez ici d'autres hauts tricotés en fils du groupe B, avec des longueurs de manches différentes; vous pourrez vous en inspirer pour trouver la longueur/la méthode qui vous convient. Bon tricot!
24.03.2021 - 07:52
![]() Louise Ojén napisała::
Louise Ojén napisała::
Jeg er lidt over halvvejs i bærestykket med A2. Og det går nu op for mig at mønsteret er skævt. I opskriften står der at jeg skal strikke 14 m ret, A2 osv. Men hvornår starter de 14 masker ret? For starter de altid lige efter raglan mærket så vil mønstret jo ikke ende midt på...? Hvordan sikrer jeg mig at mønstret bliver på midten af forstykket, når der i opskriften står jeg skal strikke 14 masker derefter A2 osv? Vh. Louise.
05.01.2020 - 21:54
![]() Eva napisała::
Eva napisała::
Dobrý den, prosím jak na to raglánové skosení při Velikosti XL. NEMOHU SE V TOM VYZNAT. Děkuji
30.06.2019 - 13:05Odpowiedź DROPS Design :
Dobrý den, Evo, text návodu je upravený a přeformulovaný, podívejte se, prosím, na odstavec RAGLÁNOVÉ ZKOSENÍ a pak rozpis pro SEDLO - věřím, že teď bude postup srozumitelnější a jasnější. Příjemné letní pletení! Hana
01.07.2019 - 08:43
![]() Deb From Nova Scotia napisała::
Deb From Nova Scotia napisała::
I mad this sweater in Belle navy blue, hand washed with Eucalan delicate soap, blocked and let it dry. Love the yarn; drapes nicely & has a nice weight and shine to it. I like the fit of the sweater, but, like a few others, I find the neck too wide. I’m a fairly new knitter and don’t know what to do to make the neck opening smaller. What do you suggest? I’d like to make another sweater from this pattern. I’m guessing that I should cast on fewer stitches, and knit extra rows. Correct?
20.02.2019 - 02:58Odpowiedź DROPS Design :
Dear Deb From Nova Scotia, this pattern has a quite large neck as shown in the picture. We are unfortunately not able to adapt every pattern to every single request but please contact your DROPS store - even per mail or telephone - for any individual assistance. Happy knitting!
20.02.2019 - 09:36
![]() Dk napisała::
Dk napisała::
Hello, I finished the a2 and done all the 17 raglan repetitions for size small. However, instead of finding 294 stitches I only have 286. Which actually makes sense since 17 repetitions times 8 stitches is actually 136, plus the previous 150 totals 286. Is this a mistake on the pattern? Thank you !
04.11.2018 - 17:19Odpowiedź DROPS Design :
Dear Dk, you increase for the raglan a total of 18 times (= 17 more times = 18 times), so that you will have 150 sts + (8 sts inc x 18 times = 144)= 294 sts. Happy knitting!
05.11.2018 - 09:44
![]() Kathy Fae napisała::
Kathy Fae napisała::
Thank you for the help. Another question regarding A2 section. I’m making a large. I have 50 sts on that section. (Instructions were knit 49, knit 1, then place a marker) So I have 50. I’ll work raglan increase, 4 sts, knit 16, work chart, (17 sts), that’s a total of 37 sts that only leaves 13 sts until marker. The A2 design will not be centered on the chest. What am I doing wrong?
21.06.2018 - 18:19Odpowiedź DROPS Design :
Dear Mrs Fae, A.2 should be centered over the 49 sts on front piece = K16, work A.2, K14, inc for raglan = YO, K1, YO, K1fb, K1 (= st with marker), K1fb, YO, K1, YO and continue working inc at each raglan, at the end of round you will work the increase on each side of first marker (= at the end of round + at the beg of next round). Happy knitting!
22.06.2018 - 07:54
![]() Kathy Fae napisała::
Kathy Fae napisała::
I’m unsure about A2 section. I’ve placed all my raglan markers. I’m making a Large. Is this correct: Row 1, work raglan increases (4 sts), knit 16, work row 1 of chart, then continue on with knit and regular increases to end. Row 2, knit all, twisted knit ay certain YOs. Row 3, work raglan increases, then knit 16 again, then row 3 of chart. I’m uncertain because the charted area moves over two stitches due to the two raglan increases. Am I doing this right?
21.06.2018 - 09:18Odpowiedź DROPS Design :
Dear Mrs Fae, when you will work row 3 in A.2 you should line it up over the row 1 in A.2, ie over the same 17 sts as on row 1 (you can insert a marker before and after these 17 sts to mark where A.2 should be worked). The number of sts on each side of A.2 will increase due to the raglan increases. Happy knitting!
21.06.2018 - 15:24
![]() Julie napisała::
Julie napisała::
Right now i have 294 stitches when i separate the stitches for the sleeves and the front and back on my needles i will only have 162 stitches when it written that i should have 174 the extra 12 stitches is that what i'm adding to the sleeves and counts for the 174? where does a person put the stitch markers?
28.05.2018 - 02:53Odpowiedź DROPS Design :
Dear Julie, the new markers will be inserted in the middle of the new 6 sts cast on under sleeve: 81 sts (= front piece), 6 sts (= 3 sts, 1 marker, 3 sts), 81 sts (= back piece), 6 sts (= 3 sts, 1 marker, 3 sts) = 174 sts (there are now 66 sts on each side on thread/st holders). Happy knitting!
28.05.2018 - 09:48
![]() Julie napisała::
Julie napisała::
Hi I have another question the A 2 design how many stitches are between the holes? I really don’t understand the directions so any kind of help you could give would be much appreciated
18.05.2018 - 05:39Odpowiedź DROPS Design :
Dear Julie, diagram A.2 is showing the 17 sts you have to work on mid front. Start reading diagram from the bottom corner on the right side towards the left on every round. Inserting a marker at the beg and another marker at the end of A.2 to mark these 17 sts can help. Happy knitting!
18.05.2018 - 09:05
![]() Julie napisała::
Julie napisała::
Could you please explain to me on the yoke part of the pattern when i switch the needles to size 4 i increased the 16 stitches on the next round it says it wants to set 4 markers than i knitted the 45 stitches and knitted one more stitch and put the 2nd marker on this stitch is this stitch is to be the dividing stitch between front and the sleeve?jploog
17.05.2018 - 03:30Odpowiedź DROPS Design :
Dear Julie, that's right the stitch with the 2nd marker is the st on raglan line between front and sleeve, the st with 3rd marker is between sleeve and back piece, the st with 4th marker is between back piece and sleeve (first st on round is the one between sleeve and front piece). Happy knitting!
17.05.2018 - 09:02
|
|||||||||||||||||||
Serene Spring |
|||||||||||||||||||
 |
 |
||||||||||||||||||
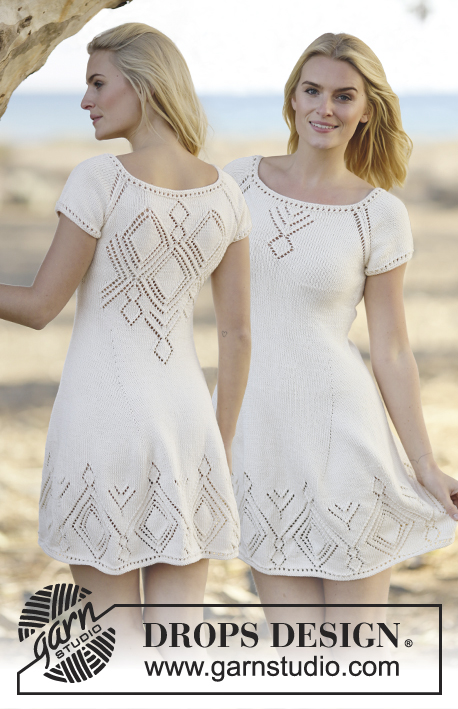
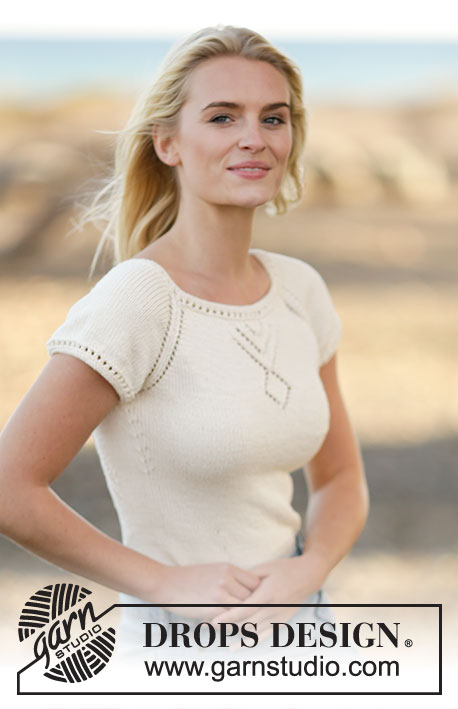
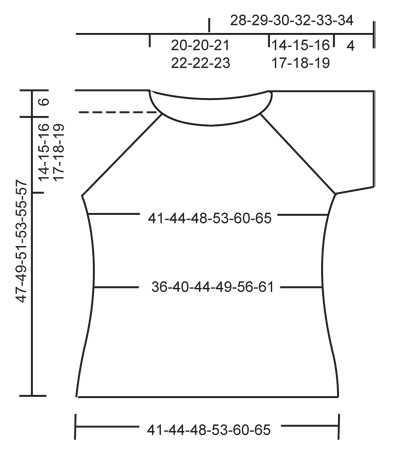
Top z ażurowym reglanem DROPS, z włóczki „Belle”. Przerabiany z góry na dół (top down). Od S do XXXL.
DROPS Extra 0-1104 |
|||||||||||||||||||
|
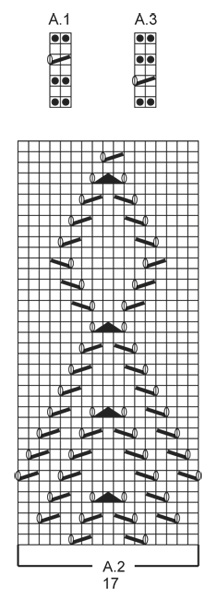
ŚCIEG FANTAZYJNY: Patrz schematy od A.1 do A.3. ZAMYKANIE OCZEK: Zamknąć 1 o. przed markerem następująco: przer. aż zostaje 2 o. przed markerem, zdjąć 1 o. jak do przerobienia na prawo, 1 o.p., przełożyć oczko zdjęte nad przerobionym oczkiem. Zamknąć 1 o. za markerem następująco: 2 o. razem na prawo. REGLAN: Dodajemy o. na reglan w zależności od rozmiaru: ROZMIAR S-M: Dodać 2 o. w miejscu każdego markera (= w sumie 8 dodanych o.) następująco: dodać 1 o. z każdej strony każdego markera (= 8 dodanych o.) następująco: 1 narzut, 1 o. przekręcone na prawo, 1 o.p., 1 o. przekręcone na prawo, 1 narzut. W nast. okrążeniu nie przer. oczek przekręconych w miejscu narzutów, powinny powstawać otwory (dziurki), powt. dodawanie o. jeszcze 17-19 razy co 2 okr. UWAGA: przerabiać dodane oczka z każdej strony 1-szego markera (= w ostatnie oczko w okrążeniu) następująco: na początku okrążenia: 1 oczko przekręcone na prawo, 1 narzut. Na końcu okrążenia: 1 narzut, 1 oczko przekręcone na prawo, 1 oczko prawe (= oczko z markerem). ROZMIARY L-XL-XXL-XXXL: Dodać 2 o. z każdej strony każdego markera (= w sumie 16 dodanych o. w okrążeniu) następująco: 1 narzut, 1 o.p., 1 narzut, 1 o. przekręcone i przerobione na prawo, 1 o.p. (oczko z markerem), 1 o. przekręcone i przerobione na prawo, 1 narzut, 1 o.p., 1 narzut (w nast. okrążeniu 1-szy i ost. narzut są przekręcone i przerobione na lewo, nie powinno być dziurek, ale 2 narzuty na środku powinny być przerobione na lewo – powstaną dziurki). Powt. dodawanie o. jeszcze 1-1-1-3 razy co 2 okr. UWAGA: przerabiać dodane oczka z każdej strony 1-szego markera (= w ostatnie oczko w okrążeniu) następująco: na początku okrążenia: 1 oczko przekręcone na prawo, 1 oczko prawe, 1 narzut, 1 oczko prawe, 1 narzut. Na końcu okrążenia: 1 narzut, 1 oczko prawe, 1 narzut, 1 oczko przekręcone na prawo, 1 oczko prawe (= oczko z markerem). Dalej dodać 1 o. z każdej strony każdego markera (= w sumie 8 dodanych o.) następująco: 1 narzut, 1 o. przekręcone na prawo, 1 o.p. (oczko z markerem), 1 o. przekręcone na prawo, 1 narzut. W nast. okrążeniu nie przer. oczek przekręconych w miejscu narzutów na lewo, powinny powstawać otwory (dziurki), powt. dodawanie o. jeszcze 19-20-22-21 razy co 2 okr. DODAWANIE OCZEK: Zacząć 1 o. przed markerem i dodawać następująco: 1 narzut, 2 o.p. (marker znajduje się między tymi 2 o.), 1 narzut. W nast. okrążeniu przer. oczka przekręcone w miejscu narzutów na prawo, aby uniknąć dziur. ---------------------------------------------------------- TOP: Przerabiany na okrągło na drutach z żyłką, z góry na dół. KARCZEK: Na drutach z żyłką nr 3,5 nabrać 134-134-140-144-144-148 o. włóczką Belle. Przer. A.1 (= 2 o.) przez wszystkie oczka. Gdy schemat A.1 zostanie przerobiony 1 raz na wysokość zacząć przer. na drutach z żyłką nr 4, a w nast. okrążeniu przer. wszystkie o. na prawo dodając równomiernie 16-20-14-22-42-46 o. = 150-154-154-166-186-194 o. W nast. okrążeniu umieścić 4 markery następująco: umieścić 1-szy w ost. oczko ost. okrążenia, 45-47-49-55-65-71 o.p. (= przód), przer. 1 o.p. i umieścić 2-gi marker w to oczko, 28-28-26-26-26-24 o.p. (= rękaw), przer. 1 o.p. i umieścić 3-ci marker w to oczko, 45-47-49-55-65-71 o.p. (= tył), przer. 1 o.p. i umieścić 4-ty marker w to oczko, 28-28-26-26-26-24 o. (= rękaw). ZACHOWAĆ TAKIE SAME NAPRĘŻENIE NICI JAK W PRZYPADKU PRÓBKI! Dalej przer. następująco - W TYM SAMYM CZASIE dodać o. na REGLAN - patrz powyżej. Dodajemy połowę oczek na reglan w miejscu 1-szego markera (patrz powyżej). Przer. 14-15-16-19-24-27 o.p., A.2 (= 17 o.), przer. na prawo, aż zostaje 1-1-2-2-2-2 o. przed 2-gim markerem, przer. REGLAN - patrz powyżej, przer. na prawo aż zostaje 1-1-2-2-2-2 o. przed 3-cim markerem, przer. reglan, przer. na prawo aż zostaje 1-1-2-2-2-2 o. przed 4-tym markerem, przer. reglan, przer. na prawo aż zostaje 1-1-2-2-2-2 o. przed 1-szym markerem, przer. reglan. Przer. dodawane o. dżersejem. Gdy schemat A.2 zostanie przerobiony 1 raz na wysokość, przer. wszystkie oczka dżersejem. Gdy wszystkie o. zostaną dodane jest 294-314-338-358-394-426 o. Dł. robótki wynosi ok. 14-15-16-17-18-19 cm. Dalej przer. dżersejem następująco: przer. 81-87-95-103-117-129 pierwszych o. (= przód), zdjąć 66-70-74-76-80-84 nast. o. na drut pomocniczy na rękaw, nabrać 6-6-6-8-8-8 o. pod rękawem (umieścić marker na środku tych nowych o.), przer. 81-87-95-103-117-129 nast. o. (= tył), zdjąć 66-70-74-76-80-84 nast. o. na drut pomocniczy na rękaw, nabrać 6-6-6-8-8-8 o. pod rękawem (umieścić marker na środku tych nowych o.) = zostaje 174-186-202-222-250-274 o. Umieścić 1 marker, OD TEGO MOMENTU MIERZYĆ STĄD. TYŁ & PRZÓD: Dalej przer. dżersejem. Na wys. 3 cm zamknąć 1 o. z każdej strony każdego z markerów na bokach (= 4 zamknięte o.) - PATRZ ZAMYKANIE OCZEK! Powt. zamykanie o. jeszcze 5-3-3-3-3-3 razy co 2½-4-4-4-4-4 cm = 150-170-186-206-234-258 o. Na wys. 20 cm we wszystkich rozmiarach, dodać 1 o. z każdej strony każdego z markerów na bokach (= 4 dodane o.) - PATRZ DODAWANIE OCZEK. Powt. dodawanie o. jeszcze 5-3-3-3-3-3 razy co 2-4-4-4-4-4 cm = 174-186-202-222-250-274 o. Na wys. 31-32-33-34-35-36 cm zacząć przer. na drutach z żyłką nr 3,5 i przer. schemat A.3 (= 2 o.) przez wszystkie oczka. Zakończyć. RĘKAWY: Przerabiane na okrągło na drutach pończoszniczych. Wziąć z powrotem o. z drutu pomocniczego na druty pończosznicze nr 4 i nabrać 6-6-6-8-8-8 o. pod rękawem = 72-76-80-84-88-92 o. Przer. dżersejem przez 2 cm, w nast. okrążeniu równomiernie zamknąć 8 o. = 64-68-72-76-80-84 o. Wziąć teraz druty pończosznicze nr 3,5 i przer. schemat A.3 przez wszystkie oczka. Zakończyć. Przer. drugi rękaw w taki sam sposób. WYKOŃCZENIE: Zszyć otwory pod rękawami. |
|||||||||||||||||||
Objaśnienia do schematu |
|||||||||||||||||||
|
|||||||||||||||||||
 |
|||||||||||||||||||
 |
|||||||||||||||||||
Skończyłaś ten wzór?Otaguj swoje zdjęcia #dropspattern lub prześlij je do #dropsfan gallery. Potrzebujesz pomocy w związku z tym wzorem?Zobacz 21 instrukcje video, sekcję Komentarze/Pytania i jeszcze więcej, wchodząc na stronę wzoru na garnstudio.com © 1982-2026 DROPS Design A/S. Wszelkie prawa zastrzeżone. Ten dokument, w całości, jest chroniony prawem. Zobacz co możesz robić z naszymi wzorami na dole każdego wzoru na naszej stronie. |
|||||||||||||||||||


Posiadając 40 lat doświadczenia w projektowaniu wzorów na druty i szydełko, DROPS Design oferuje jedną z największych kolekcji bezpłatnych wzorów w internecie – przetłumaczonych na 17 języków. Obecnie jest dostępnych 324 katalogów i 12290 wzorów w języku polskim.
Dokładamy wszelkich starań, aby oferować Wam druty i szydełka, inspiracje, fachowe porady oraz doskonałej jakości włóczki w najlepszych cenach! Zamierzasz wykorzystać nasze wzory inaczej niż tylko do osobistego użytku? Przeczytaj jakie masz prawa w Copyright, który znajdziesz na końcu każdego wzoru. Miłej pracy!
Dodaj komentarz do modelu DROPS Extra 0-1104
Chcielibyśmy się dowiedzieć co masz do powiedzenia o tym wzorze!
Jeśli chcesz zadać pytanie i szybko uzyskać odpowiedź, upewnij się, że została wybrana właściwa kategoria w formularzu poniżej. Pola obowiązkowe są oznaczone *.