
Popularne kategorie
Szukasz włóczki?


Komentarze / Pytania (68)
![]() Pirkko napisała::
Pirkko napisała::
I just finished the back square and I am in the part that you go to knitting 1 garter sts,k5,A2,k5,1garter.The instructions then say until finished measurement. How long is that finished measurement?
26.01.2024 - 19:29
![]() Jeeva napisała::
Jeeva napisała::
Hi, thank you so much for the pattern, as a beginner, this pattern is my first attempt at an apparel. And i got to learn many new techniques and tips. But i only had 1 problem and that was the size. I did a xxl but it looks smaller than the mentioned dimensions, not sure why. Though i made sure the stitches and tension were correctly managed. Any suggestions for improvement?
04.12.2023 - 15:51
![]() Lorraine Stephens napisała::
Lorraine Stephens napisała::
Drops 160-25 pattern to finish edge it says to pick up 20 stitches, then knit 63 stitches from holder, then pick up 40 stitches and knit next 63 stitches from holder and finally pick up 20 more stitches. I am so confused. Where do you pick up the 20,40 and 20 stitches from?
13.06.2023 - 04:30Odpowiedź DROPS Design :
See answer below :)
13.06.2023 - 08:40
![]() Lorraine New Stephens napisała::
Lorraine New Stephens napisała::
On the drops 160-25 pattern for the edge instructions it says to pick up 20 stitches then knit the 63 stitches then pick up 40 stitches and knit next 63 stitches then pick up another 20 stitches. Where do you pick up the 20, then 40 then another 20 from?
13.06.2023 - 04:22Odpowiedź DROPS Design :
Dear Mrs New Stephens, start picking up stitches straight after the seam on the sleeve (you left 9 cm left on sleeve seam - see chart), pick up 20 sts along these 9 cm, then work the 63 sts, pick up 40 sts along the 9 cm x 2 sides on top of next sleeve, pick up 63 sts along the other side of square and finish picking up 20 sts along the 9 cm on top of sleeve. Happy knitting!
13.06.2023 - 08:39
![]() Fanni napisała::
Fanni napisała::
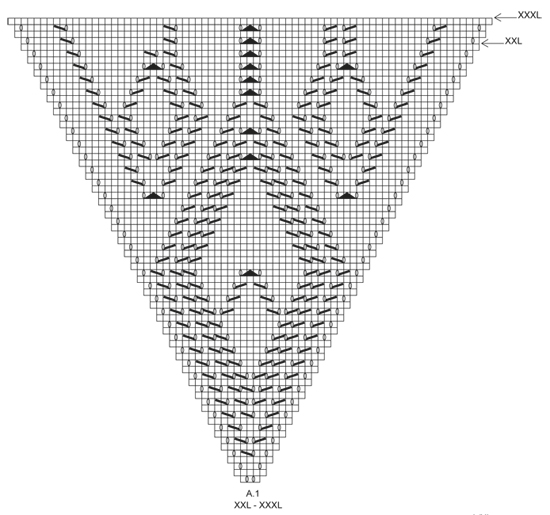
Hi, I think you have an error on the A1 diagrom for size xxl-xxxl. In the last 4 row on the left side a yarn over and a decrease is missing. Otherwise, it's a nice pattern, thank you.
24.04.2023 - 18:03
![]() Vania Monaco napisała::
Vania Monaco napisała::
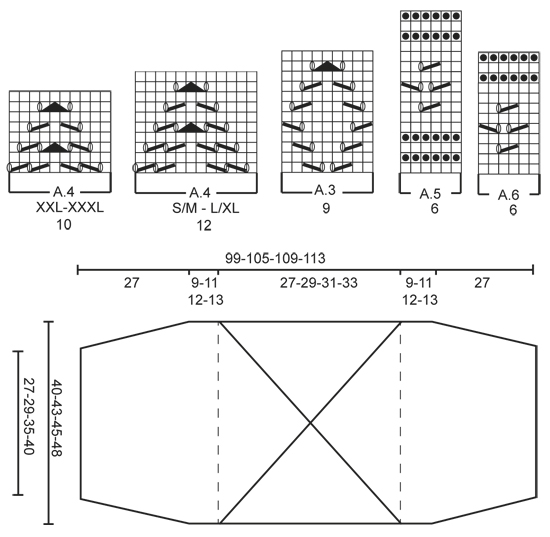
Thank you for this great design and for your website full of tips. Unfortunately it appears that the schemes A3 to A6 have disappeared from this page. Could you please have a look? Thanks!
06.10.2022 - 01:26Odpowiedź DROPS Design :
Dear Mrs Monaco, you should find diagrams A.3 to A.6 just above the measurement chart (below A.1 in size S/M -LXL). Happy knitting!
06.10.2022 - 09:06
![]() Isabelle REYT napisała::
Isabelle REYT napisała::
Merci pour le retour mais cela ne répond pas à ma question. Sur le premier tour de AU, il ne faut pas augmenter entre les marqueurs. Est que quand on tricote A6, une deuxième fois est qu'il ne faut pas augmenter entre les marqueurs également ? Ce n'est pas précisé. Merci
07.09.2022 - 08:40Odpowiedź DROPS Design :
Bonjour Mme Reyt, effectivement, quand vous augmentez dans A.6 vous ne devez pas augmenter entre le 1er et le 2ème marqueur ni entre le 3ème et le 4ème marqueur - les augmentations doivent donc être réparties entre le 2ème et le 3ème marqueur et entre le 4ème et le 1er marqueur. Bon tricot!
07.09.2022 - 09:55
![]() Isabelle napisała::
Isabelle napisała::
Bonjour Concernant les dernières augmentations sur A6. Dois je aussi ne pas augmenter sur les mailles milieu dos du haut et bas ? Merci
06.09.2022 - 09:02Odpowiedź DROPS Design :
Bonjour Isabelle, les augmentations de la bordure dans A.6 se font à intervalles réguliers réparties sur tout le tour, pas uniquement à quelques endroits du tour. Découvrez ici comment répartir des augmentations régulièrement. Bon tricot!
06.09.2022 - 09:32
![]() Amal napisała::
Amal napisała::
Hi this a follow up to my previous question about the A 6 chart. Unless I misunderstood the directions for the edge border I am knitting in the round so it’s impossible to get the garter stitch ridge by knitting all the rows. Please recheck the edge directions and clarify if you can. I purled the rows 10 and 12 to get the ridge effect. Thank you
30.05.2022 - 17:38Odpowiedź DROPS Design :
Dear Amal, to work garter stitch in the round you will have to work 2 rounds (knit 1 round, purl 1 round), see video; that's what you have to work in A.6, ie knit (including lace pattern) rows 1 to 9, then Purl 1 round, K1 round and P 1 round = there are now 2 ridges in garter stitch. Can this help? Happy knitting!
31.05.2022 - 08:31
![]() Amal napisała::
Amal napisała::
Thank you for the response to my questions. I just want to ask about the A6 chart. We will be working on the right side on all the rows, shouldn’t the dark circle be purl on the right side so we get the garter stitch ridge?
30.05.2022 - 04:09Odpowiedź DROPS Design :
Hi Amal, When working garter stitch back and forth you knit from both the right and wrong side to give the ridge pattern. So at the top of A.6, rows 10-12 you knit from the wrong side, knit from the right side and knit from the wrong side to finish. Happy knitting!
30.05.2022 - 06:57
|
|||||||||||||||||||
Kamelia#kameliashoulderpiece |
|||||||||||||||||||
 |
 |
||||||||||||||||||
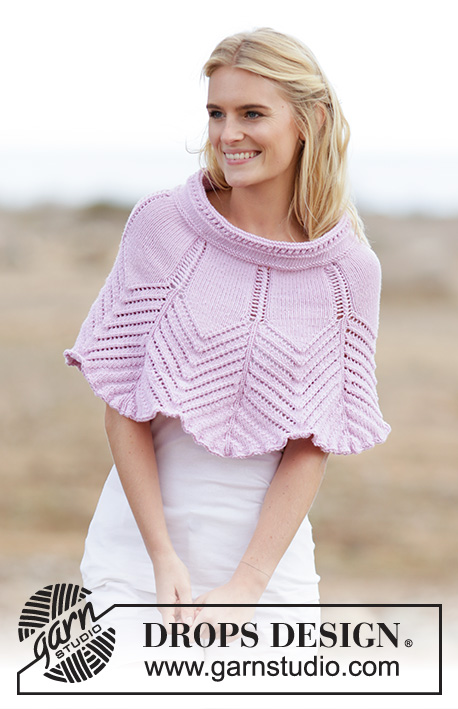
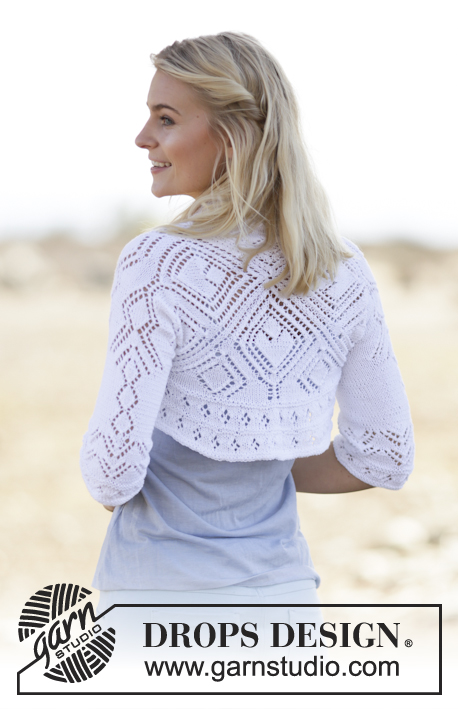
Ażurowe bolerko DROPS z włóczki „Safran”. Od S do XXXL.
DROPS 160-25 |
|||||||||||||||||||
|
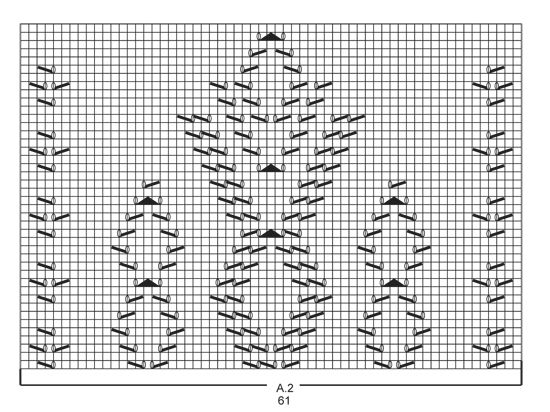
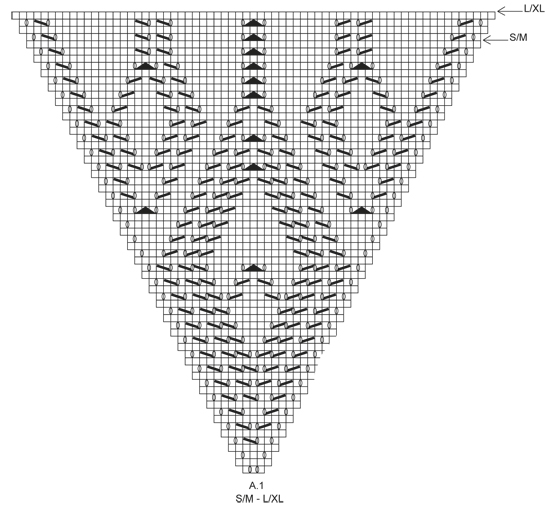
ŚCIEG FRANCUSKI (w tę i z powrotem): Przer. wszystkie rzędy na prawo. 1 „ściągacz” francuski = 2 rz. na prawo. DODAWANIE OCZEK: Dodać 1 o. wykonując 1 narzut, w nast. rzędzie przer. oczko przekręcone w miejscu narzutu na lewo (wkłuwając drut z tyłu robótki zamiast z przodu) aby uniknąć dziur. ŚCIEG FANTAZYJNY: Patrz schematy od A.1 do A.6. Schematy przedstawiają wszystkie rzędy ściegu fantazyjnego, widok na prawej stronie robótki. ---------------------------------------------------------- BOLERKO: Zaczynamy od kwadratu przerabianego na okrągło, a następnie przerabiamy każdy rękaw w tę i z powrotem. TYŁ: Przerabiany na okrągło na drutach pończoszniczych, gdy jest za dużo oczek na druty pończosznicze wziąć druty z żyłką. Nabrać 12 o. włóczką Safran i rozłożyć je równomiernie na 4 druty pończosznicze nr 3,5 (= 3 o. na każdym drucie). Następnie umieścić 4 markery następująco: 1-szy marker między 3-cim i 4-tym o., 2-gi marker między 6-tym i 7-mym o., 3-ci marker między 9-tym i 10-tym o. i 4-ty marker między 12-tym i 1-szym o. Dalej przer. wg schematu A.1 – patrz schemat dostosowany do rozmiaru (= 4 razy na szerokość). Oczka z markerami stanowią rogi, przesuwać markery w miarę postępu robótki. ZACHOWAĆ TAKIE SAME NAPRĘŻENIE NICI JAK W PRZYPADKU PRÓBKI! Gdy schemat A.1 zostanie przerobiony 1 raz na wysokość (patrz strzałka odpowiednia dla rozmiaru) każda część będzie przerabiana oddzielnie = 63-67-71-75 o. z każdej strony i w sumie 252-268-284-300 o. Dalej przer. tylko 63-67-71-75 pierwszych o. (= bok, tj. oczka między 4-tym i 1-szym markerem), zdjąć pozostałe oczka (boki) na druty z żyłką, oczka między 2-gim i 3-cim markerem będą przerabiane później. Przer. teraz w tę i z powrotem. W nast. rzędzie na prawej stronie robótki przer. następująco: przer. 2 razy 1-sze o., 0-2-4-6 o.p., A.2 (= 61 o.), 0-2-4-6 o.p., przer. 2 razy ost. oczko = 65-69-73-77 o. Dalej przer. następująco: 1 o. brzeg. ŚCIEGIEM FRANCUSKIM - patrz powyżej, 1-3-5-7 o. dżersejem, A.2, 1-3-5-7 o. dżersejem, 1 o. brzeg. ściegiem francuskim. Przer. oczka brzeg. ściegiem francuskim do końca. ROZMIAR L/XL-XXL-XXXL: W nast. rzędzie na prawej stronie robótki dodać 1 o. w odl. 1 o. od brzegu z każdej strony– PATRZ DODAWANIE OCZEK, powt. dodawanie o. jeszcze 2-4-8 razy w każdym rzędzie na prawej stronie robótki = 75-83-95 o. Przer. dodawane o. dżersejem. WSZYSTKIE ROZMIARY: = 65-75-83-95 o. Gdy schemat A.2 zostanie przerobiony 1 raz na wysokość, przer. na prawej stronie robótki następująco: 1 o. brzeg. ściegiem francuskim, 27-32-36-42 o. dżersejem, A.3 (= 9 o.), 27-32-36-42 o. dżersejem, 1 o. brzeg. ściegiem francuskim. Przer. w sumie 2 razy schemat A.3 na wysokość. Dalej przer. 0-6-0-4 rz. dżersejem. W nast. rzędzie na prawej stronie robótki równomiernie zamknąć 3-1-1-3 o. = 62-74-82-92 o. Przer. 1 rząd na lewo na lewej stronie robótki. Dalej przer. 5-6-8-9 razy schemat A.4 na szerokość – patrz schemat odpowiedni dla rozmiaru (= 12-12-10-10 o.). Przer. w sumie 2-2-3-3 razy schemat A.4 na wysokość. Dalej przer. 10-12-13-15 razy schemat A.5 (= 6 o.) na szerokość, W TYM SAMYM CZASIE w 1-szym rz. równomiernie zamknąć 0-0-2-0 o. = 62-74-80-92 o. Zakończyć, gdy schemat A.5 zostanie przerobiony 1 raz na wysokość. Przer. oczka między 2-gim i 3-cim markerem w taki sam sposób. WYKOŃCZENIE: Zszyć bok w odl. 1 o. od brzegów, do wys. 27 cm od brzegu rękawa. Powt. z drugiej strony. BRZEG: Przerabiany na okrągło na drutach z żyłką. Zacząć w miejscu szwu jednego rękawa i przer. na drutach z żyłką nr 3,5 włóczką Safran, na prawej stronie robótki, następująco: nabrać 20-25-28-30 o. w odl 1 o. ściegiem francuskim od brzegu, przer. na prawo 63-67-71-75 o. na drucie pomocniczym, nabrać 40-50-56-60 o. w odl. 1 o. od brzegu i przer. na prawo 63-67-71-75 o. na drucie pomocniczym, nabrać 20-25-28-30 o. = 206-234-254-270 o. Przer. 1 okr. na lewo - W TYM SAMYM CZASIE umieścić 4 markery następująco: przer. 40-47-52-56 o.l., umieścić 1-szy marker, 23 o.l., umieścić 2-gi marker, 80-94-104-112 o.l., umieścić 3-ci marker, 23 o.l., umieścić 4-ty marker, przer. pozostałe o. w okrążeniu (= 40-47-52-56 o.l.). Gdy dodajemy o., nie dodawać o. między 1-szym i 2-gim markerem (oznaczenia na dekolt), ani między 3-cim i 4-tym markerem (oznaczenia na środek tyłu). Przer. 1 okr. na prawo, W TYM SAMYM CZASIE równomiernie dodać 14-15-18-22 o. = 220-249-272-292 o. Przer. 1 okr. na lewo. Dalej przer. schemat A.6 (= 6 o.), W TYM SAMYM CZASIE w 1-szym okr. równomiernie dodać 14-15-16-20 o. = 234-264-288-312 o. Schemat A.6 jest teraz przerobiony 39-44-48-52 razy na szerokość. Powt. schemat A.6 jeszcze 1 raz na wysokość, W TYM SAMYM CZASIE w 1-szym okr. równomiernie dodać 24-30-36-36 o. = 258-294-324-348 o. Schemat A.6 jest teraz 43-49-54-58 razy na okrągło. Po przerobieniu schematu A.6 luźno zakończyć. |
|||||||||||||||||||
Objaśnienia do schematu |
|||||||||||||||||||
|
|||||||||||||||||||
 |
|||||||||||||||||||
 |
|||||||||||||||||||
 |
|||||||||||||||||||
 |
|||||||||||||||||||
Skończyłaś ten wzór?Otaguj swoje zdjęcia #dropspattern #kameliashoulderpiece lub prześlij je do #dropsfan gallery. Potrzebujesz pomocy w związku z tym wzorem?Zobacz 27 instrukcje video, sekcję Komentarze/Pytania i jeszcze więcej, wchodząc na stronę wzoru na garnstudio.com © 1982-2026 DROPS Design A/S. Wszelkie prawa zastrzeżone. Ten dokument, w całości, jest chroniony prawem. Zobacz co możesz robić z naszymi wzorami na dole każdego wzoru na naszej stronie. |
|||||||||||||||||||


Posiadając 40 lat doświadczenia w projektowaniu wzorów na druty i szydełko, DROPS Design oferuje jedną z największych kolekcji bezpłatnych wzorów w internecie – przetłumaczonych na 17 języków. Obecnie jest dostępnych 324 katalogów i 12290 wzorów w języku polskim.
Dokładamy wszelkich starań, aby oferować Wam druty i szydełka, inspiracje, fachowe porady oraz doskonałej jakości włóczki w najlepszych cenach! Zamierzasz wykorzystać nasze wzory inaczej niż tylko do osobistego użytku? Przeczytaj jakie masz prawa w Copyright, który znajdziesz na końcu każdego wzoru. Miłej pracy!
Dodaj komentarz do modelu DROPS 160-25
Chcielibyśmy się dowiedzieć co masz do powiedzenia o tym wzorze!
Jeśli chcesz zadać pytanie i szybko uzyskać odpowiedź, upewnij się, że została wybrana właściwa kategoria w formularzu poniżej. Pola obowiązkowe są oznaczone *.