
Popularne kategorie
Szukasz włóczki?


Komentarze / Pytania (91)
![]() Val napisała::
Val napisała::
I'm in trouble. Since I did yesterday a wrong decrease (is not clear this explanation),now I have to remake again the round of yesterday, and it's all a mess. The stitch markers skip since I had to unravel? the k 2 tog, so I don't know if the stitch marker have to stay 2 stiches ahead or after... it's all a mess right now, I ve also lost the starting point of the beginning of the round... now what I will do? I lost the right places of the stitches , nothing match anymore how they should be
14.12.2021 - 16:57Odpowiedź DROPS Design :
Dear Val, it's a bit tricky to have an idea of your work, maybe you can bring your work to your store or show them a picture so that they can help you easely? The markers on the sides should have been inserted when divding piece, you can try to follow the middle of the 10 sts cast on on your work inserting your marker, then decrease simply as explained under DECREASE TIP on each side of these markers. Hope it will help. Happy knitting!
15.12.2021 - 07:44
![]() Val napisała::
Val napisała::
Sorry, i'm confused because the dec tip says "slip 1 st as if k, k1 ,psso" and not 'K1, splip 1 as if to k, k1, psso.... " not says "K2 tog, K1, slip marker, K1, slip 1 as if to K, K1, psso, and work until 3 sts remain". Also, the "repeat dec every 2 cm until piece measure 14 cm from MARKER under sleeves" . What marker under sleeve? My marker under sleeve is follow my current row, so I'm confused, Thank you 4 help!
14.12.2021 - 16:44Odpowiedź DROPS Design :
Dear Val, the marker mid under sleeve is the marker placed in the middle of the 10 stitches cast on when dividing yoke. you will decrease on each side of the middle 2 sts under sleeve: decrease, K1, marker, K1, decrease. measuring these 14 cm from the marker = from the new stitches cast on mid under sleeve when dividing. Can this help?
15.12.2021 - 07:41
![]() Val napisała::
Val napisała::
Sorry I don't understand the decrease explanation ( I ve watched videos, is not that I don't understand how to do the 2k tog or psso) but I don' t understand what stitches I have to pick up. The instructions says "On next round dec 1 st on each side of each marker in the sides" I don't understand in which sense ' I knitted the first 11 stitches before marker, I did k 2 tog, before marker, now I have again to do k 2 tog or sl 1, k1 and psso? I don't get it.. thank you!
13.12.2021 - 22:48Odpowiedź DROPS Design :
Dear Val, you mean on body, correct? Work until 3 sts remain before the marker on the side of the jumper (body), K2 tog, K1, slip marker, K1, slip 1 as if to K, K1, psso, and work until 3 sts remain before next marker on the other side of the jumper and repeat the decrease. This video shows how to work this kind of decrease (on a sleeve in the video). Hope it can help you. Happy knitting!
14.12.2021 - 07:48
![]() Confused napisała::
Confused napisała::
Sorry, I'm at this point " cast on 10 new sts under sleeve, insert a marker in the middle of these 10 sts" ... I've never knitted a sweater so I don't understand how to hold this sweater and how to add the cast on stitches under sleeve... in which sense? There's a video? Thank you...
05.12.2021 - 17:50Odpowiedź DROPS Design :
Dear Confused, you can check the following lesson with pictures on how to knit a sweater in the round. https://www.garnstudio.com/lesson.php?id=71&cid=19 You can also check this video: https://www.garnstudio.com/video.php?id=1634&lang=en Happy knitting!
05.12.2021 - 20:53
![]() Melinda Berlanger napisała::
Melinda Berlanger napisała::
Bonjour, pour la manche, où mesurer les 38 cm? ou on a monter les 10 mailles? ou bien de l'épaule? de même pour coudre sous les manches, comment devons nous joindre les coutures? merci beaucoup
25.11.2021 - 14:41Odpowiedź DROPS Design :
Bonjour Mme Berlanger, mesurez la longueur de la manche au milieu du dessus de la manche, à partir des mailles reprises pour cette partie; cette vidéo montre comment fermer l'ouverture sous les manches (les 10 mailles montée sous la manche). Bon tricot!
25.11.2021 - 16:42
![]() Conny Andersen napisała::
Conny Andersen napisała::
Hej Nu har jeg strikket blusen i str xxxl. Der var fejl i opskriften, så jeg måtte regne ud hvor mange masker jeg skulle slå op for at maskeantallet passede med mønstret med rensdyr. Den ser ikke ud som på billedet fordi man skal strikke 11 omgange efter mønster a1. Det gør at m2 kommer til at svæve langt under a1. Det ser ikke særlig smart ud. Så jeg er lidt skuffet
10.11.2021 - 07:40
![]() Caroline napisała::
Caroline napisała::
I'm working this in size M, lovely pattern and going very well. On the body where it says 'When piece measures 56-58-60-62-64-66 cm'. Is this measured from the 10 new stitches please under the arm as was the 13 cm? thank you.
07.11.2021 - 11:43Odpowiedź DROPS Design :
Dear Caroline, the measurements are in total, not just under the arm. Happy knitting!
07.11.2021 - 13:50
![]() Christina napisała::
Christina napisała::
Hallo Liebes Team, Den Rumpfteil des Pullis habe ich bereits fertig gestellt. Beim stricken des Musters am Ärmel habe ich allerdings 74 Masche, die ich auf das Muster aufteilen soll (für je 12 Maschen). Was soll mit dem restlichen Maschen unter dem Arm gemacht werden, die nicht im Muster gestrickt werden?
25.10.2021 - 23:15Odpowiedź DROPS Design :
Liebe Christina, Sie stricken stets so viele Maschen wie möglich im Muster, das Muster geht an der unteren Ärmelmitte nicht auf. Es kommen dann ja noch die Abnahmen an der unteren Ärmelmitte hinzu, dadurch geht das Muster dann auch weiterhin nicht auf. Achten Sie darauf, dass Sie das Muster ab der oberen Ärmelmitte abzählen (wie in der Anleitung beschrieben), damit es mittig zu liegen kommt. Viel Spaß beim Weiterstricken!
26.10.2021 - 12:13
![]() Donata napisała::
Donata napisała::
Hallo liebes Drops Design Team, Ist es vorgesehen, dass der Pullover gespannt wird zur Fertigstellung?
25.10.2021 - 15:02Odpowiedź DROPS Design :
Liebe Donata, vorgesehen ist es nicht unbedingt, aber Sie können den Pullover anfeuchten und auf das passende Maß spannen, bei Einstrickmustern kann das sinnvoll sein, um das Muster etwas zu glätten, falls es etwas unregelmäßig geworden ist. Viel Spaß mit diesem schönen Pullover!
25.10.2021 - 19:37
![]() Valentina napisała::
Valentina napisała::
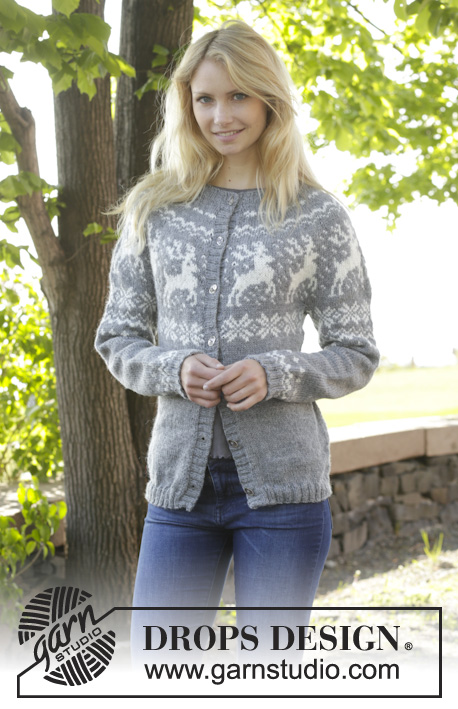
Hello, is it possible to have a more HQ photo of the lady that wear the sweater? I would like to see better the details especially in the collar YOKE 's zone. Also, I have a request about colors. Do you know if there's a knitting tool online that permit to change colors of a fair isle pattern, to see how it would look like changing colors? I would like to use more colors, but I can't image how it will result. Thanks for the infos!
20.10.2021 - 01:13Odpowiedź DROPS Design :
Dear Valentina, we only have thse pictures available that you can see on the pattern. If you are curious, why don't you check Ravelry as a number of different people knitted this and have their projects and pictures there. Happy Stitching!
20.10.2021 - 02:29
|
||||||||||
Silver Stag#silverstagsweater |
||||||||||
 |
 |
|||||||||
Sweter / sweter świąteczny na drutach z zaokrąglonym karczkiem, żakardem w renifery, przerabiany z góry na dół, z włóczki DROPS Karisma. Od S do XXXL.
DROPS 157-23 |
||||||||||
|
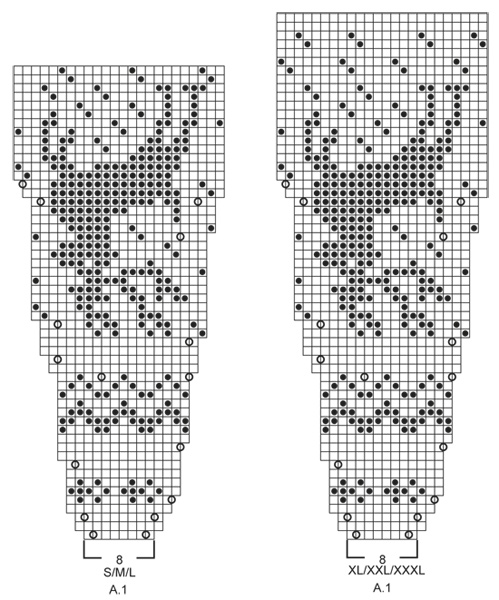
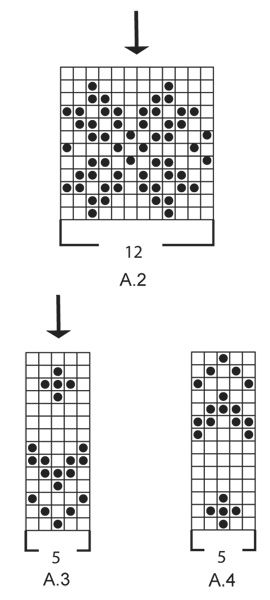
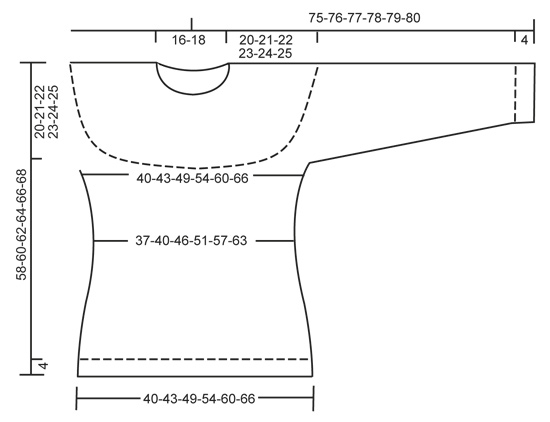
ŻAKARD: Patrz schematy A.1- A.4. Schematy pokazują wszystkie rzędy żakardu, widok na prawej stronie robótki. Przer. całą robótkę dżersejem. ZAMYKANIE OCZEK (boki i rękawy): Zamknąć przed markerem i 1 o.p. następująco: 2 o. razem na prawo. Zamknąć za markerem i 1 o.p. następująco: zdjąć 1 o. jak do przerobienia na prawo, 1 o.p., przełożyć oczko zdjęte nad przerobionym oczkiem. DODAWANIE OCZEK (boki): Dodać w sumie 4 o. w okrążeniu. Przer. aż zostaje 1 o. przed markerem, 1 narzut, 2 o. dżersejem, 1 narzut = 2 dodane o. W nast. okrążeniu przer. oczko przekręcone w miejscu narzutu na prawo (wkłuwając drut z tyłu robótki zamiast z przodu) aby uniknąć dziur. ---------------------------------------------------------- SWETER: Przerabiany na okrągło na drutach z żyłką, z góry na dół. Rękawy są przerabiane na okrągło na drutach pończoszniczych. KARCZEK: Na drutach z żyłką nr 3 nabrać 88-92-96-100-104-108 o. kolorem średni szary i przer. ściągaczem 2 o.l./2 o.p. aż dł. robótki wynosi 3 cm. Przer. teraz na drutach z żyłką nr 4 i przer. 1 okr. dżersejem, W TYM SAMYM CZASIE równomiernie dodać 0-4-8-20-24-28 o. = 88-96-104-120-128-136 o. Przer. teraz następująco: 11-12-13-15-16-17 razy schemat A.1 (= 8 o.) na szerokość. ZACHOWAĆ TAKIE SAME NAPRĘŻENIE NICI JAK W PRZYPADKU PRÓBKI! Gdy schemat A.1 zostanie przerobiony 1 raz na wysokość jest 264-288-312-360-384-408 o. Przer. 3-5-9-5-7-11 okr. kolorem średni szary. UWAGA: w rozmiarach S, L, XL, XXXL zatrzymać się 24 o. (= 1 raz schemat) przed ost. oczkiem w okrążeniu, od tej pory będzie to początek nast. okrążeń. Motyw jest teraz odpowiednio rozmieszczony, gdy dzielimy oczka na rękawy, tył i przód. Przer. kolejne okrążenie następująco: przer. 37-40-46-52-58-64 pierwszych o. (= połowa tyłu), zdjąć na drut pomocniczy 58-64-64-76-76-76 nast. o. (= rękaw), nabrać 10 o. pod rękawem, umieścić marker na środku tych 10 o., przer. 74-80-92-104-116-128 nast. o. (= przód), zdjąć na drut pomocniczy 58-64-64-76-76-76 nast. o. (= rękaw), nabrać 10 o. pod rękawem, umieścić marker na środku tych 10 o., przer. 37-40-46-52-58-64 pozostałych o. (= połowa tyłu). TYŁ & PRZÓD: Jest teraz 168-180-204-228-252-276 o. na tył i przód. Przer. teraz schemat A.2 (= 12 o.) przez wszystkie oczka. Dalej przer. tak samo, aż schemat A.2 zostanie przerobiony 1 raz na wysokość. Przer. teraz dżersejem kolorem średni szary. W nast. okrążeniu zamknąć 1 o. z każdej strony każdego markera na bokach - PATRZ ZAMYKANIE OCZEK. Powt. zamykanie o. jeszcze 2 razy co 2 cm = 156-168-192-216-240-264 o. Po przerobieniu 12-13-14-15-16-17 cm, mierząc od markerów pod rękawami, dodać 1 o. z każdej strony markerów na bokach – PATRZ DODAWANIE OCZEK. Powt. dodawanie o. jeszcze 2 razy co 2 cm = 168-180-204-228-252-276 o. Na wys. 56-58-60-62-64-66 cm od dołu robótki zacząć przer. na drutach z żyłką nr 3 i równomiernie dodać 20-24-24-28-28-32 o. = 188-204-228-256-280-308 o. Dalej przer. ściągaczem *2 o.p., 2 o.l.*. Gdy wys. ściągacza wynosi 4 cm zamknąć o. tak jak schodzą z drutu. RĘKAWY: Najpierw przer. żakardem, następnie kolorem średni szary. Wziąć z powrotem oczka z drutu pomocniczego na druty pończosznicze nr 4. Jest 58-64-64-76-76-76 o. na rękaw. Przer. 1 rz. dżersejem i nabrać 10 o. pod spodem rękawa = 68-74-74-86-86-86 o. Umieścić marker na środku tych nowych oczek. Dalej przer. na okrągło. Przer. teraz schemat A.2. UWAGA: dopasować, aby 2 o. na środku schematu (patrz strzałka) były 2 o. na środku na wierzchu rękawa. Po przerobieniu schematu A.2, przer. schemat A.3. UWAGA: dopasować, aby oczko środk. schematu (patrz strzałka) było jednym z 2 o. na środku pod rękawem, W TYM SAMYM CZASIE zacząć zamykanie o. pod spodem rękawa - PATRZ ZAMYKANIE OCZEK. Powt. zamykanie o. jeszcze 9-12-12-12-12-12 razy co 3-2½-2½-2½-2½-2½ cm = 48-48-48-60-60-60 o. Gdy dł. rękawa wynosi 38 cm, przer. schemat A.4. UWAGA: dopasować, aby oczko środk. schematu (patrz strzałka) było jednym z 2 o. na środku rękawa. Po przerobieniu schematu A.4 wziąć druty pończosznicze nr 3 i równomiernie dodać 4-8-8-0-4-4 o. = 52-56-56-60-64-64 o. Dalej przer. ściągaczem (= 2 o.p./2 o.l.) przez 3 cm. Zamknąć oczka tak jak schodzą z drutu. WYKOŃCZENIE: Zszyć otwory pod rękawami. |
||||||||||
Objaśnienia do schematu |
||||||||||
|
||||||||||
 |
||||||||||
 |
||||||||||
 |
||||||||||
Skończyłaś ten wzór?Otaguj swoje zdjęcia #dropspattern #silverstagsweater lub prześlij je do #dropsfan gallery. Potrzebujesz pomocy w związku z tym wzorem?Zobacz 25 instrukcje video, sekcję Komentarze/Pytania i jeszcze więcej, wchodząc na stronę wzoru na garnstudio.com © 1982-2026 DROPS Design A/S. Wszelkie prawa zastrzeżone. Ten dokument, w całości, jest chroniony prawem. Zobacz co możesz robić z naszymi wzorami na dole każdego wzoru na naszej stronie. |
||||||||||


Posiadając 40 lat doświadczenia w projektowaniu wzorów na druty i szydełko, DROPS Design oferuje jedną z największych kolekcji bezpłatnych wzorów w internecie – przetłumaczonych na 17 języków. Obecnie jest dostępnych 324 katalogów i 12290 wzorów w języku polskim.
Dokładamy wszelkich starań, aby oferować Wam druty i szydełka, inspiracje, fachowe porady oraz doskonałej jakości włóczki w najlepszych cenach! Zamierzasz wykorzystać nasze wzory inaczej niż tylko do osobistego użytku? Przeczytaj jakie masz prawa w Copyright, który znajdziesz na końcu każdego wzoru. Miłej pracy!
Dodaj komentarz do modelu DROPS 157-23
Chcielibyśmy się dowiedzieć co masz do powiedzenia o tym wzorze!
Jeśli chcesz zadać pytanie i szybko uzyskać odpowiedź, upewnij się, że została wybrana właściwa kategoria w formularzu poniżej. Pola obowiązkowe są oznaczone *.