
Popularne kategorie
Szukasz włóczki?


Komentarze / Pytania (91)
![]() Knitting Well Done napisała::
Knitting Well Done napisała::
Hello , I don't understand how to centered the diagram even if I follow the lesson... do you have a video that show exactly what to do to center it and make the sleeve? Thank you 👱🏻♀️
13.03.2022 - 11:29
![]() Vale napisała::
Vale napisała::
I'm so sorry to have to ask again but I don't understand: how can I decrease every 2,5 cm if there's a pattern? With 2 tog decrease, it will be deformed the pattern motif... I'm so confused .. I'm referring to this "When A.2 has been worked, continue with A.3. NOTE: Adjust pattern so that the middle st in diagram (see arrow) is one of the 2 middle sts on sleeve, AT THE SAME TIME beg dec under sleeve - remember DECREASE TIP" The decrease tip mean to knit just 2 stitches together?
20.02.2022 - 00:33Odpowiedź DROPS Design :
Dear Vale, if your tension is right in height, you should decrease approx. on every 7th round in size M = ca on every 2,5 cm; decrease as explained under DECREASE TIP , ie work until 3 sts remain before marker and decrease as shown in this video - the pattern will not match anymore at the transitions between rounds, that's just okay. Happy knitting!
21.02.2022 - 09:58
![]() Vale napisała::
Vale napisała::
I'm sorry to ask but: I don't understand how to decrease every 2,5 cm, if I have a pattern? If I decrease, the pattern will be deformed... also, what decrease I should do? (2 tog?) how? This is the pattern I'm referring: "When A.2 has been worked, continue with A.3. NOTE: Adjust pattern so that the middle st in diagram (see arrow) is one of the 2 middle sts on sleeve, AT THE SAME TIME beg dec under sleeve - remember DECREASE TIP" Thank you...seems difficult without a chart.
20.02.2022 - 00:29
![]() Vale napisała::
Vale napisała::
Sorry, I have problems again in the instructions " When A.2 has been worked, continue with A.3. NOTE: Adjust pattern so that the middle st in diagram (see arrow) is one of the 2 middle sts on sleeve, AT THE SAME TIME beg dec under sleeve - remember DECREASE TIP. Repeat dec every 3-2½-2½-2½-2½-2½ cm / 1 1/8"-7/8"-7/8"-7/8"-7/8"-7/8" 9-12-12" etc . I don't also understand how to adjust "pattern so that the middle st in diagram is one of the 2 middle". what mean? Please..help...
19.02.2022 - 15:30Odpowiedź DROPS Design :
Dear Vale, this lesson will explain you how to center a diagram. Happy knitting!
21.02.2022 - 09:17
![]() Pattern napisała::
Pattern napisała::
Sorry again but I don't understand the previously answer, in your comment says "you should increase a total of 60 sts in size L and get so 228", but I don't know what increase of 60 stitches is it exactly? Thank you again....
01.02.2022 - 17:29Odpowiedź DROPS Design :
Oops sorry, I mistyped, I meant you have 204 sts on the needle in size L - you now increase 24 sts evenly (this lesson explains how to increase evenly on a round), there are now 228 sts and you will repeat K2, P2 all the round - US-pattern will be edited asap. Happy knitting!
02.02.2022 - 07:34
![]() Patterns Difficult napisała::
Patterns Difficult napisała::
Hello, this pattern have a mistake in the Body instructions. Yesterday I had to try and try. I have 230 stitches and it says to "Continue to work rib as follows: * K 2, P 2 *, repeat from *-* until 2 sts remain, K 2. When rib has been worked for 4 cm / 1½'', bind off with K over K and P over P." But with 230 stitches, it will end with 2Kand start with 2K so I will have 4 K between the others 2k p2 2k p2 etc. What happened? Why 230 stitches?It's not an Even number to do ribbing...Thanks..
01.02.2022 - 12:22Odpowiedź DROPS Design :
Hi, it looks like there is a mistake in the US-English pattern, you should increase a total of 60 sts in size L and get so 228 sts and work K2 P2 over these 228 sts (= 57 times (K2,P2). thanks for noticing. Happy knitting!
01.02.2022 - 16:13
![]() Karine napisała::
Karine napisała::
Koon L suurust. Siis kui on vaja kududa varrukale mustrit A4 (5silmust) on silmuseid 48 3 simust jääb üle kuidas neid kududa?
03.01.2022 - 19:49Odpowiedź DROPS Design :
Tere Karine! Koo nii palju silmuseid mustrisse, kui mahub, ülejäänud nii, kuidas ilusam jääb. Head kudumist!
07.01.2022 - 21:55
![]() Val napisała::
Val napisała::
Sorry , I have to ask again, is it sure that decrease is "work until 3 sts remain before the marker this: K2 tog, K1, slip marker, K1, slip 1 as if to K, K1, psso, and work until 3 sts remain before next marker on the other side of the jumper and repeat the decrease.”" I see that in the psso passage, Should not be simply : slip marker, K1, slip 1 as if to K , and psso? Why K1 is repeated 2 times? the video tutorial says this only (not 2 times k2) : K1, slip 1 psso
14.12.2021 - 18:16Odpowiedź DROPS Design :
Dear Val, when working body you will decrease a total of 4 stitches on the round (= 2 sts decreased at each marker) / when working sleeve you will decrease that way only 2 sts (only 1 marker, mid under sleeve). Happy knitting!
15.12.2021 - 08:25
![]() Val napisała::
Val napisała::
Sorry >
14.12.2021 - 18:13
![]() Val napisała::
Val napisała::
Hello,I was able to adjust everything.I'm now again the beginning of the round, before start the dec tip. So, I hope this time I 've understood well: So I have to: knit the first 12 stitches, but before reach the first stitch marker of the round, 3 stitches before, I have to “work until 3 sts remain before the marker, K2 tog, K1, slip marker, K1, slip 1 as if to K, K1, psso, and work until 3 sts remain before next marker on the other side of the jumper and repeat. Right? Thank you again!
14.12.2021 - 17:43Odpowiedź DROPS Design :
Dear Val, looks right, I'm just wondering about the first 12 stitches, rounds were worked on yoke from mid back, so that you continue from mid back towards the side, and then work until 3 sts remain before 1st marker on the side and decrease etc.. But if you could find the sides of the jumper, it looks then fine, as the decreases are worked on each side (below sleeves). Happy knitting!
15.12.2021 - 07:55
|
||||||||||
Silver Stag#silverstagsweater |
||||||||||
 |
 |
|||||||||
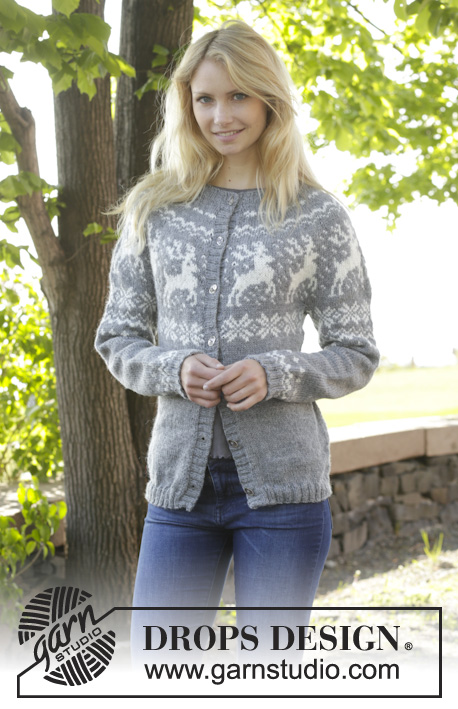
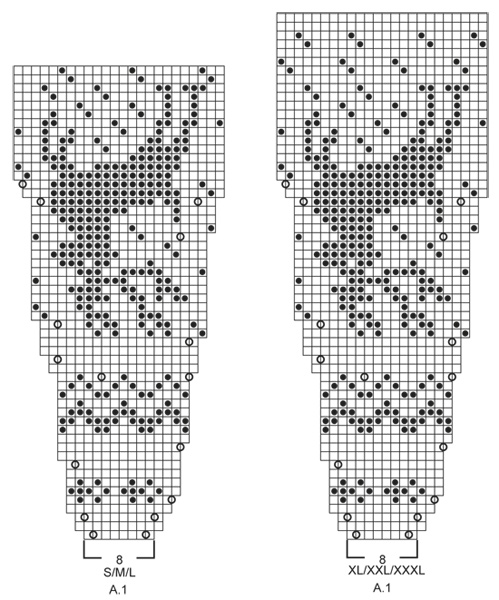
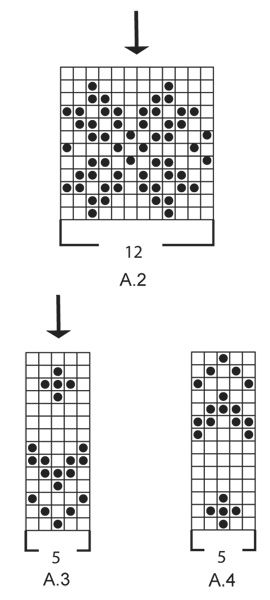
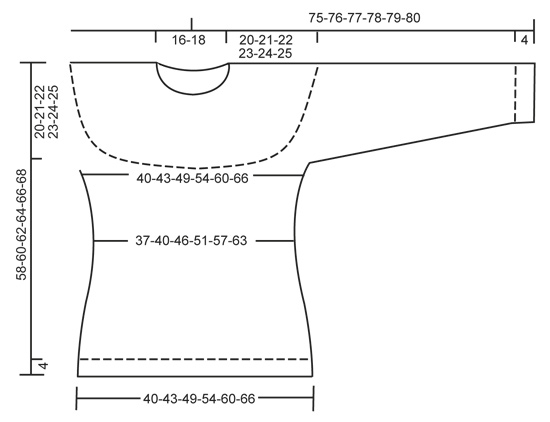
Sweter / sweter świąteczny na drutach z zaokrąglonym karczkiem, żakardem w renifery, przerabiany z góry na dół, z włóczki DROPS Karisma. Od S do XXXL.
DROPS 157-23 |
||||||||||
|
ŻAKARD: Patrz schematy A.1- A.4. Schematy pokazują wszystkie rzędy żakardu, widok na prawej stronie robótki. Przer. całą robótkę dżersejem. ZAMYKANIE OCZEK (boki i rękawy): Zamknąć przed markerem i 1 o.p. następująco: 2 o. razem na prawo. Zamknąć za markerem i 1 o.p. następująco: zdjąć 1 o. jak do przerobienia na prawo, 1 o.p., przełożyć oczko zdjęte nad przerobionym oczkiem. DODAWANIE OCZEK (boki): Dodać w sumie 4 o. w okrążeniu. Przer. aż zostaje 1 o. przed markerem, 1 narzut, 2 o. dżersejem, 1 narzut = 2 dodane o. W nast. okrążeniu przer. oczko przekręcone w miejscu narzutu na prawo (wkłuwając drut z tyłu robótki zamiast z przodu) aby uniknąć dziur. ---------------------------------------------------------- SWETER: Przerabiany na okrągło na drutach z żyłką, z góry na dół. Rękawy są przerabiane na okrągło na drutach pończoszniczych. KARCZEK: Na drutach z żyłką nr 3 nabrać 88-92-96-100-104-108 o. kolorem średni szary i przer. ściągaczem 2 o.l./2 o.p. aż dł. robótki wynosi 3 cm. Przer. teraz na drutach z żyłką nr 4 i przer. 1 okr. dżersejem, W TYM SAMYM CZASIE równomiernie dodać 0-4-8-20-24-28 o. = 88-96-104-120-128-136 o. Przer. teraz następująco: 11-12-13-15-16-17 razy schemat A.1 (= 8 o.) na szerokość. ZACHOWAĆ TAKIE SAME NAPRĘŻENIE NICI JAK W PRZYPADKU PRÓBKI! Gdy schemat A.1 zostanie przerobiony 1 raz na wysokość jest 264-288-312-360-384-408 o. Przer. 3-5-9-5-7-11 okr. kolorem średni szary. UWAGA: w rozmiarach S, L, XL, XXXL zatrzymać się 24 o. (= 1 raz schemat) przed ost. oczkiem w okrążeniu, od tej pory będzie to początek nast. okrążeń. Motyw jest teraz odpowiednio rozmieszczony, gdy dzielimy oczka na rękawy, tył i przód. Przer. kolejne okrążenie następująco: przer. 37-40-46-52-58-64 pierwszych o. (= połowa tyłu), zdjąć na drut pomocniczy 58-64-64-76-76-76 nast. o. (= rękaw), nabrać 10 o. pod rękawem, umieścić marker na środku tych 10 o., przer. 74-80-92-104-116-128 nast. o. (= przód), zdjąć na drut pomocniczy 58-64-64-76-76-76 nast. o. (= rękaw), nabrać 10 o. pod rękawem, umieścić marker na środku tych 10 o., przer. 37-40-46-52-58-64 pozostałych o. (= połowa tyłu). TYŁ & PRZÓD: Jest teraz 168-180-204-228-252-276 o. na tył i przód. Przer. teraz schemat A.2 (= 12 o.) przez wszystkie oczka. Dalej przer. tak samo, aż schemat A.2 zostanie przerobiony 1 raz na wysokość. Przer. teraz dżersejem kolorem średni szary. W nast. okrążeniu zamknąć 1 o. z każdej strony każdego markera na bokach - PATRZ ZAMYKANIE OCZEK. Powt. zamykanie o. jeszcze 2 razy co 2 cm = 156-168-192-216-240-264 o. Po przerobieniu 12-13-14-15-16-17 cm, mierząc od markerów pod rękawami, dodać 1 o. z każdej strony markerów na bokach – PATRZ DODAWANIE OCZEK. Powt. dodawanie o. jeszcze 2 razy co 2 cm = 168-180-204-228-252-276 o. Na wys. 56-58-60-62-64-66 cm od dołu robótki zacząć przer. na drutach z żyłką nr 3 i równomiernie dodać 20-24-24-28-28-32 o. = 188-204-228-256-280-308 o. Dalej przer. ściągaczem *2 o.p., 2 o.l.*. Gdy wys. ściągacza wynosi 4 cm zamknąć o. tak jak schodzą z drutu. RĘKAWY: Najpierw przer. żakardem, następnie kolorem średni szary. Wziąć z powrotem oczka z drutu pomocniczego na druty pończosznicze nr 4. Jest 58-64-64-76-76-76 o. na rękaw. Przer. 1 rz. dżersejem i nabrać 10 o. pod spodem rękawa = 68-74-74-86-86-86 o. Umieścić marker na środku tych nowych oczek. Dalej przer. na okrągło. Przer. teraz schemat A.2. UWAGA: dopasować, aby 2 o. na środku schematu (patrz strzałka) były 2 o. na środku na wierzchu rękawa. Po przerobieniu schematu A.2, przer. schemat A.3. UWAGA: dopasować, aby oczko środk. schematu (patrz strzałka) było jednym z 2 o. na środku pod rękawem, W TYM SAMYM CZASIE zacząć zamykanie o. pod spodem rękawa - PATRZ ZAMYKANIE OCZEK. Powt. zamykanie o. jeszcze 9-12-12-12-12-12 razy co 3-2½-2½-2½-2½-2½ cm = 48-48-48-60-60-60 o. Gdy dł. rękawa wynosi 38 cm, przer. schemat A.4. UWAGA: dopasować, aby oczko środk. schematu (patrz strzałka) było jednym z 2 o. na środku rękawa. Po przerobieniu schematu A.4 wziąć druty pończosznicze nr 3 i równomiernie dodać 4-8-8-0-4-4 o. = 52-56-56-60-64-64 o. Dalej przer. ściągaczem (= 2 o.p./2 o.l.) przez 3 cm. Zamknąć oczka tak jak schodzą z drutu. WYKOŃCZENIE: Zszyć otwory pod rękawami. |
||||||||||
Objaśnienia do schematu |
||||||||||
|
||||||||||
 |
||||||||||
 |
||||||||||
 |
||||||||||
Skończyłaś ten wzór?Otaguj swoje zdjęcia #dropspattern #silverstagsweater lub prześlij je do #dropsfan gallery. Potrzebujesz pomocy w związku z tym wzorem?Zobacz 25 instrukcje video, sekcję Komentarze/Pytania i jeszcze więcej, wchodząc na stronę wzoru na garnstudio.com © 1982-2026 DROPS Design A/S. Wszelkie prawa zastrzeżone. Ten dokument, w całości, jest chroniony prawem. Zobacz co możesz robić z naszymi wzorami na dole każdego wzoru na naszej stronie. |
||||||||||


Posiadając 40 lat doświadczenia w projektowaniu wzorów na druty i szydełko, DROPS Design oferuje jedną z największych kolekcji bezpłatnych wzorów w internecie – przetłumaczonych na 17 języków. Obecnie jest dostępnych 324 katalogów i 12290 wzorów w języku polskim.
Dokładamy wszelkich starań, aby oferować Wam druty i szydełka, inspiracje, fachowe porady oraz doskonałej jakości włóczki w najlepszych cenach! Zamierzasz wykorzystać nasze wzory inaczej niż tylko do osobistego użytku? Przeczytaj jakie masz prawa w Copyright, który znajdziesz na końcu każdego wzoru. Miłej pracy!
Dodaj komentarz do modelu DROPS 157-23
Chcielibyśmy się dowiedzieć co masz do powiedzenia o tym wzorze!
Jeśli chcesz zadać pytanie i szybko uzyskać odpowiedź, upewnij się, że została wybrana właściwa kategoria w formularzu poniżej. Pola obowiązkowe są oznaczone *.