
Popularne kategorie
Szukasz włóczki?


Komentarze / Pytania (68)
![]() Amy napisała::
Amy napisała::
To whom it may concern: I was wondering when I am knitting the 12 stitches do I knit both ends of the row in garter stitch or just the last stitch of the row. Thank you in advance for your help Amy
31.10.2015 - 16:27Odpowiedź DROPS Design :
Dear Amy, when you are working the 12 sts for mid upper part, work the 1st and last st in garter st. See also the video in previous answer. Happy knitting!
31.10.2015 - 18:20
![]() Amy napisała::
Amy napisała::
To whom it may concern: The problem I am having is I have the 10 stitches on my needle for the top portion of the slipper but when I reach the 7 cm am I suppose to increase on those 10 stitches to reach the number 61 stitches that I need or do I start increasing after after the 7 cm. It says to pick up 12 stitches after I reach the 7 cm on either side of the edge stitch. That is where I am having the problem. Thank you again for your help
29.10.2015 - 04:56Odpowiedź DROPS Design :
Dear Amy, after you have worked the 7 cm over the mid sts, and 10 sts left, pick up 12 sts along both side of the upper foot (along right side of the middle part + along left side of the middle part) + slip sts from thread back on needle = you have a total of 61 sts on needle and your work looks like as in video, time code 5:18 approx. Happy knitting!
29.10.2015 - 09:32
![]() Amy napisała::
Amy napisała::
To whom it may concern: I am still confused as to how many rows I need because there is no explanation for when I go to start the pattern 2 portion of the slipper part and how many increases I need to reach the required amount of sts as well. I tried to watch the video but it was hard to follow when the sped up the knitting part. Thank you again for your help Amy
28.10.2015 - 16:04Odpowiedź DROPS Design :
Dear Amy, wijth pattern 2 portion of the slipper part, do you mean the edge around leg? Work first 4 ridges in garter st (= 8 K rows) but on the 8th K row increase 6 sts evenly - see here how to increase evenly. Then work following A.1 until 35-38 cm, work 4 ridges (8 K rows), but on the 1st of these 8 rows, decrease 6 sts evenly. Happy knitting!
28.10.2015 - 18:26
![]() Amy napisała::
Amy napisała::
Amy 25.10.2015 kl. 00:38: To whom it may concern: I am currently working on the slipper boot pattern and am wondering how I am suppose to do the heel of the slipper when it doesn't say how many rows to do it just say to work back and forth on the needles. If you could let me know it would be appreciated Thank you in advance for your help
25.10.2015 - 15:33
![]() Amy napisała::
Amy napisała::
To whom it may concern: I am currently working on the slipper boot pattern and am wondering how I am suppose to do the heel of the slipper when it doesn't say how many rows to do it just say to work back and forth on the needles. If you could let me know it would be appreciated Thank you in advance for your help
25.10.2015 - 00:38
![]() Yvonne napisała::
Yvonne napisała::
Kan ik de slof ook op 2 pennen breien ?
10.06.2015 - 23:26Odpowiedź DROPS Design :
Hoi Yvonne. Nee, enkele delen van deze slof worden in de rondte gebreid.
11.06.2015 - 13:44
![]() Trudy napisała::
Trudy napisała::
I guess I did not make myself clear. I understand about putting the stitches back on the needles, although I am not sure if we are using three now or four. If we are using four - then I need to know how many stitches are put onto the fourth needle which would be the heal area of the boot.
12.04.2015 - 17:54Odpowiedź DROPS Design :
Dear Trudy, distribute the sts on 4 needle or as in the video, making sure the markers are on the correct places. Happy knitting!
13.04.2015 - 09:32
![]() Elaine Langille napisała::
Elaine Langille napisała::
I don't understand "knit over knit" and "purl over purl" I watched the video, but still didn't know how to do it
11.02.2015 - 03:56Odpowiedź DROPS Design :
Dear Mrs Langille, you work pattern 2 over the 12 sts as follows from RS: 1 edge st in garter st, *K2,P2* over the next 10 sts and finish with 1 edge st in garter st. On next row from WS work 1 edge st in garter st, *P2/K2* over the next 2 sts, 1 edge st in garter st. Happy knitting!
11.02.2015 - 09:14
![]() M Damen napisała::
M Damen napisała::
Een opmerking niet over de sloffen maar over de gebruikte taal. gecontroleerd is met 1 L niet met 2. Deze fout staat al enkele jaren bij ieder patroon.
04.01.2015 - 20:21Dianne Perrin napisała::
Drops 158-47 pattern no an-025 I do not understand the directions for A.1 which is the first row and which x box is a p from rs and which x box is k from ws and which blank box is k from rs and which blank box is p from ws
16.12.2014 - 07:15Odpowiedź DROPS Design :
Dear Mrs Perrin, please click here to read more about diagrams. Row 1 = K5, (P2, K2) repeat (to) a total of 5 times, K3. Row2= K3, (P2, K2) repeat (to) a total of 5 times, P2, K3. Happy knitting!
16.12.2014 - 09:58
|
|||||||
One Step Ahead#onestepaheadslippers |
|||||||
 |
 |
||||||
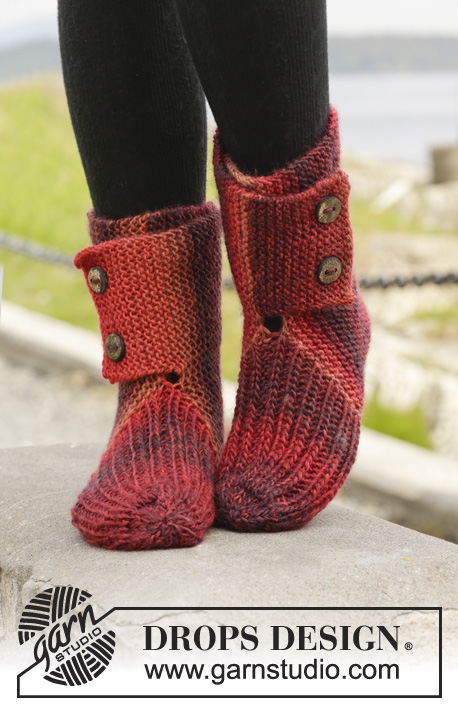
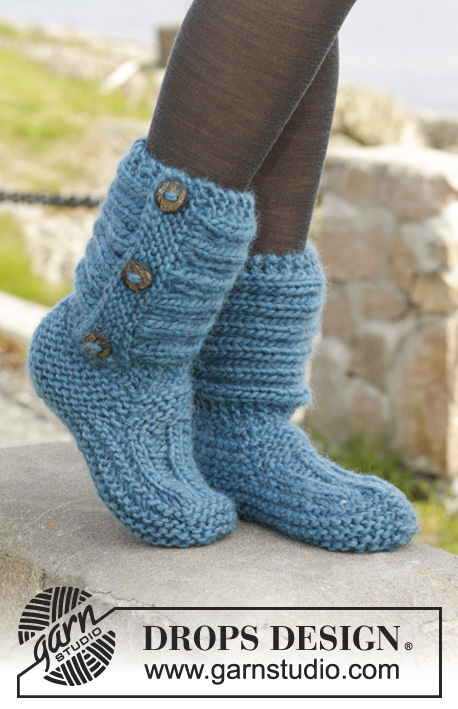
Kapcie DROPS ściegiem francuskim ze ściągaczem, z włóczki „Andes”.
DROPS 158-47 |
|||||||
|
ŚCIEG FRANCUSKI (na okrągło na drutach pończoszniczych): Przer.: *1 okr. na prawo, 1 okr. na lewo*, powt. od *-*. 1 „ściągacz” francuski = 2 okr. ŚCIEG FRANCUSKI (w tę i z powrotem): Przer. wszystkie rzędy na prawo. 1 „ściągacz” francuski = 2 rz. na prawo. ŚCIEG FANTAZYJNY: Patrz schemat A.1. ŚCIEG FANTAZYJNY 2: Rz. 1 (= na prawej stronie robótki): *2 o.p., 2 o.l.*, powt. od *-* aż zostaje 2 o., 2 o.p. Rz. 2 (= na lewej stronie robótki): przer. oczka prawe na prawo, a lewe na lewo. Powt. rz. 2 ---------------------------------------------------------- KAPCIE: Przer. najpierw brzeg na dole cholewki, następnie stopę. Zakończyć przerabiając brzeg wokół cholewki. CHOLEWKA: Na drutach pończoszniczych nr 6 nabrać 37-37-39 o. włóczką Andes. Przer. ściegiem francuskim na okrągło - patrz powyżej - aż dł. robótki wynosi ok. 4 cm, zakończyć za 1 okr. na lewo. ZACHOWAĆ TAKIE SAME NAPRĘŻENIE NICI JAK W PRZYPADKU PRÓBKI! STOPA: Dalej przer. w tę i z powrotem. Zostawić teraz na drucie 10 pierwszych o., zdjąć na drut pomocniczy 27-27-29 pozostałych o. Przer. teraz 10 o. na środku ŚCIEGIEM FANTAZYJNYM 2 – patrz powyżej – W TYM SAMYM CZASIE, na końcu 2 nast. rz. nabrać 1 o. brzeg. (przer. oczka brzeg. ściegiem francuskim - patrz powyżej) = 12 o. Gdy dł. części środkowej wynosi 7-8½-10 cm, zamknąć 1 o. brzeg. z każdej strony = 10 o. Wziąć z powrotem oczka z drutu pomocniczego i nabrać 12-14-16 o. z każdej strony części środkowej (w odl. 1 o. od brzegów) = 61-65-71 o. OD TEJ CHWILI MIERZYĆ STĄD! Umieścić 1 marker na środku 10 o. części środkowej (= z przodu, od strony palców) i kolejny marker w oczko z tyłu pięty, jest 30-32-35 o. między markerami z każdej strony. Teraz przer. na okrągło ściegiem francuskim. Po przerobieniu 2 cm, przer. 2 o. razem na prawo z każdej strony każdego markera co 2 okr. (= 4 o. mniej w każdym okrążeniu). Dalej zamykać o., aż dł. robótki wynosi 5-5-6 cm. Zamknąć pozostałe oczka. Zszywać na spodzie stopy wkłuwając igłę w skrajne pętelki oczek, aby szew nie był zbyt gruby. BRZEG WOKÓŁ CHOLEWKI: Przerabiany w tę i z powrotem. Na drutach nr 6 nabrać 22 o. włóczką Andes. Przer. 4 ściągacze francuskie, W TYM SAMYM CZASIE, w ost. rzędzie, równomiernie dodać 6 o. = 28 o. Przer. wg schematu A.1 (= 28 o.), aż dł. robótki wynosi ok. 35-36-38 cm. Dalej przer. 4 ściągacze francuskie, W TYM SAMYM CZASIE w 1-szym rz. równomiernie zamknąć 6 o. = 22 o. Zakończyć. Umieścić zamykane oczka ponad nabieranymi i przyszyć 3 guziki w ściągacze francuskie brzegu. WYKOŃCZENIE: Doszyć brzeg cholewki do pierwszego rzędu cholewki (rząd nabierania oczek, tzn. do nabieranych o. na cholewkę, na pocz. objaśnień). Ułożyć brzeg, tak aby guziki były na zewnątrz, otwór do tyłu, od strony pięty – zszywać na lewej stronie robótki, aby szew był niewidoczny. Wykonać drugi kapeć w taki sam sposób, otwór brzegu powinien być z drugiej strony. |
|||||||
Objaśnienia do schematu |
|||||||
|
|||||||
 |
|||||||
Skończyłaś ten wzór?Otaguj swoje zdjęcia #dropspattern #onestepaheadslippers lub prześlij je do #dropsfan gallery. Potrzebujesz pomocy w związku z tym wzorem?Zobacz 18 instrukcje video, sekcję Komentarze/Pytania i jeszcze więcej, wchodząc na stronę wzoru na garnstudio.com © 1982-2026 DROPS Design A/S. Wszelkie prawa zastrzeżone. Ten dokument, w całości, jest chroniony prawem. Zobacz co możesz robić z naszymi wzorami na dole każdego wzoru na naszej stronie. |
|||||||


Posiadając 40 lat doświadczenia w projektowaniu wzorów na druty i szydełko, DROPS Design oferuje jedną z największych kolekcji bezpłatnych wzorów w internecie – przetłumaczonych na 17 języków. Obecnie jest dostępnych 324 katalogów i 12290 wzorów w języku polskim.
Dokładamy wszelkich starań, aby oferować Wam druty i szydełka, inspiracje, fachowe porady oraz doskonałej jakości włóczki w najlepszych cenach! Zamierzasz wykorzystać nasze wzory inaczej niż tylko do osobistego użytku? Przeczytaj jakie masz prawa w Copyright, który znajdziesz na końcu każdego wzoru. Miłej pracy!
Dodaj komentarz do modelu DROPS 158-47
Chcielibyśmy się dowiedzieć co masz do powiedzenia o tym wzorze!
Jeśli chcesz zadać pytanie i szybko uzyskać odpowiedź, upewnij się, że została wybrana właściwa kategoria w formularzu poniżej. Pola obowiązkowe są oznaczone *.