
Categorie popolari
State cercando un filato?


Commenti / Domande (37)
![]() Eliazabeth ha scritto:
Eliazabeth ha scritto:
Hi, I love this pattern but love to knit it all in drops kidsilk if I could. How many strands off kidsilk would I use 2 or 3 strands to get the same result. Thank you
27.09.2025 - 13:53DROPS Design ha risposto:
Hi Elizabeth, I would say 3 strands. Make a swatch to be sure the fabric is ok for you. Happy knitting!
27.09.2025 - 22:04
![]() Mihaela ha scritto:
Mihaela ha scritto:
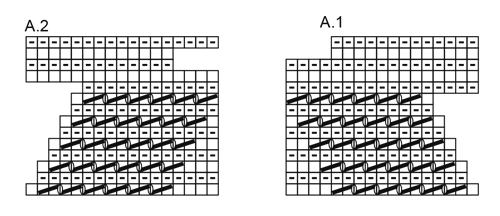
Hi, I enjoy your patterns very much. Thank you for the marvelous designs. I want to ask if the first stick on A1 diagram îs worked or sliped, în order to get the neat edge as în the picture. I tried both ways and I prefer the sliped version, but I wood like your advise. Thank you.
13.04.2025 - 13:14DROPS Design ha risposto:
Dear Mihaela, the first stitch in A.1 is the rightmost stitch of the bottom row. It's a white square, so it's a knitted stitch. Then you knit 2 together and then you work 1 yarn over. But if you prefer to work a slipped stitch you can do that. Happy knitting!
13.04.2025 - 23:52
![]() Mihaela ha scritto:
Mihaela ha scritto:
Hi, I enjoy your patterns very much. Thank you for the marvelous designs. I want to ask if the first stick on A1 diagram îs worked or sliped, în order to get the neat edge as în the picture. I tried both ways and I prefer the sliped version, but I wood like your advise. Thank you.
13.04.2025 - 13:14DROPS Design ha risposto:
Dear Mihaela, the first stitch in A.1 is the rightmost stitch of the bottom row. It's a white square, so it's a knitted stitch. Then you knit 2 together and then you work 1 yarn over. But if you prefer to work a slipped stitch you can do that. Happy knitting!
13.04.2025 - 23:52
![]() Barbara Marrs ha scritto:
Barbara Marrs ha scritto:
Hi! Are the patterns of casting on 5 new sts at the end of row 10 in A.1 and the end of row 11 in A.2, and then working only the first 13 sts in row 13 in A.1 and the first 13 sts in row 12 in A.2, are these only done once, or are they repeated over and over at end and beginning of the A.1 and A.2 sequences until you come to the second sleeve? Thankyou so much!
25.04.2024 - 17:21DROPS Design ha risposto:
Dear Barbara, that casting on and the off those stitches form the peaks of the edging and done at every repeat of the A.1/A.2 patterns. Happy Knitting!
25.04.2024 - 23:10
![]() Barbara Marrs ha scritto:
Barbara Marrs ha scritto:
Hi! The instructions say to work the first and last 17 sts with the A.1 and A.2 patterns. However, Row 1 for each of these patterns shows only 16 sts. What is done for the 17th stitch? Thank you so much!
24.04.2024 - 17:47DROPS Design ha risposto:
Dear Barbara, Both pattern has 17 stitches. A.1 starts with a knit stitch, then K2TOGs and yarnovers, and finishes woth 4 knit stitches. A.2 is the mirror image of A.1. Happy Knitting!
24.04.2024 - 22:54
![]() Barbara Marrs ha scritto:
Barbara Marrs ha scritto:
Hi! Once I have casted the new sts on each side of the sleeve and have inserted the 2 markers 30 sts in each side, do I begin the short rows with first knitting 6 rows over all the sts (starting the A1 and A2 patterns) and then the short return rows, followed by 5 rows over all sts, and then repeat the short return rows, then back to 5 rows over all, etc.? Thank you!
16.04.2024 - 17:03DROPS Design ha risposto:
Dear Mrs Mars, yes work first 6 rows over all stitches, then repeat from * to * for the short rows to the required measurements for your size. Happy knitting!
17.04.2024 - 08:24
![]() Tove Rosland ha scritto:
Tove Rosland ha scritto:
Hvor mange ganger skal man gjenta rapportene med forkortede omganger? I oppskriften virker det som det bare er én gjentakelse. Stemmer dette?
10.04.2024 - 19:59DROPS Design ha risposto:
Hei Tove. Forkortede pinner står forklart bare 1 gang (øverst i oppskriften), men det strikkes flere ganger. Antall ganger avhenger av hvilken str. du strikker / hvor mange cm det skal strikkes. mvh DROPS Design
15.04.2024 - 09:26
![]() Essi ha scritto:
Essi ha scritto:
Hei! Tein tuon boleron XL/XXL kokoisena. Neuloin ilman kid silk- lankaa. Ohjeen mukaan 200g lankaa ois pitänyt riittää, mutta se ei riittänytkään. Piti ostaa yks kerä lisää.
31.10.2023 - 09:25
![]() Dominique ha scritto:
Dominique ha scritto:
Bonjour Drops design Je ne comprends pas bien comment faire sur les mêmes rangs le raccourci à 30 mailles et le raccourci à 13 mailles. J'ai fait un premier rang raccourci au sixième rang puis au douzième rang et c'est au rang de retour , le treizième que je ne sais comment faire le raccourci sur A1 Merci de votre réponse Cordialement
11.08.2023 - 20:58DROPS Design ha risposto:
Bonjour Dominique, tricotez les rangs raccourcis comme indiqué, autrement dit, après 6 rangs sur toutes les mailles, *tricotez 30 m, tournez, et tricotez ces 30 m à nouveau; tournez et tricotez toutes les mailles, tournez, tricotez 30 m, tournez, tricotez ces 30 m, tournez et tricotez 5 rangs sur toutes les mailles*, en même temps, tricotez les diagrammes A.1 et A.2 de chaque côté; les rangs raccourcis de A.1/A.2 sont indiqués dans les diagrammes, ils ne comptent pas dans le nombre de rangs des rangs raccourcis mais se font en plus. Bon tricot!
14.08.2023 - 08:43
![]() Carmen-Gabriela ha scritto:
Carmen-Gabriela ha scritto:
Hallo nochmal, wenn ich (richtig?) falte, Umbruch gestrichelte Linie, so trifft doch Anfang A.1 auf Anfang A.2 = rechte Seitennaht und endet mit je letzter Reihe A.1 trifft wieder auf A.2 = li Seitennaht. So ist doch die Zackenborte unschön unterbrochen fürs Zus.nähen. Anfang A.1 auf Ende A.1 sowie 1 R. A.2 auf letzte R. A.2 wäre schön aber so kann man doch nicht falten/Seiten zus.nähen wegen der Ärmel^^? - Haben Sie einen Tipp?
10.05.2023 - 17:50DROPS Design ha risposto:
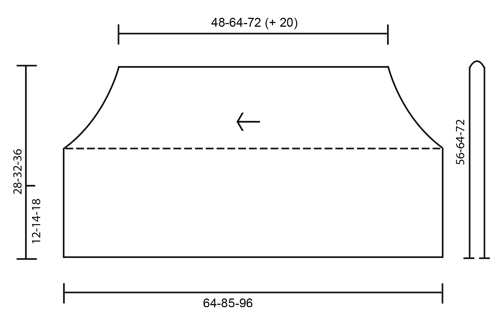
Liebe Carmen-Gabriela, schauen Sie mal die Skizze von diesem Modell, so sieht Ihr Strickstück mit A.1 und A.2 unten und oben aus, die Naht sind beidseitig, dh die Naht unter die Ärmel dann an den Seiten und dann die Seiten vom Bolero - die neuen Maschen zusammen. Viel Spa beim stricken!
11.05.2023 - 07:41
|
|||||||||||||
Henrietta#henriettabolero |
|||||||||||||
 |
 |
||||||||||||
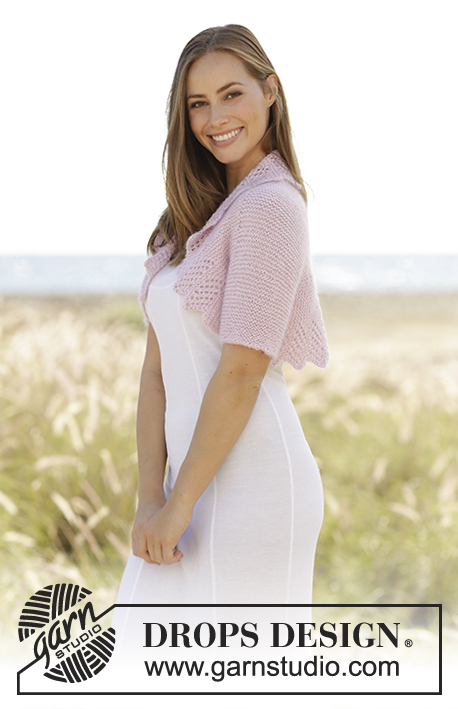
Bolero ai ferri, con ferri accorciati, motivo traforato e a punto legaccio, in DROPS BabyMerino e DROPS Kid-Silk. Taglie: Dalla XS alla XXL.
DROPS 178-58 |
|||||||||||||
|
PUNTO LEGACCIO (avanti e indietro sui ferri): 1 costa a legaccio = lavorare 2 ferri a diritto FERRI ACCORCIATI: Lavorare 6 ferri su tutte le maglie. * Lavorare 30 maglie (fino al primo segno), girare il lavoro, stringere il filo e lavorare il ferro di ritorno. Lavorare 1 ferro su tutte le maglie. Girare il lavoro, lavorare 30 maglie (fino all’altro segno), girare il lavoro, stringere il filo e lavorare il ferro di ritorno. Lavorare 5 ferri su tutte le maglie *, ripetere da *-*. 1 serie di ferri accorciati = 6 ferri (= 3 coste a legaccio) sulle 35-48-62 maglie centrali e 8 ferri (= 4 coste a legaccio) sulle maglie ai lati. MOTIVO: Vedere i diagrammi A.1 e A.2. ATTENZIONE: Alla fine della riga 10 del diagramma A.1 e alla fine della riga 11 del diagramma A.2 avviare 5 nuove maglie. Al ferro 13 del diagramma A.1 lavorare solo le prime 13 maglie del diagramma, girare il lavoro e lavorare 13 maglie sul ferro di ritorno. Alla riga 12 del diagramma A.2 lavorare solo le prime 13 maglie del diagramma, girare il lavoro e lavorare 13 maglie sul ferro di ritorno. ATTENZIONE! Questi ferri accorciati nei diagrammi A.1 e A.2 sono in aggiunta ai ferri accorciati spiegati sopra. -------------------------------------------------------- BOLERO: Si lavora avanti e indietro sui ferri circolari. Il ferro di avvio delle maglie si trova nella parte in basso della manica destra e il ferro di chiusura delle maglie si trova nella parte in basso della manica sinistra. Terminato il lavoro, piegare il bolero in due e cucire le maniche e i lati. Avviare 45-50-52 maglie sui ferri circolari n° 5 con 1 capo di ognuna delle qualità di filato (= 2 capi). Lavorare a PUNTO LEGACCIO - vedere le spiegazioni sopra. Quando la manica misura 2 cm, aumentare 1 maglia da ciascun lato; aumentare ogni 2 cm 5 volte in tutto = 55-60-62 maglie. Quando la manica misura 10 cm, avviare 20-24-30 nuove maglie da ciascun lato per la cucitura del lato destro = 95-108-122 maglie. Inserire 2 segni nel lavoro: il primo segno dopo le prime 30 maglie ed il secondo segno prima delle ultime 30 maglie (= 35-48-62 maglie tra i due segni). Lavorare come segue - sul diritto del lavoro: diagramma A.1 sulle prime 17 maglie, PUNTO LEGACCIO – vedere le spiegazioni sopra, sulle 61-74-88 maglie successive, diagramma A.2 sulle ultime 17 maglie. RICORDARSI DI MANTENERE LA CORRETTA TENSIONE DEL LAVORO! Continuare a lavorare a punto legaccio le maglie centrali e lavorare il motivo sulle prime/ultime 17 maglie da ciascun lato – vedere le spiegazioni sopra – ALLO STESSO TEMPO, lavorare A FERRI ACCORCIATI – vedere le spiegazioni sopra! Quando il lavoro misura circa 58-74-82 cm (misurare al centro del lavoro, maniche comprese) intrecciare 20-24-30 maglie da ciascun lato = cucitura lato sinistro = 55-60-62 maglie. Lavorare ora la manica sinistra. Proseguire a punto legaccio. Quando il lavoro misura 2 cm dopo aver intrecciato le maglie, diminuire 1 maglia da ciascun lato, ogni 2 cm 5 volte in tutto = 45-50-52 maglie. Intrecciare le maglie quando il lavoro misura 68-84-92 cm dal bordo di avvio delle maglie. CONFEZIONE: Piegare il bolero in due – il grafico mostra il bolero piegato. Fare la cucitura delle maniche e cucire insieme le 20-24-30 maglie da ciascun lato. |
|||||||||||||
Spiegazioni del diagramma |
|||||||||||||
|
|||||||||||||
 |
|||||||||||||
 |
|||||||||||||
Avete terminato questo modello?Allora taggate le vostre foto con #dropspattern #henriettabolero o inviatele alla #dropsfan gallery. Avete bisogno di aiuto con questo modello?Troverete 18 video tutorial, una sezione per i commenti/domande e molto altro guardando il modello su www.garnstudio.com © 1982-2026 DROPS Design A/S. Ci riserviamo tutti i diritti. Questo documento, compreso tutte le sue sotto-sezioni, è protetto dalle leggi sul copyright. Potete leggere quello che potete fare con i nostri modelli alla fine di ogni modello sul nostro sito. |
|||||||||||||


Con oltre 40 anni di esperienza nel design di modelli di maglia e uncinetto, DROPS Design offre la più estesa collezione di modelli gratuiti su internet - tradotti in 17 lingue. Ad oggi vi possiamo fornire 324 cataloghi e 12245 modelli - 9515 dei quali sono tradotti in Italiano.
Ci stiamo impegnando molto per darvi il meglio che vi possiamo offrire in termini di maglia e uncinetto, ispirazioni e consigli così come filati di grande qualità ad un prezzo incredibile! Volete utilizzare i nostri modelli per qualcosa d'altro oltre al vostro uso personale? Potete leggere tutto ciò che è consentito nel testo sul Copyright in basso su tutte le pagine dei nostri modelli. Buon lavoro!
Lasciare un commento sul modello DROPS 178-58
Noi saremmo felici di ricevere i tuoi commenti e opinioni su questo modello!
Se vuoi fare una domanda, fai per favore attenzione a selezionare la categoria corretta nella casella qui sotto per velocizzare il processo di risposta. I campi richiesti sono indicati da *.