
Categorie popolari
State cercando un filato?


Commenti / Domande (168)
![]() Jane ha scritto:
Jane ha scritto:
I am so sorry, I know you have answered this question before but I am still confused by the A.a chart. On the third row, when I come to the first cable it says to slip 1 stitch on cable needle behind the piece and knit 2. Do I purl the stitch from the cable needle or knit it. I don't understand when you say either P or K depending on the next row in diagram. Thanks so much for your help!!!
01.04.2022 - 23:07DROPS Design ha risposto:
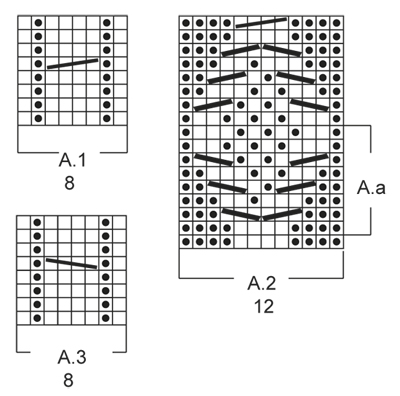
Dear Jane, the stitches in the middle of the cables in A.2 will be worked in moss stitch; so that you should either K (if this stitch is worked purled on next round) or P (if this stitch is worked K on next round). Happy knitting!
04.04.2022 - 10:59
![]() Linda Ponsford ha scritto:
Linda Ponsford ha scritto:
The pattern says to repeat A.2 one time, then A.a until the correct measurement. But the picture clearly shows A.2 repeated twice. Can you clarify this please?
04.01.2022 - 23:16DROPS Design ha risposto:
Dear Mrs Ponsford, on the picture you work A.2 one time then the first rows = Aa = the beg of a 2nd repeat of the cable that will not be worked to the end because these stitches will be decreased for the toe (reason why you work them in stocking stitch, you won't have enough sts to continue the 2nd repeat due to the decreases), only the cables on each side will be kept. Happy knitting!
05.01.2022 - 08:02
![]() Trixi ha scritto:
Trixi ha scritto:
Könnten sie mir bitte erklären wenn 33-33-37 M zb. Stehen meinen sie denn insgesamt nur 103 M so weiterschicken? Ich verstehe leider auch nicht ganz wie das so beim stricken aussehen soll oder zusammengefügt wird. Gibt es konzeptzeichnungen? Oder andere optische Hilfe?
19.12.2021 - 18:06DROPS Design ha risposto:
Liebe Trixi, es wird am Anfang nur 33-33-35 Maschen gestrickt - siehe vorrige Antwort, Sie stricken zuerst den Fußteil von hinteren Mitte bis die Öffnung für den Fuß fertig ist, dann stricken Sie in Runden bis zur Spitze. Folgen Sie nach und nach die Anleitung genau wie beschrieben, so bekommen Sie die Hausshuhen wie auf dem Foto. Viel Spaß beim stricken!
20.12.2021 - 08:15
![]() Trixi ha scritto:
Trixi ha scritto:
Ich bin es gewohnt mit bildlichen Anleitungen zu arbeiten, wieviele Runden werden am Anfang gestrickt? Am Anfang steht ein krausrippe und zur Erklärung 2re und dann wieder 2 re ich denke da ist ein Fehler und es sollte 2 re und 2 Li stehen oder? So wie es auf dem Bild auch zu sehen ist. Leier steht in der gesammten beschreiben nicht einmal von R 1 - z.B. 7 oder ähnliches. Können sie mir bitte sagen wie genau die Anleitung ist oder wo ich vielleicht eine ausführliche finden kann?
19.12.2021 - 17:58DROPS Design ha risposto:
Liebe Trixi, das Bündchen 2 re/2 li wird am Ende gestrickt - siehe BÜNDCHENRAND; diese Hausschuhen werden zuerst in Hin- und Rück-Reihen ab hinteren Mitte (Fersen) gestrickt; die Anschlagskante wird am Ende doppelt gefaltet und zusammengenäht, dann wird das Bündchenrand gestrickt. Viel Spaß beim stricken!
20.12.2021 - 08:12
![]() Pauline Lee ha scritto:
Pauline Lee ha scritto:
Dear Esteemed Knitters, Diagrams A1, A2, A3 is not found within the general directions for the pattern itself. Thank you for your valued time.
26.10.2021 - 22:08DROPS Design ha risposto:
Dear Pauline, if you mean the written out direction for those patterns, they are only available in diagram form, below the instructions. Happy Knitting!
27.10.2021 - 00:28
![]() Dorothy Moore ha scritto:
Dorothy Moore ha scritto:
When following the charts do you start at the bottom and work up or from the top and work down? In the chart for A2 and looking at the picture it looks like you start top to bottom but then the repeat A.a does not make any sense. Also please explain what p/k 1 in the cable instructions. How are you suppose to tell when to purl or when to knit the stitch.
17.10.2021 - 01:34DROPS Design ha risposto:
Dear Dorothy, when following the chart, we go from the bottom up, right to left - see How to read knitting diagrams P/K 1 in cable instructions depends on moss stitch - the stitches need to be adjusted so that the pattern comes out. Happy knitting!
18.10.2021 - 05:37
![]() Lucy ha scritto:
Lucy ha scritto:
Hello, I have dreamed of someday knitting these slippers. I have tried unfortunately failed to understand the instructions. I have seen other videos from here showing how to knit the whole slipper. I would love it and I'm sure new knitters around the world would enjoy having a demo video on these slippers. Please consider making a demo video on the Celtic Dancer slipper. I will attempt them again after my current knitting project is complete. Thanks for listening. Have a wonderful day.
05.10.2021 - 16:23DROPS Design ha risposto:
Dear Lucy, unfortunately, it's very difficult for us to make video tutorials for each pattern, which is why we usually make videos to explain the main or most complicated techniques and one for slippers in general, as a guide to create other slippers. Happy knitting!
06.10.2021 - 23:19
![]() Sue ha scritto:
Sue ha scritto:
Drops patterns look beautiful but the patterns are always so confusing to follow. Maybe you could try to write them differently.
27.09.2021 - 22:48
![]() Marylou Spencer ha scritto:
Marylou Spencer ha scritto:
Pattern is written in far too complicated a way - discouraging before one ever starts
16.09.2021 - 18:45
![]() Maureen ha scritto:
Maureen ha scritto:
Nevermind the message I sent earlier. I think I was working from the wrong video and have since found another one. It looks more like the lighter stitch. I think I'm happy with the current seaming results.
10.07.2021 - 14:39
|
|||||||||||||||||||
Celtic Dancer#celticdancerslippers |
|||||||||||||||||||
 |
 |
||||||||||||||||||
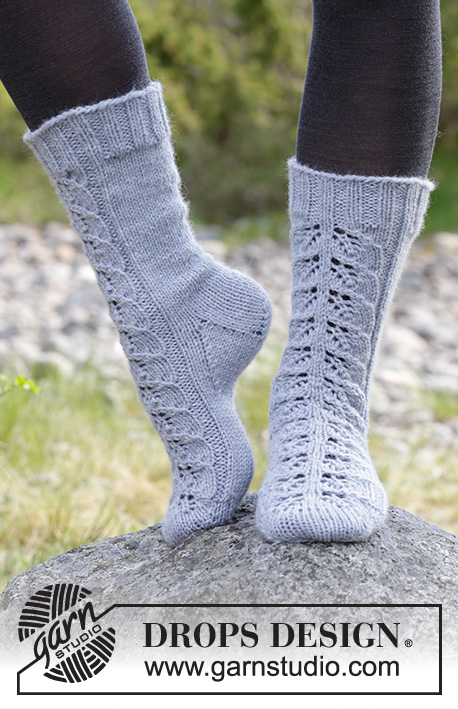
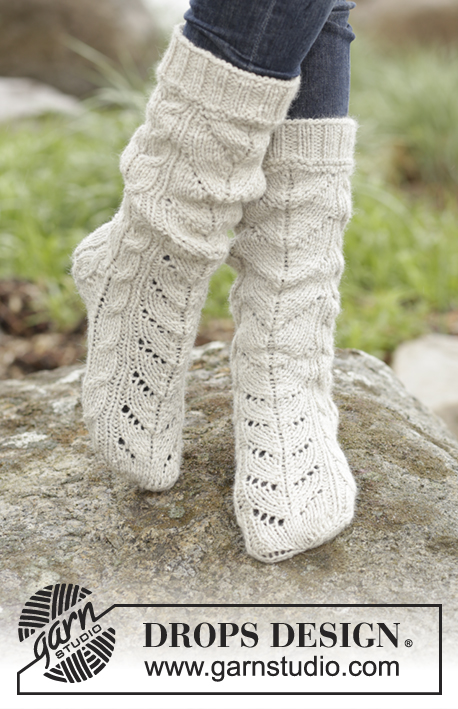
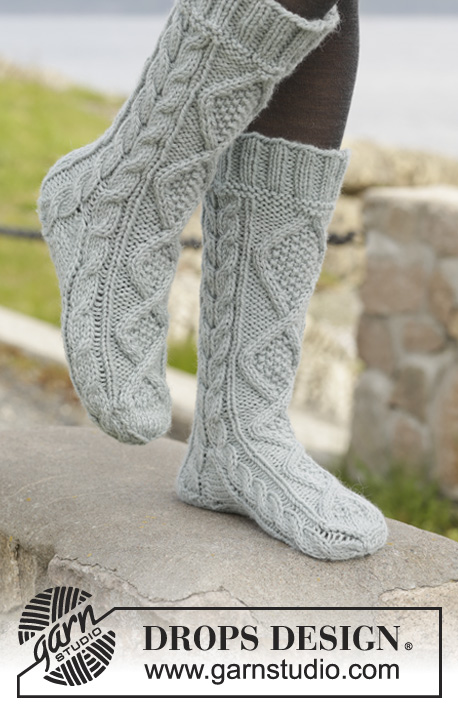
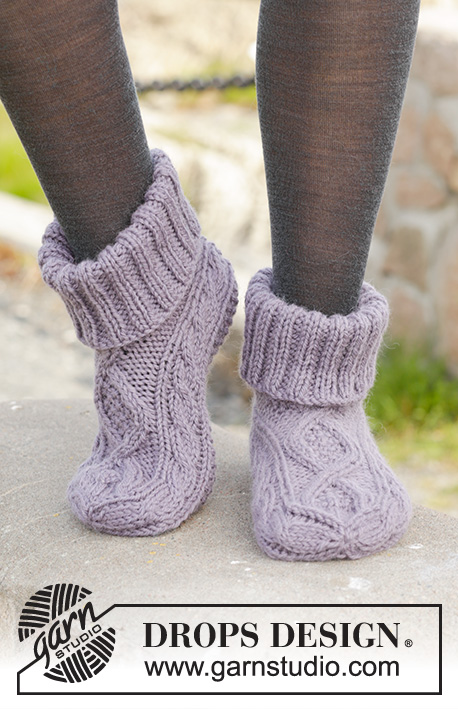
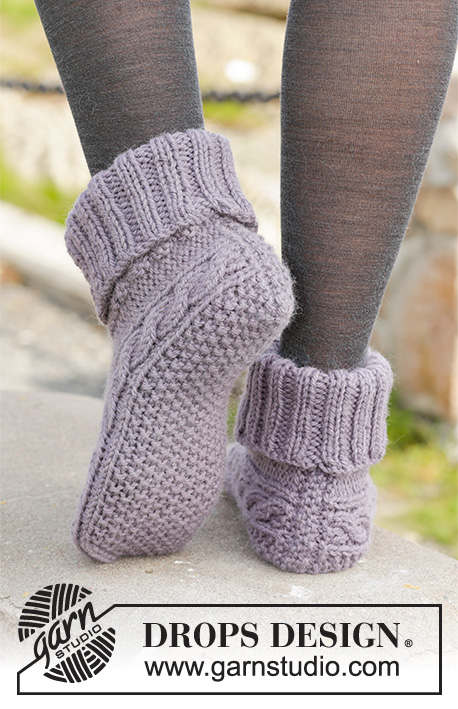
Pantofole DROPS lavorate ai ferri con trecce in "Nepal". Taglie: 35 - 43.
DROPS 156-55 |
|||||||||||||||||||
|
MOTIVO: Vedere i diagrammi A.1-A.3. I diagrammi mostrano il motivo visto dal diritto del lavoro. SUGGERIMENTO PER LE DIMINUZIONI: Diminuire 1 m prima del segnapunti come segue: 2 m insieme a dir. Diminuire 1 m dopo il segnapunti come segue: 2 m insieme a dir ritorto. M LEGACCIO (avanti e indietro sui f): Lavorare tutti i f a dir. 1 “costa” a m legaccio = 2 f dir. GRANA DI RISO: 1° f/giro: * 1 m dir, 1 m rov *, ripetere *-*. 2° f/giro: dir su rov e rov su dir. Ripetere il 2° f/giro. SUGGERIMENTO PER LE MISURAZIONI: Misurare al centro della treccia in A.1/A.3. ---------------------------------------------------------- PANTOFOLA: Lavorata avanti e indietro dal centro dietro. Avviare 33-33-35 m con i f n° 5 mm con Nepal (lasciare un’estremità di filato di circa 20 cm; usata per la confezione). Lavorare 1 “costa” a M LEGACCIO – leggere la spiegazione sopra, ALLO STESSO TEMPO sull’ultimo f distribuire 4 aumenti in modo uniforme = 37-37-39 m. Poi lavorare come segue dal diritto del lavoro: 4 m rov, A.3 (= 8 m), 13-13-15 m a GRANA DI RISO – leggere la spiegazione sopra, A.1 (= 8 m), finire con 4 m rov. Continuare il motivo in questo modo, lavorare le m rov a dir, dal rovescio del lavoro. Ripetere A.1 e A.3 fino alla fine del lavoro. FARE ATTENZIONE ALLA TENSIONE DEL LAVORO! Quando il lavoro misura 10½-11½-13 cm – leggere il SUGGERIMENTO PER LE MISURAZIONI sopra, lavorare come segue dal diritto del lavoro: 4 m rov, A.3, 13-13-15 m a grana di riso, A.1, 4 m rov, avviare 4 nuove m, lavorare le prime 4 m, il giro inizia qui = 41-41-43 m. Ora lavorare in tondo con i f a doppia punta. Lavorare il motivo come prima ma ora lavorare A.2 (= 12 m) sulle 4 m rov a ogni lato del lavoro e sulle 4 nuove m. Quando A.2 è stato lavorato 1 volta in verticale, lavorare A.a fino a quando il lavoro misura 17-19-22 cm. Ora lavorare a m rasata sulle m in A.a, o iniziare la m rasata un po’ prima. Continuare A.1 e A.3 fino alla fine del lavoro. Ora inserire 4 segnapunti nel lavoro come segue: lavorare A.3 ma inserire il 1° segnapunti tra la 1° e la 2° m e il 2° segnapunti tra la 7° e 8° m in A.3, lavorare a grana di riso come prima, lavorare A.1 ma inserire il 3° segnapunti tra la 1° e la 2° m e il 4° segnapunti tra la 7° e 8° m in A.1, lavorare a dir le m rimaste (= 14 m sul sopra del piede, 15-15-17 m sotto il piede e 6 m a ogni lato del lavoro). Ora diminuire per la punta sul giro successivo come segue: Diminuire 1 m dopo il 2° segnapunti e 1 m prima del 3° segnapunti sotto il piede 0-0-1 volte in totale – LEGGERE IL SUGGERIMENTO PER LE DIMINUZIONI sopra, lavorare le m rimaste = 14 m sul sopra del piede e 15 m sul sotto del piede (= 41 m in totale). Sul giro successivo, diminuire come segue: Diminuire 1 m prima del 1° e del 3° segnapunti e 1 m dopo il 2° e il 4° segnapunti (= 4 diminuzioni in totale). Ripetere le diminuzioni ogni giro 6 volte in totale, ALLO STESSO TEMPO sull’ultima diminuzione lavorare le m delle trecce in A.1 e A.3 come segue: 2 m insieme a dir ritorto, 2 m insieme a dir. Alla fine di tutte le diminuzioni ci sono 13 m sul f. Il lavoro misura circa 20-22-25 cm. Tagliare il filo e farlo passare attraverso le m rimaste, tirare forte e affrancare. CONFEZIONE: Piegare il bordo di avvio a metà (= centro dietro), usare l’estremità del filo dell’inizio per cucire in modo ordinato al centro dietro. BORDO: Lavorare il bordo in tondo con i f a doppia punta attorno all’apertura della pantofola. Riprendere 50-50-54 m con i f a doppia punta n° 4 mm con Nepal. Lavorare 1 giro rov. Poi lavorare 1 giro dir e ALLO STESSO TEMPO distribuire 10 aumenti in modo uniforme = 60-60-64 m. Lavorare a coste = 2 m dir/2 m rov fino a quando il lavoro misura circa 12-13-14 cm. Intrecciare con dir su dir e rov su rov. Piegare il bordo a metà. Lavorare un’altra pantofola. |
|||||||||||||||||||
Spiegazioni del diagramma |
|||||||||||||||||||
|
|||||||||||||||||||
 |
|||||||||||||||||||
Avete terminato questo modello?Allora taggate le vostre foto con #dropspattern #celticdancerslippers o inviatele alla #dropsfan gallery. Avete bisogno di aiuto con questo modello?Troverete 22 video tutorial, una sezione per i commenti/domande e molto altro guardando il modello su www.garnstudio.com © 1982-2026 DROPS Design A/S. Ci riserviamo tutti i diritti. Questo documento, compreso tutte le sue sotto-sezioni, è protetto dalle leggi sul copyright. Potete leggere quello che potete fare con i nostri modelli alla fine di ogni modello sul nostro sito. |
|||||||||||||||||||


Con oltre 40 anni di esperienza nel design di modelli di maglia e uncinetto, DROPS Design offre la più estesa collezione di modelli gratuiti su internet - tradotti in 17 lingue. Ad oggi vi possiamo fornire 324 cataloghi e 12290 modelli - 9561 dei quali sono tradotti in Italiano.
Ci stiamo impegnando molto per darvi il meglio che vi possiamo offrire in termini di maglia e uncinetto, ispirazioni e consigli così come filati di grande qualità ad un prezzo incredibile! Volete utilizzare i nostri modelli per qualcosa d'altro oltre al vostro uso personale? Potete leggere tutto ciò che è consentito nel testo sul Copyright in basso su tutte le pagine dei nostri modelli. Buon lavoro!
Lasciare un commento sul modello DROPS 156-55
Noi saremmo felici di ricevere i tuoi commenti e opinioni su questo modello!
Se vuoi fare una domanda, fai per favore attenzione a selezionare la categoria corretta nella casella qui sotto per velocizzare il processo di risposta. I campi richiesti sono indicati da *.