
Categorie popolari
State cercando un filato?


Commenti / Domande (168)
![]() Christiane ha scritto:
Christiane ha scritto:
Ich verstehe die Erklärung zum Diagramm "1 M auf eine Hilfsnadel hinter die Arbeit legen, 2 M re., 1 M li/re von der Hilfsnadel. Was bedeutet 1 M li/re, also wann rechts und wann links?
17.11.2025 - 21:23DROPS Design ha risposto:
Liebe Christiane, es kommt darauf an, an welcher Stelle Sie gerade im Perlmuster sind. Sie müssen die Masche so stricken, dass sie ins Perlmuster passt - oder zum Linksgestrick am rechten und linken Rand des Diagramms. Viel Spaß beim Stricken!
17.11.2025 - 21:58
![]() Sacha ha scritto:
Sacha ha scritto:
Ik zag nu dat in het Engels mijn vraag ook al door iemand gesteld is en heb ik het antwoord gevonden. De eerste/laatste steek van de kabel brei je in gerstekorrel en is dus afhankelijk van de steek in de onderliggende toer. Ik kan weer verder.
19.09.2025 - 19:12
![]() Sacha ha scritto:
Sacha ha scritto:
Deze leuke sloffen ben ik aan het maken. Ik weet ook hoe ik kabels moet maken, maar één ding in het patroon begrijp ik niet. Bij de kabel over 3 steken staat: op kabelnaald, 2r, 1av/r. Hoe is de 1 av/r bedoeld? Ik begrijp niet wat ik daar moet doen.
18.09.2025 - 14:47
![]() Prodache ha scritto:
Prodache ha scritto:
Prodache
27.05.2025 - 16:53
![]() Gaetane ha scritto:
Gaetane ha scritto:
Bonjour ! Avez vous pris la laine en double ? Merci !
05.12.2024 - 17:06DROPS Design ha risposto:
Bonjour Mme Gaetane, c'est un seul fil a tricoter ces chaussons. Bon tricot!
05.12.2024 - 17:45
![]() Kristen Hanson ha scritto:
Kristen Hanson ha scritto:
I am wondering what way is the best to sew up the slipper heel.
20.11.2024 - 01:19DROPS Design ha risposto:
Hi Kristen, The seam needs to be flat, so sew together edge to edge using grafting stitch will give the best result. Here is a link to a video if you need it: https://www.garnstudio.com/video.php?id=60&lang=en Happy crafting!
20.11.2024 - 06:47
![]() Nicolle ha scritto:
Nicolle ha scritto:
Hi, I am wondering how to switch to knitting in the round after i have knitted the piece (11,5cm size M) and cast on 4 new stitches. At this point i have all the stitches (41) on one double pointed needle. So, do I now split the knitting in 3 parts (e.g. 14+14+13stitches) onto 3 double pointed needles and work the piece in the round this way, startin from the beginning of A2? I would appreciate some advice on this (how to switch from knitting straight to knitting in the round). thank you!
06.09.2024 - 09:29DROPS Design ha risposto:
Hi Nicolle, yes, it's exactly as you write - divide the stitches on several DPN needles and join them in the round. Happy knitting! Milá Nicolle, ano, je to přesně tak, jak píšete - oka rozdělte na několik ponožkových jehlic a spojte do kruhu. Hodně zdaru!
06.09.2024 - 16:31
![]() Teresa Matheson ha scritto:
Teresa Matheson ha scritto:
Ok, I followed your instructions but I still end up knitting the whole circular part from the Wrong side. Probably because you stipulate the last row on straight needles is to be. RS row. "from RS: P 4, A.3, 13-13-15 sts moss st, A.1, P 4, cast on 4 new sts, work the first 4 sts, round beg here = 41-41-43 sts" so I still end up having to substitute in front for behind on the cables and pearling the knits/knitting the pearls. It gets the desired result though. 😃
29.04.2024 - 09:57
![]() Teresa Matheson ha scritto:
Teresa Matheson ha scritto:
I was just checking back through the comments as I'm confused. After 22 cm for the last 3 cm to 25cm do you work Aa as stocking stitch? One answer said yes, as you are decreasing and it's too hard to work the pattern while decreasing, but an earlier answer said continue to work the pattern (as in the photo) while decreasing. I did stocking stitch but it looks odd with hardly any of the second pattern.
21.04.2024 - 22:00DROPS Design ha risposto:
Dear Teresa, you need to continue working the pattern as you decrease. This means that the stitches in A.a are worked in stocking stitch from 22 cm onwards, while you continue working the pattern for A.1 and A.3. Then you decrease for the foot at one side of each marker which should correspond to A.a stitches or the sides of the A.1/A.3 charts, so the decreases shouldn't interrupt the rest of the pattern. Happy knitting!
22.04.2024 - 00:44
![]() Teresa Matheson ha scritto:
Teresa Matheson ha scritto:
Do you cast the 4 new stitches on the end of the row you have just finished and then knit them off onto a new needle having a split row? Or do you need to cast them onto a new needle and knit them back onto the full needle thus having the whole row on one needle. I did the latter as the first meant you started the row on stitch 5 of A2. But it meant that I knitted the rest of the slipper inside out.
21.04.2024 - 21:49DROPS Design ha risposto:
Dear Teresa, you work: P 4, A.3, 13-13-15 sts moss st, A.1, P 4, cast on 4 new sts, work the next 4 sts. Here you will start working the round; you have displaced the beginning of the round. The cast on stitches are worked as normal stitches and don't split the row. Happy knitting!
22.04.2024 - 00:47
|
|||||||||||||||||||
Celtic Dancer#celticdancerslippers |
|||||||||||||||||||
 |
 |
||||||||||||||||||
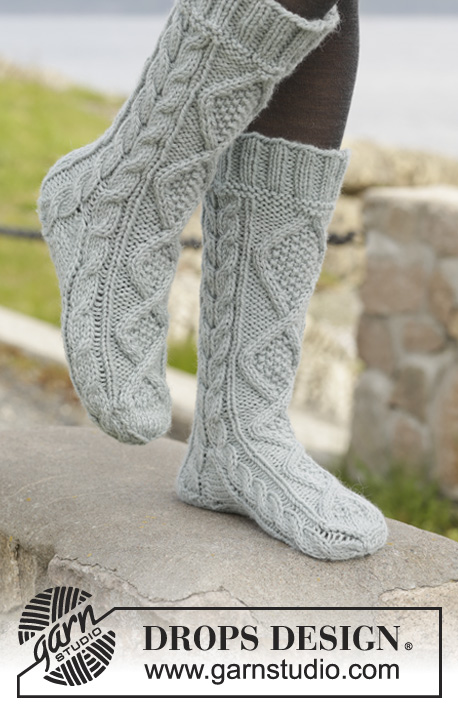
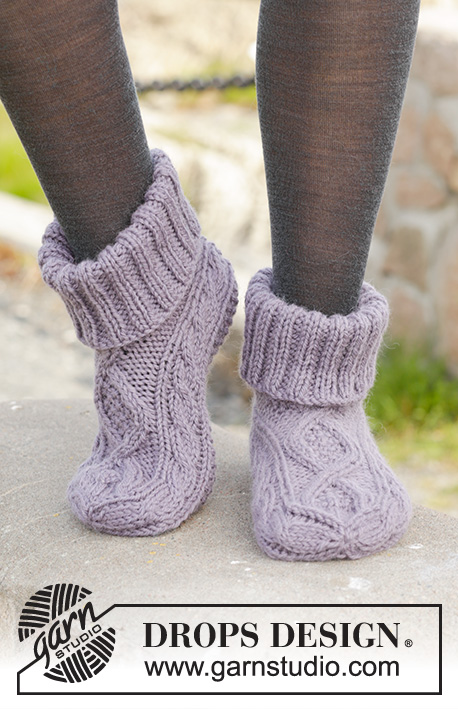
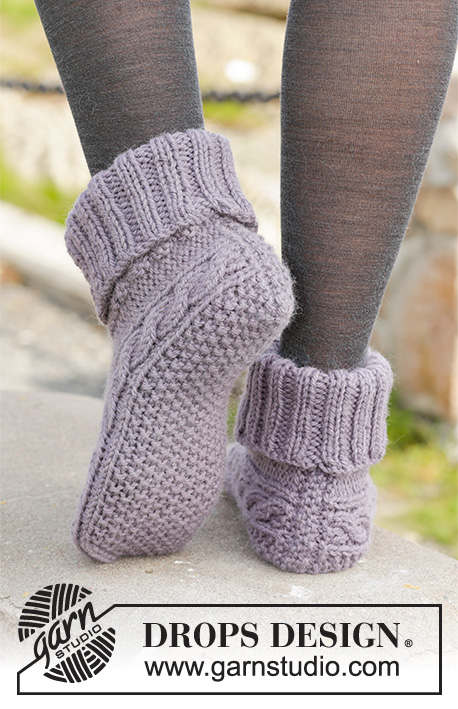
Pantofole DROPS lavorate ai ferri con trecce in "Nepal". Taglie: 35 - 43.
DROPS 156-55 |
|||||||||||||||||||
|
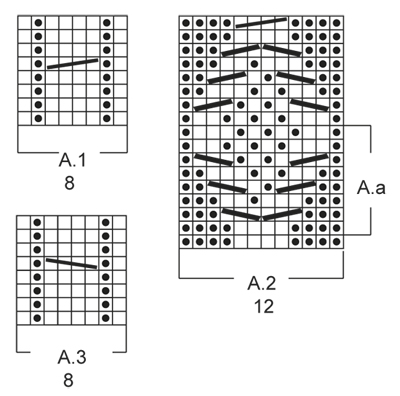
MOTIVO: Vedere i diagrammi A.1-A.3. I diagrammi mostrano il motivo visto dal diritto del lavoro. SUGGERIMENTO PER LE DIMINUZIONI: Diminuire 1 m prima del segnapunti come segue: 2 m insieme a dir. Diminuire 1 m dopo il segnapunti come segue: 2 m insieme a dir ritorto. M LEGACCIO (avanti e indietro sui f): Lavorare tutti i f a dir. 1 “costa” a m legaccio = 2 f dir. GRANA DI RISO: 1° f/giro: * 1 m dir, 1 m rov *, ripetere *-*. 2° f/giro: dir su rov e rov su dir. Ripetere il 2° f/giro. SUGGERIMENTO PER LE MISURAZIONI: Misurare al centro della treccia in A.1/A.3. ---------------------------------------------------------- PANTOFOLA: Lavorata avanti e indietro dal centro dietro. Avviare 33-33-35 m con i f n° 5 mm con Nepal (lasciare un’estremità di filato di circa 20 cm; usata per la confezione). Lavorare 1 “costa” a M LEGACCIO – leggere la spiegazione sopra, ALLO STESSO TEMPO sull’ultimo f distribuire 4 aumenti in modo uniforme = 37-37-39 m. Poi lavorare come segue dal diritto del lavoro: 4 m rov, A.3 (= 8 m), 13-13-15 m a GRANA DI RISO – leggere la spiegazione sopra, A.1 (= 8 m), finire con 4 m rov. Continuare il motivo in questo modo, lavorare le m rov a dir, dal rovescio del lavoro. Ripetere A.1 e A.3 fino alla fine del lavoro. FARE ATTENZIONE ALLA TENSIONE DEL LAVORO! Quando il lavoro misura 10½-11½-13 cm – leggere il SUGGERIMENTO PER LE MISURAZIONI sopra, lavorare come segue dal diritto del lavoro: 4 m rov, A.3, 13-13-15 m a grana di riso, A.1, 4 m rov, avviare 4 nuove m, lavorare le prime 4 m, il giro inizia qui = 41-41-43 m. Ora lavorare in tondo con i f a doppia punta. Lavorare il motivo come prima ma ora lavorare A.2 (= 12 m) sulle 4 m rov a ogni lato del lavoro e sulle 4 nuove m. Quando A.2 è stato lavorato 1 volta in verticale, lavorare A.a fino a quando il lavoro misura 17-19-22 cm. Ora lavorare a m rasata sulle m in A.a, o iniziare la m rasata un po’ prima. Continuare A.1 e A.3 fino alla fine del lavoro. Ora inserire 4 segnapunti nel lavoro come segue: lavorare A.3 ma inserire il 1° segnapunti tra la 1° e la 2° m e il 2° segnapunti tra la 7° e 8° m in A.3, lavorare a grana di riso come prima, lavorare A.1 ma inserire il 3° segnapunti tra la 1° e la 2° m e il 4° segnapunti tra la 7° e 8° m in A.1, lavorare a dir le m rimaste (= 14 m sul sopra del piede, 15-15-17 m sotto il piede e 6 m a ogni lato del lavoro). Ora diminuire per la punta sul giro successivo come segue: Diminuire 1 m dopo il 2° segnapunti e 1 m prima del 3° segnapunti sotto il piede 0-0-1 volte in totale – LEGGERE IL SUGGERIMENTO PER LE DIMINUZIONI sopra, lavorare le m rimaste = 14 m sul sopra del piede e 15 m sul sotto del piede (= 41 m in totale). Sul giro successivo, diminuire come segue: Diminuire 1 m prima del 1° e del 3° segnapunti e 1 m dopo il 2° e il 4° segnapunti (= 4 diminuzioni in totale). Ripetere le diminuzioni ogni giro 6 volte in totale, ALLO STESSO TEMPO sull’ultima diminuzione lavorare le m delle trecce in A.1 e A.3 come segue: 2 m insieme a dir ritorto, 2 m insieme a dir. Alla fine di tutte le diminuzioni ci sono 13 m sul f. Il lavoro misura circa 20-22-25 cm. Tagliare il filo e farlo passare attraverso le m rimaste, tirare forte e affrancare. CONFEZIONE: Piegare il bordo di avvio a metà (= centro dietro), usare l’estremità del filo dell’inizio per cucire in modo ordinato al centro dietro. BORDO: Lavorare il bordo in tondo con i f a doppia punta attorno all’apertura della pantofola. Riprendere 50-50-54 m con i f a doppia punta n° 4 mm con Nepal. Lavorare 1 giro rov. Poi lavorare 1 giro dir e ALLO STESSO TEMPO distribuire 10 aumenti in modo uniforme = 60-60-64 m. Lavorare a coste = 2 m dir/2 m rov fino a quando il lavoro misura circa 12-13-14 cm. Intrecciare con dir su dir e rov su rov. Piegare il bordo a metà. Lavorare un’altra pantofola. |
|||||||||||||||||||
Spiegazioni del diagramma |
|||||||||||||||||||
|
|||||||||||||||||||
 |
|||||||||||||||||||
Avete terminato questo modello?Allora taggate le vostre foto con #dropspattern #celticdancerslippers o inviatele alla #dropsfan gallery. Avete bisogno di aiuto con questo modello?Troverete 22 video tutorial, una sezione per i commenti/domande e molto altro guardando il modello su www.garnstudio.com © 1982-2026 DROPS Design A/S. Ci riserviamo tutti i diritti. Questo documento, compreso tutte le sue sotto-sezioni, è protetto dalle leggi sul copyright. Potete leggere quello che potete fare con i nostri modelli alla fine di ogni modello sul nostro sito. |
|||||||||||||||||||


Con oltre 40 anni di esperienza nel design di modelli di maglia e uncinetto, DROPS Design offre la più estesa collezione di modelli gratuiti su internet - tradotti in 17 lingue. Ad oggi vi possiamo fornire 324 cataloghi e 12290 modelli - 9561 dei quali sono tradotti in Italiano.
Ci stiamo impegnando molto per darvi il meglio che vi possiamo offrire in termini di maglia e uncinetto, ispirazioni e consigli così come filati di grande qualità ad un prezzo incredibile! Volete utilizzare i nostri modelli per qualcosa d'altro oltre al vostro uso personale? Potete leggere tutto ciò che è consentito nel testo sul Copyright in basso su tutte le pagine dei nostri modelli. Buon lavoro!
Lasciare un commento sul modello DROPS 156-55
Noi saremmo felici di ricevere i tuoi commenti e opinioni su questo modello!
Se vuoi fare una domanda, fai per favore attenzione a selezionare la categoria corretta nella casella qui sotto per velocizzare il processo di risposta. I campi richiesti sono indicati da *.