
Categorie popolari
State cercando un filato?


Commenti / Domande (146)
![]() Marilyn ha scritto:
Marilyn ha scritto:
Thank you for your response! I have another question. When it says "work rib back and forth on heel sts for 5-5.5-6 cm" does that mean that the entire piece, right from the first row should measure 5 cm or just from where you started the heel part? Thanks!
27.09.2016 - 17:24DROPS Design ha risposto:
Dear Marilyn, the 5-5.5-6 cm apply only to heel, ie to the 21 sts worked back and forth. Happy knitting!
28.09.2016 - 08:32
![]() Marilyn ha scritto:
Marilyn ha scritto:
After the part where you pick up the 9 stitched on either side, this pattern blows my mind. I have NO IDEA how to proceed. Can you please elaborate? A video on the heel part of this slipper woukd be very helpful, the videos attached to the pattern are not specific to this pattern. Thanks
27.09.2016 - 04:55DROPS Design ha risposto:
Dear Marilyn, when you have 48 sts on needle, then insert a marker as follows: 1st marker, 3 sts, M.1 (= 15 sts), 3 sts, 2nd marker (= 21 sts between markers). Continue now with stocking st and M.1 dec before 1st marker and after 2nd marker a total of 6 times every other round = 36 sts remain. Happy knitting!
27.09.2016 - 10:14
![]() Chantal ha scritto:
Chantal ha scritto:
Hi Drops Design, I finally figured it out, with some assistance. For those in the same boat as I was it's marker - 23 sts - marker. Thanks :)
26.09.2016 - 03:06
![]() Chantal ha scritto:
Chantal ha scritto:
Dear Drops Design, I realize a few people have asked this question already, but the placement of the markers is still baffling me. (Insert a marker each side of the middle 21-23-25 sts on upper foot (= 3-4-5 sts each side of M.1) I am knitting the middle size of this pattern. Do I place my markers before and after the 23rd stitch? Thanks in advance for your answer.
25.09.2016 - 16:50DROPS Design ha risposto:
Dear Chantal, in 2nd size you should have on upper foot: 1st marker, 4 sts, 15 sts in M.1, 4 sts, 2nd marker. So that there are 23 sts for upper foot (15 sts in M.1 + 4 sts on each side of M.1). Happy knitting!
26.09.2016 - 10:51Rosalie ha scritto:
First time making socks and I am stuck on one place. A video from start to finish; of making these gorgeous socks; would be wonderful.please explain this part to me : Insert a marker each side of the middle 21-23-25 sts on upper foot (= 3-4-5 sts each side of M.1). Continue in stockinette st and M.1 - AT THE SAME TIME dec each side as follows: K tog into back of loop the 2 last sts before first marker on upper foot and K tog the first 2 sts after second marker on upper foot. Thank you
21.09.2016 - 00:32DROPS Design ha risposto:
Dear Rosalie, when all sts are on needle, insert a marker 3-4-5 sts before M.1 an 3-4-5 sts after M.1 then dec before 1st marker with K2 tog twisted and after 2nd marker with K2 tog (this will dec the number of sts you picked up along heel) = 36-38-42 sts remain. Happy knitting!
21.09.2016 - 09:23
![]() Donna ha scritto:
Donna ha scritto:
You mentioned you had no name for these how about the name (Cable Vamp.) They are very pretty. Donna
31.08.2016 - 15:52
![]() Donna ha scritto:
Donna ha scritto:
You mentioned you had no name for these how about the name (Cable Vamp.) They are very pretty. Donna
31.08.2016 - 15:16
![]() Jean Tansley ha scritto:
Jean Tansley ha scritto:
I tend to agree with Teresa in how confusing this pattern is. I have knit the toe several times and am not convinced it is correct. I had to make changes to get it to end off correctly. A friend of mine has been knitting for years as well and she had to resort to her own way of decreasing for toes. I'm debating whether I will even attempt the second slipper.
29.08.2016 - 19:21DROPS Design ha risposto:
Dear Mrs Tansley, this pattern is correct, I personnaly made 2 pairs of these in 2 sizes and they worked fine. Feel free to ask any question here or contact your DROPS store for any further personnal assistance. Happy knitting!
30.08.2016 - 08:31
![]() Teresa ha scritto:
Teresa ha scritto:
I have been knitting for over 40 years and have knitted many pairs of socks and slippers sweaters etc. in that time. this has to be the most confusing pattern I have ever come across. It would make it a lot easier if it was written in regular pattern form.
26.08.2016 - 16:02DROPS Design ha risposto:
Dear Teresa, you are always welcome to ask your questions here or to contact your DROPS store for any further personnal assistance when working a pattern. Happy knitting!
29.08.2016 - 12:39
![]() Ann Parsons ha scritto:
Ann Parsons ha scritto:
What weight is the yarn used for short socks with cables?
22.08.2016 - 11:23DROPS Design ha risposto:
Dear Mrs Parsons, DROPS Alaska is a 10 ply/aran - read more about this yarn on its shadecard. Happy knitting!
22.08.2016 - 13:07
|
|||||||||||||||||||||||||
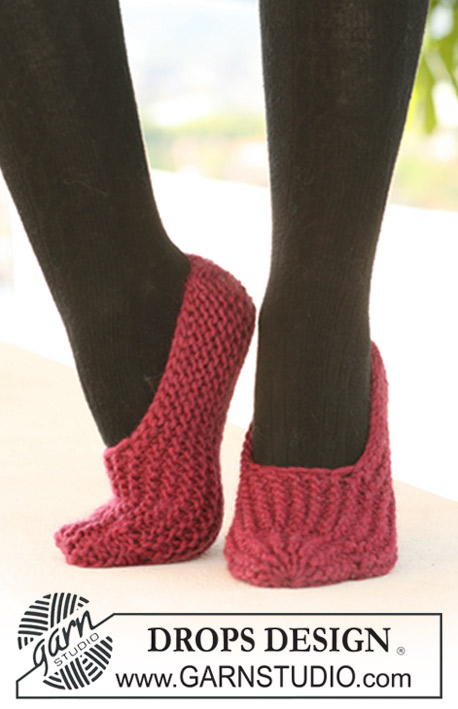
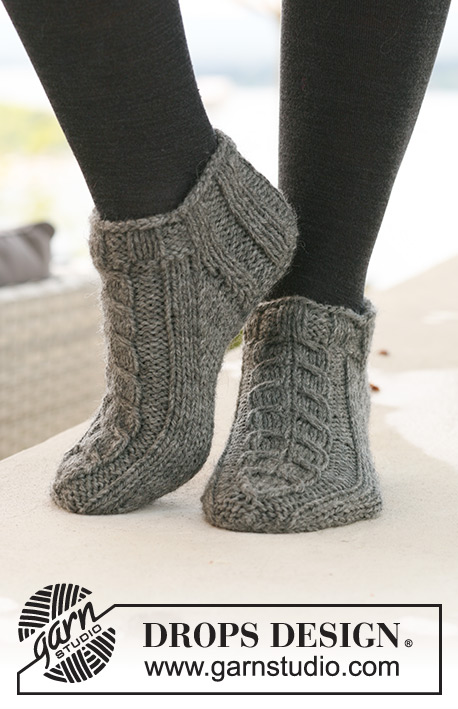
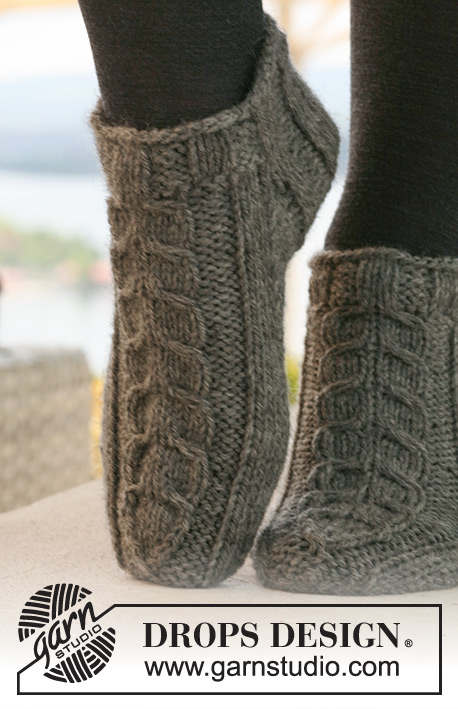
Alaskan Cables |
|||||||||||||||||||||||||
 |
 |
||||||||||||||||||||||||
Calzini corti DROPS, con trecce in "Alaska".
DROPS 125-15 |
|||||||||||||||||||||||||
|
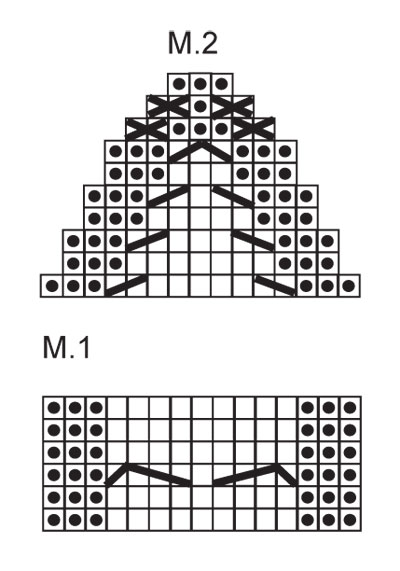
MOTIVO: Vedere i diagrammi M.1 (=15 m) e M.2 (= 15 m). I diagrammi mostrano il motivo sul diritto del lavoro. DIMINUZIONI PER IL TALLONE (lavorate a maglia rasata): Ferro 1 (= diritto del lavoro): lavorare finché non rimangono 6-7-7 m, passare la m successiva a dir senza lavorarla, 1 m dir, accavallare la m passata sulla m lavorata, girare il lavoro. Ferro 2 (= rovescio del lavoro): lavorare finché non rimangono 6-7-7 m, passare la m successiva a rov senza lavorarla, 1 m rov, accavallare la m passata sulla m lavorata, girare il lavoro. Ferro 3 (= diritto del lavoro): lavorare finché non rimangono 5-6-6 m, passare la m successiva a dir senza lavorarla, 1 m dir, accavallare la m passata sulla m lavorata, girare il lavoro. Ferro 4 (= rovescio del lavoro): lavorare finché non rimangono 5-6-6 m, passare la m successiva a rov senza lavorarla, 1 m rov, accavallare la m passata sulla m lavorata, girare il lavoro. Continuare a diminuire in questo modo con 1 m in meno prima di ogni diminuzione, finché sul ferro non rimangono 9-11-11 m. -------------------------------------------------------- CALZINI: Si lavorano in tondo. Avviare 42-48-48 m sui ferri a doppia punta n° 4,5 con il filato Alaska. Lavorare 2 giri a dir e 5 giri a coste 3 m dir / 3 m rov. Al giro successivo, lavorare seguendo il MOTIVO - vedere le spiegazioni sopra - come segue: proseguire a coste 3 m dir / 3 m rov sulle prime 18-24-24 m, 6-6-6 m dir, diagramma M.1 (= 15 m), 3-3-3 m dir. RICORDARSI LA TENSIONE DEL LAVORO! Proseguire in questo modo finché il lavoro non misura 4 cm per tutte le taglie. Tenere ora le prime 21-27-27 m sui ferri per il tallone e mettere in attesa su un ferma maglie le ultime 21-21-21 m (= parte superiore del piede). Lavorare a coste avanti e indietro sulle m del tallone per 5-5,5-6 cm. ATTENZIONE! Nel corso dell’ultimo ferro sul rovescio del lavoro, diminuire come segue: Taglie 35/37: 1 m nella prima e nell’ultimo gruppo di m lavorate a dir, lavorando 2 m insieme a dir; Taglie 38/40 e 41/43: 1 m in ognuno dei gruppi di m lavorate a dir, lavorando 2 m insieme a dir. Tutte le taglie: = 19-23-23 m. Inserire un segno nel lavoro. Lavorare ora le DIMINUZIONI PER IL TALLONE – vedere le spiegazioni sopra! Terminate le diminuzioni per il tallone, riprendere 9-10-12 m da ciascun lato del tallone e riportare sui ferri di lavoro le 21-21-21 m messe in attesa sul ferma maglie = 48-52-56 m. Inserire un segno da ciascun lato delle 21-23-25 m centrali della parte superiore del piede (= 3-4-5 m da ciascun lato del diagramma M.1). Proseguire a maglia rasata e seguendo il diagramma M.1 - ALLO STESSO TEMPO, diminuire da ciascun lato come segue: lavorare insieme a dir ritorto le ultime 2 m prima del primo segno sulla parte superiore del piede e lavorare insieme a dir le prime 2 m dopo il secondo segno sulla parte superiore del piede. Ripetere queste diminuzioni ogni 2 giri per un totale di 6-7-7 volte = 36-38-42 m. Proseguire finché il lavoro non misura 18-20-22 cm dal segno sul tallone – assicurarsi di aver completato una intera ripetizione del diagramma M.1 (= rimangono ancora da lavorare ca. 4-4-5 cm). Inserire un segno da ciascun lato in modo che ci siano 19-19-21 m per la pianta del piede e 17-19-21 m per la parte superiore del piede (= 1-2-3 m da ciascun lato del diagramma M.1). Diminuire ora per la punta. LEGGERE TUTTE LE INDICAZIONI SUCCESSIVE PRIMA DI PROSEGUIRE. (ATTENZIONE! diminuire in modo differente per la pianta del piede e per la parte superiore del piede, ma fare le diminuzioni nel corso dello stesso giro). Diminuire per la pianta del piede come segue: lavorare insieme a dir ritorto le 2 m dopo il segno e lavorare insieme a dir le 2 m prima del segno. Ripetere queste diminuzioni ogni 2 giri per un totale di 4-4-4 volte, poi ad ogni giro per un totale di 3-3-4 volte. ALLO STESSO TEMPO, diminuire per la parte superiore del piede, come segue: Lavorare il diagramma M.2 sulle m del diagramma M.1 (lavorare le 1-2-3 m da ciascun lato del diagramma M.1 a maglia rasata come prima). Finire lavorando gli ultimi 3 giri a rov per le taglie 41/43 = sul ferro rimangono 10-12-14 m. Tagliare il filo, passarlo attraverso le restanti m, stringere e fermare il filo. |
|||||||||||||||||||||||||
Spiegazioni del diagramma |
|||||||||||||||||||||||||
|
|||||||||||||||||||||||||
 |
|||||||||||||||||||||||||
Avete terminato questo modello?Allora taggate le vostre foto con #dropspattern o inviatele alla #dropsfan gallery. Avete bisogno di aiuto con questo modello?Troverete 19 video tutorial, una sezione per i commenti/domande e molto altro guardando il modello su www.garnstudio.com © 1982-2026 DROPS Design A/S. Ci riserviamo tutti i diritti. Questo documento, compreso tutte le sue sotto-sezioni, è protetto dalle leggi sul copyright. Potete leggere quello che potete fare con i nostri modelli alla fine di ogni modello sul nostro sito. |
|||||||||||||||||||||||||
Con oltre 40 anni di esperienza nel design di modelli di maglia e uncinetto, DROPS Design offre la più estesa collezione di modelli gratuiti su internet - tradotti in 17 lingue. Ad oggi vi possiamo fornire 324 cataloghi e 12126 modelli - 9398 dei quali sono tradotti in Italiano.
Ci stiamo impegnando molto per darvi il meglio che vi possiamo offrire in termini di maglia e uncinetto, ispirazioni e consigli così come filati di grande qualità ad un prezzo incredibile! Volete utilizzare i nostri modelli per qualcosa d'altro oltre al vostro uso personale? Potete leggere tutto ciò che è consentito nel testo sul Copyright in basso su tutte le pagine dei nostri modelli. Buon lavoro!
Lasciare un commento sul modello DROPS 125-15
Noi saremmo felici di ricevere i tuoi commenti e opinioni su questo modello!
Se vuoi fare una domanda, fai per favore attenzione a selezionare la categoria corretta nella casella qui sotto per velocizzare il processo di risposta. I campi richiesti sono indicati da *.