
Categorie popolari
State cercando un filato?


Commenti / Domande (146)
Heather ha scritto:
After heel decreases, I ve picked up 9 sts each side, Ive gone in pattern across upper foot to get to other side to pu other 9 sts, Im backwards (working on wrong side, after heel decreases should i do another row to make sure in on right side?? also once that is done and I proceed where it says continue in stockinette and M! and decrease at same time (again right now I'm one wrong side)
25.01.2017 - 15:16DROPS Design ha risposto:
See answer above.
25.01.2017 - 15:54
![]() Terhi ha scritto:
Terhi ha scritto:
En ihan ymmärrä tuota mallineuletta.. Ensin pitää kutoa 6 oikein, sitten 3 nurin, nostaa 3 apupuikolle ja kutoa 1 oikein, jonka jälkeen apupuikolta ne 3. Siinähän tulee 13 silmukkaa? Jos per puikko on 12 silmukkaa? Mitä kohtaa en ymmärrä? Help! :-)
16.01.2017 - 07:55DROPS Design ha risposto:
Hei! Palmikkoneuleen mallikertaa toistetaan vain kerran kerroksella, eli palmikkokuvio tulee ainoastaan sukan etuosaan.
13.02.2017 - 17:16
![]() Debbie ha scritto:
Debbie ha scritto:
After knitting 18 cm from marker on heel the comment " adjust to after a full repeat of M1 (= approx 4 cm remain). What does that mean?
08.11.2016 - 22:05DROPS Design ha risposto:
Dear Debbie, make sure you have worked a full repeat of M.1 (work to the last row in M.1) when your piece measures 18 cm from marker on heel, work more/less row if necessary so that the last row is last row in M.1. Happy knitting!
09.11.2016 - 09:49
![]() Debbie A Davis ha scritto:
Debbie A Davis ha scritto:
2nd last paragraph - adjust to after a full repeat of m1
08.11.2016 - 22:03
![]() Vennie ha scritto:
Vennie ha scritto:
Where do I get the 27 stitches to put on stitch holder? I only havee 11 that are on the flap, I just knit
01.11.2016 - 19:35DROPS Design ha risposto:
Dear Vennie, after ribbing you are working as follows over the 48 sts: K3/P3 over the first 24 sts, K6, M.1 (= 15 sts), K3 = 24+6+15+3= 48 sts. When piece measures 4 cm / 1½'' from cast on row, keep the first 27 sts on needle (= the first 24 sts worked in rib + next 3 sts) and slip the last 21 sts on a st holder (= K3, M.1, K3). Happy knitting!
02.11.2016 - 09:16
![]() Vennie ha scritto:
Vennie ha scritto:
I am thoroughly confused.... I cast on 48 stitches, worked the 5 rounds in k3/p3. I then I ribbed for 24 stitches, K 6 then did pattern with 15 sts worked on that until there was 11 stitches remaining, and piece measured 1 1/2 " so now I have a flap of 11 sts on 1 needle measuring 1 1/2 " long and 29 stitches left over at original length. Am I doing something wrong? I don't understand how i have 27 to work heel and 21 for st holder. Please help me Thank you
30.10.2016 - 01:48DROPS Design ha risposto:
Dear Vennie, after ribbing, you work K3/P3 over the 24 sts as before, then K6, M1 and K3 over the remaining sts on round = 48 sts until piece measures 1½''. Then keep the first 27 sts on needle (for heel) and slip the last 21 sts on a st holder (mid upper foot, sts will be worked again later). Work heel back and forth over the 27 sts dec sts as explained for your size. Happy knitting!
31.10.2016 - 10:37Valda Stryde ha scritto:
Had a little trouble doing first sock. but was watching TV at the same time. So I started to pay attention to what I was doing .When I got the first sock completed I had no trouble. I have completed four pairs now and I can watch TV while doing them now. Beautiful pattern and quite easy to follow. Just have to pay attention doing the first one then everything is quite easy after that. thank you for this pattern.
12.10.2016 - 17:04
![]() Shirley Myles ha scritto:
Shirley Myles ha scritto:
I wish someone would rewrite this pattern .... I needed help every step of the way !
10.10.2016 - 03:34DROPS Design ha risposto:
Dear Mrs Myles, you are welcome to ask you question here, for any individual assistance, remember you will get help from your DROPS store, even per mail or telefon. Happy knnitting!
10.10.2016 - 10:20
![]() Joanne ha scritto:
Joanne ha scritto:
I understand reading the pattern but don't know where the 23 stitches are coming from ?? is it the stitches that came off of stitch holder because I only have 21 ???? totally confused along with several people I have asked for assistance.
03.10.2016 - 20:42DROPS Design ha risposto:
Dear Joanne, when you've finished with heel decreases and pick up sts, you'll end up with 52 sts. Now you've to put a marker as follows: keep M.1 (= 15 sts) as central, leave 4 sts each side of M.1 and place 1 marker each side of the 4 sts, so you'll have: marker, 4 sts, M.1, 4 sts, marker. Happy knitting!
04.10.2016 - 08:46
![]() Joanne ha scritto:
Joanne ha scritto:
I am very confused .. I'm working on middle size .. I have one needle with 21 stitches from stitch holder, one needle with 10 stitches picked up side of heel, other needle with 11 from heel decrease, and 4th needle with 10 stitches for heel pickup .. total of 52 as pattern says .. I'm not sure where it says insert markers each side of 23 stitches .. which 23 stitches ..pls help trying to make these as a gift..
02.10.2016 - 03:58DROPS Design ha risposto:
Dear Joanne, markers should be inserted as follows: 1st marker, 4 sts, M.1 (= 15 sts), 4 sts, 2nd marker (= 23 sts between markers = top of foot). Happy knitting!
03.10.2016 - 09:28
|
|||||||||||||||||||||||||
Alaskan Cables |
|||||||||||||||||||||||||
 |
 |
||||||||||||||||||||||||
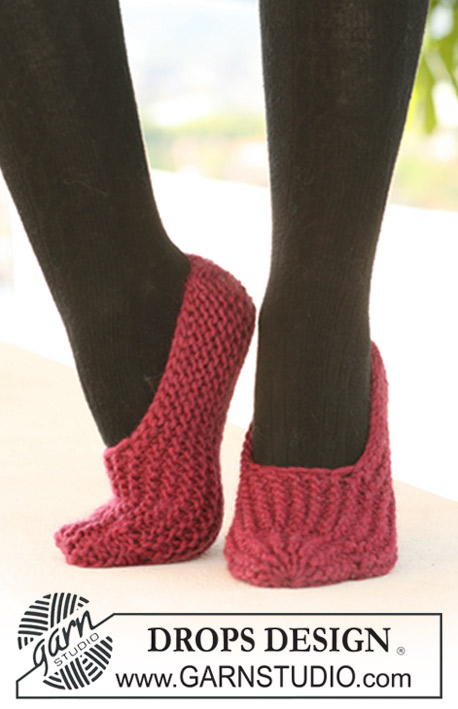
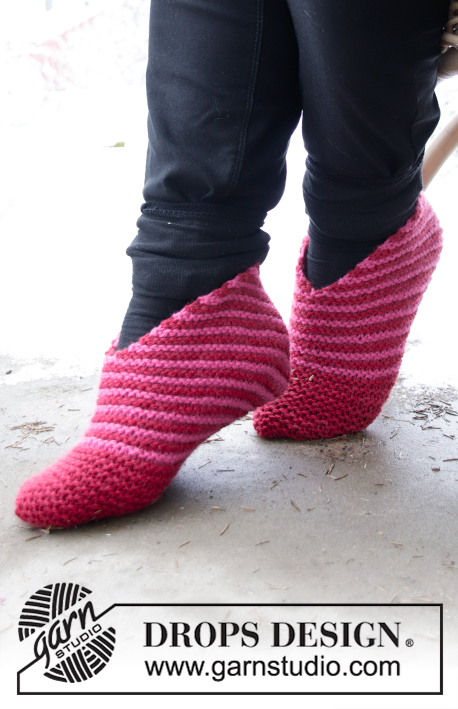
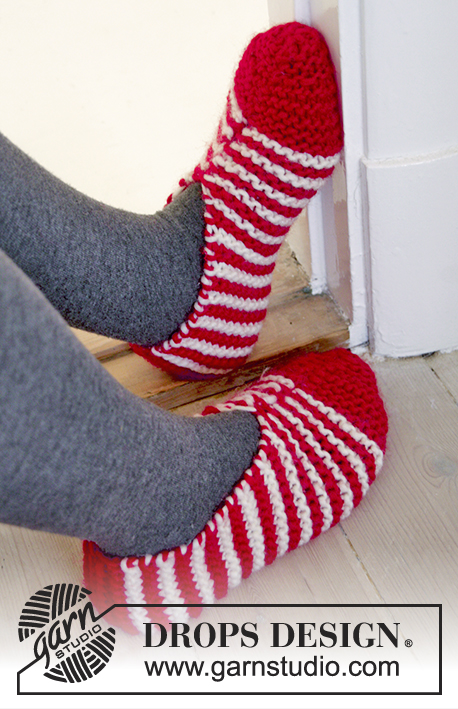
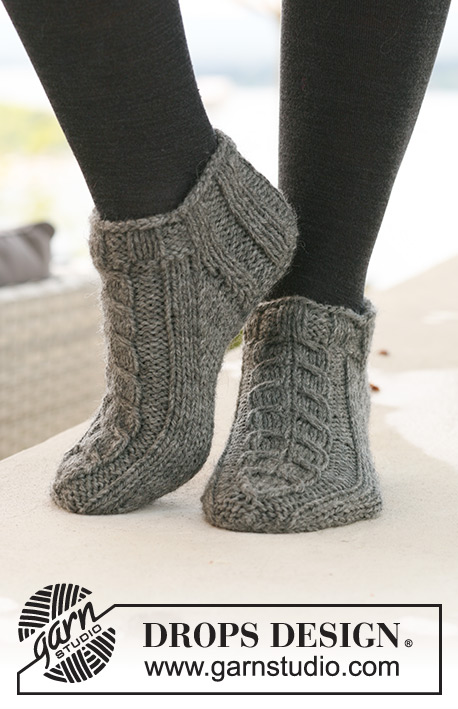
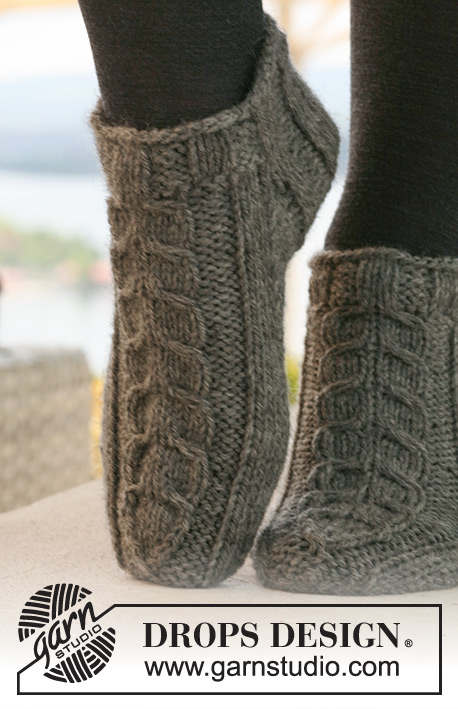
Calzini corti DROPS, con trecce in "Alaska".
DROPS 125-15 |
|||||||||||||||||||||||||
|
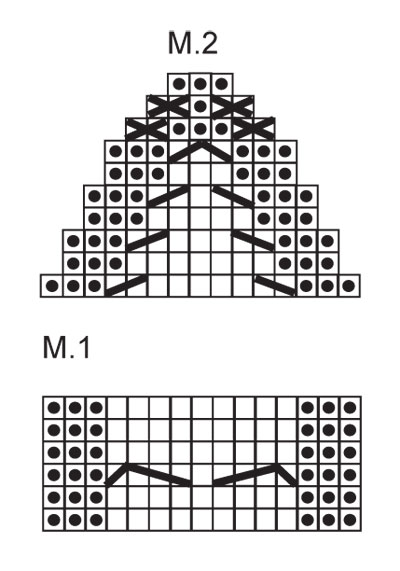
MOTIVO: Vedere i diagrammi M.1 (=15 m) e M.2 (= 15 m). I diagrammi mostrano il motivo sul diritto del lavoro. DIMINUZIONI PER IL TALLONE (lavorate a maglia rasata): Ferro 1 (= diritto del lavoro): lavorare finché non rimangono 6-7-7 m, passare la m successiva a dir senza lavorarla, 1 m dir, accavallare la m passata sulla m lavorata, girare il lavoro. Ferro 2 (= rovescio del lavoro): lavorare finché non rimangono 6-7-7 m, passare la m successiva a rov senza lavorarla, 1 m rov, accavallare la m passata sulla m lavorata, girare il lavoro. Ferro 3 (= diritto del lavoro): lavorare finché non rimangono 5-6-6 m, passare la m successiva a dir senza lavorarla, 1 m dir, accavallare la m passata sulla m lavorata, girare il lavoro. Ferro 4 (= rovescio del lavoro): lavorare finché non rimangono 5-6-6 m, passare la m successiva a rov senza lavorarla, 1 m rov, accavallare la m passata sulla m lavorata, girare il lavoro. Continuare a diminuire in questo modo con 1 m in meno prima di ogni diminuzione, finché sul ferro non rimangono 9-11-11 m. -------------------------------------------------------- CALZINI: Si lavorano in tondo. Avviare 42-48-48 m sui ferri a doppia punta n° 4,5 con il filato Alaska. Lavorare 2 giri a dir e 5 giri a coste 3 m dir / 3 m rov. Al giro successivo, lavorare seguendo il MOTIVO - vedere le spiegazioni sopra - come segue: proseguire a coste 3 m dir / 3 m rov sulle prime 18-24-24 m, 6-6-6 m dir, diagramma M.1 (= 15 m), 3-3-3 m dir. RICORDARSI LA TENSIONE DEL LAVORO! Proseguire in questo modo finché il lavoro non misura 4 cm per tutte le taglie. Tenere ora le prime 21-27-27 m sui ferri per il tallone e mettere in attesa su un ferma maglie le ultime 21-21-21 m (= parte superiore del piede). Lavorare a coste avanti e indietro sulle m del tallone per 5-5,5-6 cm. ATTENZIONE! Nel corso dell’ultimo ferro sul rovescio del lavoro, diminuire come segue: Taglie 35/37: 1 m nella prima e nell’ultimo gruppo di m lavorate a dir, lavorando 2 m insieme a dir; Taglie 38/40 e 41/43: 1 m in ognuno dei gruppi di m lavorate a dir, lavorando 2 m insieme a dir. Tutte le taglie: = 19-23-23 m. Inserire un segno nel lavoro. Lavorare ora le DIMINUZIONI PER IL TALLONE – vedere le spiegazioni sopra! Terminate le diminuzioni per il tallone, riprendere 9-10-12 m da ciascun lato del tallone e riportare sui ferri di lavoro le 21-21-21 m messe in attesa sul ferma maglie = 48-52-56 m. Inserire un segno da ciascun lato delle 21-23-25 m centrali della parte superiore del piede (= 3-4-5 m da ciascun lato del diagramma M.1). Proseguire a maglia rasata e seguendo il diagramma M.1 - ALLO STESSO TEMPO, diminuire da ciascun lato come segue: lavorare insieme a dir ritorto le ultime 2 m prima del primo segno sulla parte superiore del piede e lavorare insieme a dir le prime 2 m dopo il secondo segno sulla parte superiore del piede. Ripetere queste diminuzioni ogni 2 giri per un totale di 6-7-7 volte = 36-38-42 m. Proseguire finché il lavoro non misura 18-20-22 cm dal segno sul tallone – assicurarsi di aver completato una intera ripetizione del diagramma M.1 (= rimangono ancora da lavorare ca. 4-4-5 cm). Inserire un segno da ciascun lato in modo che ci siano 19-19-21 m per la pianta del piede e 17-19-21 m per la parte superiore del piede (= 1-2-3 m da ciascun lato del diagramma M.1). Diminuire ora per la punta. LEGGERE TUTTE LE INDICAZIONI SUCCESSIVE PRIMA DI PROSEGUIRE. (ATTENZIONE! diminuire in modo differente per la pianta del piede e per la parte superiore del piede, ma fare le diminuzioni nel corso dello stesso giro). Diminuire per la pianta del piede come segue: lavorare insieme a dir ritorto le 2 m dopo il segno e lavorare insieme a dir le 2 m prima del segno. Ripetere queste diminuzioni ogni 2 giri per un totale di 4-4-4 volte, poi ad ogni giro per un totale di 3-3-4 volte. ALLO STESSO TEMPO, diminuire per la parte superiore del piede, come segue: Lavorare il diagramma M.2 sulle m del diagramma M.1 (lavorare le 1-2-3 m da ciascun lato del diagramma M.1 a maglia rasata come prima). Finire lavorando gli ultimi 3 giri a rov per le taglie 41/43 = sul ferro rimangono 10-12-14 m. Tagliare il filo, passarlo attraverso le restanti m, stringere e fermare il filo. |
|||||||||||||||||||||||||
Spiegazioni del diagramma |
|||||||||||||||||||||||||
|
|||||||||||||||||||||||||
 |
|||||||||||||||||||||||||
Avete terminato questo modello?Allora taggate le vostre foto con #dropspattern o inviatele alla #dropsfan gallery. Avete bisogno di aiuto con questo modello?Troverete 19 video tutorial, una sezione per i commenti/domande e molto altro guardando il modello su www.garnstudio.com © 1982-2026 DROPS Design A/S. Ci riserviamo tutti i diritti. Questo documento, compreso tutte le sue sotto-sezioni, è protetto dalle leggi sul copyright. Potete leggere quello che potete fare con i nostri modelli alla fine di ogni modello sul nostro sito. |
|||||||||||||||||||||||||
Con oltre 40 anni di esperienza nel design di modelli di maglia e uncinetto, DROPS Design offre la più estesa collezione di modelli gratuiti su internet - tradotti in 17 lingue. Ad oggi vi possiamo fornire 324 cataloghi e 12126 modelli - 9398 dei quali sono tradotti in Italiano.
Ci stiamo impegnando molto per darvi il meglio che vi possiamo offrire in termini di maglia e uncinetto, ispirazioni e consigli così come filati di grande qualità ad un prezzo incredibile! Volete utilizzare i nostri modelli per qualcosa d'altro oltre al vostro uso personale? Potete leggere tutto ciò che è consentito nel testo sul Copyright in basso su tutte le pagine dei nostri modelli. Buon lavoro!
Lasciare un commento sul modello DROPS 125-15
Noi saremmo felici di ricevere i tuoi commenti e opinioni su questo modello!
Se vuoi fare una domanda, fai per favore attenzione a selezionare la categoria corretta nella casella qui sotto per velocizzare il processo di risposta. I campi richiesti sono indicati da *.