
Categorie popolari
State cercando un filato?


Commenti / Domande (146)
![]() Marraine Mamour ha scritto:
Marraine Mamour ha scritto:
Bonjour ! J'ai fait une chaussette et je trouve le talon trop court. Est-ce que je dois faire 4 cm de côtes et arrêter M1 à 5,5 cm total ou 4 cm + 5,5 cm de M1 avant de commencer la diminution ?
20.08.2016 - 14:10DROPS Design ha risposto:
Bonjour Mme Mamour, vous tricotez comme indiqué soit 2 tours end, 5 tours de côtes, puis point fantaisie jusqu'à 4 cm de hauteur totale (= depuis le rang de montage) puis tricotez le talon sur les 27 premières m pendant 5.5 cm (taille 38/40) sans compter les 4 cm sur toutes les mailles. Bon tricot!
22.08.2016 - 09:08
![]() Tish ha scritto:
Tish ha scritto:
I like the pattern but was wondering if there is a plan to make it downloadable (PDF) as well??
15.08.2016 - 18:41DROPS Design ha risposto:
Dear Mrs Tish, You cannot download our patterns. You need to either see them online or print them. The only alternative you have is to print as .PDF - so if you can print as .PDF from your phone, a file will be created, instead of a print, that you can store. Happy knitting!
16.08.2016 - 09:05Louise ha scritto:
J aimerais avoir ce patron de bas en francais merci
17.07.2016 - 17:16DROPS Design ha risposto:
Bonjour Louise, tous nos modèles sont traduits en français, cliquez sur la flèche du menu déroulant sous la photo pour changer la langue et accéder aux explications en français. Bon tricot!
18.07.2016 - 09:26Louise ha scritto:
J aimerais avoir ce patron de bas en francais merci
17.07.2016 - 17:15Florence O'Neill ha scritto:
I have come to the part of the pattern where you decrease for the toes. I am confused by the wording "work m.2 over m.1...each side of m.1". Can you clarify for me? A video demo of this part would be helpful on your website. Thanks!
12.11.2015 - 01:25DROPS Design ha risposto:
Dear Mrs O'Neill, when inserting markers for toe, you have 17-19-21 sts for uupper foot = M.1 + 1-2-3 sts on each side of M.1 (= before and after M.1). For toe shaping, work now M.2 instead of M.1 with the 1-2-3 sts on each side in stocking st as before. Happy knitting!
12.11.2015 - 10:17
![]() Valerie ha scritto:
Valerie ha scritto:
When working the heal on the small size should it end with 9 stitches or 11. If I knit the way it says I end up with 11 and to get 9 I would have to knit 2 together and it just doesn't look right. Am I not reading the pattern right, I have done it twice now and ends the same way.
16.10.2015 - 21:52DROPS Design ha risposto:
Dear Valerie, when 11 sts remain on heel, you have to work 2 more rows (1 from RS and 1 from WS) as before until you get only 9 sts in the smallest size. Happy knitting!
17.10.2015 - 14:32
![]() Svenja ha scritto:
Svenja ha scritto:
Hallo, ich verstehe bei dem ersten abnehmen ( nach 5 1/2 cm auf der Rückseite wie folgt abk.) nicht genau, warum ich bei jeder der 4 re. Partien 2m zusammenstricken muss und wo ich die Makierung anbringen soll... Danke schon mal für die Antwort! :)
22.09.2015 - 19:43DROPS Design ha risposto:
Die Anleitung wurde gerade sprachlich etwas überarbeitet, vielleicht ist es nun klarer. Die Markierung setzen Sie an die R, die Sie zuletzt gestrickt haben, sie ist zum späteren Messen gedacht. Die M müssen Sie abnehmen, damit die M-Zahl passt. Sie nehmen also in den 4 rechts gestrickten Bereichen je 1 M, haben also danach 4 M weniger, zuerst hatten Sie ja 27 Fersen-Maschen, danach sind es dann 23.
27.09.2015 - 23:06
![]() Git L ha scritto:
Git L ha scritto:
Jag har hört att man har haft problem med tån. Det misstaget jag gjorde var att jag gjorde minskningar på båda sidor av markeringarna (som man brukar med sockor) OCH i samband med mönstret på ovansidan. Det kanske kan förtydligas. I övrigt - mycket trevliga sockor!
15.02.2015 - 11:07
![]() Stina ha scritto:
Stina ha scritto:
Nach 4cm wird ein Teil der Maschen auf die Hilfsnadel gelegt. Beziehen sich die 4cm auf die Totallänge oder die Länge ab Musterbeginn? Danke!
17.01.2015 - 17:37DROPS Design ha risposto:
Antwort siehe unten! :-)
17.01.2015 - 18:29
![]() Stina ha scritto:
Stina ha scritto:
Nach 4cm wird ein Teil der Maschen auf die Hilfsnadel gelegt. Beziehen sich die 4cm auf die Totallänge oder die Länge ab Musterbeginn? Danke!
17.01.2015 - 17:10DROPS Design ha risposto:
Das bezieht sich auf die Gesamtlänge, wie auch alle weiteren "nach" + cm-Angaben, sofern nicht anders beschrieben. Gutes Gelingen!
17.01.2015 - 18:28
|
|||||||||||||||||||||||||
Alaskan Cables |
|||||||||||||||||||||||||
 |
 |
||||||||||||||||||||||||
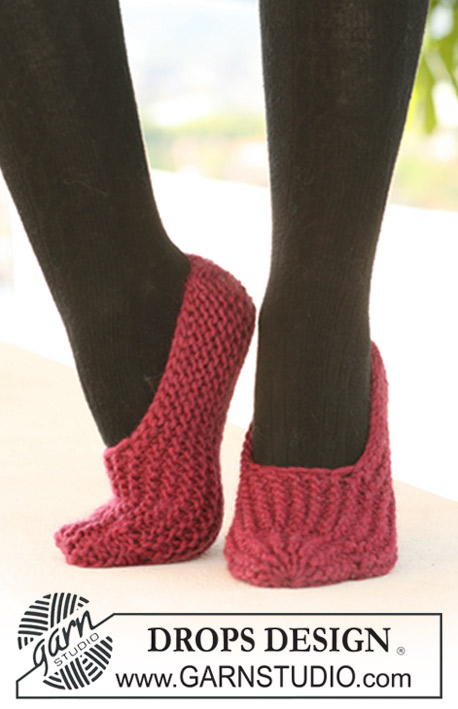
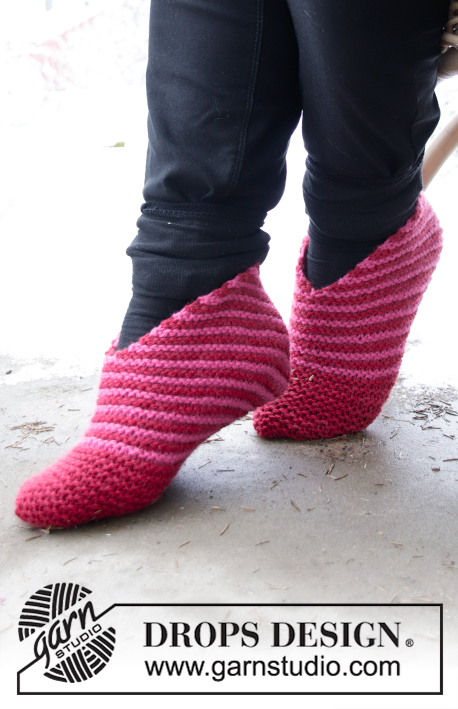
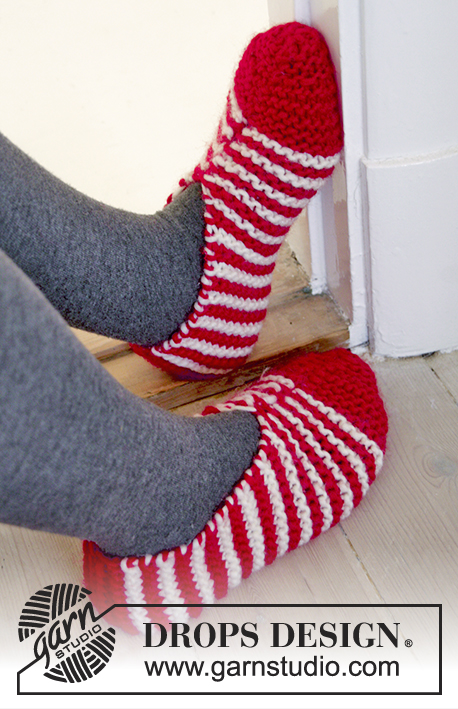
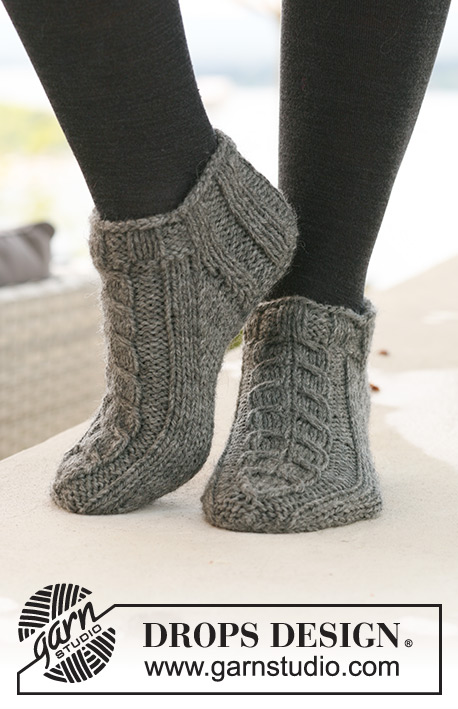
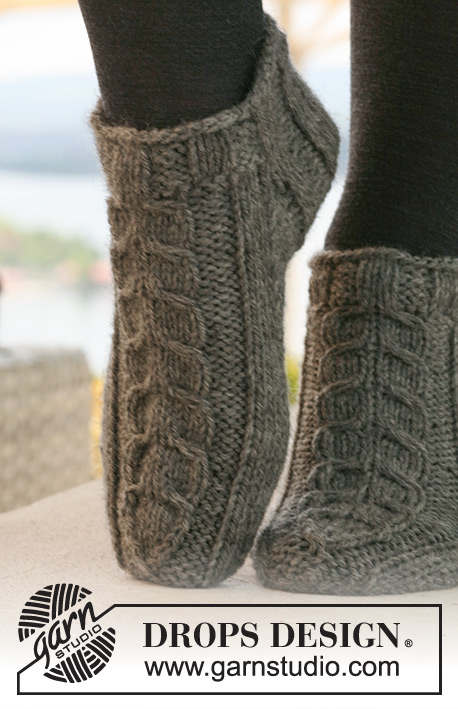
Calzini corti DROPS, con trecce in "Alaska".
DROPS 125-15 |
|||||||||||||||||||||||||
|
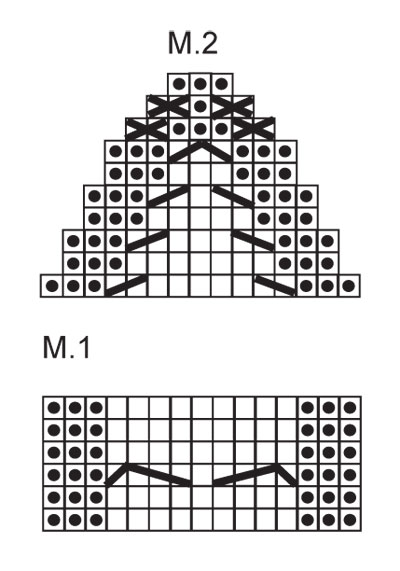
MOTIVO: Vedere i diagrammi M.1 (=15 m) e M.2 (= 15 m). I diagrammi mostrano il motivo sul diritto del lavoro. DIMINUZIONI PER IL TALLONE (lavorate a maglia rasata): Ferro 1 (= diritto del lavoro): lavorare finché non rimangono 6-7-7 m, passare la m successiva a dir senza lavorarla, 1 m dir, accavallare la m passata sulla m lavorata, girare il lavoro. Ferro 2 (= rovescio del lavoro): lavorare finché non rimangono 6-7-7 m, passare la m successiva a rov senza lavorarla, 1 m rov, accavallare la m passata sulla m lavorata, girare il lavoro. Ferro 3 (= diritto del lavoro): lavorare finché non rimangono 5-6-6 m, passare la m successiva a dir senza lavorarla, 1 m dir, accavallare la m passata sulla m lavorata, girare il lavoro. Ferro 4 (= rovescio del lavoro): lavorare finché non rimangono 5-6-6 m, passare la m successiva a rov senza lavorarla, 1 m rov, accavallare la m passata sulla m lavorata, girare il lavoro. Continuare a diminuire in questo modo con 1 m in meno prima di ogni diminuzione, finché sul ferro non rimangono 9-11-11 m. -------------------------------------------------------- CALZINI: Si lavorano in tondo. Avviare 42-48-48 m sui ferri a doppia punta n° 4,5 con il filato Alaska. Lavorare 2 giri a dir e 5 giri a coste 3 m dir / 3 m rov. Al giro successivo, lavorare seguendo il MOTIVO - vedere le spiegazioni sopra - come segue: proseguire a coste 3 m dir / 3 m rov sulle prime 18-24-24 m, 6-6-6 m dir, diagramma M.1 (= 15 m), 3-3-3 m dir. RICORDARSI LA TENSIONE DEL LAVORO! Proseguire in questo modo finché il lavoro non misura 4 cm per tutte le taglie. Tenere ora le prime 21-27-27 m sui ferri per il tallone e mettere in attesa su un ferma maglie le ultime 21-21-21 m (= parte superiore del piede). Lavorare a coste avanti e indietro sulle m del tallone per 5-5,5-6 cm. ATTENZIONE! Nel corso dell’ultimo ferro sul rovescio del lavoro, diminuire come segue: Taglie 35/37: 1 m nella prima e nell’ultimo gruppo di m lavorate a dir, lavorando 2 m insieme a dir; Taglie 38/40 e 41/43: 1 m in ognuno dei gruppi di m lavorate a dir, lavorando 2 m insieme a dir. Tutte le taglie: = 19-23-23 m. Inserire un segno nel lavoro. Lavorare ora le DIMINUZIONI PER IL TALLONE – vedere le spiegazioni sopra! Terminate le diminuzioni per il tallone, riprendere 9-10-12 m da ciascun lato del tallone e riportare sui ferri di lavoro le 21-21-21 m messe in attesa sul ferma maglie = 48-52-56 m. Inserire un segno da ciascun lato delle 21-23-25 m centrali della parte superiore del piede (= 3-4-5 m da ciascun lato del diagramma M.1). Proseguire a maglia rasata e seguendo il diagramma M.1 - ALLO STESSO TEMPO, diminuire da ciascun lato come segue: lavorare insieme a dir ritorto le ultime 2 m prima del primo segno sulla parte superiore del piede e lavorare insieme a dir le prime 2 m dopo il secondo segno sulla parte superiore del piede. Ripetere queste diminuzioni ogni 2 giri per un totale di 6-7-7 volte = 36-38-42 m. Proseguire finché il lavoro non misura 18-20-22 cm dal segno sul tallone – assicurarsi di aver completato una intera ripetizione del diagramma M.1 (= rimangono ancora da lavorare ca. 4-4-5 cm). Inserire un segno da ciascun lato in modo che ci siano 19-19-21 m per la pianta del piede e 17-19-21 m per la parte superiore del piede (= 1-2-3 m da ciascun lato del diagramma M.1). Diminuire ora per la punta. LEGGERE TUTTE LE INDICAZIONI SUCCESSIVE PRIMA DI PROSEGUIRE. (ATTENZIONE! diminuire in modo differente per la pianta del piede e per la parte superiore del piede, ma fare le diminuzioni nel corso dello stesso giro). Diminuire per la pianta del piede come segue: lavorare insieme a dir ritorto le 2 m dopo il segno e lavorare insieme a dir le 2 m prima del segno. Ripetere queste diminuzioni ogni 2 giri per un totale di 4-4-4 volte, poi ad ogni giro per un totale di 3-3-4 volte. ALLO STESSO TEMPO, diminuire per la parte superiore del piede, come segue: Lavorare il diagramma M.2 sulle m del diagramma M.1 (lavorare le 1-2-3 m da ciascun lato del diagramma M.1 a maglia rasata come prima). Finire lavorando gli ultimi 3 giri a rov per le taglie 41/43 = sul ferro rimangono 10-12-14 m. Tagliare il filo, passarlo attraverso le restanti m, stringere e fermare il filo. |
|||||||||||||||||||||||||
Spiegazioni del diagramma |
|||||||||||||||||||||||||
|
|||||||||||||||||||||||||
 |
|||||||||||||||||||||||||
Avete terminato questo modello?Allora taggate le vostre foto con #dropspattern o inviatele alla #dropsfan gallery. Avete bisogno di aiuto con questo modello?Troverete 19 video tutorial, una sezione per i commenti/domande e molto altro guardando il modello su www.garnstudio.com © 1982-2026 DROPS Design A/S. Ci riserviamo tutti i diritti. Questo documento, compreso tutte le sue sotto-sezioni, è protetto dalle leggi sul copyright. Potete leggere quello che potete fare con i nostri modelli alla fine di ogni modello sul nostro sito. |
|||||||||||||||||||||||||


Con oltre 40 anni di esperienza nel design di modelli di maglia e uncinetto, DROPS Design offre la più estesa collezione di modelli gratuiti su internet - tradotti in 17 lingue. Ad oggi vi possiamo fornire 324 cataloghi e 12126 modelli - 9398 dei quali sono tradotti in Italiano.
Ci stiamo impegnando molto per darvi il meglio che vi possiamo offrire in termini di maglia e uncinetto, ispirazioni e consigli così come filati di grande qualità ad un prezzo incredibile! Volete utilizzare i nostri modelli per qualcosa d'altro oltre al vostro uso personale? Potete leggere tutto ciò che è consentito nel testo sul Copyright in basso su tutte le pagine dei nostri modelli. Buon lavoro!
Lasciare un commento sul modello DROPS 125-15
Noi saremmo felici di ricevere i tuoi commenti e opinioni su questo modello!
Se vuoi fare una domanda, fai per favore attenzione a selezionare la categoria corretta nella casella qui sotto per velocizzare il processo di risposta. I campi richiesti sono indicati da *.