
Categorie popolari
State cercando un filato?


Commenti / Domande (146)
![]() ROGET Anne ha scritto:
ROGET Anne ha scritto:
Y a-t-il moyen de tricoter ce modèle en magic loop?
21.01.2026 - 23:47DROPS Design ha risposto:
Bonjour Mme Roget, tout à fait, la technique du magic loop s'adapte à tous les modèles. Bon tricot!
23.01.2026 - 09:23
![]() Anna ha scritto:
Anna ha scritto:
Hej! Fantastiskt fin socka. Förstår inte ”sätt en markör på var sida av de mittersta 23 m på foten (=4m på var sida av M1). Menas det att jag ska sätta en markör ”utanför” M1? På maska 4 på båda sidor om M1? Det betyder att jag ska sätta markör på de maskorna tagit upp på sidan hälen? Stämmer detta? Undrar också vilken sida man gör vridna o vanliga på? Kan man uttrycka sig utifrån att man har sockan på foten (höger o vänster sida). 🤔 Taack!
26.12.2025 - 20:54DROPS Design ha risposto:
Hei Anna. Ja, du setter da 1 merke forbi den første/siste maske som ble strikket opp av de 10. I hver side. mvh DROPS Design
19.01.2026 - 12:57
![]() Sheila ha scritto:
Sheila ha scritto:
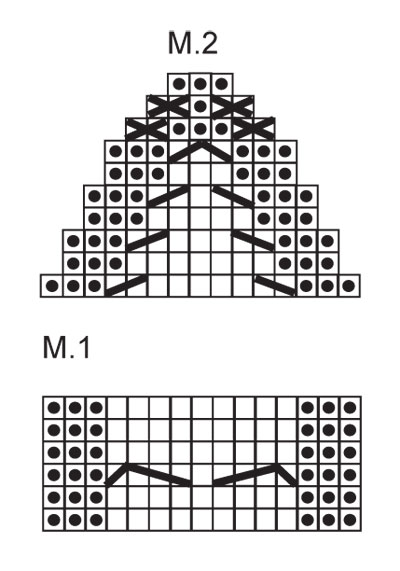
The patterns, M1 and M2 are shown from the right side. Does that mean that when knitting from the wrong side, you reverse the stitches [(ie purl where it says knit, and knit where it says purl) so that you end up with a stockinette stitch? Or do you want a garter stitch?
25.03.2025 - 17:10DROPS Design ha risposto:
Dear Sheila, socks are worked in the round so diagrams will always be worked from the right side, read them from the right towards the left on every round. This means first cable is worked on 3rd row then every 6th round. And stitches are worked as shown in diagram on every round; P over P and K over K. Happy knitting!
26.03.2025 - 07:44
![]() Cherie ha scritto:
Cherie ha scritto:
Your answer to my question on where to out the markers didn’t answer my question “on each side of the foot with 19-19-21 stitches for under foot and 17-19-21 stitches for top of foot” do they go before and after the 19 stitches? Or are there 4 markers on each side of the 19 stitches under and top? Repeating what’s already written on the pattern isn’t helping. Need very clear placement of where the markers are going
18.03.2025 - 14:39
![]() Cherie ha scritto:
Cherie ha scritto:
On the toe decrease it says insert marker on each side. Each side of what? Between what stitches do they go? Horribly written pattern I must say.
18.03.2025 - 03:25DROPS Design ha risposto:
Dear Cherie, these markers should be inserted on each side of the foot with 19-19-21 stitches for under foot and 17-19-21 stitches for top of foot. Hope it can help. Happy knitting!
18.03.2025 - 10:28
![]() Sheila ha scritto:
Sheila ha scritto:
Hi. I am confused about the rows of HEEL DECREASES. with 23 stitches, I am instructed to knit until 7 stitches remain, then slip a stitches, K1, psso, which leaves 5 stitches not yet knit on the needle. But then it says to turn piece. I assume then you go on to Row 2 of the heel decreases. But what happens to the 5 stitches not yet knit on the needle?
16.03.2025 - 22:52DROPS Design ha risposto:
Dear Sheila, these 5 stitches are left unworked for now but, in the next row, when you knit until less stitches remain, you will be taking 1 of these unworked stitches for the final decreases. Hereis a video example on how these decreases are worked. Happy knitting!
16.03.2025 - 23:43
![]() Anja ha scritto:
Anja ha scritto:
Hei:) veldig fint mønster:) jeg synes det er vanskelig å forstå følgende: etter jeg har strikket vrangbord og M1 en gang, skal jeg da fortsette med bare M1 en rapport til eller gå rett over til M2, og når skal jeg isåfall begynne å strikke M2? beklager om jeg spør "dumt"? På forhånd takk for svar:)
11.03.2025 - 17:45DROPS Design ha risposto:
Hei Anja, Når du har strikket 4 cm med vrangbord og M.1, strikker du videre kun på hælen. Og da strikker du vrangbord, fram og tilbake over hælmaskene. Når du setter sammen maskene til foten, fortsetter du med 1 rapport av M.1 over maskene på toppen av foten. Du begynner med M.2 etter den ene rapporten av M.1. God fornøyelse!
12.03.2025 - 06:22
![]() Rasha ha scritto:
Rasha ha scritto:
Dear Droos Designs, I’m working the part before the decrease for size 7.5-9 where it says “ 1 st in each of the K4-section by K2 tog.” this part is not clear, there is no k4 part in the work and also now I have 27 sts on the needle that should be decreased to 23 sts, it is not clear how I should do it, can you explain how many stitched and how many rows I should decrease? Thank you
29.12.2024 - 18:57DROPS Design ha risposto:
Dear Rasha, there is a typo in the pattern. It should say in each of the 4 K-sections. So in every K3/P3 in the 24 rib stitches for the heel you will decrease 1 knit stitch in each K3 by working k2tog, to get a K2/P3 rib. This way you will decrease 4 stitches, from 27 to 23. These stitches are all decreased in the same row. Happy knitting!
30.12.2024 - 23:38
![]() Rasha ha scritto:
Rasha ha scritto:
Dear Drops designs, I am currently working on this beautiful piece but I got confused by the part where it says “ Continue like this until piece measures 4 cm / 1½" for all sizes” Do you mean 4 cm from the beginning or 4 cm from the start of M1? Thank you
29.12.2024 - 08:56DROPS Design ha risposto:
Dear Rasha, this mean whole piece, i.e.4 cm from beginning. Happy knitting!
29.12.2024 - 11:22
![]() Omama ha scritto:
Omama ha scritto:
Hallo, Frage ... warum die gleiche Maschenzahl für die beiden größeren Modelle? Habe die mittlere Grösse angeschlagen 48 M, viel zu weit für die Füsslänge 24. Habe schon viel gestrickt aber die gleiche Maschenzahl für zwei verschiedene Größen hatte ich noch nie. Und die Maschenprobe stimmte. Ich brauche für Schuhgröße 37, Fusslänge 24, da sind 48 M der Wahnsinn. Ist das ein Druckfehler bitte? LG
18.12.2024 - 19:56DROPS Design ha risposto:
Liebe Frau Omama, Schuhgröße 37 ist lieber 1. Größe, dann können Sie den Fuß stricken, bis die Arbeit 20 cm (anstatt 18 cm) stricken, und dann die Spitze wie bei der 1. Größe stricken, so wird die Arbeit schmaler aber trotzdem genügend lang. Viel Spaß beim Stricken!
19.12.2024 - 09:17
|
|||||||||||||||||||||||||
Alaskan Cables |
|||||||||||||||||||||||||
 |
 |
||||||||||||||||||||||||
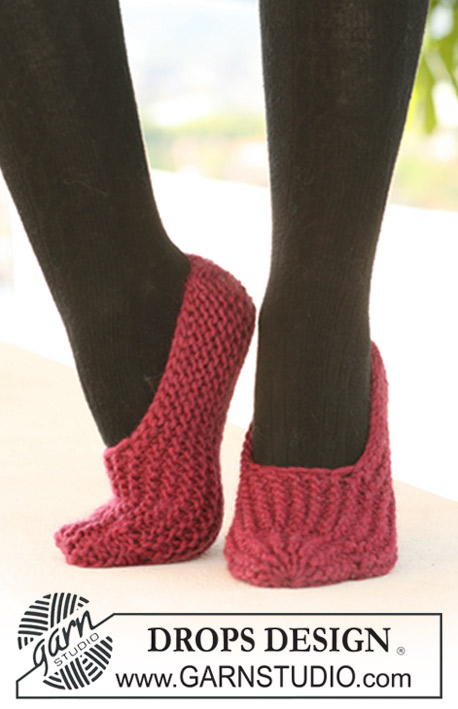
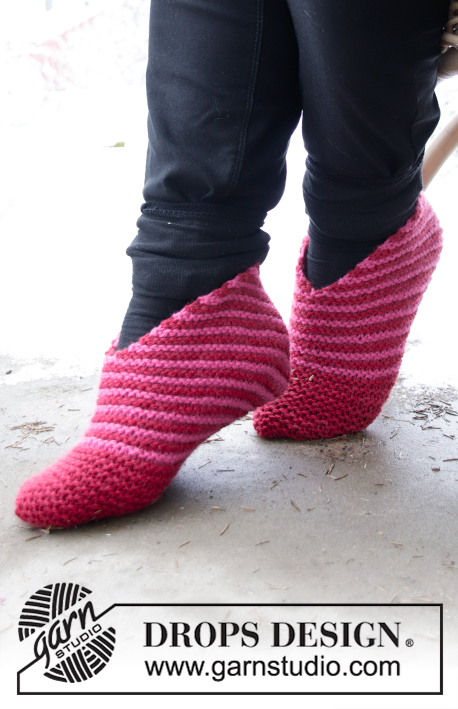
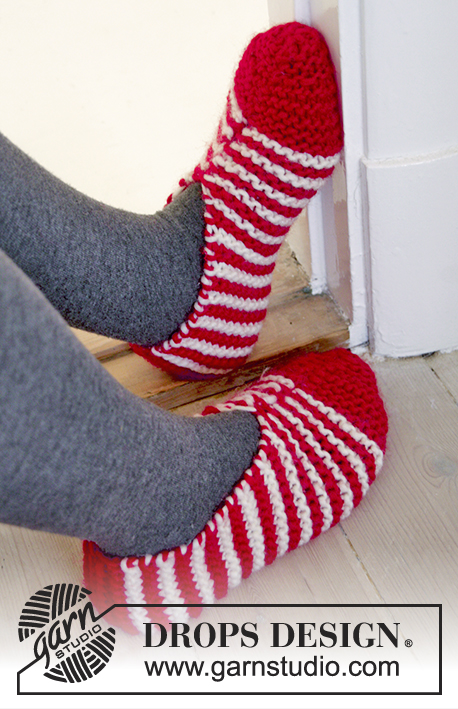
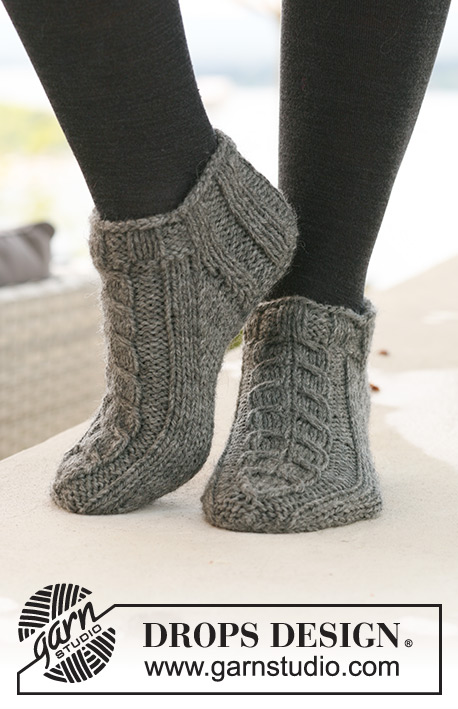
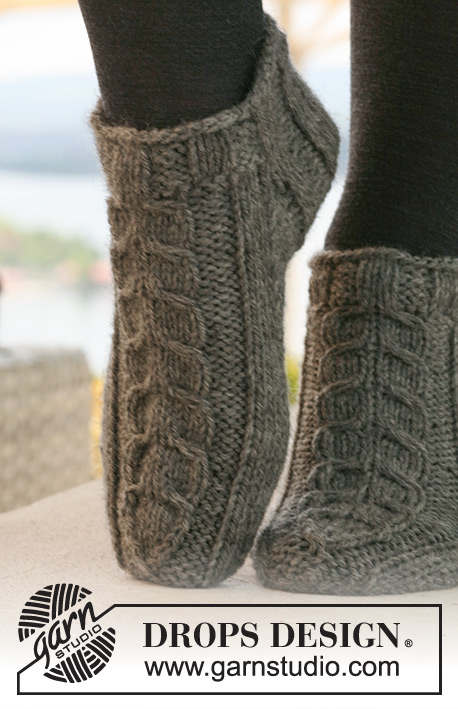
Calzini corti DROPS, con trecce in "Alaska".
DROPS 125-15 |
|||||||||||||||||||||||||
|
MOTIVO: Vedere i diagrammi M.1 (=15 m) e M.2 (= 15 m). I diagrammi mostrano il motivo sul diritto del lavoro. DIMINUZIONI PER IL TALLONE (lavorate a maglia rasata): Ferro 1 (= diritto del lavoro): lavorare finché non rimangono 6-7-7 m, passare la m successiva a dir senza lavorarla, 1 m dir, accavallare la m passata sulla m lavorata, girare il lavoro. Ferro 2 (= rovescio del lavoro): lavorare finché non rimangono 6-7-7 m, passare la m successiva a rov senza lavorarla, 1 m rov, accavallare la m passata sulla m lavorata, girare il lavoro. Ferro 3 (= diritto del lavoro): lavorare finché non rimangono 5-6-6 m, passare la m successiva a dir senza lavorarla, 1 m dir, accavallare la m passata sulla m lavorata, girare il lavoro. Ferro 4 (= rovescio del lavoro): lavorare finché non rimangono 5-6-6 m, passare la m successiva a rov senza lavorarla, 1 m rov, accavallare la m passata sulla m lavorata, girare il lavoro. Continuare a diminuire in questo modo con 1 m in meno prima di ogni diminuzione, finché sul ferro non rimangono 9-11-11 m. -------------------------------------------------------- CALZINI: Si lavorano in tondo. Avviare 42-48-48 m sui ferri a doppia punta n° 4,5 con il filato Alaska. Lavorare 2 giri a dir e 5 giri a coste 3 m dir / 3 m rov. Al giro successivo, lavorare seguendo il MOTIVO - vedere le spiegazioni sopra - come segue: proseguire a coste 3 m dir / 3 m rov sulle prime 18-24-24 m, 6-6-6 m dir, diagramma M.1 (= 15 m), 3-3-3 m dir. RICORDARSI LA TENSIONE DEL LAVORO! Proseguire in questo modo finché il lavoro non misura 4 cm per tutte le taglie. Tenere ora le prime 21-27-27 m sui ferri per il tallone e mettere in attesa su un ferma maglie le ultime 21-21-21 m (= parte superiore del piede). Lavorare a coste avanti e indietro sulle m del tallone per 5-5,5-6 cm. ATTENZIONE! Nel corso dell’ultimo ferro sul rovescio del lavoro, diminuire come segue: Taglie 35/37: 1 m nella prima e nell’ultimo gruppo di m lavorate a dir, lavorando 2 m insieme a dir; Taglie 38/40 e 41/43: 1 m in ognuno dei gruppi di m lavorate a dir, lavorando 2 m insieme a dir. Tutte le taglie: = 19-23-23 m. Inserire un segno nel lavoro. Lavorare ora le DIMINUZIONI PER IL TALLONE – vedere le spiegazioni sopra! Terminate le diminuzioni per il tallone, riprendere 9-10-12 m da ciascun lato del tallone e riportare sui ferri di lavoro le 21-21-21 m messe in attesa sul ferma maglie = 48-52-56 m. Inserire un segno da ciascun lato delle 21-23-25 m centrali della parte superiore del piede (= 3-4-5 m da ciascun lato del diagramma M.1). Proseguire a maglia rasata e seguendo il diagramma M.1 - ALLO STESSO TEMPO, diminuire da ciascun lato come segue: lavorare insieme a dir ritorto le ultime 2 m prima del primo segno sulla parte superiore del piede e lavorare insieme a dir le prime 2 m dopo il secondo segno sulla parte superiore del piede. Ripetere queste diminuzioni ogni 2 giri per un totale di 6-7-7 volte = 36-38-42 m. Proseguire finché il lavoro non misura 18-20-22 cm dal segno sul tallone – assicurarsi di aver completato una intera ripetizione del diagramma M.1 (= rimangono ancora da lavorare ca. 4-4-5 cm). Inserire un segno da ciascun lato in modo che ci siano 19-19-21 m per la pianta del piede e 17-19-21 m per la parte superiore del piede (= 1-2-3 m da ciascun lato del diagramma M.1). Diminuire ora per la punta. LEGGERE TUTTE LE INDICAZIONI SUCCESSIVE PRIMA DI PROSEGUIRE. (ATTENZIONE! diminuire in modo differente per la pianta del piede e per la parte superiore del piede, ma fare le diminuzioni nel corso dello stesso giro). Diminuire per la pianta del piede come segue: lavorare insieme a dir ritorto le 2 m dopo il segno e lavorare insieme a dir le 2 m prima del segno. Ripetere queste diminuzioni ogni 2 giri per un totale di 4-4-4 volte, poi ad ogni giro per un totale di 3-3-4 volte. ALLO STESSO TEMPO, diminuire per la parte superiore del piede, come segue: Lavorare il diagramma M.2 sulle m del diagramma M.1 (lavorare le 1-2-3 m da ciascun lato del diagramma M.1 a maglia rasata come prima). Finire lavorando gli ultimi 3 giri a rov per le taglie 41/43 = sul ferro rimangono 10-12-14 m. Tagliare il filo, passarlo attraverso le restanti m, stringere e fermare il filo. |
|||||||||||||||||||||||||
Spiegazioni del diagramma |
|||||||||||||||||||||||||
|
|||||||||||||||||||||||||
 |
|||||||||||||||||||||||||
Avete terminato questo modello?Allora taggate le vostre foto con #dropspattern o inviatele alla #dropsfan gallery. Avete bisogno di aiuto con questo modello?Troverete 19 video tutorial, una sezione per i commenti/domande e molto altro guardando il modello su www.garnstudio.com © 1982-2026 DROPS Design A/S. Ci riserviamo tutti i diritti. Questo documento, compreso tutte le sue sotto-sezioni, è protetto dalle leggi sul copyright. Potete leggere quello che potete fare con i nostri modelli alla fine di ogni modello sul nostro sito. |
|||||||||||||||||||||||||


Con oltre 40 anni di esperienza nel design di modelli di maglia e uncinetto, DROPS Design offre la più estesa collezione di modelli gratuiti su internet - tradotti in 17 lingue. Ad oggi vi possiamo fornire 324 cataloghi e 12245 modelli - 9515 dei quali sono tradotti in Italiano.
Ci stiamo impegnando molto per darvi il meglio che vi possiamo offrire in termini di maglia e uncinetto, ispirazioni e consigli così come filati di grande qualità ad un prezzo incredibile! Volete utilizzare i nostri modelli per qualcosa d'altro oltre al vostro uso personale? Potete leggere tutto ciò che è consentito nel testo sul Copyright in basso su tutte le pagine dei nostri modelli. Buon lavoro!
Lasciare un commento sul modello DROPS 125-15
Noi saremmo felici di ricevere i tuoi commenti e opinioni su questo modello!
Se vuoi fare una domanda, fai per favore attenzione a selezionare la categoria corretta nella casella qui sotto per velocizzare il processo di risposta. I campi richiesti sono indicati da *.