
Popular categories
Looking for a yarn?


Comments / Questions (92)
![]() Kasia wrote:
Kasia wrote:
Witam, czyli na podkroje rękawów zakończyć po 10 oczek na ściągaczach francuskich a nie zamknąć?
24.09.2021 - 14:28DROPS Design answered:
Witaj Kasiu, zamknąć te 10 o. = zakończyć, tak samo jak się kończy robótkę. Zobacz film TUTAJ. Pozdrawiam
24.09.2021 - 14:51
![]() Kasia wrote:
Kasia wrote:
Serdecznie dziękuję za rozjaśnienie instrukcji 😊 Proszę jeszcze napisać , czy robiąc oddzielnie tył i przód biorę nie nitki ? Pozdrawiam i dziękuję za szybkie odpowiedzi i cierpliwość 😉
23.09.2021 - 20:54DROPS Design answered:
Witaj Kasiu, chodziło Ci o 2 oddzielne nitki? Tak to zrozumiałam. Nitka po wykonaniu przodu i tyłu (razem na okrągło) została odcięta, dlatego teraz bierzesz nową nitkę i dołączasz do robótki, aby wykonać pozostałą część tyłu i drugą na pozostałą część przodu. Powodzenia!!
24.09.2021 - 09:11
![]() Kasia wrote:
Kasia wrote:
Witam, odkąd liczyć pierwsze okrążenie za ściągaczami francuskimi, jeśli chodzi o zamykanie o. na podkroje rękawów? Kiedy zamykam w rozmiarze XL 10 oczek, marker nie znajduje się w ich środku, tylko pośrodku 14 o. ściągacza. Brakuje oczek, żeby zamknąć tych 5 ostatnich. Wychodzą na 5 pierwszych zamkniętych. Co robię nie tak ?
22.09.2021 - 18:51DROPS Design answered:
Kasiu, na podkroje rękawów zamykasz 10 o. na środku tych 2 ściągaczy francuskich na bokach (po 5 oczek z każdej strony każdego markera na bokach). 2 pozostałe oczka z każdej strony ściągacza francuskiego wejdą w skład przodu i tyłu i dalej będziesz zamykać oczka na podkroje rękawów przed/za tymi 2 oczkami ściegiem francuskim (patrz poprzednia odpowiedź). Powodzenia!
22.09.2021 - 20:16
![]() Kasia wrote:
Kasia wrote:
Zamykałam na początku ? Proszę o korektę
22.09.2021 - 17:25DROPS Design answered:
Kasiu nie rozumiem pytania/prośby. Proszę napisz dokładniej. Pozdrawiam
22.09.2021 - 17:48
![]() Kasia wrote:
Kasia wrote:
Witam, jestem na etapie zamykania oczek na podkroje rękawów za dwoma ściągaczami ściegiem francuskim i nie rozumiem wskazówki - zamknąć w odległości 2 oczek ściegiem francuskim od brzegów. Bardzo proszę o wyjaśnienie, gdzie te brzegi i o jaka odległość 2 oczek chodzi? Jeszcze proszę o pomoc co zrobić, bo zgubiłam gdzieś jedno oczko że 180 czy mogę je teraz, gdzieś dodać? Gdzie najlepiej? Pozdrawiam serdecznie
20.09.2021 - 20:13DROPS Design answered:
Witaj Kasiu, jak zamkniesz oczka na podkroje rękawów, to przerabiasz dalej tył i przód oddzielnie. Wtedy będziesz zamykać oczka na formowanie podkrojów rękawów w odl. 2 oczek od brzegów robótki (z każdej strony). Zamykać za 2 oczkami brzegowymi ściegiem francuskim oznacza zamykać za 2 pierwszymi oczkami w rzędzie. Zamykać przed 2 oczkami brzegowymi ściegiem francuskim znaczy zamykać przed 2 ostatnimi oczkami w rzędzie (patrz ZAMYKANIE OCZEK (podkroje rękawów)). Co do zguby dodaj gdzieś z boku, żeby nie było widać. Pozdrawiamy
21.09.2021 - 10:24
![]() Kasia wrote:
Kasia wrote:
Witam, proszę o wyjaśnienie co oznacza zamykanie oczek ściegiem francuskim des bords ?
08.09.2021 - 20:34DROPS Design answered:
Witaj Kasiu, dziękuję bardzo za twój komentarz, już koryguję tłumaczenie: 'Zamykać na podkroje rękawów w odl. 2 oczek ściegiem francuskim od brzegów'. Pozdrawiamy serdecznie!
08.09.2021 - 21:59
![]() Renée wrote:
Renée wrote:
Jag har kört fast! Jag ska börja sticka resår för framstycket men förstår inte hur jag gör det rätt. Efter att ha stickat första varvet och vänder sedan på arbetet för att fortsätta, blir det ju tvärtom - räta blir aviga osv, så det blir ju ingen resår? Hur gör jag :-(
21.08.2021 - 11:57DROPS Design answered:
Hej Renée. Du ska sticka fram - och bakstycket runt (efter ärmhålen stickas arbetet sedan fram och tillbaka) så när du stickat första varvet fortsätter du bara runt med varv två och stickar räta över räta och aviga över aviga i 8 cm. Mvh DROPS Design
24.08.2021 - 09:48
![]() Jayne wrote:
Jayne wrote:
I've just got to where you say work fron and back separately Do I need different straight needle or continue with circular needle if this is the case do I need to put the stitches for back piece on a separate needle while I work the front Sorry im a bit confused
03.07.2021 - 18:26DROPS Design answered:
Dear Jane, actually it is up to you. You can leave half of the stitches on the needle, and keep knitting on teh other half. If you find this uncomfortable, you can put half of the stitches on a stitch-holder, a piece of therad, or another circular needle. Happy Knitting!
04.07.2021 - 00:41
![]() Katie wrote:
Katie wrote:
For the start of the back piece, I have interpreted it as there being 8 stockinette rows, where every fourth row has a decrease tip, as well as the first RS row = 3 decreases. I am confused how this will decrease the number of stitches from 62 to 54. What have I done wrong here please?
31.05.2021 - 09:26DROPS Design answered:
Dear Kate, the pattern tells you, that after dividing the stitches, when you do the back, decrease 8for the armhole) 1 stitch each side 4 times (assuming from the 62 stitch that you are making the smallest size), that is 8 stitch, 62-8 = 54 stitch. Happy Kntting!
31.05.2021 - 09:35
![]() Katie wrote:
Katie wrote:
Hi When I did the last three binding off I am left with one stitch knitted which is clearly affecting the armholes. What do I do with this one stitch please
27.05.2021 - 09:03DROPS Design answered:
Dear Katie, check your number of stitches on needle and the one cast off, you shoud have 6-6-10-10-16-20 sts cast off on each side and 62-68-72-80-84-90 stitches worked between the stitches cast off. Hope this will help, happy knitting!
27.05.2021 - 09:41
|
|
Spiced Breeze#spicedbreezetop |
|
 |
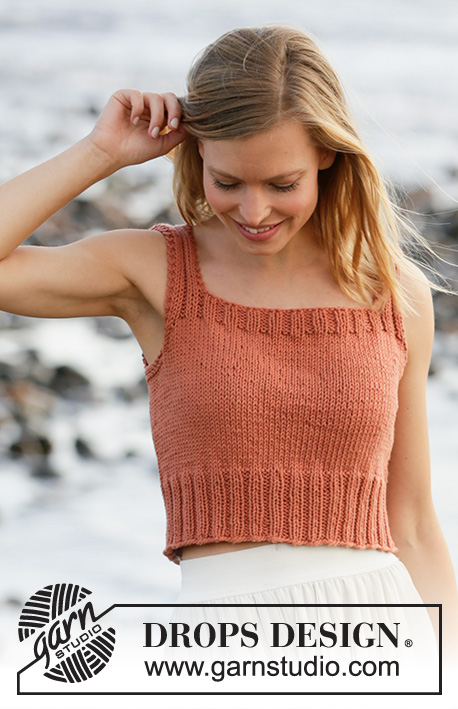 |
Knitted top in DROPS Paris. Piece is knitted in stocking stitch with edges in rib. Size: S - XXXL
DROPS 211-15 |
|
|
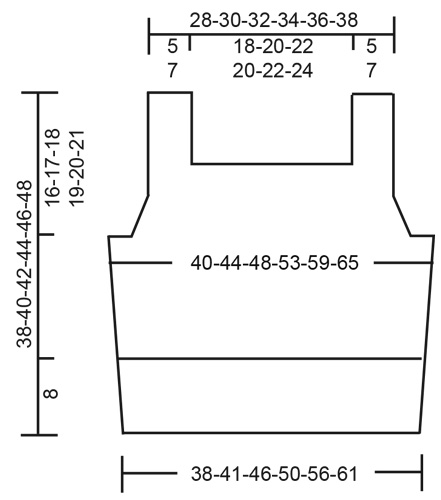
---------------------------------------------------------- EXPLANATION FOR THE PATTERN: ---------------------------------------------------------- GARTER STITCH (worked in the round): 1 ridge vertically = 2 rounds, i.e. knit 1 round and purl 1 round. GARTER STITCH (back and forth): Knit all rows. 1 ridge vertically = knit 2 rows. DECREASE TIP (applies to armholes): Decrease for armhole inside 2 edge stitches in garter stitch. All decreases are done from the right side. Decrease as follows after 2 edge stitches in garter stitch: Slip 1 stitch knitwise, knit 1, pass slipped stitch over stitch worked (= 1 stitch decreased). Decrease as follows before 2 edge stitches in garter stitch: Begin 2 stitches before the 2 edge stitches and knit 2 together (= 1 stitch decreased). ---------------------------------------------------------- START THE PIECE HERE: ---------------------------------------------------------- TOP - SHORT OVERVIEW OF THE PIECE: Worked in the round on circular needle, from the bottom and up to armholes. Then work front and back piece back and forth on circular needle separately. Then sew the shoulder seams. BODY: Cast on 136-148-164-180-200-220 stitches on circular needle size 4.5 mm with Paris. Knit 1 round. Then work rib in the round (= knit 2/purl 2) for 8 cm. Insert 1 marker thread at beginning of round and 1 marker thread after 68-74-82-90-100-110 stitches. Marker threads mark the sides on body. Switch to circular needle size 5 mm and work in stocking stitch in the round. REMEMBER THE KNITTING TENSION! When piece measures 21-22-23-24-25-26 cm, , work 2 ridges in GARTER STITCH - read explanation above, over the middle 10-10-14-14-20-24 stitches in each side (marker threads are in the middle of these 10-10-14-14-20-24 stitches - work the other stiches in stocking stitch). On first round after the 2 ridges cast off for armholes as follows: Cast off 3-3-5-5-8-10 stitches, work 62-68-72-80-84-90 stitches in stocking stitch, cast off 6-6-10-10-16-20 stitches (marker thread is in the middle of these 6-6-10-10-16-20 stitches), work 62-68-72-80-84-90 stitches in stocking stitch, and cast off the remaining 3-3-5-5-8-10 stitches. Cut the yarn. Finish front and back piece separately. FRONT PIECE: = 62-68-72-80-84-90 stitches. Begin from wrong side and continue with stocking stitch back and forth and 2 edge stitches in garter stitch in each side. AT THE SAME TIME on first row from right side, decrease 1 stitch in each side for armholes - read DECREASE TIP. Decrease like this on every other row (i.e. every row from right side) 4-5-5-7-7-8 times in total in each side = 54-58-62-66-70-74 stitches remain. After last decrease for armholes, purl 1 row from wrong side with 2 edge stitches in garter stitch in each side. Switch to circular needle size 4.5 mm and work next row from right side as follows: 2 edge stitches in garter stitch, * knit 2, purl 2 *, repeat from *-* until 4 stitches remain, knit 2 and finish with 2 edge stitches in garter stitch. Continue rib like this for 3 cm. On next row from right side cast off for neck as follows: Work 2 edge stitches in garter stitch, * knit 2, purl 2 *, work from *-* 1-1-1-2-2-2 times in total, knit 2 and 2 stitches in garter stitch, then cast off the next 34-38-42-38-42-46 stitches for neck (cast off with knit over knit and purl over purl), work 2 stitches in garter stitch, * knit 2, purl 2 *, work from *-* 1-1-1-2-2-2 times in total, knit 2 and finish 2 edge stitches in garter stitch. There are now 10-10-10-14-14-14 stitches remain in each side for shoulder strap. Finish the shoulder straps separately. SHOULDER STRAP: = 10-10-10-14-14-14 stitches. Work rib back and forth as before with 2 edge stitches in garter stitch in each side until entire piece measures 38-40-42-44-46-48 cm from cast-on edge (or desired length). Cast off. Work the other shoulder strap the same way. BACK PIECE: = 62-68-72-80-84-90 stitches. Begin from wrong side and continue with stocking stitch back and forth and 2 edge stitches in garter stitch in each side. AT THE SAME TIME on first row from right side, decrease 1 stitch in each side for armholes - read DECREASE TIP. Decrease like this on every 4th row (not on every other row on front piece) 4-5-5-7-7-8 times in total in each side = 54-58-62-66-70-74 stitches. After last decrease for armholes, purl 1 row from wrong side with 2 edge stitches in garter stitch in each side. Switch to circular needle size 4.5 mm and work next row from right side as follows: 2 edge stitches in garter stitch, * knit 2, purl 2 *, repeat from *-* until 4 stitches remain, knit 2 and finish with 2 edge stitches in garter stitch. Continue rib like this for 3 cm. On next row from right side cast off for neck as follows: Work 2 edge stitches in garter stitch, * knit 2, purl 2 *, work from *-* 1-1-1-2-2-2 times in total, knit 2 and 2 stitches in garter stitch, then cast off the next 34-38-42-38-42-46 stitches for neck (cast off with knit over knit and purl over purl), work 2 stitches in garter stitch, * knit 2, purl 2 *, work from *-* 1-1-1-2-2-2 times in total, knit 2 and finish 2 edge stitches in garter stitch. There are now 10-10-10-14-14-14 stitches remain in each side for shoulder strap. Work shoulder straps separately the same way as on front piece. ASSEMBLY: Sew the shoulder seams. |
|
 |
|
Have you finished this pattern?Tag your pictures with #dropspattern #spicedbreezetop or submit them to the #dropsfan gallery. Do you need help with this pattern?You'll find 21 tutorial videos, a Comments/Questions area and more by visiting the pattern on garnstudio.com. © 1982-2026 DROPS Design A/S. We reserve all rights. This document, including all its sub-sections, has copyrights. Read more about what you can do with our patterns at the bottom of each pattern on our site. |
|


With over 40 years in knitting and crochet design, DROPS Design offers one of the most extensive collections of free patterns on the internet - translated to 17 languages. As of today we count 324 catalogues and 12290 patterns translated into English (UK/cm). 12290
We work hard to bring you the best knitting and crochet have to offer, inspiration and advice as well as great quality yarns at incredible prices! Would you like to use our patterns for other than personal use? You can read what you are allowed to do in the Copyright text at the bottom of all our patterns. Happy crafting!
Post a comment to pattern DROPS 211-15
We would love to hear what you have to say about this pattern!
If you want to leave a question, please make sure you select the correct category in the form below, to speed up the answering process. Required fields are marked *.