
Popular categories
Looking for a yarn?


Comments / Questions (71)
![]() Annelies Rennert wrote:
Annelies Rennert wrote:
Bitte erklären Sie mir nochmal das stricken vom halben Vorder und rückenteil. Da es geteilt ist, kann ich doch nicht in Runden stricken. Dann verstehe ich das abnehmen nicht. Unter dem Arm oder? Bitte erklären, danke. Mfg. Annelies Rennert
20.08.2022 - 15:21DROPS Design answered:
Liebe Frau Rennert, ja stimmt, es wird ab der Markierung in der mittlere M. nicht mehr in Runden gestrickt sondern in Hin- und Rückreihen, die Hälfte der Maschen legen Sie still (die mittlere M am Rückenteil bis die letzte M vor der mittleren M am Vorderteil = linke Seite vom Pullover) und ab diese mittlere M Vorderteil (rechte Seite vom Pullover) so stricken : die 2 ersten M abketten, wie zuvor weiterstricken (bei den Hinreichen wird es wie zuvor beidseitig der Markierung an der Seite abgenommen), wenden, die 2 ersten M abketten, wie zuvor weiterstricken, wenden und so weiter stricken bis nur noch 3 M übrig sind. Kann das Ihnen Helfen?
22.08.2022 - 09:46
![]() Pascale wrote:
Pascale wrote:
Dans le demi-dos et demi-devant, (A2) peut-on remplacer les 2 mailles rabattues au début de chaque rang par des rangs raccourcis (short- rows)? Ça éviterait de relever des mailles par la suite ?!?
16.08.2022 - 19:57DROPS Design answered:
Bonjour Pascale, probablement, mais pensez à bien ajuster le nombre de mailles - vous pouvez alors augmenter/diminuer à intervalles réguliers au 1er tour de la bordure du bas du pull. Bon tricot!
17.08.2022 - 08:10
![]() Nele Peeters wrote:
Nele Peeters wrote:
Bij het breien van de mouw krijg ik een uitstulping in de oksel, na 3x opnieuw blijf ik die hebben, ondanks de minderingen en ik zie geen enkele manier om dit op te lossen, door de nieuwe opbouw van dit patroon kan ik zelf niet vinden waardoor die uitstulping ontstaat, hopelijk kan iemand me helpen
01.08.2022 - 21:13DROPS Design answered:
Dag Nele,
Om eerlijk te zijn kan ik ook niet echt vinden waar die uitstulping door zou kunnen komen. Heb je aan het begin van de mouw steken opgenomen in de 8 tot 12 opgezette steken in de zijkant van het lijf, om de oksel dicht te maken? Het zou mooi zijn als iemand met je mee kan kijken. Heb je de mogelijkheid om bij een verkooppunt langs te gaan met je breiwerk?
16.08.2022 - 21:39
![]() Elaine wrote:
Elaine wrote:
Si je comprends bien lorsque je débute A2 je dois être sur l’endroit et ma première maille sur la broche est la maille centrale avec un marqueur du devant. Donc , je tricote le devant droit et le dos droit. Merci de votre aide
25.06.2022 - 15:31DROPS Design answered:
Bonjour Elaine, le premier rang de la partie A.2 se tricote sur l'endroit effectivement, et à partir de la maille du milieu devant mais il s'agit du demi-devant gauche + le demi-dos gauche, les mailles du demi-dos droit + celles du demi-devant droit ont été tricotées et mises en attente lors de la division des deux parties. Bon tricot!
27.06.2022 - 08:12
![]() Paulette Pol wrote:
Paulette Pol wrote:
C'est la première fois que je place des marqueurs dans des mailles et ça me damne de les ôter puis de les replacer pour pouvoir tricoter ces mailles. Existe-t-il une méthode plus simple ? Maintenant que mon ouvrage est plus avancé, j'ai décidé d'enlever les marqueurs et de me guider simplement sur les trous. Ai-je raison ? Je tremble à chaque fois de faire une erreur. Merci de me rassurer et / ou de me guider vers une solution plus pratique.
24.05.2022 - 03:50DROPS Design answered:
Bonjour Mme Pol, les marqueurs permettent de bien repérer des mailles/des zones délimitées pour faciliter le travail (augmentations, diminutions etc...). On peut utiliser des marqueurs que l'on place dans une maille ou sur l'aiguille ou bien des fils marqueurs , si vous pensez pouvoir vous en passer en étant plus à l'aise ainsi, aucun souci, pensez juste à bien suivre l'évolution de votre ouvrage, en continuant à augmenter/diminuer aux endroits indiqués pour ne rien décaler. Bon tricot!
24.05.2022 - 08:14
![]() Ariane Zenker wrote:
Ariane Zenker wrote:
Ich bin jetzt beim halben Vorder-/Rückenteil (A2). Am Markierer seitlich sollen weiter die Maschen abgenommen werden, weiterhin nur jede zweite Reihe? Oder soll ich in jeder Reihe (auch bei den Rückreihen) abnehmen?
21.04.2022 - 20:29DROPS Design answered:
Liebe Frau Zenker, nehmen Sie am Markierer in jeder 2. Reihe (= in jeder Hinreihe) wie zuvor ab. Viel Spaß beim stricken!
22.04.2022 - 07:41
![]() Carolyn Beeton wrote:
Carolyn Beeton wrote:
The instructions for the sleeves say: “ Slip the 79-85-97-101-105-111 stitches from stitch holder … and pick in addition up 1 stitch in each of the 8-8-10-12-12-12 new stitches cast on in the side under sleeve = 87-93-104-113-117-123 stitches.” In size L, shouldn’t you end with 107 stitches? (97+10)
09.04.2022 - 16:36DROPS Design answered:
Dear Carolyn, that's correct, it should be 107 stitches for size L. We'll correct the typo as soon as possible. Thank you. Happy knitting!
09.04.2022 - 18:32
![]() Esperanza wrote:
Esperanza wrote:
Hola. La orilla del escote después de aumentar 8 puntos, inserto el marcador cada 27puntos para la talla L y me sobran puntos.
18.03.2022 - 00:54DROPS Design answered:
Hola Esperanza, ten en cuenta que los marcapuntos se insertan en los puntos, no entre los puntos. Por lo tanto, 27 (en la talla L) se multiplica por 4 (108pts) y 4 pts con el marcapuntos = 112 pts.
20.03.2022 - 18:03
![]() Martine wrote:
Martine wrote:
Ik begin aan A2. In de uitleg staat dat je bij het begin van elke naald 2 st. dient af te kanten. Op de foto lijken de minderingen onder de mouwen door te lopen. Daarvan staat in de uitleg niets. Heb ik het juist dat die mindering ook in A2 dient verder gezet te worden? Dank u wel.
10.02.2022 - 16:35DROPS Design answered:
Dag Martine,
Zowel in de zijkant van het lijf (dus aan elke kant van de markeerdraad) als midden onder de mouw lopen inderdaad de minderingen door. Dus je kant 2 steken af aan elke kant en TEGELIJKERTIJD minder je aan elke kant van de markerdraad midden onder de mouw.
11.02.2022 - 14:06
![]() Marianne Lange wrote:
Marianne Lange wrote:
Jeg skal til at strikke siderne, men forstår ikke hvad det er for en aflukning jeg skal lave i siderne . er det indtagning på hv anden pind som hidtil ,jeg kan jo ikke lukke af i midten af arbejdet, jeg ved godt at jeg skal lukke 2 masker i begyndelsen af hv pind
08.11.2021 - 14:51DROPS Design answered:
Hej Marianne, ja du tager ind i hver side ifølge indtagningstipset. Vi kan ikke se hvor du læser aflukning i siden, skriv gerne nøjagtig hvor du er, så er det lettere for os at hjælpe til :)
11.11.2021 - 15:30
|
|||||||||||||||||||||||||
Spring Lineup#springlineupsweater |
|||||||||||||||||||||||||
 |
 |
||||||||||||||||||||||||
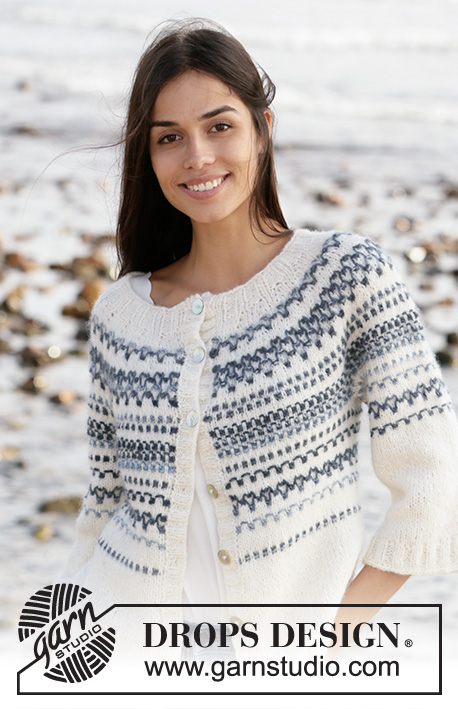
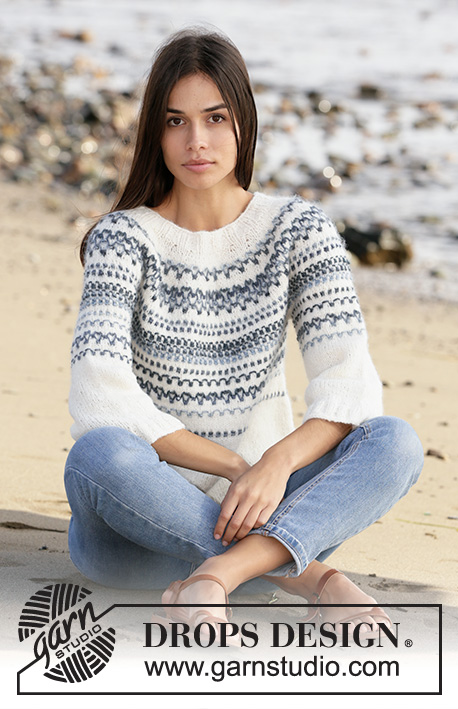
Knitted jumper in DROPS Belle. Piece is knitted top down at an angle with stripes. Size: S - XXXL
DROPS 210-14 |
|||||||||||||||||||||||||
|
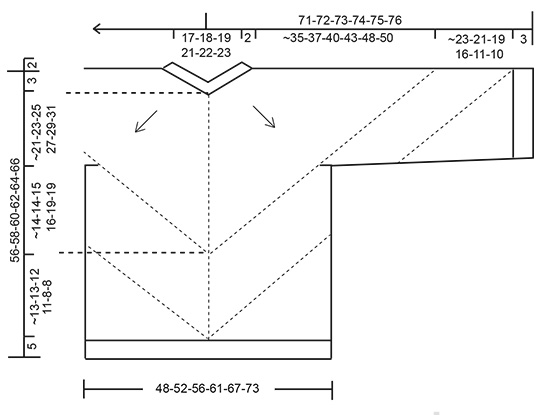
---------------------------------------------------------- EXPLANATION FOR THE PATTERN: ---------------------------------------------------------- GARTER STITCH (worked in the round): 1 ridge vertically = 2 rounds, i.e. knit 1 round and purl 1 round. PATTERN: See diagram A.1. Illustrations A.2 and A.3 show how parts are worked when working back and forth. INCREASE TIP-1 (evenly): To calculate how to increase evenly, use the total number of stitches on row (e.g. 104 stitches) and divide stitches by number of increases to be done (e.g. 8) = 13. In this example increase by making 1 yarn over after every 13th stitch. On next round knit yarn overs twisted to avoid holes. INCREASE TIP-2: Increase 1 stitch on each side of stitch with marker (= 8 stitches increased on round): Increase as follows: Work until stitch with marker, make 1 yarn over, knit next stitch, make 1 yarn over. On next round knit the yarn overs (or purl if it is on a row with purl stitches in A.1), to make holes. Then work the new stitches in pattern A.1 DECREASE TIP: Decrease 1 stitch on each side of marker thread as follows: Work until 3 stitches remain before marker thread and knit 2 together, knit 2 (marker thread is between these stitches), slip 1 stitch knitwise, knit 1, pass slipped stitch over stitch worked. CAST-OFF TIP: To avoid a tight cast-off edge you may use a larger needle size. If this also is too tight, work a 1 yarn over after approx. every 4th stitch while casting off (cast off yarn overs as regular stitches). ---------------------------------------------------------- START THE PIECE HERE: ---------------------------------------------------------- JUMPER - SHORT OVERVIEW OF THE PIECE: Neck edge and yoke are worked in the round on circular needle, top down. Now divide yoke for body and sleeves. Work body in the round, top down. Then divide the piece mid front/mid back and work back and forth in 2 parts (= sides). Work rib edge at the bottom at the end. Work sleeves in the round on double pointed needles/a short circular needle, top down. Then divide the piece mid on top of sleeve and work back and forth in one part (= underside of sleeve). Work rib edge at the bottom at the end. NECK EDGE: Cast on 96-100-104-112-116-120 stitches on circular needle size 3.5 mm with light beige. Work ridges in GARTER STITCH - read explanation above, for 2 cm. Then knit 1 round while increasing 0-0-8-8-8-24 stitches evenly - read INCREASE TIP-1 = 96-100-112-120-124-144 stitches. Switch to circular needle size 4 mm. Now insert 4 markers in the piece. Insert marker in the stitch as follows: Insert a marker in the first stitch on round (= mid back), skip the next 23-24-27-29-30-35 stitches, insert a marker in next stitch (= mid on top of shoulder), skip the next 23-24-27-29-30-35 stitches, insert a marker in next stitch (= mid front), skip the next 23-24-27-29-30-35 stitches, insert a marker in next stitch (= mid on top of shoulder), there are now 23-24-27-29-30-35 stitches between last and first marker on round. YOKE: Now work pattern as follows: Work A.1 in the round, AT THE SAME TIME increase 1 stitch on each side of stitches with a marker - read INCREASE TIP-2. Increase like this every other round 40-44-48-51-56-59 times in total = 416-452-496-528-572-616 stitches. REMEMBER THE KNITTING TENSION! Piece measures approx. 29-31-34-36-40-42 cm from after neck edge and down in knitting direction (i.e. measure between the increase on one shoulder and mid front/mid back), and approx. 35-37-40-43-48-50 cm along middle stitch at each of the increases. Work next round as follows: Work the first 65-71-76-82-91-99 stitches (= half back piece), slip the next 79-85-97-101-105-111 stitches on a stitch holder for sleeve and cast on 8-8-10-12-12-12 new stitches on needle (= in the side under sleeve), work the next 129-141-151-163-181-197 stitches (= front piece), slip the next 79-85-97-101-105-111 stitches on a stitch holder for sleeve and cast on 8-8-10-12-12-12 new stitches on needle (= in the side under sleeve), work the remaining 64-70-75-81-90-98 stitches (= half back piece). Insert 1 marker in the middle stitch on each shoulder, and insert 1 marker in the middle of front piece. Leave marker there - MEASURE PIECE FROM HERE! BODY: = 274-298-322-350-386-418 stitches. Insert a marker thread in the new stitches cast-on under sleeves in each side (= 4-4-5-6-6-6 new stitches on each side of marker thread). Continue in the round with pattern A.1 and increase 1 stitch on each side of middle stitch on front piece and back piece every other round as before, AT THE SAME TIME on first round with increase begin decrease in each side - read DECREASE TIP. Decrease like this every other round (the same round as increase is worked mid front and mid back). Continue like this until piece measures approx. 13-13-12-11-8-8 cm mid front (measured from marker inserted in middle stitch) – adjust to finish on a round without increases and decreases, and that 3 stripes in the same colour have been worked vertically (so that the 3 stripes in the same colour are not broken). Approx. 5 cm remains with garter stitch until finished measurements. Cut the yarn. Slip stitch with marker mid back + stitches until before stitch with marker mid front on 1 stitch holder (= half back piece + half front piece), work over these stitches later. There is now half a front piece and half a back piece on row. HALF FRONT/BACK PIECE: See illustration A.2 for this part. Work with light beige until finished measurements. Begin from right side and cast off stitch with marker mid front/mid back. Continue with stocking stitch, light beige and decrease on each side of marker in the sides - AT THE SAME TIME cast off 2 stitches at the beginning of every row. Continue like this until 3 stitches remain on row, cut the yarn and pull it through the remaining stitch and fasten. HALF FRONT/BACK PIECE: Slip stitches from stitch holder on circular needle size 4 mm and work the same way as other half front/back piece. BOTTOM EDGE: Begin in one side and pick up approx. 202-218-236-256-282-306 stitches along entire bottom edge on circular needle size 3.5 mm with light beige - pick up inside the cast off, so that the cast off does not show. Work in garter stitch for 5 cm. Cast off - read CAST-OFF TIP. SLEEVES: Slip the 79-85-97-101-105-111 stitches from stitch holder in one side of piece double pointed needles or a short circular needle size 4 mm and pick in addition up 1 stitch in each of the 8-8-10-12-12-12 new stitches cast on in the side under sleeve = 87-93-107-113-117-123 stitches. Insert a marker thread in the middle of the new stitches cast-on (= 4-4-5-6-6-6 new stitches on each side of marker thread). Move the marker thread upwards when working. Continue in the round with A.1 and increase on each side of middle stitch at the top of sleeve every other round, AT THE SAME TIME on first round with increase begin decrease in each side of marker thread mid under sleeve - remember DECREASE TIP. Decrease like this on every round 6-10-22-24-24-24 times (= 6-10-22-24-24-24 stitches decreased in total on these rounds) = 81-83-85-98-93-99 stitches. Then continue decrease under sleeve and increase over sleeve on every other round (so that number of stitch is constant) until finished measurements. Continue like this until piece measures approx. 23-21-19-16-11-10 cm from marker in middle stitch – adjust to finish on a round without increases and decreases, and that 3 stripes in the same colour have been worked vertically (so that the 3 stripes in the same colour are not broken). Approx. 3 cm remains with garter stitch until finished measurements. Cut the yarn. Now work back and forth - see illustration A.3 for this part. Begin from right side and cast off the middle stitch mid on top of sleeve (i.e. the stitch with increases on each side). Continue with stocking stitch and decrease at the marker mid under sleeve - AT THE SAME TIME cast off 2 stitches at the beginning of every row. Continue like this until 3 stitches remain on row, cut the yarn and pull it through the remaining stitches. Work the other sleeve the same way. SLEEVE EDGES: Begin mid under sleeve and pick up approx. 59-61-63-65-67-69 stitches along entire bottom edge on double pointed needles size 3.5 mm with light beige - pick up inside the cast off, so that the cast off does not show. Work garter stitch in the round for 3 cm. Cast off - remember CAST-OFF TIP. Work the other sleeve edge the same way. |
|||||||||||||||||||||||||
Diagram explanations |
|||||||||||||||||||||||||
|
|||||||||||||||||||||||||
 |
|||||||||||||||||||||||||
 |
|||||||||||||||||||||||||
 |
|||||||||||||||||||||||||
Have you finished this pattern?Tag your pictures with #dropspattern #springlineupsweater or submit them to the #dropsfan gallery. Do you need help with this pattern?You'll find 27 tutorial videos, a Comments/Questions area and more by visiting the pattern on garnstudio.com. © 1982-2026 DROPS Design A/S. We reserve all rights. This document, including all its sub-sections, has copyrights. Read more about what you can do with our patterns at the bottom of each pattern on our site. |
|||||||||||||||||||||||||


With over 40 years in knitting and crochet design, DROPS Design offers one of the most extensive collections of free patterns on the internet - translated to 17 languages. As of today we count 324 catalogues and 12290 patterns translated into English (UK/cm). 12290
We work hard to bring you the best knitting and crochet have to offer, inspiration and advice as well as great quality yarns at incredible prices! Would you like to use our patterns for other than personal use? You can read what you are allowed to do in the Copyright text at the bottom of all our patterns. Happy crafting!
Post a comment to pattern DROPS 210-14
We would love to hear what you have to say about this pattern!
If you want to leave a question, please make sure you select the correct category in the form below, to speed up the answering process. Required fields are marked *.