
Popular categories
Looking for a yarn?


Comments / Questions (71)
![]() Magdalena wrote:
Magdalena wrote:
Czy robiąc boki w każdym rzędzie zamykac oczko przed i za markerem? Czy w co drugim?
23.08.2025 - 12:36DROPS Design answered:
Witaj Magdaleno, na bokach zamykasz oczka co 2 okrążenia, czyli jedno okrążenie jest bez zamykania oczek, a drugie z zamykaniem, itd. Pozdrawiamy!
29.08.2025 - 19:35
![]() MO wrote:
MO wrote:
Hoe kan je nu meerderen én minderen op dezelfde steken? Ga verder in de rondte met patroon A.1 en meerder 1 steek aan elke kant van de middelste steek op het voorpand en achterpand iedere andere naald zoals hiervoor, TEGELIJKERTIJD op de eerste naald met meerderingen, begint u met minderen aan elke kant - lees TIP VOOR HET MINDEREN. Minder zo om de naald (op dezelfde naald waarop de meerderingen worden gebreid midden voor en midden achter)
13.08.2025 - 08:20DROPS Design answered:
Dag MO,
Je meerdert midden voor/ midden achter en je mindert aan de zijkanten.
18.08.2025 - 10:25
![]() MO wrote:
MO wrote:
Wat is de bedoeling van A2 en A3. Ergens moet het omgeslagen worden en vastgenaaid. Is dat de bedoeling?
12.08.2025 - 12:32DROPS Design answered:
Dag MO,
Op een gegeven moment heb je een punt midden voor en een punt midden achter. Dan worden de steken van de ene punt naar de andere punt gebreid, waarbij je steeds steken afkant aan elke kant. Je hoeft dus niets achteraf dicht te naaien.
18.08.2025 - 10:24
![]() Laura Smith wrote:
Laura Smith wrote:
Where is chart 2 and chart 3, please
09.08.2025 - 20:54DROPS Design answered:
Dear Laura, A.2 and A.3 are not stitch-patterns; only illustrations that show the shaping of the specific section that you are working. The only knitting chart here is A.1. Happy knitting!
10.08.2025 - 16:59
![]() Ingrid Van Den Bosch wrote:
Ingrid Van Den Bosch wrote:
Kan ik op dit model een verhoogde achterkant in short rows breien en hoe moet het dan met de meerderingen middenachter en schouders aub? Dank u
04.03.2025 - 19:08DROPS Design answered:
Dag Ingrid,
Het is voor ons helaas niet mogelijk om een patroon aan te passen naar persoonlijke wensen.
06.03.2025 - 19:42
![]() Cecile wrote:
Cecile wrote:
Bonjour. Je vais commencer le demi devant/dos en aller retour. Est-ce-qu'il faut rabattre les mailles sur l envers ET sur l' endroit ou seulement sur l endroit? Merci
14.06.2024 - 12:09DROPS Design answered:
Bonjour Cécile, vous devez rabattre les mailles au début de chaque rang = de chaque côté soit sur l'endroit et sur l'envers; vous obtiendrez ainsi un bord droit. Bon tricot!
14.06.2024 - 16:23
![]() Cécile wrote:
Cécile wrote:
Bonjour. Je tricote le modèle en taille M. Je viens de faire les 44 augmentations. Cette dernière augmentation tombe sur un rang en couleur zinc. Le rang suivant doit être fait en mailles envers ET il faut séparer les différentes parties du pull (manches et dos/devant). Est-ce gênant ? Faut il faire le rang en mailles envers puis faire un autre rang en mailles endroit avec la séparation des manches et du dos/ devant. En vous remerciant
11.02.2024 - 17:56DROPS Design answered:
Bonjour Cécile, vous pouvez tricoter encore 1 tour après la dernière augmentation et diviser au tour suivant. Continuez ensuite les rayures séparément, vous les reprendrez sur les manches au même rang que le 1er que vous tricotez pour le dos et le devant. Bon tricot!
12.02.2024 - 09:05
![]() Ingrid wrote:
Ingrid wrote:
Jeg har kommet til Halvt forstykke/halvt bakstykke. Jeg forstår nå at jeg skal felle av 2 masker i starten av hver pinne. Men fellingen på hver side av merket i sidene - skal det også gjøres på hver pinne eller kun på retten?
15.08.2023 - 19:52DROPS Design answered:
Hei Ingrid, Du fortsetter å felle i siden hver 2. pinne (hver pinne fra retten). God fornøyelse!
16.08.2023 - 06:41
![]() Sabine wrote:
Sabine wrote:
Bin eben mit dem ersten Teil A2 fertig. Finde es gut das man hier so gut die Fragen beantwortet bekommt. Danke dafür. War mir nicht sicher ob bei dem Teil in jeder Runde an der mitte abgenommen werden sollte. Aber doch nur in der hinreihe. Also bisher alles richtig. Bin schon auf das Ergebnis gespannt. Hatte noch zu DDR Zeiten ähnliches gestrickt, da jedoch mit 3 Maschen unten an der Seite begonnen. Leider habe ich die Anleitung nicht mehr. Ich finde Ihre Seite toll. Danke und gerne weiter so.
05.06.2023 - 00:45
![]() Marion Linden wrote:
Marion Linden wrote:
Tatsächlich erschließt sich mir die Anleitung nach der Fertigstellung der vorderen und hinteren Spitze nicht. Laut Zeichnung (und sofern die Arbeit weiterhin von oben nach unten gearbeitet wird) wird ein Dreieck gestrickt, welches oben schmal beginnt und nach unten hin breit wird. Warum werden dann Maschen abgenommen? Müsste an den Seiten nicht eher zugenommen werden, damit ein Dreieck entsteht? Vielleicht wäre hier ein Video oder entsprechende Fotos ganz hilfreich.
21.12.2022 - 13:06DROPS Design answered:
Liebe Frau Linden, das Dreieck (A.2) ist der Teil, der hin- und zurück gestrickt wird, damit kein Spitz entsteht muss man am Anfang jeder Reihe (= Hin- sowie Rückreihe) 2 Maschen abketten bis 3 Maschen (die 3 mittleren Maschen an der Seite, unter die Ärmel) übrig sind. Viel Spaß beim stricken!
21.12.2022 - 13:15
|
|||||||||||||||||||||||||
Spring Lineup#springlineupsweater |
|||||||||||||||||||||||||
 |
 |
||||||||||||||||||||||||
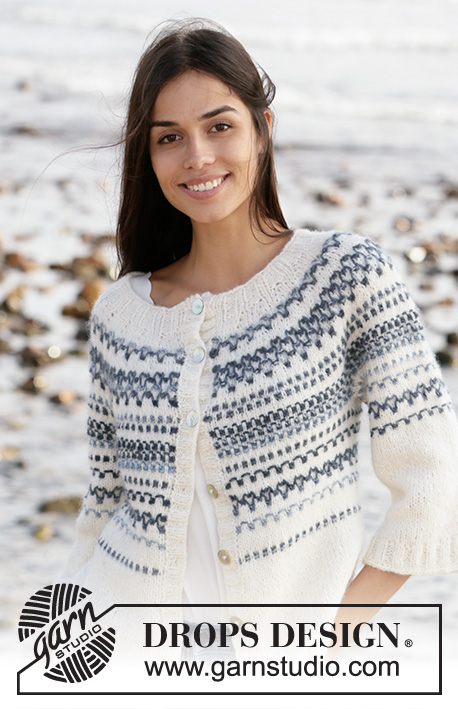
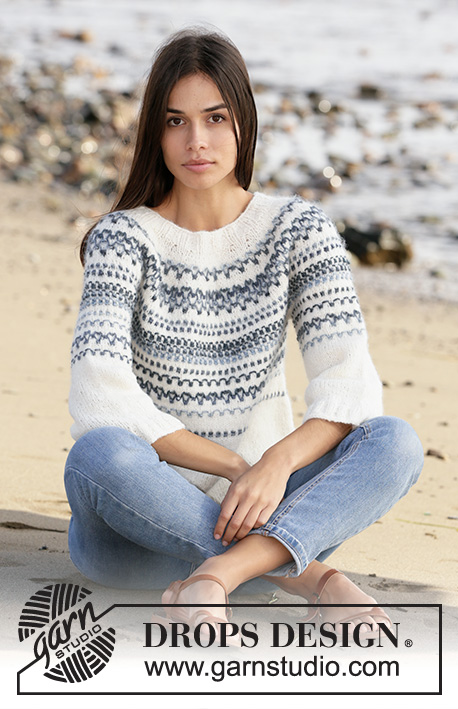
Knitted jumper in DROPS Belle. Piece is knitted top down at an angle with stripes. Size: S - XXXL
DROPS 210-14 |
|||||||||||||||||||||||||
|
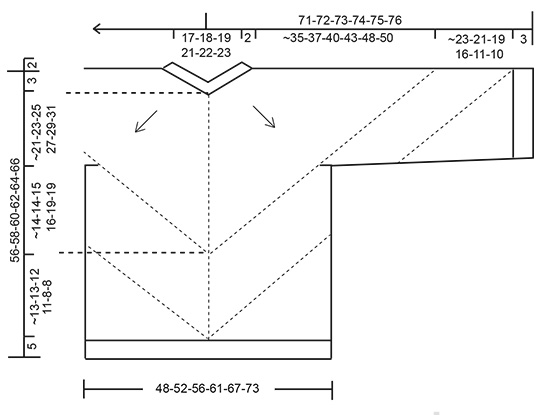
---------------------------------------------------------- EXPLANATION FOR THE PATTERN: ---------------------------------------------------------- GARTER STITCH (worked in the round): 1 ridge vertically = 2 rounds, i.e. knit 1 round and purl 1 round. PATTERN: See diagram A.1. Illustrations A.2 and A.3 show how parts are worked when working back and forth. INCREASE TIP-1 (evenly): To calculate how to increase evenly, use the total number of stitches on row (e.g. 104 stitches) and divide stitches by number of increases to be done (e.g. 8) = 13. In this example increase by making 1 yarn over after every 13th stitch. On next round knit yarn overs twisted to avoid holes. INCREASE TIP-2: Increase 1 stitch on each side of stitch with marker (= 8 stitches increased on round): Increase as follows: Work until stitch with marker, make 1 yarn over, knit next stitch, make 1 yarn over. On next round knit the yarn overs (or purl if it is on a row with purl stitches in A.1), to make holes. Then work the new stitches in pattern A.1 DECREASE TIP: Decrease 1 stitch on each side of marker thread as follows: Work until 3 stitches remain before marker thread and knit 2 together, knit 2 (marker thread is between these stitches), slip 1 stitch knitwise, knit 1, pass slipped stitch over stitch worked. CAST-OFF TIP: To avoid a tight cast-off edge you may use a larger needle size. If this also is too tight, work a 1 yarn over after approx. every 4th stitch while casting off (cast off yarn overs as regular stitches). ---------------------------------------------------------- START THE PIECE HERE: ---------------------------------------------------------- JUMPER - SHORT OVERVIEW OF THE PIECE: Neck edge and yoke are worked in the round on circular needle, top down. Now divide yoke for body and sleeves. Work body in the round, top down. Then divide the piece mid front/mid back and work back and forth in 2 parts (= sides). Work rib edge at the bottom at the end. Work sleeves in the round on double pointed needles/a short circular needle, top down. Then divide the piece mid on top of sleeve and work back and forth in one part (= underside of sleeve). Work rib edge at the bottom at the end. NECK EDGE: Cast on 96-100-104-112-116-120 stitches on circular needle size 3.5 mm with light beige. Work ridges in GARTER STITCH - read explanation above, for 2 cm. Then knit 1 round while increasing 0-0-8-8-8-24 stitches evenly - read INCREASE TIP-1 = 96-100-112-120-124-144 stitches. Switch to circular needle size 4 mm. Now insert 4 markers in the piece. Insert marker in the stitch as follows: Insert a marker in the first stitch on round (= mid back), skip the next 23-24-27-29-30-35 stitches, insert a marker in next stitch (= mid on top of shoulder), skip the next 23-24-27-29-30-35 stitches, insert a marker in next stitch (= mid front), skip the next 23-24-27-29-30-35 stitches, insert a marker in next stitch (= mid on top of shoulder), there are now 23-24-27-29-30-35 stitches between last and first marker on round. YOKE: Now work pattern as follows: Work A.1 in the round, AT THE SAME TIME increase 1 stitch on each side of stitches with a marker - read INCREASE TIP-2. Increase like this every other round 40-44-48-51-56-59 times in total = 416-452-496-528-572-616 stitches. REMEMBER THE KNITTING TENSION! Piece measures approx. 29-31-34-36-40-42 cm from after neck edge and down in knitting direction (i.e. measure between the increase on one shoulder and mid front/mid back), and approx. 35-37-40-43-48-50 cm along middle stitch at each of the increases. Work next round as follows: Work the first 65-71-76-82-91-99 stitches (= half back piece), slip the next 79-85-97-101-105-111 stitches on a stitch holder for sleeve and cast on 8-8-10-12-12-12 new stitches on needle (= in the side under sleeve), work the next 129-141-151-163-181-197 stitches (= front piece), slip the next 79-85-97-101-105-111 stitches on a stitch holder for sleeve and cast on 8-8-10-12-12-12 new stitches on needle (= in the side under sleeve), work the remaining 64-70-75-81-90-98 stitches (= half back piece). Insert 1 marker in the middle stitch on each shoulder, and insert 1 marker in the middle of front piece. Leave marker there - MEASURE PIECE FROM HERE! BODY: = 274-298-322-350-386-418 stitches. Insert a marker thread in the new stitches cast-on under sleeves in each side (= 4-4-5-6-6-6 new stitches on each side of marker thread). Continue in the round with pattern A.1 and increase 1 stitch on each side of middle stitch on front piece and back piece every other round as before, AT THE SAME TIME on first round with increase begin decrease in each side - read DECREASE TIP. Decrease like this every other round (the same round as increase is worked mid front and mid back). Continue like this until piece measures approx. 13-13-12-11-8-8 cm mid front (measured from marker inserted in middle stitch) – adjust to finish on a round without increases and decreases, and that 3 stripes in the same colour have been worked vertically (so that the 3 stripes in the same colour are not broken). Approx. 5 cm remains with garter stitch until finished measurements. Cut the yarn. Slip stitch with marker mid back + stitches until before stitch with marker mid front on 1 stitch holder (= half back piece + half front piece), work over these stitches later. There is now half a front piece and half a back piece on row. HALF FRONT/BACK PIECE: See illustration A.2 for this part. Work with light beige until finished measurements. Begin from right side and cast off stitch with marker mid front/mid back. Continue with stocking stitch, light beige and decrease on each side of marker in the sides - AT THE SAME TIME cast off 2 stitches at the beginning of every row. Continue like this until 3 stitches remain on row, cut the yarn and pull it through the remaining stitch and fasten. HALF FRONT/BACK PIECE: Slip stitches from stitch holder on circular needle size 4 mm and work the same way as other half front/back piece. BOTTOM EDGE: Begin in one side and pick up approx. 202-218-236-256-282-306 stitches along entire bottom edge on circular needle size 3.5 mm with light beige - pick up inside the cast off, so that the cast off does not show. Work in garter stitch for 5 cm. Cast off - read CAST-OFF TIP. SLEEVES: Slip the 79-85-97-101-105-111 stitches from stitch holder in one side of piece double pointed needles or a short circular needle size 4 mm and pick in addition up 1 stitch in each of the 8-8-10-12-12-12 new stitches cast on in the side under sleeve = 87-93-107-113-117-123 stitches. Insert a marker thread in the middle of the new stitches cast-on (= 4-4-5-6-6-6 new stitches on each side of marker thread). Move the marker thread upwards when working. Continue in the round with A.1 and increase on each side of middle stitch at the top of sleeve every other round, AT THE SAME TIME on first round with increase begin decrease in each side of marker thread mid under sleeve - remember DECREASE TIP. Decrease like this on every round 6-10-22-24-24-24 times (= 6-10-22-24-24-24 stitches decreased in total on these rounds) = 81-83-85-98-93-99 stitches. Then continue decrease under sleeve and increase over sleeve on every other round (so that number of stitch is constant) until finished measurements. Continue like this until piece measures approx. 23-21-19-16-11-10 cm from marker in middle stitch – adjust to finish on a round without increases and decreases, and that 3 stripes in the same colour have been worked vertically (so that the 3 stripes in the same colour are not broken). Approx. 3 cm remains with garter stitch until finished measurements. Cut the yarn. Now work back and forth - see illustration A.3 for this part. Begin from right side and cast off the middle stitch mid on top of sleeve (i.e. the stitch with increases on each side). Continue with stocking stitch and decrease at the marker mid under sleeve - AT THE SAME TIME cast off 2 stitches at the beginning of every row. Continue like this until 3 stitches remain on row, cut the yarn and pull it through the remaining stitches. Work the other sleeve the same way. SLEEVE EDGES: Begin mid under sleeve and pick up approx. 59-61-63-65-67-69 stitches along entire bottom edge on double pointed needles size 3.5 mm with light beige - pick up inside the cast off, so that the cast off does not show. Work garter stitch in the round for 3 cm. Cast off - remember CAST-OFF TIP. Work the other sleeve edge the same way. |
|||||||||||||||||||||||||
Diagram explanations |
|||||||||||||||||||||||||
|
|||||||||||||||||||||||||
 |
|||||||||||||||||||||||||
 |
|||||||||||||||||||||||||
 |
|||||||||||||||||||||||||
Have you finished this pattern?Tag your pictures with #dropspattern #springlineupsweater or submit them to the #dropsfan gallery. Do you need help with this pattern?You'll find 27 tutorial videos, a Comments/Questions area and more by visiting the pattern on garnstudio.com. © 1982-2026 DROPS Design A/S. We reserve all rights. This document, including all its sub-sections, has copyrights. Read more about what you can do with our patterns at the bottom of each pattern on our site. |
|||||||||||||||||||||||||


With over 40 years in knitting and crochet design, DROPS Design offers one of the most extensive collections of free patterns on the internet - translated to 17 languages. As of today we count 324 catalogues and 12290 patterns translated into English (UK/cm). 12290
We work hard to bring you the best knitting and crochet have to offer, inspiration and advice as well as great quality yarns at incredible prices! Would you like to use our patterns for other than personal use? You can read what you are allowed to do in the Copyright text at the bottom of all our patterns. Happy crafting!
Post a comment to pattern DROPS 210-14
We would love to hear what you have to say about this pattern!
If you want to leave a question, please make sure you select the correct category in the form below, to speed up the answering process. Required fields are marked *.