
Popular categories
Looking for a yarn?


Comments / Questions (62)
![]() Britty wrote:
Britty wrote:
No consigo encontrar los gráficos, le ocurre a alguien más? Tengo todo para empezar y al ir a imprimir el gráfico para prepararme las indicaciones a mi talla...no lo encuentro. Sabéis si hay algún error?, Alguna solución? Gracias
02.03.2020 - 12:12DROPS Design answered:
Hola Britty. Ha sido por correcciones en los diagramas. Ahora ya están disponibles.
03.03.2020 - 23:28
![]() Esme wrote:
Esme wrote:
No se ven los diagramas en el móvil en español, he probado varios móviles pero no se ven. En cambio, lo he visto en noruego y si se ven. Es un error de la página? O lo tengo que mirar en otro idioma? Muchas gracias!
01.03.2020 - 17:49DROPS Design answered:
Hola Esme. Ha sido por correcciones en los diagramas. Ahora ya están disponibles.
03.03.2020 - 23:24
![]() ChrisPJ wrote:
ChrisPJ wrote:
Hallo, in Diagramm A2 für Größe XL sollte man in Reihe 4 die Maschen 1 und 7 lieber rechts stricken, damit sie besser ins Muster passen. Vielen Dank für das schöne Modell!
23.02.2020 - 12:35DROPS Design answered:
Liebe ChrisPJ, Sie sind ja recht, danke für den Hinweis, Diagramm wird korrigiert. Viel Spaß beim stricken!
03.03.2020 - 15:24
![]() Reidun wrote:
Reidun wrote:
I forklaringen på diagrammet er det markert en svart firkant = strikk 4-4-4-5-5-5 masker i samme maske slik: Strikk 1 rett, men vent med å slippe masken av venstre pinne, 1 kast, 1 rett i samme maske, 1 kast, 0-0-0-1-1-1 rett i samme maske og slipp masken av pinnen Kan ikke finne den svarte firkanten i diagrammet. Er det en feil?
17.02.2020 - 17:09DROPS Design answered:
Hej Reidun, du har ret, den sorte firkant bruges ikke i denne opskrift. Tak for info :)
18.02.2020 - 14:35
![]() Jonna wrote:
Jonna wrote:
Hej Drops Jeg elsker ar strikke med rundt bærestykke. Desværre er begyndt med at lave næsten alle opskrifter strikket ovenfra. Husker I på os der fortsat ønsker at strikke nedenfra ?? Vh. Jonna
16.02.2020 - 18:19DROPS Design answered:
Hej Jonna, det er meget lettere at strikke dem med runde bærestykker ovenfra og ned. Se her hvordan du gør: Hvordan strikkes en trøje ovenfra og ned? her har du nogle som strikkes nedenfra og op Rundt bærestykke - damer - nedefra og op
18.02.2020 - 11:14
![]() Lilou wrote:
Lilou wrote:
Bonjour, j'aurais été tentée par ce joli pull (comme pour d'autres modèles), malheureusement, dès que je vois "aiguilles doubles pointes" j'abandonne!.. en effet, je n'arrive absolument pas à tricoter avec ces aiguilles, et ce n'est pas faute d'avoir essayé. Dommage que vous les utilisiez dans de nombreux modèles!... et merci pour les autres. salutations
15.02.2020 - 09:12DROPS Design answered:
Bonjour Lilou, avez-vous déjà essayé la technique dite du magic loop? - Retrouvez également quelques informations complémentaires ici. Bon tricot!
17.02.2020 - 13:17
![]() Anne Larsen wrote:
Anne Larsen wrote:
I diagram 2 strikkes i str s,m og l 3 vrang, 1 ret, 3 vrang, derefter er et blankt felt og 1 ret. Hvad skal jeg gøre med det blanke felt?
07.02.2020 - 17:22DROPS Design answered:
Hej Anne, de 2 første pinde i selve diagrammet består af 8 masker (de 8 masker som du beskriver her) når du kommer op til 3. pind, så skal der tages ud ved stjernen, disse nye masker er tegnet ind i diagrammet på 4.pind. Sæt gerne et mærke imellem hver diagram, så du er sikker på at have samme antal masker i hver rapport. God fornøjelse!
11.02.2020 - 13:50
![]() Jane Blond Schultz wrote:
Jane Blond Schultz wrote:
Hej..jeg har ikke strikket så meget efter diagram så jeg forstår ikke helt hvordan jeg strikke efter det,når det er delt op på den måde,😉er ret ny inde for strik.
05.02.2020 - 16:52DROPS Design answered:
Hej Jane, når du har strikket A.1 har du taget ud ifølge diagrammet til det antal masker du skal fortsætte med ifølge A.2. Sæt gerne et mærke imellem hver diagram på omgangen, så du er sikker på at få alle udtagninger med. Når du ser en stjerne i diagrammet tages der ud ifølge din størrelse. Disse nye masker er tegnet ind i diagrammet så du ved hvordan de skal strikkes på næste pind. God fornøjelse!
11.02.2020 - 11:20
![]() Belaud wrote:
Belaud wrote:
Je ne retrouve pas sur les diagrammes A1 et A2 la légende qui est sur la 3eme ligne des explications( le carré noir tricoter 4fois la même maille etc.....) À quel moment doit on tricoter ce carré tout noir. Les diagrammes à commencer au milieu du dos?là où se trouve le repéré? Merci pour votre aide.
05.02.2020 - 16:51DROPS Design answered:
Bonjour Mme Belaud, il semble que ce symbole ne soit pas utilisé pour le pull (seulement pour le gilet). Les tours commencent effectivement au milieu dos. Bon tricot!
06.02.2020 - 09:35
![]() Phyllis Womack wrote:
Phyllis Womack wrote:
I don\'t know how to read the charts. Is it bottom up and row by row filling in the blank spaces with knit stitches?
01.02.2020 - 20:51DROPS Design answered:
Dear Mrs Womack, please find here how to read knitting diagrams. Happy knitting!
03.02.2020 - 10:41
|
||||||||||||||||||||||||||||
Alberta Rose#albertarosesweater |
||||||||||||||||||||||||||||
 |
 |
|||||||||||||||||||||||||||
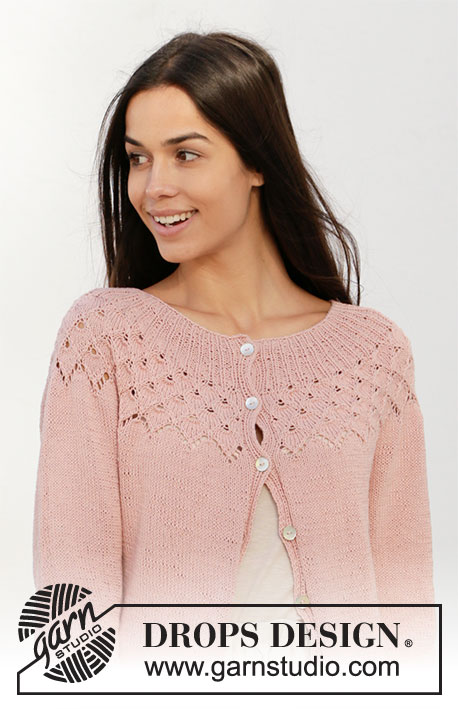
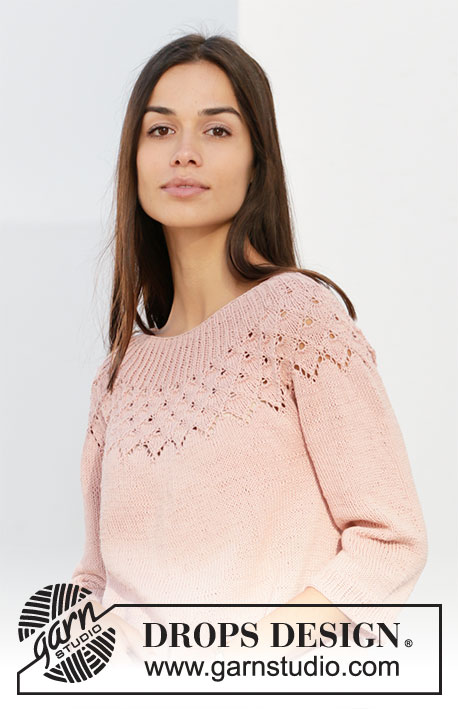
Knitted jumper with round yoke in DROPS Safran. The piece is worked top down with lace pattern, leaf pattern and ¾-length sleeves. Sizes S - XXXL.
DROPS 212-5 |
||||||||||||||||||||||||||||
|
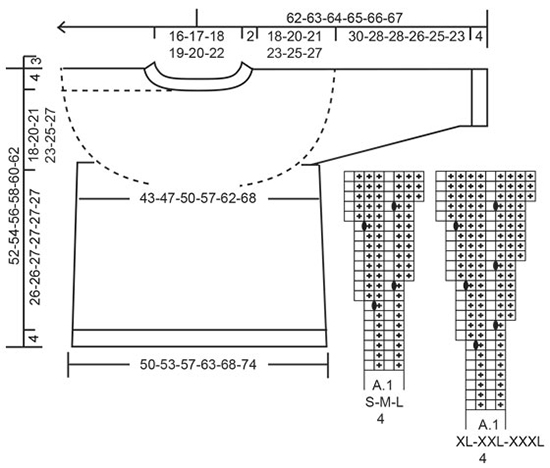
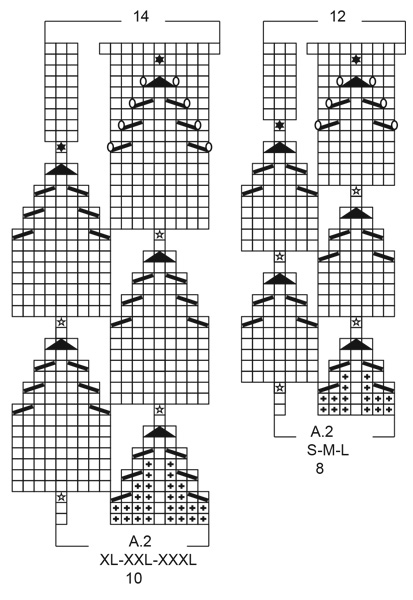
------------------------------------------------------- EXPLANATIONS FOR THE PATTERN: ------------------------------------------------------- PATTERN: See diagrams A.1 and A.2. Choose diagrams for your size. INCREASE TIP-1 (for sides of body): Work until there are 2 stitches left before the marker thread, make 1 yarn over, knit 4 (marker thread sits between these 4 stitches), make 1 yarn over. On the next round work the yarn overs twisted to avoid holes. Then work the new stitches in stocking stitch. INCREASE TIP-2 (evenly spaced): To work out how to increase evenly, count the total number of stitches on the needle (e.g. 244 stitches) and divide by the number of increases to be made (e.g. 62) = 3.93. In this example, increase by making 1 yarn over after approx. each 4th stitch. On the next round work the yarn overs twisted to avoid holes. DECREASE TIP (for sleeves): Decrease 1 stitch on each side of the marker thread as follows: Work until there are 3 stitches left before the marker thread, knit 2 together, knit 2 (marker thread sits between these 2 stitches), slip 1 stitch as if to knit, knit 1 and pass the slipped stitch over the knitted stitch. CASTING-OFF TIP: To avoid the cast-off edge being tight you can cast off with a larger size needle. If the edge is still tight, make 1 yarn over after approx. each 4th stitch at the same time as casting off and the yarn overs are cast off as normal stitches. ------------------------------------------------------- START THE PIECE HERE: ------------------------------------------------------- JUMPER – SHORT OVERVIEW OF THE PIECE: The neck and yoke are worked in the round with circular needle, from mid back and top down. The yoke is divided for body and sleeves and the body is continued in the round with circular needle. The sleeves are worked in the round with double pointed needles, top down. NECK: Cast on 108-116-124-124-128-140 stitches with circular needle size 2.5 mm and Safran. Knit 1 round. Work A.1 (= 4 stitches) in the round (= 27-29-31-31-32-35 times in width). When the first 6 rounds of the pattern are worked, change to circular needle size 3.5 mm. Insert 1 marker at the beginning of the round, mid back; the yoke will be measured from this marker! YOKE: When A.1 has been worked 1 time in height there are 216-232-248-310-320-350 stitches on the needle. The piece measures approx. 5-5-5-6-6-6 cm from the marker. Work A.2 (= 8-8-8-10-10-10 stitches) in the round (= 27-29-31-31-32-35 times in width). REMEMBER THE KNITTING TENSION! When A.2 has been worked 1 time in height there are 324-348-372-434-448-490 stitches on the needle. The piece measures approx. 16-16-16-21-21-21 cm from the marker. Continue with stocking stitch until the piece measures 18-20-21-23-25-27 cm from the marker. Now divide the piece for body and sleeves as follows: Knit 46-50-53-62-65-73 (= half back piece), place the next 70-74-80-93-94-98 stitches on a thread for the sleeve and cast on 8-8-10-8-12-10 stitches under the sleeve, knit 92-100-106-124-130-148 (= front piece), place the next 70-74-80-93-94-98 stitches on a thread for the sleeve and cast on 8-8-10-8-12-10 stitches under the sleeve and finish with knit 46-50-53-62-65-73 (= half back piece). BODY: = 200-216-232-264-284-314 stitches. Insert 1 marker thread in the middle of the 8-8-10-8-12-10 stitches cast on under each sleeve (= sides of body). There are 100-108-116-132-142-156 stitches on the back piece and 100-108-116-132-142-158 stitches on the front piece. Allow the threads to follow your work onwards; they will be used when increasing in the sides. Work stocking stitch in the round. When the piece measures 3 cm from the division increase 1 stitch on each side of both marker threads – read INCREASE TIP-1 (= 4 stitches increased). Increase like this every 2½ cm a total of 7 times = 228-244-260-292-312-342 stitches. Continue working until the piece measures 26-26-27-27-27-27 cm from the division. Knit 1 round and increase 60-62-64-65-66-66 stitches evenly spaced – read INCREASE TIP-2 = 288-306-324-357-378-408 stitches. Change to circular needle size 2.5 mm and work rib (= knit 1 / purl 2). Continue this rib for 4 cm. Cast off with knit – read CASTING-OFF TIP. SLEEVES: Place the 70-74-80-93-94-98 stitches from the thread on the one side of the piece onto double pointed needles size 3.5 mm and knit up 1 stitch in each of the 8-8-10-8-12-10 stitches cast on under the sleeve = 78-82-90-101-106-108 stitches. Insert 1 marker thread in the middle of these 8-8-10-8-12-10 new stitches under the sleeve. Allow the thread to follow your work onwards; it will be used when decreasing mid under sleeve. Work in the round in stocking stitch. When the piece measures 2 cm from the division decrease 1 stitch on each side of the marker thread – read DECREASE TIP (= 2 stitches decreased). Decrease like this every 2½-2-1½-1-1-1 cm a total of 9-10-13-17-18-18 times = 60-62-64-67-70-72 stitches. When the sleeve measures 30-28-28-26-25-23 cm from where the sleeve was divided from the body, increase 6-7-8-5-8-6 stitches evenly spaced = 66-69-72-72-78-78 stitches. Change to double pointed needles size 2.5 mm and work rib (= knit 1 / purl 2) over all stitches. Cast off with knit when the sleeve measures 34-32-32-30-29-27 cm from the division. Work the other sleeve in the same way. |
||||||||||||||||||||||||||||
Diagram explanations |
||||||||||||||||||||||||||||
|
||||||||||||||||||||||||||||
 |
||||||||||||||||||||||||||||
 |
||||||||||||||||||||||||||||
Have you finished this pattern?Tag your pictures with #dropspattern #albertarosesweater or submit them to the #dropsfan gallery. Do you need help with this pattern?You'll find 23 tutorial videos, a Comments/Questions area and more by visiting the pattern on garnstudio.com. © 1982-2026 DROPS Design A/S. We reserve all rights. This document, including all its sub-sections, has copyrights. Read more about what you can do with our patterns at the bottom of each pattern on our site. |
||||||||||||||||||||||||||||


With over 40 years in knitting and crochet design, DROPS Design offers one of the most extensive collections of free patterns on the internet - translated to 17 languages. As of today we count 324 catalogues and 12245 patterns translated into English (UK/cm). 12245
We work hard to bring you the best knitting and crochet have to offer, inspiration and advice as well as great quality yarns at incredible prices! Would you like to use our patterns for other than personal use? You can read what you are allowed to do in the Copyright text at the bottom of all our patterns. Happy crafting!
Post a comment to pattern DROPS 212-5
We would love to hear what you have to say about this pattern!
If you want to leave a question, please make sure you select the correct category in the form below, to speed up the answering process. Required fields are marked *.