Alberta Rose by DROPS Design

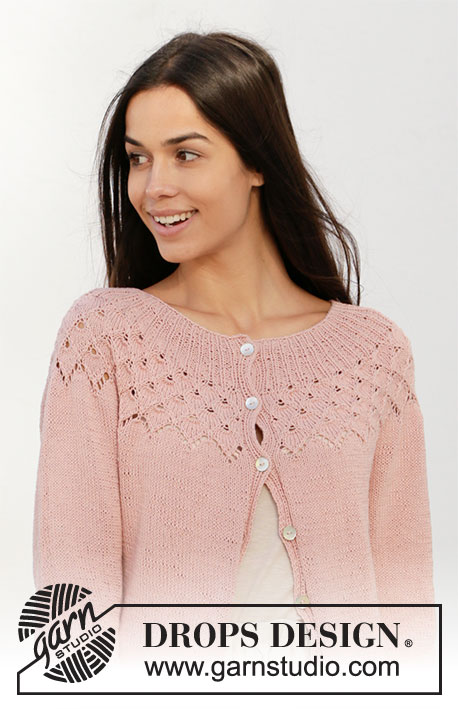
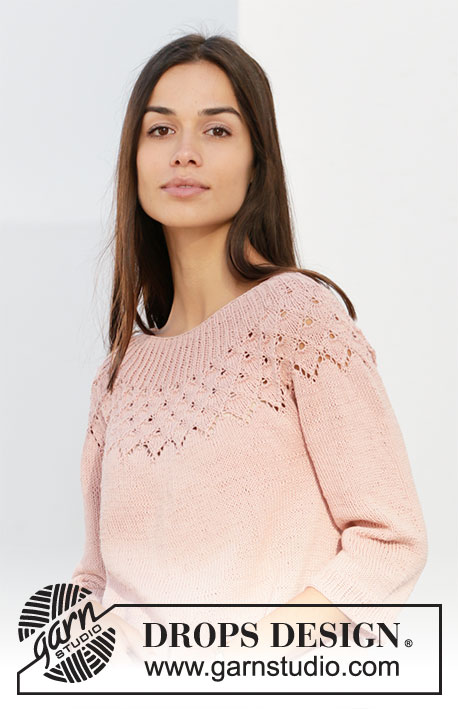
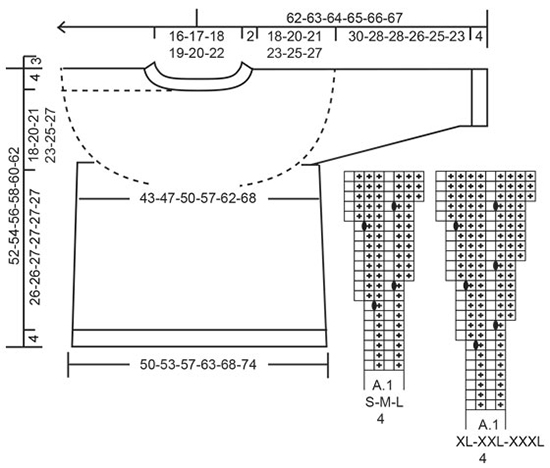
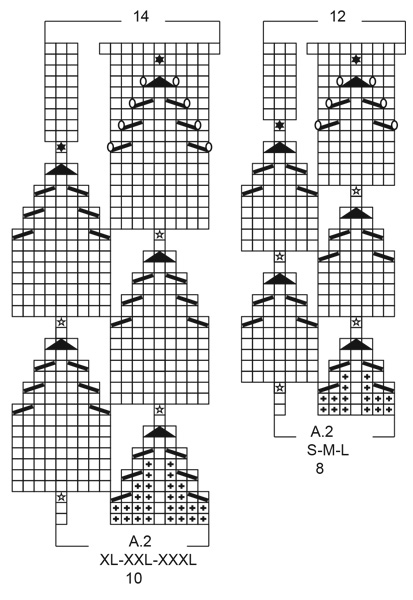
Pulovr s kruhovým sedlem s ažurovým lístkovým vzorem a ¾ rukávem pletený shora dolů z příze DROPS Safran. Velikost S - XXXL.

DROPS 212-5
DROPS Design: model č. e-300
Skupina přízí A
-------------------------------------------------------

VELIKOST:
S - M - L - XL - XXL - XXXL

MATERIÁL:
DROPS SAFRAN firmy Garnstudio (spadá do skupiny přízí A)
300-300-350-400-400-450 g, barva č. 56, pudrová růžová

ZKUŠEBNÍ VZOREK:
23 ok na šířku a 30 řad na výšku lícovým žerzejem = 10 x 10 cm.

JEHLICE:
DROPS PONOŽKOVÉ JEHLICE č.3,5.
DROPS KRUHOVÁ JEHLICE č.3,5, dlouhá 40 a 80 cm.
DROPS PONOŽKOVÉ JEHLICE č.2,5.
DROPS KRUHOVÁ JEHLICE č.2,5, dlouhá 40 a 80 cm – na lemy.
Uvedená síla jehlic je pouze orientační. Máte-li ve svém zkušebním vzorku více ok na 10 cm, použijte jehlice silnější. Pokud máte naopak méně ok na 10 cm, použijte jehlice slabší.

-------------------------------------------------------

Zkušební vzorek – Podívejte se, jak ho měřit a proč
Náhradní příze – Podívejte se, jak změnit přízi
Skupina přízí A až F – Neměňte návod, změňte přízi
Spotřeba příze při použití náhradní příze – Využijte náš převodník

-------------------------------------------------------


100% bavlna
od 43.00 Kč /50g
DROPS Safran uni colour DROPS Safran uni colour 43.00 Kč /50g
Ganella
Objednat
needles Jehlice a háčky Objednat
Přízi na tento model můžete mít už za 258Kč. Více zde.

Návod

-------------------------------------------------------

VYSVĚTLIVKY:

-------------------------------------------------------

VZOR:
Viz schémata A.1 a A.2. Zvolte si schéma pro požadovanou velikost.

TIP – PŘIDÁVÁNÍ 1 (boky trupu):
Pleteme až po poslední 2 oka před značkou: 1x nahodíme, 4 oka upleteme hladce (značka leží uprostřed těchto 4 ok), 1x nahodíme.
V následující kruhové řadě pleteme nahození za zadní nit, aby se v pletenině netvořily dírky. Nová oka pak pleteme lícovým žerzejem.

TIP – PŘIDÁVÁNÍ 2:
Abychom vypočítali, v jakých rozestupech máme přidávat, vydělíme celkový počet ok na jehlici (např. 244 ok) počtem ok, která potřebujeme přidat (tj. 62), takže 244 : 62 = 3,93.
V tomto případě tedy 1x nahodíme za každým zhruba 4. okem. V následující kruhové řadě pleteme nahození za zadní nit, aby se v pletenině netvořily dírky.


TIP - UJÍMÁNÍ (rukávy):
Ujímáme 1 oko na každé straně značky, takto – začínáme 3 oka před značkou: 2 oka spleteme hladce, 2 oka upleteme hladce (značka leží mezi nimi), 1 oko sejmeme hladce, 1 upleteme hladce a sejmuté přes ně přetáhneme.

TIP - UZAVÍRÁNÍ:
Abychom neměli uzavřený okraj moc stažený, můžeme na uzavírání ok použít silnější jehlici. Pokud ani to nestačí, pak 1x nahodíme za každým zhruba 4. okem – toto nahození hned uzavřeme jako běžné oko.

-------------------------------------------------------

POPIS PRÁCE:

-------------------------------------------------------

PULOVR - JAK BUDEME POSTUPOVAT:
Lem průkrčníku a sedlo pleteme v kruhových řadách na kruhové jehlici, shora dolů od středu zadní strany. Pak sedlo rozdělíme na trup a rukávy.
Rukávy upleteme v kruhových řadách na ponožkových jehlicích.

LEM PRŮKRČNÍKU:
Na kruhovou jehlici č.2,5 nahodíme přízí Safran 108-116-124-124-128-140 ok a upleteme 1 kruhovou řadu hladce.
Pak pleteme v kruhových řadách vzor A.1 (= 4 oka; = 27-29-31-31-32-35 sekvencí vzoru).
Po upletení prvních 6 kruhových řad vzoru převedeme pleteninu na kruhovou jehlici č.3,5.
Označíme si začátek kruhové řady = střed zadní strany průkrčníku; SEDLO NYNÍ MĚŘÍME OD TOHOTO MÍSTA!

SEDLO:
Po dokončení 1 celé sekvence vzoru A.1 (na výšku) máme na jehlici 216-232-248-310-320-350 ok. Díl měří asi 5-5-5-6-6-6 cm (od značky).
Pleteme v kruhových řadách vzor A.2 (= 8-8-8-10-10-10 ok; = 27-29-31-31-32-35 sekvencí vzoru).
Po dokončení 1 celé sekvence vzoru A.2 (na výšku) máme na jehlici 324-348-372-434-448-490 ok.
Díl teď měří asi 16-16-16-21-21-21 cm (od značky). Pokračujeme lícovým žerzejem až do výše 18-20-21-23-25-27 cm (od značky).
Nyní rozdělíme díl na trup a rukávy. Postupujeme takto:
Upleteme 46-50-53-62-65-73 (= polovina zadního dílu), následujících 70-74-80-93-94-98 ok odložíme na pomocnou jehlici (= rukáv), nahodíme 8-8-10-8-12-10 nových ok (= podpaží), upleteme 92-100-106-124-130-148 ok (= přední díl), dalších 70-74-80-93-94-98 ok odložíme na pomocnou jehlici (= rukáv), nahodíme 8-8-10-8-12-10 nových ok (= podpaží) a dopleteme posledních 46-50-53-62-65-73 ok (= polovina zadního dílu).

TRUP:
= 200-216-232-264-284-314 ok. Doprostřed 8-8-10-8-12-10 nových ok v podpaží na každé straně vložíme značku (= boky trupu). Mezi značkami leží 100-108-116-132-142-156 ok zadního dílu a 100-108-116-132-142-158 ok předního dílu.
Značky během pletení snímáme vždy do aktuálně pletené kruhové řady - využijeme je později při přidávání na bocích.
Pleteme v kruhových řadách lícovým žerzejem.
Ve výši 3 cm od podpaží přidáme na obou stranách obou značek 1 oko – viz TIP – PŘIDÁVÁNÍ 1 (= přidáme 4 oka). Toto přidávání opakujeme vždy po 2,5 cm výšky, celkem 7x = 228-244-260-292-312-342 ok.
Pokračujeme až do výše 26-26-27-27-27-27 cm od podpaží. Upleteme 1 kruhovou řadu hladce a SOUČASNĚ přidáme rovnoměrně 60-62-64-65-66-66 ok – viz TIP – PŘIDÁVÁNÍ 2 = 288-306-324-357-378-408 ok.
Pleteninu převedeme na kruhovou jehlici č.2,5 a pleteme pružným vzorem 1/2 (tj. střídáme 1 oko hladce, 2 obrace).
Když je pružný lem vysoký 4 cm, všechna oka hladce uzavřeme – viz TIP – UZAVÍRÁNÍ.

RUKÁV:
Odložených 70-74-80-93-94-98 ok jednoho rukávu vrátíme z pomocné jehlice zpět na ponožkové jehlice č.3,5 a navíc k nim nabereme po 1 oku z každého z 8-8-10-8-12-10 nově nahozených ok v podpaží = 78-82-90-101-106-108 ok.
Doprostřed 8-8-10-8-12-10 nových ok v podpaží vložíme značku.
Značku snímáme vždy do aktuálně pletené kruhové řady; využijeme ji při ujímání.
Pleteme v kruhových řadách lícovým žerzejem. Ve výši 2 cm od podpaží ujmeme na každé straně značky 1 oko – viz TIP – UJÍMÁNÍ (= ujmeme 2 oka). Toto ujímání opakujeme vždy po 2,5-2-1,5-1-1-1 cm výšky, celkem 9-10-13-17-18-18x = 60-62-64-67-70-72 ok.
Ve výši 30-28-28-26-25-23 cm od podpaží přidáme rovnoměrně 6-7-8-5-8-6 ok = 66-69-72-72-78-78 ok. Pleteninu převedeme na ponožkové jehlice č.2,5 a pleteme lem pružným vzorem 1/2 (tj. střídáme 1 oko hladce, 2 obrace). Když je rukáv dlouhý asi 34-32-32-30-29-27 cm (od podpaží), všechna oka volně uzavřeme.
Stejným způsobem upleteme i druhý rukáv.

Schéma

symbols = hladce
symbols = obrace
symbols = 1 oko rozpleteme na 7-7-7-9-9-9 ok, takto: upleteme 1 oko hladce, ale nespouštíme je z levé jehlice, *1x nahodíme a to samé oko opět upleteme hladce*, *-* opakujeme celkem 3-3-3-4-4-4x, pak spustíme upletené oko z jehlice
symbols = 1x nahodíme mezi 2 oky; v následující řadě pleteme nahození za zadní nit (nevznikne dírka)
symbols = 1x nahodíme mezi 2 oky
symbols = 2 oka spleteme hladce
symbols = 1 oko sejmeme hladce, 1 upleteme hladce a sejmuté přes ně přetáhneme
symbols = 2 oka sejmeme na pravou jehlici jako bychom je chtěli splést hladce, 1 oko upleteme hladce a obě sejmutá přes ně přetáhneme
symbols = 1 oko rozpleteme na 3, takto: upleteme 1 oko hladce, ale nespouštíme je z levé jehlice, 1x nahodíme a to samé oko opět upleteme hladce, pak spustíme upletené oko z jehlice
diagram
diagram

Potřebujete poradit s tímto návodem?

Děkujeme, že jste si vybrali návod DROPS Design. Zakládáme si na tom, že dáváme k dispozici návody ověřené a snadno srozumitelné. Všechny návody jsou přeložené z norského originálu a tak si můžete kdykoli srovnat rozměry a počty s původním návodem (DROPS 212-5) .

Máte s návodem potíže? Níže najdete seznam odkazů, které vám pomohou dokončit vaše dílo co nejdříve - nebo se třeba přiučit něco nového.

signature-image signature

Máte s návodem potíže? Níže najdete seznam odkazů, které vám pomohou dokončit vaše dílo co nejdříve - nebo se třeba přiučit něco nového.

Každý náš návod je doprovázen speciálními video-ukázkami, které vás navedou.

Máme takopodrobné rozpisy různých technik a postupů krok za krokem - najdete je zde.

1) Why is the knitting/crochet tension so important?

Knitting tension is what determines the final measurements of your work, and is usually measured per 10 x 10 cm. It is provided like so: number of stitches in width x number of rows in height - eg: 19 stitches x 26 rows = 10 x 10 cm.

The knitting tension is very individual; some people knit/crochet loosely while others work tightly. You adjust the knitting tension with the needle size, which is why the suggested needle size only serve as a guide! You need to adjust this (up or down) to ensure that YOUR knitting tension matches the knitting tension provided in the pattern. If you work with a different knitting tension than provided you will have a different yarn consumption, and your work will have different measurements than what the pattern suggests.

The knitting tension also determines which yarns can replace each other. As long as you achieve the same knitting tension you can replace one yarn with another.

See DROPS lesson: How to measure your tension/gauge

See DROPS video: How to make a gauge tension swatch

nahoru

2) What are the yarn groups?

All our yarns are categorised into yarn groups (from A to F) according to thickness and knitting tension – group A contains the thinnest yarns and group F the thickest. This makes it easier for you to find alternative yarns to our patterns, should you wish to switch yarn. All yarns within the same group have a similar knitting tension and can easily replace each other. However, different yarn qualities have different structures and properties which will give the finished work a unique look and feel.

Click here for an overview of the yarns in each yarn group

nahoru

3) Can I use a different yarn than what the pattern suggests?

The important thing when changing from one yarn to another is that the knitting/crochet tension remains the same. This is so that the measurements of the finished piece will be the same as on the sketch provided. It is easier to achieve the same knitting tension using yarns from the same yarn group. It is also possible to work with multiple strands of a thinner yarn to achieve the knitting tension of a thicker one. Please try our yarn converter. We recommend you to always work a test swatch.

Please NOTE: when changing yarn the garment might have a different look and feel to the garment in the photo, due to individual properties and qualities of each yarn.

See DROPS lesson: Can I use a different yarn than the one mentioned in the pattern?

nahoru

4) How do I use the yarn converter?

At the top of all our patterns you’ll find a link to our yarn converter, which is a helpful tool should you wish to use a different yarn than suggested. By filling in the yarn quality you wish to replace, the amount (in your size) and number of strands, the converter will present good alternative yarns with the same knitting tension. Additionally it will tell you how much you’ll require in the new qualities and whether you’ll need to work with multiple strands. Most skeins are 50g (some are 25g or 100g).

If the pattern is worked with multiple colours, every colour will have to be converted separately. Similarly, if the pattern is worked with several strands of different yarns (for example 1 strand Alpaca and 1 strand Kid-Silk) you will have to find alternatives for each, individually.

Click here to see our yarn converter

nahoru

5) Why do I get the wrong knitting tension with the suggested needle size?

The needle size provided in the pattern serves only as a guide, the important thing is to follow the knitting tension. And since knitting tension is very individual, you will have to adjust the needle size to ensure that YOUR tension is the same as in the pattern – maybe you’ll have to adjust 1, or even 2 needle sizes, up or down to achieve the correct tension. For this, we recommend that you work test swatches.

Should you work with a different knitting tension than the one provided, the measurements of the finished garment might deviate from the measurement sketch.

See DROPS lesson: How to measure your tension/gauge

See DROPS video: How to make a gauge tension swatch

nahoru

6) Why is the pattern worked top-down?

Working a garment top-down provides more flexibility and room for personal adjustment. For example it is easier to try the garment on while working, as well as making adjustments to length of yoke and shoulder caps.

The instructions are carefully explaining every step, in the correct order. Diagrams are adjusted to the knitting direction and are worked as usual.

nahoru

7) Why are the sleeves shorter in larger sizes?

The total width of the garment (from wrist-to-wrist) will be larger in the larger sizes, despite the actual sleeves being shorter. The larger sizes have longer sleeve caps and wider shoulders, so there will be a good fit in all sizes.

nahoru

8) What is a repeat?

Diagrams are often repeated on the round or in height. 1 repeat is the diagram the way it appears in the pattern. If it says to work 5 repeats of A.1 in the round, then you work A.1 a total of 5 times after/next to each other in the round. If it says to work 2 repeats of A.1 vertically/in height you work the entire diagram once, then begin again at the start and work the entire diagram one more time.

nahoru

9) How do I work according to a knitting diagram?

The diagram depicts all rows/rounds, and every stitch seen from the right side. It is read from bottom to top, from right to left. 1 square = 1 stitch.

When working back and forth, every other row is worked from the right side and every other row is worked from the wrong side. When working from the wrong side, the diagram will have to be worked reversed: from left to right, knit stitches are purled, purl stitches are knit etc.

When working in the round every round is worked from the right side and the diagram are worked from right to left on all rounds.

See DROPS lesson: How to read knitting diagrams

nahoru

10) How do I work according to a crochet diagram?

The diagram depicts all rows/rounds, and every stitch seen from the right side. It is worked from bottom to top, from right to left.

When working back and forth every other row is worked from the right side: from right to left and every other row is worked from the wrong side: from left to right.

When working in the round, every row in the diagram are worked from the right side, from right to left.

When working a circular diagram you start in the middle and work your way outwards, counter clockwise, row by row.

The rows usually start with a given number of chain stitches (equivalent to the height of the following stitch), this will either be depicted in the diagram or explained in the pattern.

See DROPS lesson: How to read crochet diagrams

nahoru

11) How do I work several diagrams simultaneously on the same row/round?

Instructions for working several diagrams after each other on the same row/round, will often be written like so: “work A.1, A.2, A.3 a total of 0-0-2-3-4 times". This means you work A.1 once, then A.2 is worked once, and A.3 is repeated (in width) the number of times provided for your size – in this case like so: S = 0 times, M = 0 times, L=2 times, XL= 3 times and XXL = 4 times.

The diagrams are worked as usual: begin with the first row in A.1, then work the first row in A.2 etc.

See DROPS lesson: How to read knitting diagrams

See DROPS lesson: How to read crochet diagrams

nahoru

12) Why does the piece start with more chain stitches than it’s worked with?

Chain stitches are slightly narrower than other stitches and to avoid working the cast-on edge too tight, we simply chain more stitches to begin with. The stitch count will be adjusted on the following row to fit the pattern and measurement sketch.

nahoru

13) Why increase before the rib edge when the piece is worked top-down?

The rib edge is more elastic and will contract slightly compared to, for example, stocking stitch. By increasing before the rib edge, you avoid a visible difference in width between the rib edge and the rest of the body.

nahoru

14) Why increase in the cast-off edge?

It’s very easy to cast off too tightly, and by making yarn overs while casting off (and simultaneously casting these off) you avoid a too tight cast off edge.

See DROPS video: How to bind off with yarn overs (yo)

nahoru

15) How do I increase/decrease on every 3rd and 4th row/round alternately?

To achieve an even increase (or decrease) you can increase on, for example: every 3rd and 4th row alternately, like so: work 2 rows and increase on the 3rd row, work 3 rows and increase on the 4th. Repeat this until the increase is complete.

See DROPS lesson: Increase or decrease 1 st on every 3rd and 4th row alternately

nahoru

16) Why is the pattern slightly different than what I see in the photo?

Pattern repeats can vary slightly in the different sizes, in order to get the correct proportions. If you’re not working the exact same size as the garment in the photo, yours might deviate slightly. This has been carefully developed and adjusted so that the complete impression of the garment is the same in all sizes.

Make sure to follow instructions and diagrams for your size!

nahoru

17) How can I work a jacket in the round instead of back and forth?

Should you prefer to work in the round instead of back and forth, you may of course adjust the pattern. You’ll need to add steeks mid-front (usually 5 stitches), and follow the instructions. When you would normally turn and work from the wrong side, simply work across the steek and continue in the round. At the end you’ll cut the piece open, pick up stitches to work bands, and cover the cut edges.

See DROPS video: How to knit steeks and cut open

nahoru

18) Can I work a jumper back and forth instead of in the round?

Should you prefer to work back and forth instead of in the round, you may of course adjust the pattern so you work the pieces separately and then assemble them at the end. Divide the stitches for the body in 2, add 1 edge stitch in each side (for sewing) and work the front and back pieces separately.

See DROPS lesson: Can I adapt a pattern for circular needles into straight needles?

nahoru

19) Why do you show discontinued yarns in the patterns?

Since different yarns have different qualities and textures we have chosen to keep the original yarn in our patterns. However, you can easily find options among our available qualities by using our yarn converter, or simply pick a yarn from the same yarn group.

It is possible that some retailers still have discontinued yarns in stock, or that someone has a few skeins at home that they would like to find patterns for.

The yarn converter will provide both alternative yarn as well as required amount in the new quality.

nahoru

20) How do I make a women’s size garment into a men’s size one?

If you have found a pattern you like which is available in women’s size it’s not very difficult to convert it to men’s size. The biggest difference will be the length of sleeves and body. Start working on the women size that you think would fit across the chest. The additional length will be worked right before you cast off for the armhole/sleeve cap. If the pattern is worked top-down you can add the length right after the armhole or before the first decrease on sleeve.

Regarding additional yarn amount, this will depend on how much length you add, but it is better with a skein too many than too few.

nahoru

21) How do I prevent a hairy garment from shedding?

All yarns will have excess fibres (from production) that might come off as lint or shedding. Brushed yarns (ie hairier yarns) have more of these loose, excess fibres, causing more shedding.

Shedding also depends on what is worn under or over the garment, and whether this pulls at the yarn fibres. It’s therefore not possible to guarantee that there will be no shedding

Below are some tips on how to get the best result when working with hairier yarns:

1. When the garment is finished (before you wash it) shake it vigorously so the looser hairs come off. NOTE: do NOT use a lint roller, brush or any method that pulls at the yarn.

2. Place the garment in a plastic bag and put it in your freezer - the temperature will cause the fibres to become less attached to each other, and excess fibres will come off easier.

3. Leave in the freezer for a few hours before taking it out and shaking it again.

4. Wash the garment according to the instructions on the yarn label.

nahoru

22) Where on the garment is the length measured?

The measurement sketch/schematic drawing provides information regarding the full length of the garment. If it’s a jumper or a jacket the length is measured from the highest point on the shoulder closest to the neckline, and straight down to the bottom of the garment. It is NOT measured from the tip of shoulder. Similarly, the length of yoke is measured from the highest point on the shoulder and down to where yoke is split into body and sleeves.

On a jacket measures are never taken along bands, unless specifically stated. Always measure inside band stitches when measuring the length.

See DROPS lesson: How to read a schematic drawing

nahoru

23) How do I know how many balls of yarn I need?

The required amount of yarn is provided in grams, eg: 450 g. To calculate how many balls you’ll need you first need to know how many grams are in 1 ball (25g, 50g or 100g). This information is available if you click on the individual yarn quality on our pages. Divide the amount required with the amount of each ball. For example, if each ball is 50g (the most common amount), the calculation will be as follows: 450 / 50 = 9 balls.

nahoru

Pořídili jste si přízi DROPS na tento model? Pak máte taky právo žádat po svém prodejci, u něhož jste nakoupili, pomoc a rady. Seznam DROPS obchodů najdete tady!
Pořád se nemůžete dobrat odpovědi, kterou hledáte? Pak posuňte stránku dolů a napište nám svůj dotaz, naši specialisté se vám pokusí poradit. Obvykle to zvládneme během 5 až 10 pracovních dnů.. Mezitím si můžete pročíst otázky a odpovědi, které k tomuto modelu položili ostatní, nebo navštívit skupinu DROPS Workshop na Facebooku, kde vám může poradit některá spřízněná duše!

Komentáře / Otázky (53)

country flag Anne Andersen wrote:

Er diagrammet for str XL rettet , jeg får 11 retmasker mellem vrangmaskerne og det kan jeg ikke få til st passe

20.02.2023 - 12:43

country flag Anne Andersen wrote:

Jeg har nu opgivet at strikke denne model, da diagram 2 i str XL ikke virker. Og det er netop pind 4 der driller. Hvor mage retmasker skal der være mellem vrang maskerne ?? Jeg får det til 11 masker, men så bliver det forkert på resten af omgangen Er mønstret rettet ?? Mvh Anne

20.02.2023 - 12:41

DROPS Design answered:

Hej Anne, ja det stemmer, du strikker 9 masker i stjernemasken og så har du 2 masker ret fra den anden side af diagrammet :)

23.02.2023 kl. 15:29

country flag Núria wrote:

Hola primeramente muchas gracias por los patrones gratuitos, tengo una duda he empezado el patrón Alberta Rose con hilo safran y no entiendo cuando pone seguir esquema A1 (4 puntos) y 27 en horizontal? Gracias de antemano, espero me ayuden. Saludos

01.10.2022 - 05:58

DROPS Design answered:

Hola Núria, tienes que trabajar la primera fila del diagrama A.1, que se encuentra bajo las instrucciones del patrón. Puedes ver cómo leer los diagramas aquí: https://www.garnstudio.com/lesson.php?id=68&cid=23 El diagrama A.1 tiene 4 puntos en la primera fila, tienes que repetir estos 4 puntos 27 veces en la vuelta (es decir, repites la primera fila de A.1 27 veces en la vuelta).

02.10.2022 kl. 23:54

country flag Susan wrote:

Ich verstehe die Zunahmen nicht. Also im Diagramm mit dem Stern gekennzeichnet. Und auch nicht was mit hintere Mitte gemeint ist. Es ist ein wirklich sehr schöner Pulli aber bin wohl zu doof.

30.03.2022 - 13:49

DROPS Design answered:

Liebe Susan, die hintere Mitte ist die Mitte am Rückenteil. Mit dem Stern (3. Symbol im Diagram) sollen Sie die selbe Maschen entweder 7 Mal (S, M, L) oder 9 Mal (XL, XXL, XXXL) stricken (so nehmen Sie 6 Maschen (S,M,L) oder 8 Maschen (XL, XXL, XXXL). Dieses Video zeigt für den Top, wie man solche Diagramme strickt, sicher kann es Ihnen helfen. Viel Spaß beim stricken!

30.03.2022 kl. 14:16

country flag Lisa wrote:

Hallo, ich bin etwas verwirrt darüber, wo ich den Markierer der Halsbänder anbringen. Nach den ersten sechs Runden oder wenn ich A.1 fertig geschrieben habe?

25.01.2022 - 15:17

DROPS Design answered:

Liebe Lisa, der Markierer setzen Sie nach Bündchen, am Ende der Halsblende (= vor der Passe), er soll hier bleiben so daß die Arbeit ab diese Markierer gemessen wird. Viel Spaß beim stricken!

25.01.2022 kl. 16:48

country flag Lisa wrote:

Hallo, ich bin etwas verwirrt darüber, wo ich den Markierer der Halsbänder anbringen. Nach den ersten sechs Runden oder wenn ich A.1 fertig geschrieben habe?

25.01.2022 - 15:16

country flag Eva Sæther wrote:

Det var Drops 212-6 jeg sente spørsmål om

03.12.2021 - 10:23

country flag Eva Sæther wrote:

Jeg prøver å strikke str M. Det står at jeg skal legge opp 131 masker inkludert stolpene. Strikker deretter A2og A1 og øker slik det er oppsatt. Når jeg er ferdig mef A2 og A1 for str M skal jeg ha 247 masker. Jeg har 223 masker. Jeg har også bare 23 ganger i bredden. Hva blir riktig antall i bredden for str M? Mønstret. Er det riktig at + skal være vrang fra retten? Kan dere sende svar på mailto::eva.saether@ posten.no.

03.12.2021 - 10:20

DROPS Design answered:

Hej Eva. Jag antar att det är modell 212-6 du stickar. Du ska sticka A.2 29 gånger i bredden. I A.2 ökar du 4 maskor per rapport totalt. 29 x 4= 116 m ökade totalt. 131+116=247 m. Mvh DROPS Design

03.12.2021 kl. 12:12

country flag Eugenia wrote:

Hello! Please, the first increases on the yoke are every 3 stiches or 4? Thank you!

13.07.2021 - 18:20

DROPS Design answered:

Dear Eugenia, the first increases are done after every 4th stitch. Happy Stitching!

13.07.2021 kl. 21:09

country flag Susana wrote:

Buenas y muchas gracias por el patrón, yo tengo dudas de que talla elegir, suelo usar una 40-42 talla española, y tengo 100cm de contorno de pecho, ¿es talla M o L? Muchas gracias.

30.05.2021 - 10:42

DROPS Design answered:

Hola Susana, está prenda es bastante ajustada, por lo que necesitarías una talla L o mejor XL, para que no quede demasiado justo. De todas formas, puedes consultas todas las medidas debajo del patrón, en el esquema de la prenda.

30.05.2021 kl. 20:25

Přidejte komentář k návodu DROPS 212-5

Rádi bychom věděli, co si o tomto modelu myslíte!

Pokud se chcete na něco zeptat, dbejte prosím na to, abyste ve formuláři níže vybrali správnou kategorii - díky tomu se dříve dozvíte, co potřebujete vědět. Povinná pole jsou označena *.

Z galerie #dropsfan

Alberta Rose

Ida Marin, Sweden

Alberta Rose

Inês, Portugal

Alberta Rose

Olena Kostrytsia, India

Viz více