
Popular categories
Looking for a yarn?


Comments / Questions (2)
![]() Mari wrote:
Mari wrote:
Hei, denne jakka har fine farger og pent mønster. Dessverre er passformen forferdelig! Ellers er jeg frustrert over at dere nå nærmest utelukkende har oppskrifter hvor det strikkes ovenfra og ned. Jeg skulle ønske dere hadde langt flere hvor det strikkes nedenfra og opp. Det blir penere vrangborder og halskant da, i tillegg til at det er mye mer tilfredstillende å strikke bærestykke og hals til slutt. Greit at folk er forskjellig, men det er virkelig altfor mye av ovenfra og ned nå.
24.08.2023 - 19:55
![]() Kirsten Emmoth wrote:
Kirsten Emmoth wrote:
Hej. Jag har stickat denna kofta åt en kompis i storlek L. Jag har använt det rekommenderade garnet och stickor. Enligt mönstret skulle den bli 56 cm lång, den blev 48 cm. Den skulle bli 53cm bred, den blev 40 cm. Koftan blev alldeles för liten! Jag stickar definitivt inte hårt, snarare lite löst. Jag är en van stickare har aldrig upplevt något sånt här tidigare. Kan det vara fel på mönstret? Hälsningar Kirsten
15.04.2021 - 14:59DROPS Design answered:
Hej Kirsten. Det låter som om du har haft en annan stickfasthet än den som uppges i mönstret. I storlek L är det 227 m på fram- och bakstycke, varav 5 m överlappar den andra framkanten. Enligt stickfastheten ska du ha 2,1 m/cm; 222 m/2,1= 106 cm. Detta innebär 106/2= 53 cm i bredden, så måtten ska vara riktiga i måttskissen. Mvh DROPS Design
16.04.2021 - 10:46
|
|||||||||||||
River Challenge Jacket#riverchallengejacket |
|||||||||||||
 |
 |
||||||||||||
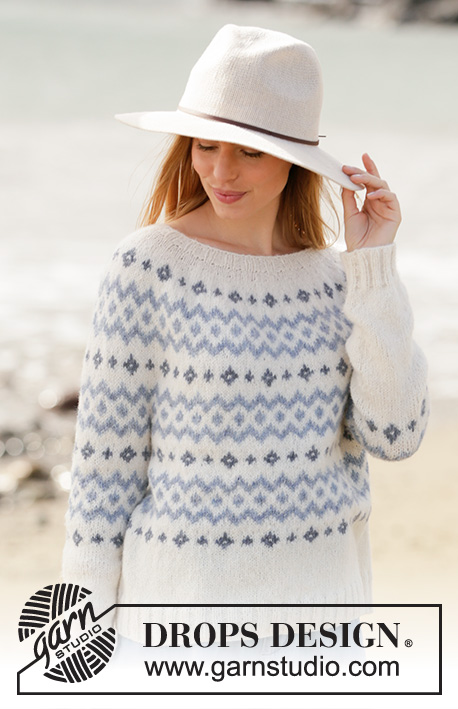
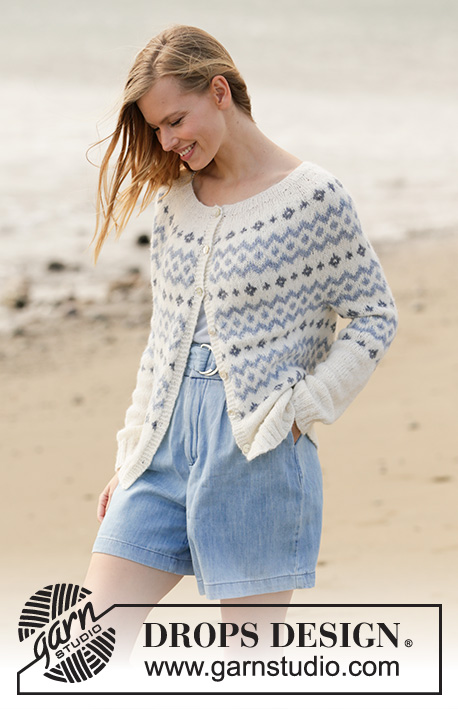
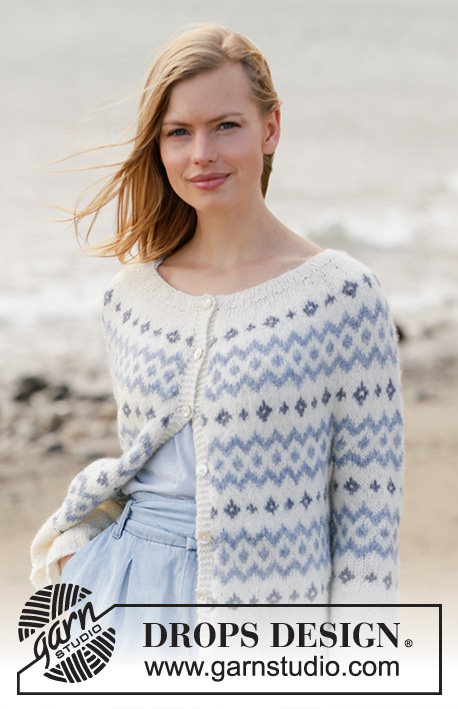
Knitted jacket with Nordic pattern in DROPS Sky. The piece is worked top down with round yoke. Sizes S - XXXL.
DROPS 210-2 |
|||||||||||||
|
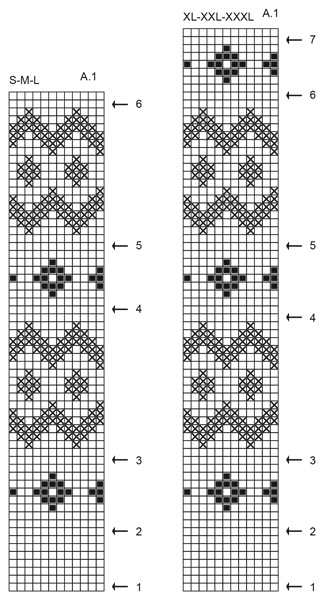
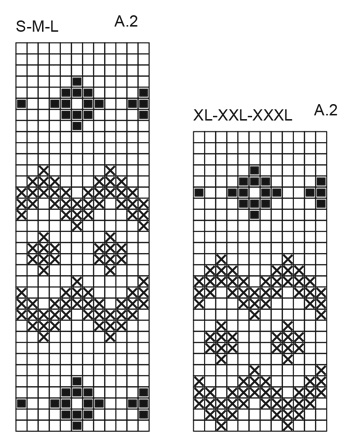
------------------------------------------------------- EXPLANATIONS FOR THE PATTERN: ------------------------------------------------------- RIDGE/GARTER STITCH (worked back and forth): Knit all rows. 1 ridge in height = Knit 2 rows. PATTERN: See diagrams A.1 and A.2. Choose diagram for your size. The diagrams are worked in stocking stitch. INCREASE TIP (evenly spaced): To work out how to increase evenly, count the total number of stitches on the needle (e.g. 108 stitches) minus the bands (e.g. 10 stitches) and divide the remaining stitches by the number of increases to be made (e.g. 35) = 2.8. In this example, increase by making 1 yarn over after alternately each 2nd and 3rd stitch (approx.). Do not increase over the bands. On the next row purl the yarn overs twisted to avoid holes. DECREASE TIP (for sleeves): Decrease 1 stitch on each side of the marker thread as follows: Work until there are 3 stitches left before the marker thread, knit 2 together, knit 2 (marker thread sits between these 2 stitches), slip 1 stitch as if to knit, knit 1 and pass the slipped stitch over the knitted stitch. BUTTONHOLES: Work buttonholes on the right band (when the garment is worn). Work from the right side when there are 3 stitches left on the row as follows: Make 1 yarn over, knit 2 together and knit 1. On the next row knit the yarn over to leave a hole. The first buttonhole is worked when the rib on the neck measures approx. 1½-2 cm. Then work the other 6-6-7-7-7-7 buttonholes with approx. 7 cm between each one. CASTING-OFF TIP: To avoid the cast-off edge being tight you can cast off with a larger size needle. If the edge is still tight, make 1 yarn over after approx. each 4th stitch at the same time as casting off and the yarn overs are cast off as normal stitches. ------------------------------------------------------- START THE PIECE HERE: ------------------------------------------------------- JACKET – SHORT OVERVIEW OF THE PIECE: The neck and yoke are worked back and forth with circular needle from mid front and top down. The yoke is divided for body and sleeves and the body continued back and forth. The sleeves are worked in the round with short circular needle/double pointed needles, top down. NECK: Cast on 108-112-112-116-120-124 stitches (including 5 band stitches on each side towards mid front) with circular needle size 3 mm and white. Purl 1 row (= wrong side). The next row is worked as follows from the right side: 5 band stitches in GARTER STITCH – read description above, * knit 2, purl 2 *, work from *-* until there are 7 stitches left, knit 2 and finish with 5 band stitches in garter stitch. Continue this rib for 3 cm – remember BUTTONHOLES on right band – read description above. YOKE: Change to circular needle size 4 mm and continue as follows: 5 band stitches in garter stitch, A.1 until there are 6 stitches left, work the first stitch in A.1 and finish with 5 band stitches in garter stitch. AT THE SAME TIME on rows marked with arrows increase evenly spaced as follows: Arrow 1: Increase 35-43-55-51-47-55 stitches – read INCREASE TIP in explanations above = 143-155-167-167-167-179 stitches on the needle (11-12-13-13-13-14 repeats of 12 stitches). Arrow 2: Increase 36-36-48-48-48-48 stitches = 179-191-215-215-215-227 stitches on the needle (14-15-17-17-17-18 repeats of 12 stitches.) Arrow 3: Increase 36-36-48-48-48-48 stitches = 215-227-263-263-263-275 stitches on the needle. (17-18-21-21-21-22 repeats of 12 stitches). Arrow 4: Increase 36-36-36-36-48-48 stitches = 251-263-299-299-311-323 stitches on the needle (20-21-24-24-25-26 repeats of 12 stitches). Arrow 5: Increase 24-36-36-36-48-48 stitches = 275-299-335-335-359-371 stitches on the needle (22-24-27-27-29-30 repeats of 12 stitches). Arrow 6: Increase 24-24-24-36-36-48 stitches = 299-323-359-371-395-419 stitches on the needle (24-26-29-30-32-34 repeats of 12 stitches). Arrow 7 (applies only to sizes XL-XXL and XXXL): Increase 0-0-0-24-24-24 stitches = 299-323-359-395-419-443 stitches on the needle (24-26-29-32-34-36 repeats of 12 stitches). Complete A.1 in height. The next row is worked with white as follows from the wrong side: Work the first 47-50-55-61-66-71 stitches in garter stitch and stocking stitch (= front piece), place the next 60-66-74-80-82-84 stitches on 1 thread for the sleeve, cast on 6-6-8-8-10-12 new stitches on the needle (= in side under the sleeve), work 85-91-101-113-123-133 stitches in stocking stitch (= back piece), place the next 60-66-74-80-82-84 stitches on 1 thread for the sleeve, cast on 6-6-8-8-10-12 new stitches on the needle (= in side under the sleeve) and work the remaining 47-50-55-61-66-71 stitches in stocking stitch and garter stitch (= front piece). Body and sleeves are finished separately. THE PIECE IS NOW MEASURED FROM HERE! BODY: = 191-203-227-251-275-299 stitches. Continue according to A.2. When A.2 has been completed 1 time in height continue with white, stocking stitch and garter stitch until the piece measures 20-22-24-24-26-28 cm from the division. Purl 1 row from the wrong side where you increase 1-1-1-1-1-1 stitch = 192-204-228-252-276-300 stitches. Change to circular needle size 3 mm and work rib from the right side as follows: 5 band stitches in garter stitch, * knit 2, purl 2 *, work from *-* until there are 7 stitches left, knit 2 and 5 band stitches in garter stitch. Work until the rib measures 5 cm. Loosely cast off - read CASTING-OFF TIP in explanations above. Cut and fasten the strands. SLEEVES: Place the 60-66-74-80-82-84 stitches from the thread on the one side of the piece on short circular needle or double pointed needles size 4 mm and knit up 1 stitch in each of the 6-6-8-8-10-12 stitches cast on under the sleeve = 66-72-82-88-92-96 stitches. Insert a marker thread in the middle of the new stitches under the sleeve. Continue working in the round with A.2. When the piece measures approx. 3-3-4-4-4-4 cm, decrease 2 stitches mid under the sleeve – read DECREASE TIP. Continue with pattern and decrease every 3½-3-2-1½-1½-1½ cm a total of 8-10-14-16-16-18 times = 50-52-54-56-60-60 stitches. When A.2 has been completed, continue with white and stocking stitch until the sleeve measures 34-34-35-33-34-34 cm (or to desired length; there is 5 cm left to finished length). Work 1 round where you increase 2-0-2-0-0-0 stitches evenly spaced = 52-52-56-56-60-60 stitches. Change to double pointed needles size 3 mm and work rib (knit 2 / purl 2) for 5 cm. Loosely cast off, remember CASTING-OFF TIP. Cut and fasten the strands. Work the other sleeve in the same way. ASSEMBLY: Sew buttons onto the left band. |
|||||||||||||
Diagram explanations |
|||||||||||||
|
|||||||||||||
 |
|||||||||||||
 |
|||||||||||||
 |
|||||||||||||
Have you finished this pattern?Tag your pictures with #dropspattern #riverchallengejacket or submit them to the #dropsfan gallery. Do you need help with this pattern?You'll find 29 tutorial videos, a Comments/Questions area and more by visiting the pattern on garnstudio.com. © 1982-2026 DROPS Design A/S. We reserve all rights. This document, including all its sub-sections, has copyrights. Read more about what you can do with our patterns at the bottom of each pattern on our site. |
|||||||||||||


With over 40 years in knitting and crochet design, DROPS Design offers one of the most extensive collections of free patterns on the internet - translated to 17 languages. As of today we count 324 catalogues and 12290 patterns translated into English (UK/cm). 12290
We work hard to bring you the best knitting and crochet have to offer, inspiration and advice as well as great quality yarns at incredible prices! Would you like to use our patterns for other than personal use? You can read what you are allowed to do in the Copyright text at the bottom of all our patterns. Happy crafting!
Post a comment to pattern DROPS 210-2
We would love to hear what you have to say about this pattern!
If you want to leave a question, please make sure you select the correct category in the form below, to speed up the answering process. Required fields are marked *.