
Popular categories
Looking for a yarn?


Comments / Questions (20)
![]() GESQUIN wrote:
GESQUIN wrote:
Merci pour les explications et la réponse rapide . Je vais donc essayer les leçons avec les circulaires car j'aimerais réaliser ces beaux modèles.
16.07.2021 - 16:49
![]() GESQUIN wrote:
GESQUIN wrote:
Bonjour, je trouve que beaucoup de modèles sont très beaux mais hélas je ne tricote pas avec des circulaires et il n'y a pas beaucoup de modèles avec des aiguilles droites (normales). est il possible de les réaliser avec les aiguilles droites? Merci
16.07.2021 - 11:56DROPS Design answered:
Bonjour Mme Gesquin, cette leçon explique comment adapter un modèle sur aiguilles droites; mais il sera parfois plus simple d'apprendre à tricoter sur circulaire à l'aide de nos vidéos par exemple, nombreuses sont celles qui les ont finalement domptées après les avoir essayées. Bon tricot!
16.07.2021 - 14:24
![]() Lillian B B Svenning wrote:
Lillian B B Svenning wrote:
Hvorfor blir det bølger? Hva gjør jeg feil?
29.05.2020 - 19:02
![]() Lillian B B Svenning wrote:
Lillian B B Svenning wrote:
Hvorfor blir det bølger? Hva gjør jeg feil?
29.05.2020 - 18:59
![]() Sharon wrote:
Sharon wrote:
I have california 8 ply wool and wondered what needles to use and how many balls required for this pattern, thanks
03.05.2020 - 02:31DROPS Design answered:
Dear Sharon, We are able to provide free patterns thanks to our yarns sold throughout the world. You will therefore understand that we can only recomand you to contact the store where you bought the yarn for any further help & assistance. You will find here our DROPS stores in USA. Thank you for your comprehension.
04.05.2020 - 12:30
![]() Lise wrote:
Lise wrote:
Der skal kun tages 7 masker ud på str M for at få de 248 masker til ryg-og forstykke. IKKE 10 masker, som der står i opskriften, og man skal IKKE have 272 masker.
29.04.2020 - 22:11DROPS Design answered:
Hej Det står i oppskriften att du ska ta ut 7 m i strl M och du ska sen ha 248 m (strl M är den första siffran i det stycket, strl S är förklarat i stycket över). Mvh DROPS Design
30.04.2020 - 09:37
![]() Murielle Pham wrote:
Murielle Pham wrote:
Bonjour, je crois qu,il y a une erreur... Après le motif, en taille M, il y a 241m On doit faire 10 augmentations a 24 cm...donc 251 m et vous notez 272.... Ai je loupé quelque chose?? Merci
07.04.2020 - 13:57DROPS Design answered:
Bonjour Mme Pham, en taille M, on doit augmenter 7 mailles (= dans ce paragraphe, la taille M est la 1ère taille), on aura donc bien 241 m + 7 = 248 m (et 272 m en taille L). Au paragraphe suivant, la taille M est de nouveau la 2ème: 40 m = devant droit, 50 m = manche etc... Bon tricot!
09.04.2020 - 15:46
![]() Isabelle wrote:
Isabelle wrote:
Cela a été un régal à tricoter; c'est comme tricoter un nuage. Les explications sont claires. L'ouvrage monte vite. La laine ne bouge pas au blocage. Moralité: je recommencerais à tricoter de la laine air. En plus elle ne bouloche pas!
26.02.2020 - 10:36
![]() Josee Simons wrote:
Josee Simons wrote:
Hoeveel bollen voor maat 42, garen alpaca+zijde..25 gr per bol en 140 m lengte
17.02.2020 - 00:26DROPS Design answered:
Dag Josee,
Begrijp ik het goed dat je 2 draden van kwaliteit A wilt gebruiken? Wat je kunt doen is naar de totale looplengte kijken. Bereken de totale looplengte die je nodig zou hebben om het vest in Air te breien en deel deze door de looplengte van de gewenste garenkwaliteit om de hoeveelheid bollen te berekenen. Dit doe je dan weer keer 2, omdat je met een dubbele draad breit.
20.02.2020 - 21:09
![]() Ainhoa Amorrosta wrote:
Ainhoa Amorrosta wrote:
Parece todo muy detallado y me encantan vuestras lanas
20.01.2020 - 01:05
|
||||||||||||||||||||||
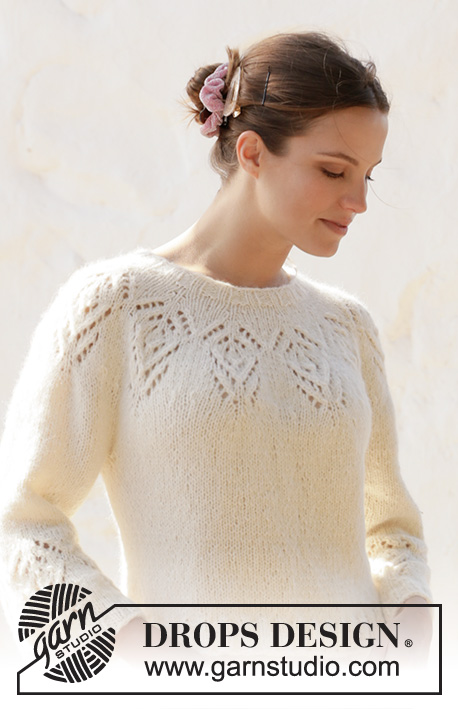
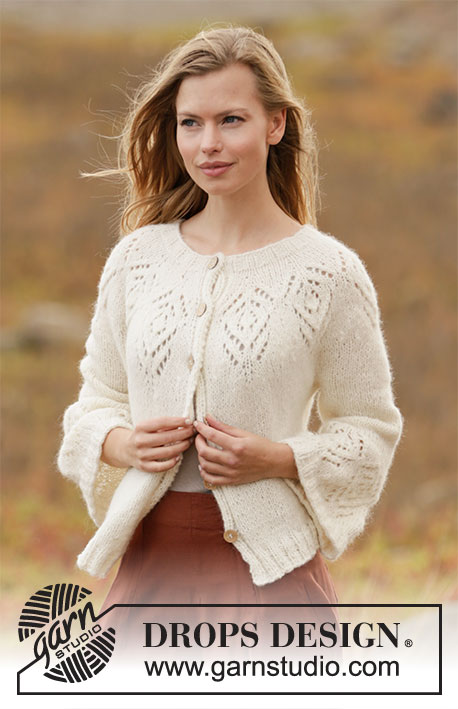
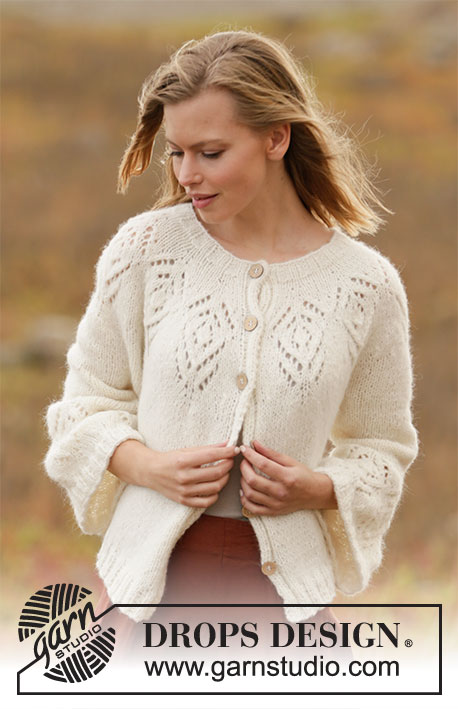
Tulip Ring Jacket#tulipringjacket |
||||||||||||||||||||||
 |
 |
|||||||||||||||||||||
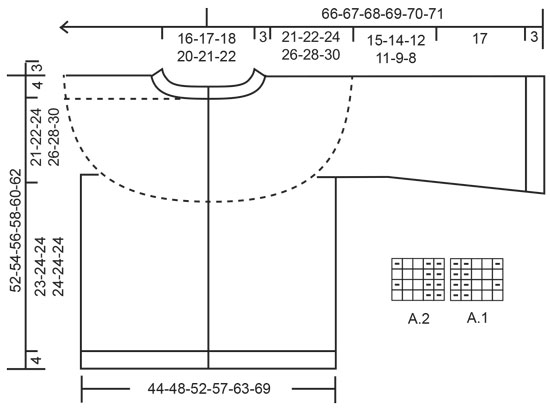
Knitted jacket with round yoke in DROPS Air. The piece is worked top down with lace pattern and trumpet-sleeves. Sizes S - XXXL.
DROPS 212-4 |
||||||||||||||||||||||
|
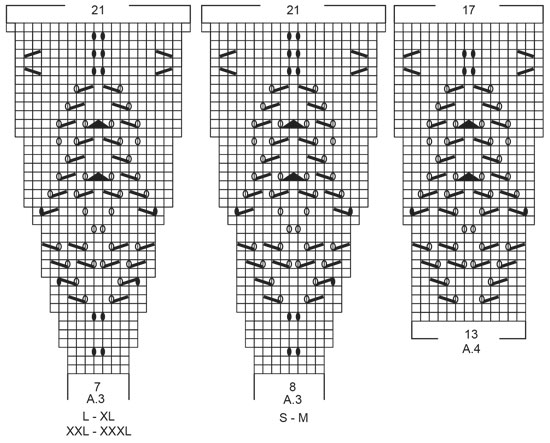
------------------------------------------------------- EXPLANATIONS FOR THE PATTERN: ------------------------------------------------------- PATTERN: See diagrams A.1 to A.4. Choose diagram for your size (applies to A.3). The diagrams show all rows in the pattern seen from the right side. INCREASE TIP (evenly spaced): To work out how to increase evenly, count the total number of stitches on the needle (e.g. 84 stitches) minus bands (e.g. 10 stitches) and divide the remaining stitches by the number of increases to be made (e.g. 6) = 12.3. In this example, increase by making 1 yarn over after approx. each 12th stitch. Do not increase on bands. On the next row work the yarn overs twisted to avoid holes. DECREASE TIP (for sleeves): Decrease 1 stitch on each side of the marker thread as follows: Work until there are 3 stitches left before the marker thread, knit 2 together, knit 2 (marker thread sits between these 2 stitches), slip 1 stitch as if to knit, knit 1 and pass the slipped stitch over the knitted stitch (= 2 stitches decreased). CASTING-OFF TIP: To avoid the cast-off edge being tight you can cast off with a larger size needle. If the edge is still tight, make 1 yarn over after approx. each 4th stitch at the same time as casting off and the yarn overs are cast off as normal stitches. BUTTONHOLES: Work buttonholes on right band (when garment is worn). Work from the right side when there are 4 stitches left on row as follows: Make 1 yarn over, knit 2 together and work the last 2 stitches. On the next row knit the yarn over to leave a hole. The first buttonhole is worked when the neck measures 2½-3 cm. Then work the other 5-5-6-6-6-6 buttonholes with approx. 8½-8½-8-8-8½-9 cm between each one. ------------------------------------------------------- START THE PIECE HERE: ------------------------------------------------------- JACKET – SHORT OVERVIEW OF THE PIECE: The neck and yoke are worked back and forth with circular needle from mid front and top down. The yoke is divided for body and sleeves and the body continued back and forth. The sleeves are worked in the round with short circular needle/double pointed needles, top down. NECK: Cast on 84-88-92-96-100-104 stitches (including 5 band stitches on each side towards mid front) with circular needle size 4.5 mm and Air. Purl 1 row (= wrong side). The next row is worked as follows from the right side: Work A.1 over the first 5 stitches (= band), * knit 2, purl 2 *, work from *-* until there are 7 stitches left on the row, knit 2 and finish with A.2 over the last 5 stitches (= band). Continue this rib for 2½-3 cm – remember the BUTTONHOLES on the right band – read description above. When the rib is finished knit 1 row from the right side where you increase 6-10-2-5-8-11 stitches evenly spaced – read INCREASE TIP = 90-98-94-101-108-115 stitches. Purl 1 row from the wrong side (yarn overs purled twisted and bands worked as before). Change to circular needle size 5.5 mm. Insert 1 marker after the band at the beginning of the row; the yoke will be measured from this marker! YOKE: Now work pattern as follows: Work A.1 over the first 5 stitches, A.3 - choose diagram for your size (= 10-11-12-13-14-15 repeats of 8-8-7-7-7-7 stitches), A.2 over the last 5 stitches. REMEMBER THE KNITTING TENSION! When A.3 has been completed there are 220-241-262-283-304-325 stitches on the needle. The piece measures approx. 20 cm from the marker. Continue in the different sizes as follows: Size S: Knit 1 row from the right side (bands worked as before) where you increase 6 stitches evenly spaced = 226 stitches. Continue working until the piece measures 21 cm from the marker. Then work the next row from the wrong side as described below. Sizes M, L, XL, XXL and XXXL: Work stocking stitch back and forth (bands worked as before). When the piece measures 21-22-23-24-25 cm increase 7-10-9-16-18 stitches evenly spaced = 248-272-292-320-343 stitches. Continue working until the piece measures 22-24-26-28-30 cm from the marker. Then work the next row from the wrong side as described below. All sizes: Now divide the piece for body and sleeves on the next row as follows: Work the first 36-40-42-46-51-56 stitches (= right front piece), place the next 46-50-56-60-64-66 stitches on a thread for the sleeve, cast on 8-8-8-10-10-10 new stitches on the needle (= in side under the sleeve), work the next 62-68-76-80-90-99 stitches (= back piece), place the next 46-50-56-60-64-66 stitches on a thread for the sleeve, cast on 8-8-8-10-10-10 new stitches on the needle (= in side under the sleeve), work the remaining 36-40-42-46-51-56 stitches (= left front piece). Body and sleeves are finished separately. THE PIECE IS NOW MEASURED FROM HERE. BODY: = 150-164-176-192-212-231 stitches. Work stocking stitch back and forth (bands worked as before). When the piece measures 23-24-24-24-24-24 cm from the division, purl 1 row from the wrong side where you increase 18-20-20-20-24-25 stitches evenly spaced (bands worked as before) = 168-184-196-212-236-256 stitches. Change to circular needle size 4.5 mm and work rib as follows: A.1, * knit 2, purl 2 *, work from *-* until there are 7 stitches left, knit 2 and work A.2. Continue this rib for 4 cm. Cast off with knit over knit and purl over purl – read CASTING-OFF TIP. The jacket measures approx. 52-54-56-58-60-62 cm from the shoulder down. SLEEVES: Place the 46-50-56-60-64-66 stitches from the thread on the one side of the piece on short circular needle/double pointed needles size 5.5 mm and knit up 1 stitch in each of the 8-8-8-10-10-10 stitches cast on under the sleeve = 54-58-64-70-74-76 stitches. Insert a marker thread in the middle of the 8-8-8-10-10-10 stitches under the sleeve. Allow the thread to follow your work onwards; it will be used when decreasing under the sleeve. Work stocking stitch in the round. When the sleeve measures 4-4-4-2-2-2 cm from the division begin to decrease under the sleeve – read DECREASE TIP. Decrease like this every 5-5-1½-1-1-1 cm a total of 2-3-6-9-7-5 times = 50-52-52-52-60-66 stitches. When the sleeve measures 15-14-12-11-9-8 cm from the division (shorter measurements in larger sizes due to longer yoke), knit 1 round where you adjust the number of stitches to 52-52-52-52-56-60 stitches (i.e. in size S increase 2 stitches, in sizes M, L, XL the number of stitches remains the same and in sizes XXL and XXXL decrease 4-6 stitches). Now work pattern in the round as follows: * Knit 0-0-0-0-1-2, work A.4 *, work from *-* a total of 4 times on the round. When A.4 has been completed in height 68-68-68-68-72-76 stitches on the needle. Knit 1 round where you increase 4 stitches evenly spaced in all sizes = 72-72-72-72-76-80 stitches. Change to circular needle size 4.5 mm and work rib (= knit 2 / purl 2) for 3 cm. Cast off with knit over knit and purl over purl. The sleeve measures 35-34-32-31-29-28 cm from the division. Work the other sleeve in the same way. ASSEMBLY: Sew buttons onto the left band. |
||||||||||||||||||||||
Diagram explanations |
||||||||||||||||||||||
|
||||||||||||||||||||||
 |
||||||||||||||||||||||
 |
||||||||||||||||||||||
Have you finished this pattern?Tag your pictures with #dropspattern #tulipringjacket or submit them to the #dropsfan gallery. Do you need help with this pattern?You'll find 26 tutorial videos, a Comments/Questions area and more by visiting the pattern on garnstudio.com. © 1982-2026 DROPS Design A/S. We reserve all rights. This document, including all its sub-sections, has copyrights. Read more about what you can do with our patterns at the bottom of each pattern on our site. |
||||||||||||||||||||||


With over 40 years in knitting and crochet design, DROPS Design offers one of the most extensive collections of free patterns on the internet - translated to 17 languages. As of today we count 324 catalogues and 12290 patterns translated into English (UK/cm). 12290
We work hard to bring you the best knitting and crochet have to offer, inspiration and advice as well as great quality yarns at incredible prices! Would you like to use our patterns for other than personal use? You can read what you are allowed to do in the Copyright text at the bottom of all our patterns. Happy crafting!
Post a comment to pattern DROPS 212-4
We would love to hear what you have to say about this pattern!
If you want to leave a question, please make sure you select the correct category in the form below, to speed up the answering process. Required fields are marked *.