
Popular categories
Looking for a yarn?


Comments / Questions (89)
![]() Hege wrote:
Hege wrote:
Str M. Har strikker alle fellingene på den ene armen, men står nå fast. Fortsett videre med glattstrikk til ermet måler 11-11-10-8-7-5 cm fra delingen. Nå strikkes det mønster Delingen, er det fra der armen begynner under ermet, eller mener de fra siste felling på armen? Om det er fra der armen begynner under ermet, så stemmer ikke dette da ermet etter fellingen nå måler 14 cm.
07.03.2023 - 13:12
![]() Susanne wrote:
Susanne wrote:
Jeg vil høre om der er et garn alternativ til denne opskrift som ikke er langhåret/lodden, som man kan bruge som alternativ? tak
04.03.2023 - 15:48DROPS Design answered:
Hej Susanne, jo du kan bruge alle dem som tilhører garngruppe C Garngrupper det er kun Brushed Alpaca Silk og DROPS Air som er langhåret :)
07.03.2023 - 15:49
![]() Emily wrote:
Emily wrote:
I have purchased the Drops Alpaca Brushed Silk. I bought 5 skeins to make a size small but now they have arrived in worried, should I have bought double to hold the yarn doubled? Please could you advise me. Many Thanks
17.02.2023 - 14:40DROPS Design answered:
Dear Emily, in size S you need just 5 balls Brushed Alpaca Silk - and work with only 1 strand of yarn, remember to check your tension: you should have 16 sts x 20 rows in stocking stitch = 10 cm - adjust needle size if required. Happy knitting!
17.02.2023 - 16:15
![]() Mary Roche wrote:
Mary Roche wrote:
Dear expert -I am happy with how this pattern has progressed so far using Drops alpaca/silk. I would however like to adapt the finish to the body so that the edge rolls (rather than rib) e.g. as in the Gotland Drops 150-43 hat finish. Would you have suggestions for this? should I do one row of rib and four - five (or more) rows of stocking stitch and if so would smaller needles be a good idea?? Many thanks Mary
16.08.2022 - 13:05
![]() Iza wrote:
Iza wrote:
Dzień dobry, zakończyłam etap dodawania oczek reglanowych. Ich ilość się zgadza (280 - rozmiar L), ale długość mierzona od karczku to ok. 19 cm. Opis mówi "Dalej przerabiać dżersejem aż długość robótki od markera wynosi 21cm". Czy dobrze rozumiem, że powinnam teraz przerobić tyle okrążeń bez dodawania oczek, aby otrzymać 21cm? Pytanie błahe, ale wolę się upewnić, aby wszystko wyszło jak należy. Serdecznie pozdrawiam!
26.06.2022 - 21:14DROPS Design answered:
Witaj Izo, masz rację. Miłej pracy!
27.06.2022 - 21:17
![]() Anne Synøve Andersen wrote:
Anne Synøve Andersen wrote:
Hei! Strikker et av ermene nå. I medium. Skal ha 64 masker når jeg jobber med A2. Etterhvert uti A2 merker jeg at jeg har 62 masker. Skjønner ikke hva som skjer. Det skjer igjen og igjen. Hva gjør jeg eventuelt feil? Jeg har rekt opp og prøvd på nytt mange ganger og prøver å følge med hele tiden så det blir rett, men går alltid fra 64 til 62 masker helt plutselig og vet ikke hvordan det skjer.
17.03.2022 - 16:00DROPS Design answered:
Hei Anne Synøve, I A.2 har du en del felling på hver runde. Du må bare passe på at, i forbindelse med å strikke 2 rett sammen eller ta en maske løs osv, at du også lage 1 kast , enten før eller etter som viste i diagrammet. God fornøyelse!
18.03.2022 - 07:11
![]() Barbara Ferrari wrote:
Barbara Ferrari wrote:
Come faccio a sapere di preciso quanto devo aumentare per una taglia M? Ho seguito il suggerimento che avete chiesto ma mi dà 2.8 e facendo un aumento ogni 2 e 3 maglie me ne avanzano 10. Potreste aiutarmi per favore? Grazie.
14.03.2022 - 15:33DROPS Design answered:
Buonasera Barbara, può distribuire le 10 maglie mancanti sui gruppi di 2 maglie, quindi aumentando in modo più frequente ogni 3 maglie. Buon lavoro!
15.03.2022 - 18:37
![]() Maria Cruz wrote:
Maria Cruz wrote:
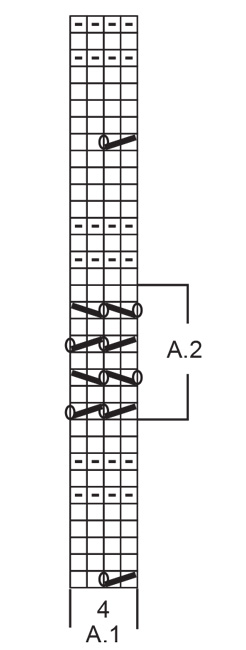
Hello, I’m knitting cloud’s hug size med, the sleeves chart doesn’t have any numbers, I would like to know , how many rows do I have to knit for A1.? And how many rows do I have to knit for A2 ? Please explain , because I’m a little confuse. Thank You😊🤔 I did not see you answer to my question , can you please resent it . Thank You Maria Cruz 19.02.2022 - 05:22
20.02.2022 - 04:52
![]() Maria Cruz wrote:
Maria Cruz wrote:
Hello, I’m knitting cloud’s hug size med, the sleeves chart doesn’t have any numbers, I would like to know , how many rows do I have to knit for A1.? And how many rows do I have to knit for A2 ? Please explain , because I’m a little confuse. Thank You😊🤔
19.02.2022 - 05:22DROPS Design answered:
Dear Mrs Cruz, you start working A.1 when sleeve measures 10 cm from the division (= from where you started sleeve), work A.1 to the eyelets rows "A.2" and repeat A.2 until you have worked 16 cm with this pattern (sleeve measures 30 cm), now finish A.1 (work the last rows in diagram from after A.2). Happy knitting!
21.02.2022 - 09:01
![]() Chloe wrote:
Chloe wrote:
Hello, I used needle size 6 instead of 5.5 because of how my swatch turned out, but now that I blocked my sweater the sleeves are very long, too long. The rest of the sweater did not move though. How can I fix this? Is there a method to shorten the sleeves in the middle? Thank you for your help
09.02.2022 - 23:54DROPS Design answered:
Dear Chloe, always remember to let piece dry flat, whithout hanging. this video shows how to extend a sleeve, this should help you to shorten them. Happy knitting!
10.02.2022 - 09:20
|
||||||||||||||||
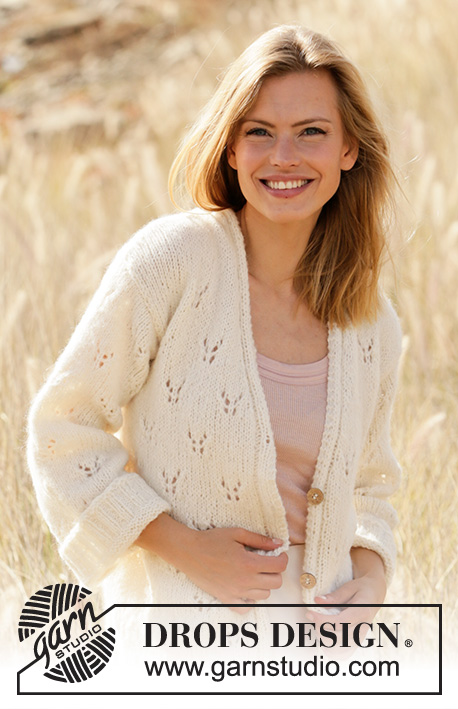
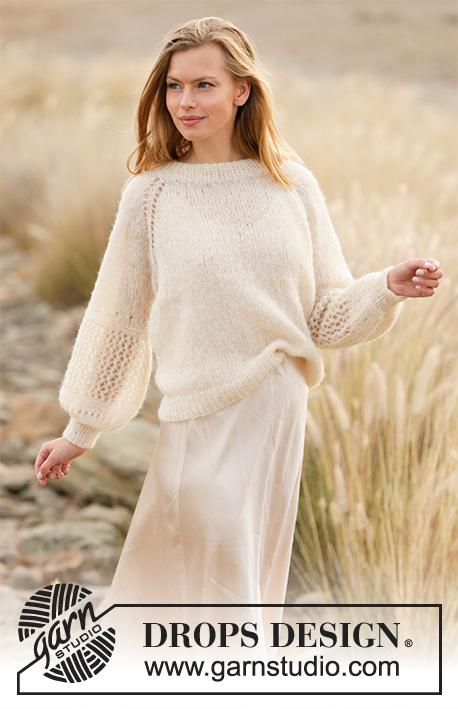
Cloud's Hug#cloudshugsweater |
||||||||||||||||
 |
 |
|||||||||||||||
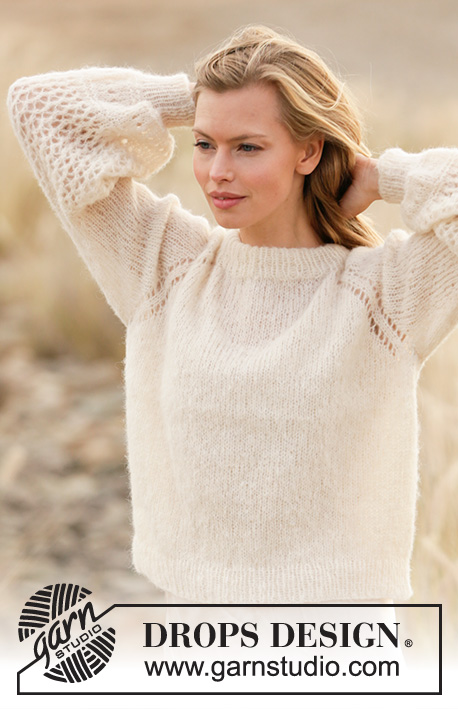
Knitted jumper with raglan in DROPS Brushed Alpaca Silk. Piece is knitted top down with lace pattern and balloon sleeves. Size XS – XXL.
DROPS 212-13 |
||||||||||||||||
|
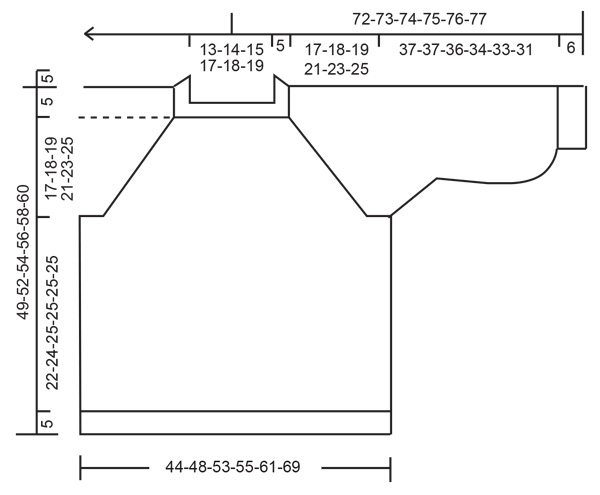
---------------------------------------------------------- EXPLANATION FOR THE PATTERN: ---------------------------------------------------------- PATTERN: See diagrams A.1 and A.2. INCREASE/DECREASE TIP (evenly): To calculate how to increase/decrease evenly, use the total number of stitches on row (e.g. 74 stitches) , and divide stitches by number of increases/decreases to be done (e.g. 22) = 3.3. In this example increase by making 1 yarn over after alternately approx. every 3rd and 4th stitch. On next round knit yarn overs twisted to avoid holes. If decreasing knit in this example alternately approx. every 2nd and 3rd stitch and every 3rd and 4th stitch together. RAGLAN: Increase 1 stitch on each side of marker thread in every transition between sleeves and body as follows: Work until 1 stitch remains before marker thread, make 1 yarn over, knit 2 (marker thread is between these stitches), make 1 yarn over. Repeat at the remaining marker threads (= 8 stitches increased on round). On next round knit the yarn overs to make holes. Then work the new stitches in stocking stitch. DECREASE TIP (applies to sleeves): Decrease 1 stitch on each side of marker thread as follows: Work until 3 stitches remain before marker thread and knit 2 together, knit 2 (marker thread is between these stitches), slip 1 stitch knitwise, knit 1, pass slipped stitch over stitch worked. CAST-OFF TIP: To avoid a tight cast-off edge you may use a larger needle. If this also is too tight, make 1 yarn over after approx. every 4th stitch and cast off these as regular stitches. ---------------------------------------------------------- START THE PIECE HERE: ---------------------------------------------------------- JUMPER - SHORT OVERVIEW OF THE PIECE: Work neck edge and yoke in the round on circular needle from mid back, top down. Now divide yoke for body and sleeves. Body is worked in the round on circular needle, top down. Work sleeves in the round on double pointed needles/short circular needle, top down. NECK EDGE: Loosely cast on 74-76-80-84-88-92 stitches on circular needle size 5.5 mm with Brushed Alpaca Silk. Knit 1 round. Switch to circular needle size 4 mm. Work rib (= knit 1/purl 1) in the round until piece measures 10 cm. Knit 1 round while increasing 22-24-28-28-32-44 stitches evenly - read INCREASE/DECREASE TIP = 96-100-108-112-120-136 stitches. Switch to circular needle size 5.5 mm. Insert 1 marker at the beginning of round (= approx. mid back), measure yoke from this marker! YOKE: Now insert 4 marker threads in the piece as follows. Insert a marker thread after 16-17-19-19-21-25 stitches (= in transition between back piece and right sleeve), skip the next 16-16-16-18-18-18 stitches, insert a marker thread here (= in transition between right sleeve and front piece), skip the next 32-34-38-38-42-50 stitches, insert a marker thread here (= in transition between front piece and left sleeve), skip the next 16-16-16-18-18-18 stitches, insert a marker thread here (= in transition between left sleeve and back piece), 16-17-19-19-21-25 stitches remain on round after last marker thread. REMEMBER THE KNITTING TENSION! Work in stocking stitch in the round, AT THE SAME TIME on first round begin increase for RAGLAN – read explanation above. Increase like this every other round 16-18-19-21-23-25 times in total = 224-244-260-280-304-336 stitches. Then continue in stocking stitch until piece measures 17-18-19-21-23-25 cm from marker. Now divide piece for body and sleeves. Work next round as follows: Work 32-35-38-40-44-50 stitches (= half back piece), slip the next 48-52-54-60-64-68 stitches on a stitch holder for sleeve, cast on 6-6-8-8-10-10 new stitches on needle (= in the side under sleeve), work the next 64-70-76-80-88-100 stitches (= front piece), slip the next 48-52-54-60-64-68 stitches on a stitch holder for sleeve, cast on 6-6-8-8-10-10 new stitches on needle (= in the side under sleeve), work the last 32-35-38-40-44-50 stitches (= half back piece). Then finish body and sleeves separately. NOW MEASURE THE PIECE FROM HERE! BODY: = 140-152-168-176-196-220 stitches. Work in stocking stitch in the round. When piece measures 22-24-25-25-25-25 cm, increase 10-12-12-12-14-16 stitches evenly = 150-164-180-188-210-236 stitches. Switch to circular needle size 4 mm. Work rib (knit 1/purl 1) in the round for 5 cm. Cast off with knit over knit and purl over purl - read CAST-OFF TIP. Jumper measures approx. 49-52-54-56-58-60 cm from shoulder and down. SLEEVES: Slip the 48-52-54-60-64-68 stitches from stitch holder in one side of piece back on a short circular needle/double pointed needles size 5.5 mm , and pick in addition up 1 stitch in each of the 6-6-8-8-10-10 new stitches under sleeve = 54-58-62-68-74-78 stitches. Insert a marker thread in the middle of the new stitches under the sleeve. Move the marker thread upwards when working. Use marker later when decreasing under sleeve. Work the different sizes as follows: Size XS, S and M: Work in stocking stitch in the round. When piece measures 2 cm, decrease 1 stitch on each side of marker thread - read DECREASE TIP. Decrease like this every 4th-4th-2nd round 5-5-7 times in total = 44-48-48 stitches. Size L, XL and XXL: Work in stocking stitch in the round. On 2nd round begin decrease under sleeve - read DECREASE TIP. Decrease like this on every round 4-5-7 times in total, then on every other round 4-4-2 times in total = 52-56-60 stitches. All sizes: Continue in stocking stitch until sleeve measures 11-11-10-8-7-5 cm from division. Now work pattern A.1 in the round on round (= 11-12-12-13-14-15 repetitions of 4 stitches). On 7th round increase 16-16-16-16-12-12 stitches evenly = 60-64-64-68-68-72 stitches. When you have worked up to A.2 in diagram, repeat A.2 vertically until 16 cm have been worked with A.2 in all sizes (sleeve measures approx. 31-31-30-28-27-25 cm and approx. 6 cm remain with pattern + 6 cm rib on sleeve). Then work the remaining rounds in diagram. Knit 1 round while decreasing 11-13-13-13-13-14 stitches evenly = 49-51-51-55-55-58 stitches. Knit 1 round while decreasing 17-17-15-15-13-14 stitches evenly = 32-34-36-40-42-44 stitches. Switch to double pointed needles size 4 mm. Work rib (knit 1/purl 1) in the round for 6 cm. Cast off with knit over knit and purl over purl - read CAST-OFF TIP. Work the other sleeve the same way. ASSEMBLY: Fold down neck edge on wrong side to that it is double and fasten it with small stitches - make sure avoid a tight seam! |
||||||||||||||||
Diagram explanations |
||||||||||||||||
|
||||||||||||||||
 |
||||||||||||||||
 |
||||||||||||||||
Have you finished this pattern?Tag your pictures with #dropspattern #cloudshugsweater or submit them to the #dropsfan gallery. Do you need help with this pattern?You'll find 26 tutorial videos, a Comments/Questions area and more by visiting the pattern on garnstudio.com. © 1982-2026 DROPS Design A/S. We reserve all rights. This document, including all its sub-sections, has copyrights. Read more about what you can do with our patterns at the bottom of each pattern on our site. |
||||||||||||||||


With over 40 years in knitting and crochet design, DROPS Design offers one of the most extensive collections of free patterns on the internet - translated to 17 languages. As of today we count 324 catalogues and 12290 patterns translated into English (UK/cm). 12290
We work hard to bring you the best knitting and crochet have to offer, inspiration and advice as well as great quality yarns at incredible prices! Would you like to use our patterns for other than personal use? You can read what you are allowed to do in the Copyright text at the bottom of all our patterns. Happy crafting!
Post a comment to pattern DROPS 212-13
We would love to hear what you have to say about this pattern!
If you want to leave a question, please make sure you select the correct category in the form below, to speed up the answering process. Required fields are marked *.