
Popular categories
Looking for a yarn?


Comments / Questions (25)
![]() Jazzy wrote:
Jazzy wrote:
Can you knit this sweater for men as well? Which size would correspond to men's size L?
07.01.2025 - 16:41DROPS Design answered:
Dear Jazzy, this point of the FAQ might help you adapting a pattern for a men - read more about sizes here. Happy knitting!
07.01.2025 - 17:16
![]() Manon wrote:
Manon wrote:
Bonjour, du coup si je tricote les 9 mailles en attente comme avant, il faut que je regarde bien avec le 1er tour que ça ne me gêne pas car lors de ce dernier on tricoté plus 2 mailles ensemble mais seulement une.
05.08.2023 - 13:07DROPS Design answered:
Bonjour Manon, lorsque vous aviez mis les mailles en attente, vous deviez avoir aussi vos mailles glissées avec des jetés et les mailles sans jeté, tricotez le 1er tour comme indiqué sous le col en veillant à bien tricoter les mailles en attente (1 jeté, glissez 1 m à l'env, tricotez ensemble à l'endroit le jeté et la maille glissée). Dans cette vidéo, nous montrons comment tricoter des côtes anglaises en rond, peut-être que cette vidéo pourra vous aider. Bon tricot!
07.08.2023 - 09:41
![]() Manon wrote:
Manon wrote:
Bonjour, j'ai encore une question sur l'encolure. Au niveau des 9 mailles en attente comment faire les cotes anglaises ? Par quoi faut-il commencer ? Merci
31.07.2023 - 18:18DROPS Design answered:
Bonjour Manon, ces 9 mailles en côtes anglaises doivent être tricotées comme avant, autrement dit, tout dépend de comment vous devez tricoter la première de ces 9 mailles, calculez comment commencer le 1er tour pour que les côtes anglaises continuent sans transition. Bon tricot!
01.08.2023 - 08:59
![]() Manon wrote:
Manon wrote:
Au niveau de l'encolure/col, le premier tour commence avant ou après les 9 mailles du devant ? Merci
30.07.2023 - 15:29DROPS Design answered:
Bonjour Manon, commencez à relever les mailles du col soit au milieu dos, soit au niveau de l'une des deux épaules. Bon tricot!
31.07.2023 - 11:27
![]() Manon wrote:
Manon wrote:
Bonjour, Combien de mailles faut-il relever au niveau du col pour une taille S ? Merci
30.07.2023 - 15:18DROPS Design answered:
Bonjour Manon, vous relevez environ 27 mailles autour de l'encolure et tricotez les 9 mailles du devant en attente = vous devez avoir environ 36 mailles (ajustez en fonction de votre tension si besoin, mais gardez bien un nombre pair de mailles). Bon tricot!
31.07.2023 - 11:26
![]() Tascha Andersen wrote:
Tascha Andersen wrote:
Hej.. Hvor slår jeg om 1 gang i omgang 1 ?? Før de ni masker på tråden eller efter ????? Hilsen Tascha
04.04.2022 - 19:15DROPS Design answered:
Hej Tascha, du kan gøre det at du starter med de 9 masker foran "som du kender" og så fortsætter du patenten hele vejen rundt som du har gjort igennem hele blusen.
05.04.2022 - 08:22
![]() Tascha Andersen wrote:
Tascha Andersen wrote:
Hej.. Kan ikke få patenten til at passe i halsen efter udtagning af masker. Har nu reduceret maskeantallet til 27 m (str S) som i skrev + de 9 = 36 men ved omgang 3 går det galt igen .. Starter jeg forkert eller ?? Hvor skal der startes ? Efter eller før de ni masker på tråden , altså hvor slår jeg om og tar løst af 1 gang i omgang 1 ?? Hilsen Tascha
15.03.2022 - 13:17DROPS Design answered:
Hej Tascha, Hvis du har taget ud/ind over de midterste masker i halsen, vil patenten ikke gå op som på billedet. Enten tager du ikke ud over de midterste masker eller så laver du en synlig overgang, så patenten i halsen bliver uafhængig af forstykket. God fornøjelse!
30.03.2022 - 14:23
![]() Tascha Andersen wrote:
Tascha Andersen wrote:
Jeg kan simpelthen ikke få patentmønsteret til at passe når jeg har taget de 36 masker ud som jeg skal bruge til min str S oppe i halsen. Det passer fint hen over de 9 masker fra tråden foran som er lagt oven i de 36 som så gir 45 men efter de 9 masker går det heeelt galt 😩 Hvad gør jeg forkert ? Har prøvet at starte FØR de 9 masker og EFTER. Hvor starter jeg patenten henne på min rundpind ? Hilsen Tascha
08.03.2022 - 11:06DROPS Design answered:
Hei Tascha. Det skal strikkes opp 36 masker inkludert de 9 maskene fra tråden (ikke + de 9 maskene fra tråden). Så når du har strikkes de 9 maskene fra tråden har du 27 masker det skal strikkes opp, 9+27=36 masker rundt halsen. mvh DROPS Design
14.03.2022 - 10:17
![]() Helle Madum wrote:
Helle Madum wrote:
Jeg kan ikke få maskeantallet til at passe efter 1 række helt i starten af opskriften... Hvordan gør jeg, har læst det tyske svar, I har givet samme spørgsmål... Hvordan skal rækken strikkes, så der bliver taget ind fra 76 masker til 55 masker... Har aldrig før har svært ved jeres opskrifter.
03.02.2022 - 22:52DROPS Design answered:
Hei Mette. Strikker du str. XXL eller XXXL? Om du strikker str. XXL legger du opp 76 masker og feller 25 masker på 1. pinne skal du ha 51 masker, mens i str. XXXL legger du opp 82 masker og feller 27 masker = 55 masker. Husk når du strikker 1. pinne på Helpatent skal ikke kastet til patentmasken (masken du løfter løst av pinnen som om den skulle strikkes vrang) telles som en egen maske (kastet tilhører patentmasken). mvh DROPS Design
07.02.2022 - 11:59
![]() Nina Visang wrote:
Nina Visang wrote:
Ich verstehe die Anleitung für den Kragen leider nicht. Wo beginnt der Kragen? An der Seite der 11 stillgelegten Machen? Ich habe riesige Löcher bei den neu aufgenommenen Maschen und das Muster passt irgendwie nicht. Auch das Stricken mit der Rundnadel geht überhaupt nicht. Das muss doch mit einem Nadelspiel gemacht werden.Das sieht total blöd aus!
14.10.2021 - 17:53DROPS Design answered:
Liebe Frau Visang, Sie können bei einer Schulter oder hinten in der Mitte von Halsausschnitt/Rückenteil anfangen, Maschenanzahl passen Sie so an, daß das Muster wie zuvor über die mittleren 11 Maschen gestrickt wird. Um Löcher zu vermeiden, können Sie ein Extra Faden zwischen 2 Maschen auffasssen und diese Faden verschränkt mit der nächsten Maschen stricken. Mit der 80 Nadel können Sie Magic Loop stricken. Viel Spaß beim stricken!
15.10.2021 - 07:37
|
|
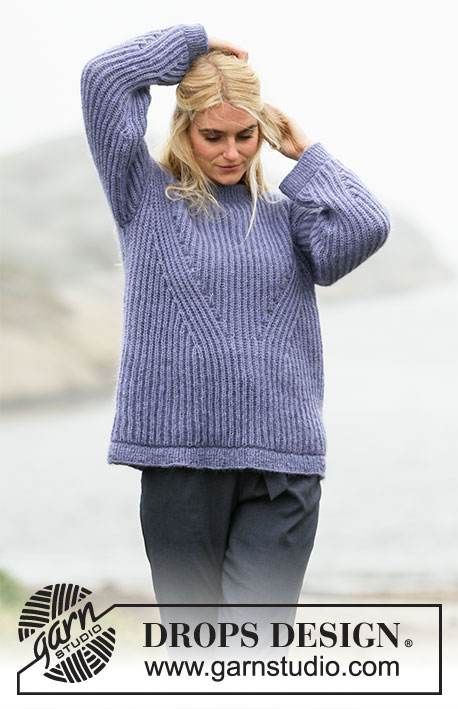
Moraine#morainesweater |
|
|
|
|
Knitted jumper in DROPS Snow. Piece is knitted with English rib and high collar. Size: S - XXXL
DROPS 205-29 |
|
|
---------------------------------------------------------- EXPLANATION FOR THE PATTERN: ---------------------------------------------------------- GARTER STITCH (back and forth): Knit all rows. 1 ridge vertically = knit 2 rows. ENGLISH RIB (back and forth): ROW 1 (= right side): 1 stitch in garter stitch, * knit 2 together, make 1 yarn over, slip 1 stitch purlwise *, work from *-* until 3 stitches remain, knit 2 together, work 1 stitch in garter stitch. ROW 2 (= wrong side): 1 stitch in garter stitch, * make 1 yarn over, slip 1 stitch purlwise, knit yarn over and slipped stitch together *, work from *-* until 2 stitches remain, finish with 1 yarn over, slip 1 stitch purlwise, 1 stitch in garter stitch. ROW 3 (= right side): 1 stitch in garter stitch, * knit yarn over and slipped stitch together, make 1 yarn over, slip 1 stitch purlwise *, work from *-* until 1 yarn over and 2 stitches remain, knit yarn over and slipped stitch together and 1 stitch in garter stitch. Repeat rows 2 and 3. INCREASE TIP (applies to sleeves): All increases are done on 3rd row in the pattern (= from right side). Increase alternately in each side of sleeve. I.e. in stitch after edge stitch on beginning of row and in stitch before edge stitch at the end of row. Work 3 stitches in stitch and yarn over as follows: Knit yarn over and stitch together but wait to slip stitch and yarn over off the needle, make 1 yarn over on right needle, knit stitch and yarn over together 1 more time = 3 stitches (= 2 stitches increased). Then work the new stitches in English rib pattern but on first row (from wrong side) there are no English rib stitch between the increased stitches. Therefore work stitch to be worked together with yarn over without yarn over. ---------------------------------------------------------- START THE PIECE HERE: ---------------------------------------------------------- JUMPER - SHORT OVERVIEW OF THE PIECE: Work jumper back and forth in several parts and sew together when finished. Work collar in the round on circular needle. BACK PIECE: Cast on 55-61-64-70-76-82 stitches (including 1 edge stitch in garter stitch in each side) on circular needle size 12 mm with Snow. Work in ENGLISH RIB - read explanation above. When first row has been worked, 18-20-21-23-25-27 stitches have been decreased = 37-41-43-47-51-55 stitches on row. Then continue with 2nd and 3rd row in English rib. REMEMBER THE KNITTING TENSION! When piece measures 40-41-43-43-44-45 cm, insert a marker thread in each side (marks armhole). Continue until piece measures 58-60-62-64-66-68 cm, adjust so that next row is worked from wrong side. Work the first 14-16-16-18-20-22 stitches (= shoulder), cast off the next 9-9-11-11-11-11 stitches but to avoid a tight cast-off edge cast off yarn overs as stitches, work the remaining 14-16-16-18-20-22 stitches (= shoulder). Then finish each shoulder separately. Work English rib as before but now work 2 stitches in garter stitch towards the neck. Continue like this until piece measures 60-62-64-66-68-70 cm. Cast off. To avoid a tight cast-off edge cast off yarn overs as stitches. Work the other shoulder the same way. FRONT PIECE: Cast on 55-61-64-70-76-82 stitches (including 1 edge stitch in garter stitch in each side) on circular needle size 12 mm with Snow. Work English rib the same way as on back piece. When first row has been worked, 18-20-21-23-25-27 stitches have been decreased = 37-41-43-47-51-55 stitches on row. Then continue with 2nd and 3rd row in English rib. When piece measures 40-41-43-43-44-45 cm, insert a marker thread in each side (marks armhole). Continue until piece measures 54-56-58-60-62-64 cm, adjust so that next row is worked from wrong side. Work the first 14-16-16-18-20-22 stitches (= shoulder), work the next 9-9-11-11-11-11 stitches before slipping them on a stitch holder for neck and work the remaining 14-16-16-18-20-22 stitches(= shoulder). Then finish each shoulder separately. Work English rib as before but now work 2 stitches in garter stitch towards the neck. Continue like this until piece measures 60-62-64-66-68-70 cm. Cast off. To avoid a tight cast-off edge cast off yarn overs as stitches. Work the other shoulder the same way. SLEEVES: Cast on 40-40-40-43-43-46 stitches (including 1 edge stitch in garter stitch in each side) on circular needle size 12 mm with Snow. Work English rib. When first row has been worked, 13-13-13-14-14-15 stitches have been decreased = 27-27-27-29-29-31 stitches. Then continue with 2nd and 3rd row in English rib. When piece measures 9 cm, adjust so that next row is worked from right side, increase 2 stitches in first stitch after edge stitch in garter stitch at the beginning of row (seen from right side) - read INCREASE TIP = 29-29-29-31-31-33 stitches. Continue in the different sizes as explained below. Size S: Increase in size S is now done. Continue from All sizes below. Size M, L, XL, XXL and XXXL: Continue increase on every other side of piece approx. every 15.-15.-15.-13.-13 cm 2-2-2-3-3 times (= 4-4-4-6-6 stitches increased in total) = 31-31-33-35-37 stitches on needle. All sizes: Continue with English rib until sleeve measures 48-46-46-44-42-40 cm. Cast off. To avoid a tight cast-off edge cast off yarn overs as stitches. Work another sleeve the same way. ASSEMBLY: Sew shoulder seams inside cast-off edge. Sew sleeves in body between the 2 marker threads inserted in the sides for armholes. Sew inside 1 edge stitch in garter stitch on body and inside cast-off edge on sleeves. Sew seam under sleeves and then down the side seam. NECK: Work collar in the round on circular needle. Pick up 36-44 stitches from right side around the neck (including the 9-9-11-11-11-11 stitches from stitch holder) on circular needle size 12 mm. Work English rib in the round, adjust so that English rib pattern fits over the 9-9-11-11-11-11 stitches put on stitch holder for neck: ROUND 1: * Make 1 yarn over, slip 1 stitch purlwise, knit 1 (over the 9-9-11-11-11-11 stitches from stitch holder knit yarn over and slipped stitch together) *, repeat from *-* the rest of round. ROUND 2: * Purl together yarn over and slipped stitch, 1 yarn over, slip 1 stitch purlwise *, repeat from *-* the rest of round. ROUND 3: * Make 1 yarn over, slip 1 stitch purlwise, knit together yarn over and slipped stitch *, repeat from *-* the rest of round. Repeat row 2 and 3 until piece measures approx. 16 cm. Cast off. To avoid a tight cast-off edge cast off yarn overs as stitches (cast off yarn overs by purling and stitches by knitting). Cut and fasten the yarn. |
|
 |
|
Have you finished this pattern?Tag your pictures with #dropspattern #morainesweater or submit them to the #dropsfan gallery. Do you need help with this pattern?You'll find 15 tutorial videos, a Comments/Questions area and more by visiting the pattern on garnstudio.com. © 1982-2026 DROPS Design A/S. We reserve all rights. This document, including all its sub-sections, has copyrights. Read more about what you can do with our patterns at the bottom of each pattern on our site. |


With over 40 years in knitting and crochet design, DROPS Design offers one of the most extensive collections of free patterns on the internet - translated to 17 languages. As of today we count 324 catalogues and 12290 patterns translated into English (UK/cm). 12290
We work hard to bring you the best knitting and crochet have to offer, inspiration and advice as well as great quality yarns at incredible prices! Would you like to use our patterns for other than personal use? You can read what you are allowed to do in the Copyright text at the bottom of all our patterns. Happy crafting!
Post a comment to pattern DROPS 205-29
We would love to hear what you have to say about this pattern!
If you want to leave a question, please make sure you select the correct category in the form below, to speed up the answering process. Required fields are marked *.