
Popular categories
Looking for a yarn?


Comments / Questions (166)
![]() Laurence wrote:
Laurence wrote:
Bonjour je souhaite avoir des explications sur les manches, pourquoi ne les tricote t on pas avec les aiguilles circulaires, de plus je ne comprends pas comment et quand on fait des augmentations, que signifient 3 1/5 , 3 , 2 1/5, 2 etc merci d avance
01.04.2020 - 15:57
![]() Anne wrote:
Anne wrote:
Hei! Jeg har problemer med å forstå hvordan man skal strikke A1 til V-hals. Sånn jeg forstår det skal det strikkes fire rette, og så skal det settes fire masker på en flettepinne, men jeg finner ingen forklaring på hva man skal gjøre med disse videre? Det står også noe om at «når A1 er ferdig i høyden», men igjen forklaring på når man faktisk er ferdig i høyden. Setter pris på litt hjelp, på forhånd tusen takk.
31.03.2020 - 23:43DROPS Design answered:
Hei Anne, Du skal begynne med å sette 4 masker på flettepinnen og la flettepinnen ligger på forsida av arbeidet. Deretter strikker du 4 masker fra venstre pinnen og så de 4 maskene fra flettepinnen. Da har maskene krysset hverandre og du får en flette. Du er ferdig med A.1 i høyden når du har strikket de 2 radene i diagrammet. God fornøyelse!
02.04.2020 - 08:44
![]() Morane wrote:
Morane wrote:
Bonjour, Je suis au niveau de p'empiecement/raglan, j'ai glisser mes manches correctement, par contre je suis confuse au niveau des reduction pour le raglan: Les diminutions se font sur l'endroit. Vu que je tricote en circulaire, faut-il que je diminue tous les 2 tours ?
26.03.2020 - 16:11DROPS Design answered:
Bonjour Morane, les diminutions du raglan se font d'abord tous les 4 tours puis tous les 2 tours/ rangs, donc au début vous tricotez 1 tour de diminutions/3 tours sans diminuer puis vous tricotez 1 tour ou 1 rang de diminutions ( = sur l'endroit)/1 tour ou 1 rang sans diminuer. Bon tricot!
26.03.2020 - 16:34
![]() Christel Verhaert wrote:
Christel Verhaert wrote:
Beste, bedankt voor uw snelle respons. Het enige probleem is dat uw tekst niet helemaal in het antwoord van 25 maart staat. Kan u het me nogmaals doorsturen? Bedankt!
25.03.2020 - 12:06
![]() Cornelia wrote:
Cornelia wrote:
Liebe Leute, es hat sich geklärt. Aber erst nach mehreren Versuchen. Vielleicht könnte man die Anleitung für die Halsblende zu Beginn erklärend ergänzen mit einem Satz wie: die Halsblende wird von zwei Seiten gearbeitet. Es wird jeweils lediglich über die ersten vier Maschen der V-Ausschnittblende in zügigen Abnahmen nach hinten bis zur Mitte gearbeitet. Ansonsten: toller Pulli! Ich mach mir gleich noch einen! ;)
25.03.2020 - 00:26
![]() Cornelia wrote:
Cornelia wrote:
Liebe Leute, ich verstehe wie Laura nicht, wo ich wie mit der Halsblende beginne. Hinten in der Mitte oder vorne dem V-Asuschnitt entlang? Man arbeitet das Abnehmen jeweils über vier Maschen auf der Nadel. Aber wo beginnt das Ganze? Was wird wo stillgelegt? Ihr seht ich steh vollkommen im Schilf. Hab schon drei Versuche gestartet ohne Erfolg. Vielen Dank für eure Hilfe.
24.03.2020 - 23:18DROPS Design answered:
Liebe Cornelia, die Halsblende beginnt wenn alle Abnahmen für Raglan/Halsausschnitt fertig sind (= die Arbeit misst ca 54 bis 64 cm bis zum Schulter), und jetzt stricken Sie die 4 ersten Maschen (Hinreihe) mit 1 der übrigen Maschen bei jeder Hinreihe zusammen, bis alle Maschen bis zur Markierung (hinten in der Mitte) gestrickt sind. Dann stricken Sie die 2. Hälfte und stricken die 4 Maschen zusammen mit der übrigen nächsten Masche bei alle Rückreihen. Viel Spaß beim stricken!
25.03.2020 - 09:56
![]() Laura wrote:
Laura wrote:
Buongiorno, mi scusi ma non mi è ancora chiaro. le 4 maglie in sospeso sono le 4 maglie del collo dietro? Se può riscrivermi gli ultimi passaggi in altro modo, la ringrazio.
23.03.2020 - 13:36DROPS Design answered:
Buongiorno Laura. Le 4 m che mette in attesa sono le ultime maglie sul ferro, quelle che corrispondono al lato sinistro dello scollo. Lavora poi iniziando dalle 3 maglie sul lato destro e lavorando gli 8 ferri come indicati, arriva al centro sul dietro dello scollo. Ripete poi dall’altra parte, lavorando così la parte sinistra dello scollo. Dovrà poi fare una piccola cucitura al centro, sul dietro dello scollo. Buon lavoro!
24.03.2020 - 08:49
![]() Christel Verhaert wrote:
Christel Verhaert wrote:
Kan deze trui met gewone naalden gebreid worden ipv rondbreinaald? Hebt u hiervoor een patroon of wat meer uitleg? Alvast bedankt!
22.03.2020 - 20:49DROPS Design answered:
Dag Christel,
Om een patroon aan te passen om met rechte naalden te breien hebben we een instructie geschreven. Deze kun je vinden.
25.03.2020 - 11:12
![]() Laura wrote:
Laura wrote:
Buonasera, mi scusi non è chiaro la fine del lavoro. Il bordo: mettere il segno a metà lavoro dietro--> cioè serve per lavorare prima un lato sinistro e poi l'altro? Ma non è possibile partire da sinistra e fare sullo stesso giro la diminuzione prima a sinistra e poi a destra, giro di rovescio, giro diminuzione bordo 3 diritti, 2ins... lavorazione diritti, 2 accav, 3 diritti, giro rovescio, ecc?? grazie
19.03.2020 - 18:47DROPS Design answered:
Buongiorno Laura. Si lavora prima un lato e poi l'altro. Si tratta di unire il bordino di 3 maglie alle maglie dello scollo che sono rimaste sui ferri. Buon lavoro!
20.03.2020 - 13:53
![]() Jessica wrote:
Jessica wrote:
Hallo, ich stricke den Pullover in Größe L und mir ist die Raglanabnahme nicht ganz klar. Ich verstehe wie ich jede 4. Runde arbeiten muss (8 Maschen werden abgemascht) aber was soll ich in jeder 2. Runde tun? Würde ich abmaschen wir für jede 4. Runde wären das 240Maschen Auch verstehe ich nicht wie ich im V-Ausschnitt auf 7 Maschen komme, wird rechts und links nicht gleich abgestrickt? Oder sollte ich abwechselnd 3/4 & 4/3 stricken ? Vielen Dank
03.03.2020 - 00:28DROPS Design answered:
Liebe Jessica, in L stricken Sie die 1. Runde mit 8 Raglanabnahmen, dann stricken Sie 3 Runden ohne Abnahmen und bei der nächsten Runde beginnen Sie mit Abnahmen in jeder 2. Runde/Reihe (insgesamt 30 Mal). Sie werden insgesamt 31 Mal 8 Maschen für den Raglan abnehmen. Dann nehmen Sie für den Vaussschnitt: 7 Mal 1 M in jeder 2. Reihe (= 1 Reihe mit Abn., 1 Reihe ohne Abn, und diese 2 R x 6, 1 Reihe mit Abn), und dann 6 Mal in jeder 4. Reihe (= 1 Reihe mit Abn, 3 Reihe ohne Abn x 5, 1 Reihe mit Abn) = 13 M bei jedem Vorderteil abgenommen. Viel Spaß beim stricken!
03.03.2020 - 09:49
|
||||||||||
December Moon#decembermoonsweater |
||||||||||
 |
 |
|||||||||
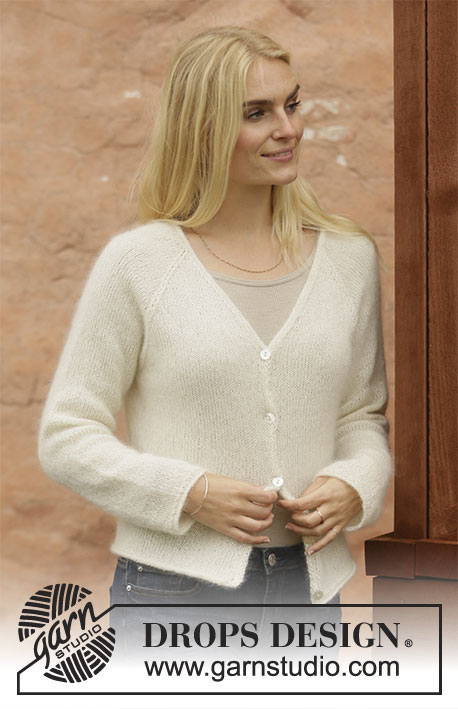
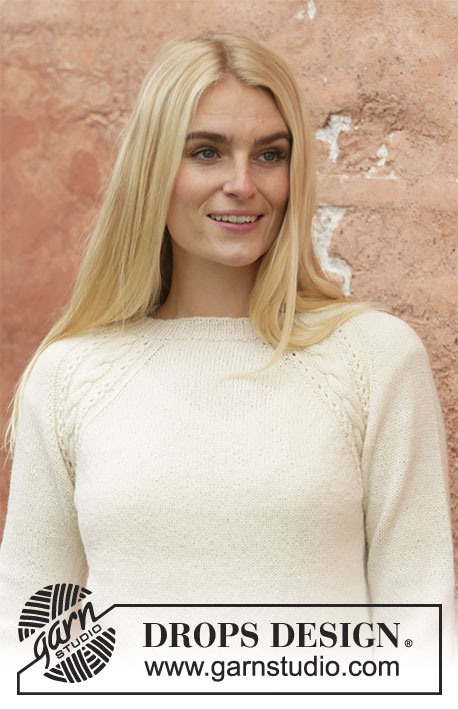
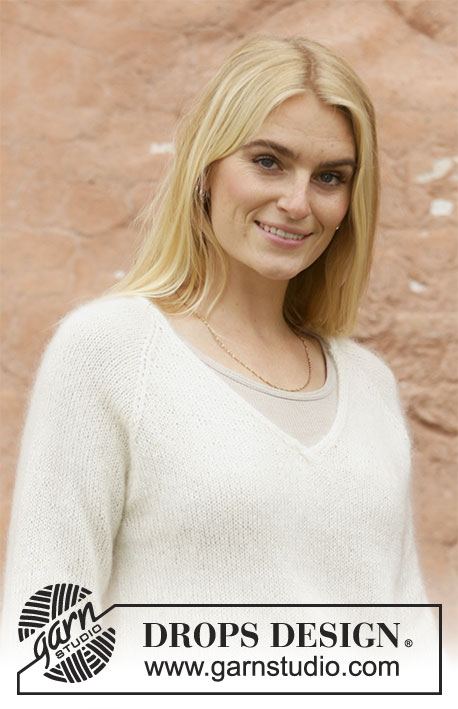
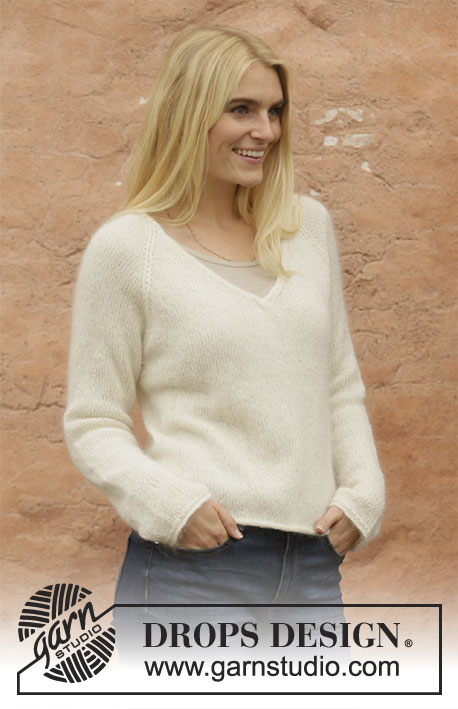
Knitted jumper with raglan and V-neck in DROPS Lace and DROPS Kid-Silk or DROPS Sky. Size: S - XXXL
DROPS 206-12 |
||||||||||
|
---------------------------------------------------------- EXPLANATION FOR THE PATTERN: ---------------------------------------------------------- PATTERN: See diagrams A.1 to A.3. Diagrams show all rows in pattern seen from the right side. INCREASE TIP (applies to sleeves): Work until 2 stitches remain before marker thread, 1 yarn over, knit 4 (marker thread is in the middle of these stitches), 1 yarn over. On next round knit yarn overs twisted to avoid holes. Then work the new stitches in stocking stitch. RAGLAN: All decreases are done from the right side! Decrease 1 stitch on each side of marker thread as follows: Work until 2 stitches remain before marker thread, knit 2 together, marker thread is here, slip 1 stitch knitwise, knit 1, pass slipped stitch over stitch worked. Repeat at each of the remaining marker threads (= 8 stitches decreased). V-NECK: Decrease for V-neck on front piece. All decreases are done from the right side! Decrease as follows after A.2: Slip 1 stitch knitwise, knit 1, pass slipped stitch over (= 1 stitch decreased). Decrease as follows before A.3: Work until 2 stitches remain before A.3, knit the next 2 stitches together (= 1 stitch decreased). ---------------------------------------------------------- START THE PIECE HERE: ---------------------------------------------------------- JUMPER - SHORT OVERVIEW OF THE PIECE: Worked in the round on circular needle up to V-neck, then work back and forth until yoke is done. Finish by working the neck edges. Work sleeves in the round on double pointed needles/a short circular needle. BODY: Cast on 184-200-220-236-260-288 stitches on circular needle size 4.5 mm with 1 strand Lace + 1 strand Kid-Silk (= 2 strands) or 1 strand Sky. Work rolling edge as follows: Knit 1 round. Switch to circular needle size 4 mm and knit 3 rounds. Work next round as follows: * Knit 1, purl 1 *, repeat from *-* the entire round. Now work in stocking stitch in the round. REMEMBER THE KNITTING TENSION! When piece measures 31-31-31-31-30-30 cm, cast off stitches for armholes as in each side as follows: Work the first 42-46-50-54-59-64 stitches on round (= half back piece), cast off the next 8-8-10-10-12-16 stitches for sleeve, work the next 84-92-100-108-118-128 stitches (= front piece), cast off the next 8-8-10-10-12-16 stitches for armhole, work the remaining 42-46-50-54-59-64 stitches. Put piece aside and work the sleeves. SLEEVE: Cast on 50-52-54-56-56-60 stitches on circular needle size 4.5 mm with 1 strand Lace + 1 strand Kid-Silk (= 2 strands) or 1 strand Sky. Work rolling edge as follows: Knit 1 round. Switch to double pointed needles size 4 mm and knit 3 rounds. Work next round as follows: * Knit 1, purl 1 *, repeat from *-* the entire round. Work in stocking stitch in the round. When piece measures 10-10-10-8-9-9 cm, increase 2 stitches under sleeve - read INCREASE TIP! Increase like this every 3½-2½-2-2-1½-1½ cm 10-13-16-17-18-18 times in total = 70-78-86-90-92-96 stitches. When sleeve measures 46-45-44-43-40-39 cm (shorter measurements in the larger sizes because of longer yoke), cast off the middle 8-8-10-10-12-16 stitches under sleeve (= 4-4-5-5-6-8 stitches on each side of marker thread) = 62-70-76-80-80-80 stitches. Put piece aside and knit another sleeve the same way. YOKE: Slip sleeves on to same circular needle as body where armholes were cast off = 292-324-352-376-396-416 stitches. Now insert 4 marker threads in the piece between front piece, back piece and sleeves, but displace marker threads so that there are 1-1-1-2-4-6 stitches in each side of front piece and back piece on each side of sleeves. I.e. there are 82-90-98-104-110-116 stitches for front and back piece, and 64-72-78-84-88-92 stitches for each sleeve. Start round mid back and continue in the round with stocking stitch. AT THE SAME TIME on first round begin decrease for raglan, and when piece measures 6-7-8-9-11-12 cm from where sleeves were slipped onto same circular needle as body, work V-neck on front piece: RAGLAN: Decrease for RAGLAN - read explanation above. Decrease like this every 4th round 2-1-1-1-3-4 times and every other round/row 22-27-30-33-33-34 times (= 24-28-31-34-36-38 times). V-NECK: When yoke measures 6-7-8-9-11-12 cm, work A.1 over the middle 8 stitches on front piece – adjust so that first row in A.1 is worked on a round with decreases (for raglan). When A.1 has been worked vertically, work back to beginning of round mid back. Cut the yarn. Now divide front piece in the middle of A.1, and work back and forth, start from right side, at V-neck on front piece as follows: Work A.2 over the first 4 stitches from division in the middle of front piece, decrease 1 stitch for V-NECK – read explanation above, work stocking stitch (continue decrease for raglan as before) until 6 stitches remain towards division in the middle of front piece in opposite side, decrease 1 stitch – remember V-NECK, work A.3 over the last 4 stitches. Continue back and forth like this, and decrease for V-neck every other row 7-6-7-5-6-6 times and every 4th row 5-6-6-8-8-9 times (= 12-12-13-13-14-15 stitches in total decreased for V-neck in each side). When all decreases for V-neck and raglan are done, there are 76-76-78-78-80-82 stitches on needle. Work next row from right side as follows: Knit the first 3 stitches, purl the next 2 stitches together (= 1 stitch decreased), knit until 5 stitches remain on needle, purl the next 2 stitches together (= 1 stitch decreased), knit the last 3 stitches = 74-74-76-76-78-80 stitches. Work 1 row from wrong side with knit over knit and purl over purl. Jumper measures approx. 54-56-58-60-62-64 cm from shoulder and down. NECK EDGE: Insert a marker thread mid back. Slip the last 4 stitches on needle on a stitch holder, and work back and forth over the first 4 stitches for neck edge, at the same time work neck edge together with the remaining stitch on sleeve and neck line on back piece as follows: Work as follows from right side: ROW 1: Knit the first 3 stitches, knit the next 2 stitches together (= 1 stitch decreased). ROW 2: Turn and purl the 4 stitches. ROW 3: Knit the first 3 stitches, knit the next 3 stitches together (= 2 stitches decreased). ROW 4: Turn and purl the 4 stitches. ROWS 5-8: Work the same way as on 3rd and 4th row. Repeat rows 1-8 until you reach the marker thread mid back in the neck. Cast off the 4 stitches on neck edge. Slip the 4 stitches from stitch holder on 4 mm needles and work from wrong side as follows: ROW 1: Purl the first 3 stitches, purl the next 2 stitches together (= 1 stitch decreased). ROW 2: Turn and knit the 4 stitches. ROW 3: Purl the first 3 stitches, purl the next 3 stitches together (= 2 stitches decreased). ROW 4: Turn and knit the 4 stitches. ROWS 5-8: Work the same way as on 3rd and 4th row. Repeat rows 1-8 until reach the marker thread mid back in the neck. Cast off the 4 stitches on neck edge. Sew cast-off edge together on the 2 neck edges mid back in the neck. Fasten off. |
||||||||||
Diagram explanations |
||||||||||
|
||||||||||
 |
||||||||||
Have you finished this pattern?Tag your pictures with #dropspattern #decembermoonsweater or submit them to the #dropsfan gallery. Do you need help with this pattern?You'll find 31 tutorial videos, a Comments/Questions area and more by visiting the pattern on garnstudio.com. © 1982-2026 DROPS Design A/S. We reserve all rights. This document, including all its sub-sections, has copyrights. Read more about what you can do with our patterns at the bottom of each pattern on our site. |
||||||||||


With over 40 years in knitting and crochet design, DROPS Design offers one of the most extensive collections of free patterns on the internet - translated to 17 languages. As of today we count 324 catalogues and 12290 patterns translated into English (UK/cm). 12290
We work hard to bring you the best knitting and crochet have to offer, inspiration and advice as well as great quality yarns at incredible prices! Would you like to use our patterns for other than personal use? You can read what you are allowed to do in the Copyright text at the bottom of all our patterns. Happy crafting!
Post a comment to pattern DROPS 206-12
We would love to hear what you have to say about this pattern!
If you want to leave a question, please make sure you select the correct category in the form below, to speed up the answering process. Required fields are marked *.