
Popular categories
Looking for a yarn?


Comments / Questions (93)
![]() Birthe Børsting wrote:
Birthe Børsting wrote:
Vil gerne strikke den i xl - skal jeg vælge større strikkepind eller flere masker ( ser ud til det springer med 16 masker pr størrelse
17.06.2019 - 15:20DROPS Design answered:
Hei Birthe. Det blir litt opp til deg om du endrer maskeantallet eller strikkefastheten (ofte endret med pinnestørrelse). Husk at om du endrer strikkefastheten vil dette påvirke alle målene, også de i høyden. Du kan ta utgangapunkt i målene du ønsker at plagget skal ha, og den strikkefatsheten du velger og slik regne deg frem til maskeantallet du må bruke. Feks om du ønsker at toppen skal være 57 cm i overvidde (altså 114 rundt), og strikkefatsheten din er 2,1 maske per cm (som i oppskriften) tar du 114 x 2,1 = 240 masker. God fornøyelse
26.06.2019 - 07:23
![]() Birthe wrote:
Birthe wrote:
Vil gerne strikke den i xl - skal jeg vælge større strikkepind eller flere masker ( ser ud til det springer med 16 masker pr størrelse
17.06.2019 - 14:02
![]() Renatainga wrote:
Renatainga wrote:
Wie ist die Anweisung gemeint, die zugenommenen Maschen im Rumpfteil sollten „fortlaufend im Muster eingestrickt“ werden? Wenn ich innerhalb der 5 rechten Mustermaschen die Seitenmarkierung habe, dann sind das nach der ersten Zunahme dann 7 rechte Maschen. Nach der nächsten Zunahme sind das dann 9 rechte Maschen. Soll jetzt bereits das Perlmuster eingestrickt werden? Wie ist das gemeint? Für eine nähere Erläuterung wären ich sehr dankbar.
14.06.2019 - 22:12DROPS Design answered:
Liebe Renatainga, es wird an jeder den beiden Markierungen zugenommen (= 1 M vor + 1 M nach der Markierung), diese neuen Maschen stricken Sie wie im Muster damit das Muster über Vorder und über Rückenteil immer gleich wird (es wird nicht mehr an den beiden Seiten bzw an den beiden Markierungen anpassen). Viel Spaß beim stricken!
17.06.2019 - 07:06
![]() Helle wrote:
Helle wrote:
Hvad str. rundpind? Vh Helle
05.09.2018 - 12:07DROPS Design answered:
Hei Helle. Bruk rundpinne nr 4, lengde 60 eller 80 cm avhengig av størrelse. Om du ser på målskissen nederst ser du hvor mange cm plagget blir i bredden. Gang dette med 2, så finner du omkretsen på plagget. God fornøyelse.
05.09.2018 - 14:38Marie L wrote:
Hello, I am confused about the bind of for armholes. I placed markers to divide the front and back, and worked the seed stitch before and after the markers. The instructions then say to bind off 3 stitches on each side of marker, so this means to me 3 on the front and 3 back for both left and right side (12 total stitches bound off). Why do the instructions for the front and back then say to bind off again? Thank you. I am enjoying the pattern.
24.07.2017 - 21:13DROPS Design answered:
Dear Marie L, after you have bound off the first sts for armholes, you continue each piece (front and back piece) back and forth separately - and now you will continue decreasing 1 st inside 3 sts in seed st in each side to shape the armholes. Happy knitting!
25.07.2017 - 09:52
![]() Liesbeth wrote:
Liesbeth wrote:
In het begin moet je 2 naalden gestekorrel breien over een even aantal steken maar dan kom je niet uit. Als je breit op een rondbreinaald dan moet het stekenaantal oneven zijn.
12.07.2015 - 20:21
![]() Liesbeth wrote:
Liesbeth wrote:
Hoe kan ik het beste dit patroon vergroten tot maat XL of is het patroon hiervoor niet geschikt?
08.07.2015 - 16:04DROPS Design answered:
Hoi Liesbeth. Noteer de afmetingen die je nodig hebt voor je maat XL, en gebruik dan de stekenverhouding om te berekenen hoeveel steken je nodig hebt
29.07.2015 - 15:05
![]() Liesbeth wrote:
Liesbeth wrote:
Is dit patroon ook te krijgen in een grotere maat dan Large?
07.07.2015 - 23:01DROPS Design answered:
Hoi Liesbeth. Helaas hebben wij geen grotere maat voor deze.
29.07.2015 - 15:04
![]() Marianne Finsen wrote:
Marianne Finsen wrote:
Hejsa, jeg ville gerne prøve mine strikke evner af på denne opskrift - men synes ikke jeg har held med at finde mål på størrelserne? Jeg vil gerne vide hvad hhv str. S, M og L svarer til i brystvidde?
18.07.2013 - 22:51DROPS Design answered:
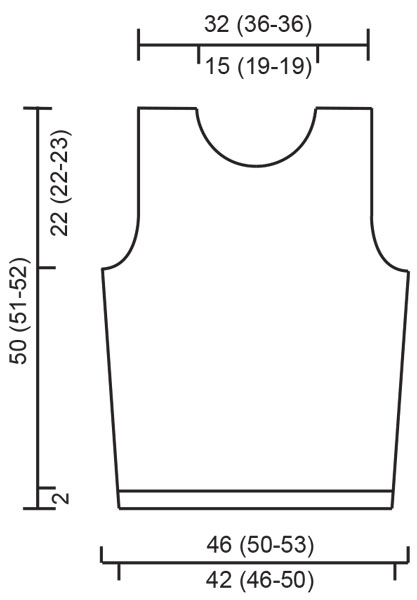
Hej Marianne. Brystvidden staar nederst paa maalskitsen under den totale bredde langs underkanten: 42 (46-50) cm. God fornöjelse.
19.07.2013 - 11:12
![]() DROPS Design NL wrote:
DROPS Design NL wrote:
Hoi. De vertaling is toegevoegd. Bedankt. Gr. Tine
28.02.2011 - 10:43
|
|||||||
Summer Charm |
|||||||
|
|
|||||||
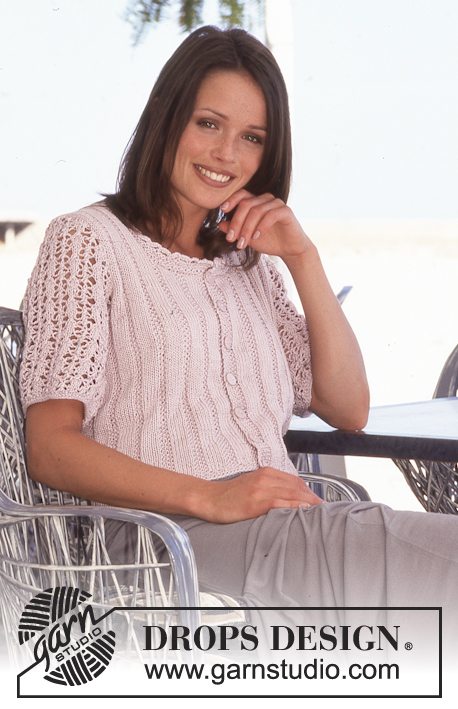
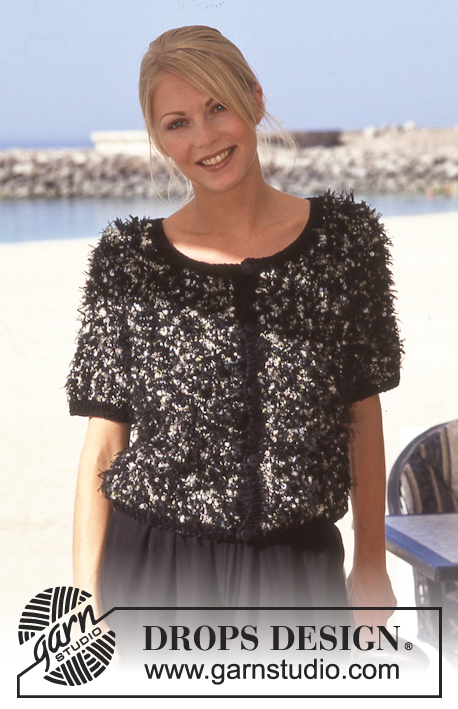
Short DROPS top in Muskat
DROPS 60-13 |
|||||||
|
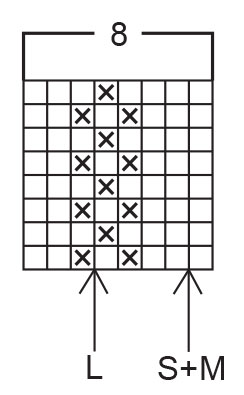
Gauge: 21 sts x 28 rows on needle 4 and stockinette st = 10 x 10 cm. Remember that needle size is only a suggestion! Pattern: See diagram (1 diagram = 1 repeat). Pattern in diagram is seen from the RS. Garter st, when knitting in the round: *Rnd 1, knit. Rnd 2, purl.* Repeat from * - *. Moss stitch: * Row 1: K 1, P 1. Row 2: K over P and P over K. * Repeat row 1 and 2 upwards. Knitting tip! Decrease like this on RS: Before 3 edge sts: K 2 tog. After 3 edge sts: slip 1 st knitwise, K 1, lift the slipped st over. Decrease like this on WS: Before 3 edge sts: P 2 twisted tog. After 3 edge sts: P 2 tog. ---------------------------------------------------------- The body: (bruk bare Body)Cast on 176 (192-208) sts on circular needle size 4 with white and work 2 rows garter st, then 3 rows of moss sts. Insert a marker on each side, front piece = 87 (95-103) sts, back piece = 89 (97-105) sts. Work the pattern upwards - starting at the arrow. Remember the gauge. At the same time after the moss st edge you inc on each side of the marker: 1 st x 4 on each 5.cm = 192 (208-224) sts, front piece = 95 (103-111) sts, back piece = 97 (105-113) sts. Incorporate the inc sts into pattern. When work measures 27 (28-28) cm work 3 rounds of moss sts over 6 (6-7) sts on each side of marker, then cast off 3 (3-4) sts for armhole on each side of markers, now work back and forwards on row – front piece = 89 (97-103) sts, back piece = 91 (99-105) sts. Front piece: = 89 (97-103) sts. Now dec for armhole – see knitting tip above! - inside 3 edge sts (work edge sts in moss st upwards) in each side of every row: 1 st x 5 (5-8), on every 2nd row: 1 st x 4, and on every 4th row: 1 st x 2 = 67 (75-75) m. When work measures 37 (37-37) cm work 3 rows moss st over the mid 15 (23-23) sts, then cast off the mid 9 (17-17) sts for the neck. Then dec towards the neck – see knitting tip above! - inside 3 edge sts (work these sts in moss st upwards) on every row: 1 st x 6, on every 2nd row: 1 st x 2, and on every 4th row: 1 st x 2. Cast off when the work measures 50 (51-52) cm. Back piece: = 91 (99-105) sts. Dec for armhole inside 3 edge sts as in front piece = 69 (77-77) sts. When work measures 47 (48-49) cm work 3 rows moss st over the mid 33 (41-41) sts, then cast off the mid 27 (35-35) sts for neck. Then dec towards the neck - see knitting tip above! - inside 3 edge sts (work these sts in moss st upwards) on every row: 1 st x 2. Cast off when work measures 50 (51-52) cm. Assembly: Sew the shoulder seams. Crochet an edge around the neck from the RS with white and needle 2 like this: Row 1: 1 dc, * 4 ch sts over 2 knitted sts, 1 sl st in 3rd knitted st *, repeat * - *. Row 2: * 4 dc around ch loop, 1 sl st in sl st from previous row *, repeat * - *. |
|||||||
Diagram explanations |
|||||||
|
|||||||
 |
|||||||
 |
|||||||
Have you finished this pattern?Tag your pictures with #dropspattern or submit them to the #dropsfan gallery. Do you need help with this pattern?You'll find 23 tutorial videos, a Comments/Questions area and more by visiting the pattern on garnstudio.com. © 1982-2026 DROPS Design A/S. We reserve all rights. This document, including all its sub-sections, has copyrights. Read more about what you can do with our patterns at the bottom of each pattern on our site. |
|||||||


With over 40 years in knitting and crochet design, DROPS Design offers one of the most extensive collections of free patterns on the internet - translated to 17 languages. As of today we count 324 catalogues and 12239 patterns translated into English (UK/cm). 12239
We work hard to bring you the best knitting and crochet have to offer, inspiration and advice as well as great quality yarns at incredible prices! Would you like to use our patterns for other than personal use? You can read what you are allowed to do in the Copyright text at the bottom of all our patterns. Happy crafting!
Post a comment to pattern DROPS 60-13
We would love to hear what you have to say about this pattern!
If you want to leave a question, please make sure you select the correct category in the form below, to speed up the answering process. Required fields are marked *.