
Popular categories
Looking for a yarn?


Comments / Questions (93)
![]() Ana wrote:
Ana wrote:
Hi, I think I understand the pattern and instructions for DROPS / 60 / 13 . But I have one question. I’m making a size L. Do I start each round as the first round, from the beginning of the chart or should I just keep knitting in the round repeating the chart on and on?
26.06.2021 - 06:26DROPS Design answered:
Dear Ana, for the pattern, start with the first row, then go on according to the diagram. Happy Stitching!
26.06.2021 - 09:15
![]() Eva Angervik wrote:
Eva Angervik wrote:
Vi är några (en person stickar M, den andra L) som har problem med att få mönstret snyggt vid sidorna, dvs mellan fram- och bakstycke. Vi är erfarna stickare och när vi stickat andra modeller har intagningar/ utlägg sett likadant ut på bägge sidor. Mönstret har snyggt anpassats. Detta får vi trots ansträngningar inte till. Vad gör vi för fel?
20.06.2021 - 12:54DROPS Design answered:
Hei Eva. Usikker på hva som blir feil hos dere, men har dere lest Strikketips? Fell slik på retten: Før 3 kantmaskene: 2 rett sammen. Etter 3 kantmasker: 1 maske løs av, strikk 1 rett, løft den løse masken over. Fell slik på vrangen: Før 3 kantmasker: 2 vridd vrang sammen. Etter 3 kantm: 2 vrang sammen. mvh DROPS design
21.06.2021 - 11:52
![]() Anke wrote:
Anke wrote:
Na de gerstekorrel beginnen met meerderen aan de zijkanten maar hoe kan ik dan verder in patroon aan de zijkanten?
22.05.2021 - 16:43DROPS Design answered:
Dag Anke,
Je breit de gemeerderde steken in patroon, volgens de teltekening. Dus als j e na de gerstekorrel meerdert, brei je die steken in tricotsteek. Na 4 keer meerderen heb je 1 patroonherhaling erbij in de breedte.
24.06.2021 - 09:39
![]() Cinzia Quarti wrote:
Cinzia Quarti wrote:
Buongiorno, sto facendo taglia S. Nel primo ferro che si inizia lo schema dopo il punto riso ho aumentato subito accanto al marca punto seguendo sullo schema il punto evidenziato S e ho apportato gli aumenti richiesti ma alla fine del giro con l’ultimo aumento prima del marcapunto finisco con una maglia rovescia e lo schema quindi non mi viene completo continuando con inizio giro con 3 maglie dritte. È giusto che venga così??
10.04.2021 - 12:14DROPS Design answered:
Buongiorno Cinzia, ha iniziato sulla maglia corretta del diagramma? Le ripetizioni successive del diagramma sul gjro sono intere, di 8 maglie. Buon lavoro!
11.04.2021 - 12:03
![]() Annet Voss wrote:
Annet Voss wrote:
Waar moet ik beginnen met het afkanten van de armsgaten, bij de eerste steek van de pen of halverwege (dus bij het volgende armsgat?
03.02.2021 - 13:15DROPS Design answered:
Dag Annet,
Je kunt telkens aan het begin van de naald afkanten voor het armsgat.
06.02.2021 - 11:29
![]() Lorinda wrote:
Lorinda wrote:
So I will work every round this way? Start with the second stitch, complete the round using all eight stitches finish the round with Stitch 1 of the diagram? I guess I would have to in order for the seed stitch to line up, correct?
04.11.2020 - 14:21DROPS Design answered:
Dear Lorinda, yes correct, the first repeat on the round is worked over the last 7 sts, then you repeat the 8 sts and finish with the first stitch in diagram. Happy knitting!
04.11.2020 - 17:02
![]() Lorinda wrote:
Lorinda wrote:
Hello, just need clarification. I am making size S and I begin the chart at the corresponding arrow. Does that mean the chart for me will repeat every 7 stitches instead of 8? Or is that arrow only for the beginning of first round only?
04.11.2020 - 12:42DROPS Design answered:
Dear Lorinda, no you just start with the 2nd stitch in diagram (= first repeat on the round), then work the 7 sts in diagram, now repeat all the 8 sts to the end of the round and finish with the first stitch in diagram just before the end of the round. And continue working diagram like this. Happy knitting!
04.11.2020 - 13:47
![]() Lorinda wrote:
Lorinda wrote:
Hello. Love this design. I have a question on the chart. I am making size S and begin 2 sts into the chart. This works out fine to the end of the front. Does the chart continue as though there is no marker denoting the back, or does the chart start over once going to the back? Do I skip the first 2 chart sts again when working on the back section or just keep going with the chart? The front and back are not aligned. The pattern is shifted and there is a wider area of stockinette once row ends
18.10.2020 - 15:18DROPS Design answered:
Hi Lorinda, You start at the arrow, then continue the complete chart to the end of the round (all stitches). Happy knitting!
19.10.2020 - 07:06
![]() Ribault Martine wrote:
Ribault Martine wrote:
Bonjour, Je suis toujours sans réponse aux dernières observations et questions que je vous ai adressé hier. Comme je l'ai écrit, je n'arrive pas à faire en sorte que les 3m de point de riz soit bien régulières avec l'inclusion des augment à faire au fur et à mesure. Avez vous une solution à proposer ? L'idéal serait de pouvoir disposer d'1 diagramme complet de l'ouvrage avec l'emplacement des augmentations tous les 5 cm. Je reste dans l'attente de votre réponse. Cdlt
28.07.2020 - 12:40DROPS Design answered:
Bonjour Mme Ribault, désolée pour le retard des réponses pour cause de vacances d'été. Les augmentations se tricotent dans le point fantaisie sur les côtés pour que vous ayez toujours le même motif sur le devant et sur le dos, autrement dit 5 mailles jersey espacées de 3 m point de riz, vous devrez donc tricoter les augmentations soit au point de riz, soit en jersey - le motif ne tombera naturellement plus juste au niveau des marqueurs sur les côtés. Rappelez-vous de contacter votre magasin, il sera beaucoup plus simple pour eux de vous aider, même par téléphone. Bon tricot!
29.07.2020 - 11:27
![]() Ribault Martine wrote:
Ribault Martine wrote:
Bonjour, (suite du message précédent) Je suis le point d\'abandonner la réalisation de ce modèle, qui pour moi est irréalisable en l'état avec ces explications, trop sugsinte à mon goût pour la réalisation des augmtat en point fantaisie au fur et à mesure. Avez vous une solution ? Peut être une vidéo avec les augmemt dans du point de riz, si c' est ça la solution, pour que le point fantaisie soit régulier dans ce modèle tricoté en rond ?
27.07.2020 - 16:47DROPS Design answered:
Bonjour Mme Ribault, rappelez-vous que, pour toute assistance et aide personnalisée à la réalisation d'un modèle, vous pouvez vous adresser directement au magasin où vous avez acheté votre laine, même par mail ou téléphone, on saura vous conseiller et vous assister. Bon tricot!
29.07.2020 - 11:12
|
|||||||
Summer Charm |
|||||||
|
|
|||||||
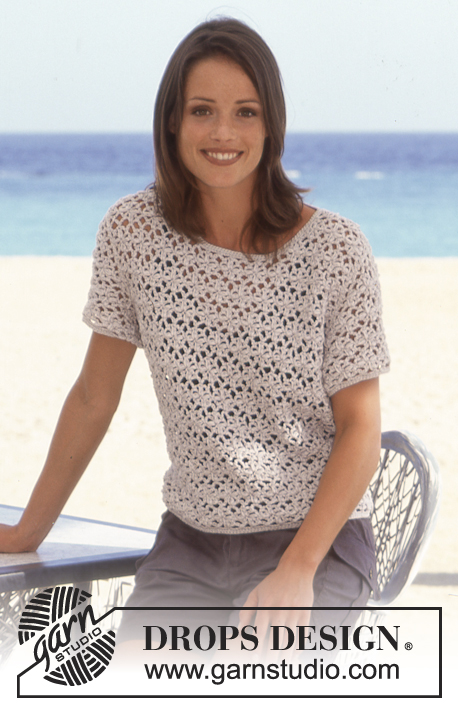
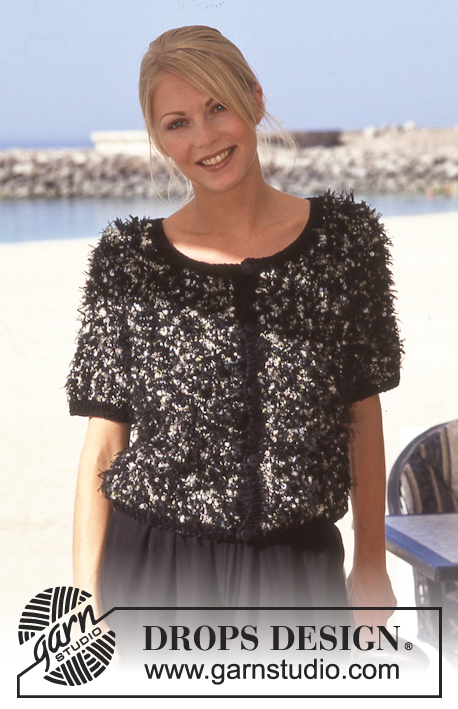
Short DROPS top in Muskat
DROPS 60-13 |
|||||||
|
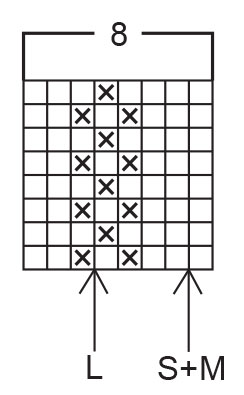
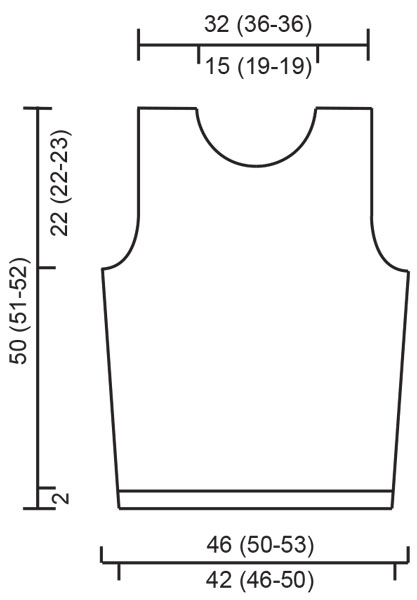
Gauge: 21 sts x 28 rows on needle 4 and stockinette st = 10 x 10 cm. Remember that needle size is only a suggestion! Pattern: See diagram (1 diagram = 1 repeat). Pattern in diagram is seen from the RS. Garter st, when knitting in the round: *Rnd 1, knit. Rnd 2, purl.* Repeat from * - *. Moss stitch: * Row 1: K 1, P 1. Row 2: K over P and P over K. * Repeat row 1 and 2 upwards. Knitting tip! Decrease like this on RS: Before 3 edge sts: K 2 tog. After 3 edge sts: slip 1 st knitwise, K 1, lift the slipped st over. Decrease like this on WS: Before 3 edge sts: P 2 twisted tog. After 3 edge sts: P 2 tog. ---------------------------------------------------------- The body: (bruk bare Body)Cast on 176 (192-208) sts on circular needle size 4 with white and work 2 rows garter st, then 3 rows of moss sts. Insert a marker on each side, front piece = 87 (95-103) sts, back piece = 89 (97-105) sts. Work the pattern upwards - starting at the arrow. Remember the gauge. At the same time after the moss st edge you inc on each side of the marker: 1 st x 4 on each 5.cm = 192 (208-224) sts, front piece = 95 (103-111) sts, back piece = 97 (105-113) sts. Incorporate the inc sts into pattern. When work measures 27 (28-28) cm work 3 rounds of moss sts over 6 (6-7) sts on each side of marker, then cast off 3 (3-4) sts for armhole on each side of markers, now work back and forwards on row – front piece = 89 (97-103) sts, back piece = 91 (99-105) sts. Front piece: = 89 (97-103) sts. Now dec for armhole – see knitting tip above! - inside 3 edge sts (work edge sts in moss st upwards) in each side of every row: 1 st x 5 (5-8), on every 2nd row: 1 st x 4, and on every 4th row: 1 st x 2 = 67 (75-75) m. When work measures 37 (37-37) cm work 3 rows moss st over the mid 15 (23-23) sts, then cast off the mid 9 (17-17) sts for the neck. Then dec towards the neck – see knitting tip above! - inside 3 edge sts (work these sts in moss st upwards) on every row: 1 st x 6, on every 2nd row: 1 st x 2, and on every 4th row: 1 st x 2. Cast off when the work measures 50 (51-52) cm. Back piece: = 91 (99-105) sts. Dec for armhole inside 3 edge sts as in front piece = 69 (77-77) sts. When work measures 47 (48-49) cm work 3 rows moss st over the mid 33 (41-41) sts, then cast off the mid 27 (35-35) sts for neck. Then dec towards the neck - see knitting tip above! - inside 3 edge sts (work these sts in moss st upwards) on every row: 1 st x 2. Cast off when work measures 50 (51-52) cm. Assembly: Sew the shoulder seams. Crochet an edge around the neck from the RS with white and needle 2 like this: Row 1: 1 dc, * 4 ch sts over 2 knitted sts, 1 sl st in 3rd knitted st *, repeat * - *. Row 2: * 4 dc around ch loop, 1 sl st in sl st from previous row *, repeat * - *. |
|||||||
Diagram explanations |
|||||||
|
|||||||
 |
|||||||
 |
|||||||
Have you finished this pattern?Tag your pictures with #dropspattern or submit them to the #dropsfan gallery. Do you need help with this pattern?You'll find 23 tutorial videos, a Comments/Questions area and more by visiting the pattern on garnstudio.com. © 1982-2026 DROPS Design A/S. We reserve all rights. This document, including all its sub-sections, has copyrights. Read more about what you can do with our patterns at the bottom of each pattern on our site. |
|||||||


With over 40 years in knitting and crochet design, DROPS Design offers one of the most extensive collections of free patterns on the internet - translated to 17 languages. As of today we count 324 catalogues and 12239 patterns translated into English (UK/cm). 12239
We work hard to bring you the best knitting and crochet have to offer, inspiration and advice as well as great quality yarns at incredible prices! Would you like to use our patterns for other than personal use? You can read what you are allowed to do in the Copyright text at the bottom of all our patterns. Happy crafting!
Post a comment to pattern DROPS 60-13
We would love to hear what you have to say about this pattern!
If you want to leave a question, please make sure you select the correct category in the form below, to speed up the answering process. Required fields are marked *.