
Popular categories
Looking for a yarn?


Comments / Questions (85)
![]() Eb wrote:
Eb wrote:
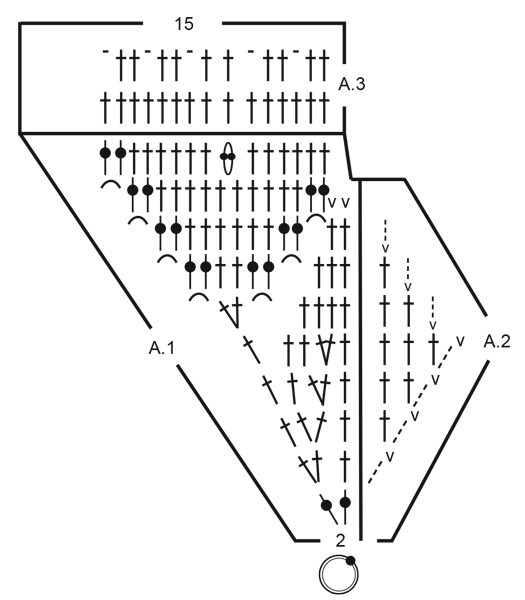
Bonjour Madame, je n'arrive pas à lire et comprendre le diagramme entre A1 et A2, malgré la lecture et la tentative de traduction des differents commentaires. Je ke vois pas comment va se former le dessin...Ai cru comprendre malgré tout qu'il fallait lire A1 puis faire A2 après puis autre tour deA1,A2...je ne sais comment. Merci beaucoup de votre aide!
20.07.2019 - 00:45
![]() Evika wrote:
Evika wrote:
Hi all, for those who's struggled to read the diagram A2, A1 (as I did) - I would say first 5 rows are standard crochet round, that means chain 4 and join to circle, 1. row = 12 double crochet into circle (make 3 chain instead of the first dc and at the end make slip stich to 3rd chain), 2. row = 2 dc into each (24 together), 3. row = 2 dc, 1dc, 4. row = 2,1,1 and 5. row = 2,1,1,1. Chains in A2 are meant only for the first time, the rest 5x you make double crochet instead of it. Hope it help :)
17.07.2019 - 12:12
![]() Cecilia Kirketerp wrote:
Cecilia Kirketerp wrote:
Är lite förvirrad av diagrammet. Hur ska jag virka A2 tillsammans med A1? Ska de tre luftmaskorna räknas som en stolpe (3:e v t.ex. 3 stolpar, 2 tills, 4 stolpar, 2 tillsammans, 3 stolpar osv 6 ggr = 18 sammanlagt?) mvh Cecilia
15.07.2019 - 10:58DROPS Design answered:
Hej Cecilia, bara första stolpen ersätts av 3 lm. Ja du virkar 3 st, 2 st i samma, 4 st, 2 st i samma osv. Lycka till :)
30.09.2019 - 08:43
![]() Stina wrote:
Stina wrote:
Hei! Hva betyr - - - v i A.2? Tre luftmasker også en fastmaske, men en fastmaske i hvor? Har prøvd å følge oppskriften direkte, men ender opp med et hull som følge av luftmaskene. Skjønner ikke helt hvordan det skal gjøres. Er det meningen å snu arbeidet eller bare hekle i sirkler? Takk for svar:)
12.07.2019 - 16:14DROPS Design answered:
Hei Stina. Forklaring til diagram ikonene finner du over diagrammene. En liten strek betyr 1 luftmaske (tre små streker = 3 luftmasker). V = 1 kjedemaske. Les teksten under HEKLEINFORMASJON i oppskriften og du får kanskje en bedre forståelse. Hatten hekles rundt, ovenfra og ned. God Fornøyelse!
26.08.2019 - 10:01
![]() Nina Johansson wrote:
Nina Johansson wrote:
Hej och tusen tack för denna härliga solhatt. Jag har nu ett fint exemplar här. Vill bara dela med mig av info. Använde 3,5 nål och erat bommul/lin garn. Gjorde först mönstret *6 men det blev en mycket liten hatt. Gjorde om o då *7 och nu känns den perfekt. Tips för er med lite större huvud. Mitt mäter 56 cm över kronlinjen.
08.07.2019 - 18:26
![]() Bethine wrote:
Bethine wrote:
Hei! Hva menes med stav om luftmaske/luftmaskebuen? Er det bare en vanlig stav i luftmasken på ringen?
04.07.2019 - 16:49DROPS Design answered:
Hej, ja det er en vanlig stav, men skriver vi om luftmaskebuen så hækler du den rundt om hele masken. Skriver vi i luftmasken så hækler du i lænken i masken. Se også videoen til venstre på siden. Hvordan hekle I og OM masken. Lycka till :)
05.07.2019 - 13:11
![]() Emma wrote:
Emma wrote:
Merci beaucoup, c'est bien ce que j'avais trouvé,comme ce n'est pas commun je pensais m'être trompée.
02.07.2019 - 08:29
![]() Emma wrote:
Emma wrote:
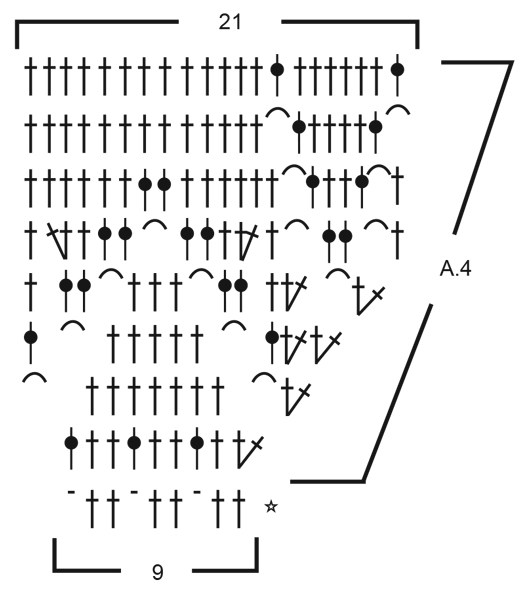
Bonjour, il n'y a aucune indication de mesure, combien de cm le bord du chapeau doit-il faire ? Pour le fil de fer c'est plus pratique de savoir à l'avance. Merci
29.06.2019 - 09:06DROPS Design answered:
Bonjour Emma, la quantité de fil de fer est indiquée - A4 = la bordure = 9 rangs soit environ 8.5 cm et les 210 brides à la fin de A.4 = environ 117 cm - sur la base de l'échantillon indiqué. Bon crochet!
01.07.2019 - 06:48
![]() Evelyn Cornelissen wrote:
Evelyn Cornelissen wrote:
Patroon begint met *a2-a2*, dat moet zijn *a1-a2*. In oorspronkelijke patroon staat het ook zo
28.06.2019 - 16:26
![]() Anna Sterz wrote:
Anna Sterz wrote:
In der deutschen Anleitung fehlt das Diagramm
24.06.2019 - 23:10
|
||||||||||||||||||||||||||||
Always Bright#alwaysbrighthat |
||||||||||||||||||||||||||||
 |
 |
|||||||||||||||||||||||||||
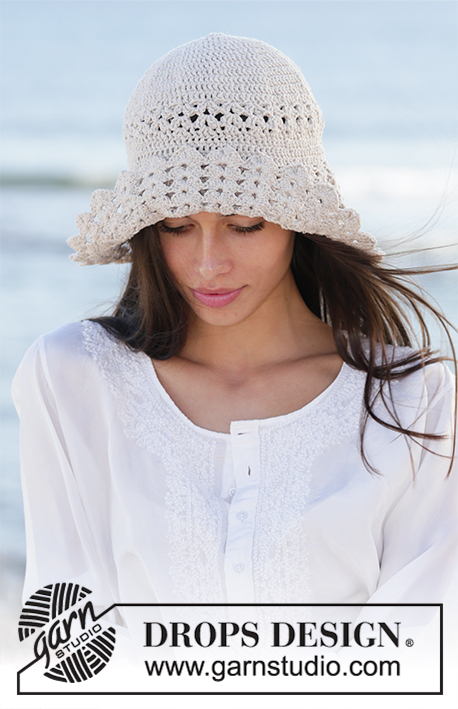
Crocheted hat in DROPS Bomull-Lin or DROPS Paris. Piece is crocheted top down with treble crochets and lace pattern.
DROPS 199-14 |
||||||||||||||||||||||||||||
|
---------------------------------------------------------- EXPLANATION FOR THE PATTERN: ---------------------------------------------------------- PATTERN: See diagrams A.1 to A.4. CROCHET INFORMATION: Replace first treble crochet on round with 3 chain stitches. Finish round with 1 slip stitch in third chain stitch from beginning of round. (When A.2 is repeated, work the 3 chain stitches as 1 treble crochet). DECREASE TIP: Decrease 1 treble crochet by working the next 2 treble crochets together as follows: Work 1 treble crochet but wait with last pull through (= 2 loops on hook), then work next treble but now pull last yarn over through all 3 loops on hook. INCREASE TIP: Increase 1 treble crochet by working 2 treble crochets in same treble crochet. ---------------------------------------------------------- START THE PIECE HERE: ---------------------------------------------------------- HAT - SHORT OVERVIEW OF THE PIECE: Work in the round top down. HAT: Work 4 chain stitches on hook size 3.5 mm with Bomull-Lin or Paris and form a ring with 1 slip stitch in first chain stitch. Read CROCHET INFO! Work * A.2, A.1 *, work from *-* 6 times in total in width (there are no stitches in A.2 on first round). REMEMBER THE CROCHET TENSION! When A.1 and A.2 have been worked vertically, there are 90 treble crochets on round. Work 1st round in A.3 and repeat this round until piece measures approx. 16 cm from the top and down. Work last round in A.3 (= eyelet row). Then work brim as explained below: BRIM: Work A.4 in the round (= 10 repetitions of 9 stitches). When A.4 has been worked vertically, there are 210 stitches on round. Place a thin steel wire along the edge of brim. Work 1 double crochet in every treble crochet the entire round while AT THE SAME TIME working around steel wire. This is done to make the hat more stiff along the edge. Adjust the length on wire according to desired measurements on brim. Twine the steel wire ends together and hide them in the stitches. Cut and fasten the yarn. |
||||||||||||||||||||||||||||
Diagram explanations |
||||||||||||||||||||||||||||
|
||||||||||||||||||||||||||||
 |
||||||||||||||||||||||||||||
 |
||||||||||||||||||||||||||||
Have you finished this pattern?Tag your pictures with #dropspattern #alwaysbrighthat or submit them to the #dropsfan gallery. Do you need help with this pattern?You'll find 13 tutorial videos, a Comments/Questions area and more by visiting the pattern on garnstudio.com. © 1982-2026 DROPS Design A/S. We reserve all rights. This document, including all its sub-sections, has copyrights. Read more about what you can do with our patterns at the bottom of each pattern on our site. |
||||||||||||||||||||||||||||


With over 40 years in knitting and crochet design, DROPS Design offers one of the most extensive collections of free patterns on the internet - translated to 17 languages. As of today we count 324 catalogues and 12290 patterns translated into English (UK/cm). 12290
We work hard to bring you the best knitting and crochet have to offer, inspiration and advice as well as great quality yarns at incredible prices! Would you like to use our patterns for other than personal use? You can read what you are allowed to do in the Copyright text at the bottom of all our patterns. Happy crafting!
Post a comment to pattern DROPS 199-14
We would love to hear what you have to say about this pattern!
If you want to leave a question, please make sure you select the correct category in the form below, to speed up the answering process. Required fields are marked *.