
Popular categories
Looking for a yarn?


Comments / Questions (85)
![]() Barbara Stephens wrote:
Barbara Stephens wrote:
Can we get this instructions in english
19.04.2020 - 15:10DROPS Design answered:
Dear Barbara, sure - you can simply choose the language from menu under the main photo. Happy crocheting!
19.04.2020 - 18:18
![]() María José wrote:
María José wrote:
Hola Quisiera saber si hay algún tutorial de cómo se empieza esta labor . He visto alguno de otras labores y si me entero pero este patrón se me complica. Pues soy principiante y no me aclaro que hay que hacer después de cerrar la cadeneta . No me aclaro de cuántos pa hay que hacer dentro y como seguir para incluir el A3 en el A2 Gracias
18.03.2020 - 17:12DROPS Design answered:
Hola Mari José. Tienes varios vídeos bajo el diagrama que te podrían ayudar en la elaboración del patrón. Sobre el empiece: Después de formar un anillo con 4 puntos de cadeneta, trabajar 12 puntos altos dentro del anillo, en la 2ª fila trabajar 2 puntos altos en cada punto alto ( el 1er punto alto se sustituye por 3 puntos de cadeneta) y finalizar la vuelta con 1 punto enano en el 3er punto de cadeneta
18.03.2020 - 18:51
![]() Kerstin wrote:
Kerstin wrote:
Diagrammet är förvirrande. Ska A2 delens 1a maska (3lm) på v3 virkas i samma maska? V6 lm, ska det hoppas över 2 lm eller? Har nu försökt olika alternativ. Inget blir rätt. Bra om antal maskor också finns med.
27.02.2020 - 17:54
![]() Linda Larsen wrote:
Linda Larsen wrote:
Hej Drops - tak for svar. Jeg må lige meddele, at min hæklefasthed skam passer! Men der er fejl i opskriften i begyndelsen af hatten. For at få mønstret til at passe, må der være 60 stm når 5. omgang er hæket færdig. Følger man Jeres mønster, er der kun 40 stm når 5. omg er hæklet færdig. Iøvrigt er jeg ellers vældig glad for Jeres opskrifter!!
12.09.2019 - 15:05
![]() Linda Larsen wrote:
Linda Larsen wrote:
Sommerhat allways bright er nu hæklet færdig, også med ståltråd i kanten. Fremadrettet vil jeg nok foretrække at stive hatten. Men der er fejl i Jeres opskrift i begyndelsen idet a2 og a1 kun kan gentages 4 gange og man ender med en spids puld
09.09.2019 - 12:05DROPS Design answered:
Hej Linda, det lyder til at du ikke har helt samme hæklefasthed som vi bruger i opskriften... da vil du ikke kunne gentage diagrammerne som vi gør. :)
12.09.2019 - 10:33
![]() Linda Larsen wrote:
Linda Larsen wrote:
Thank you to Evika 17/7-2019 , it was a BIG HELP
06.09.2019 - 10:26
![]() Cecilia wrote:
Cecilia wrote:
Jag skrev en fråga tidigare i somras men fick inget svar. Dåligt!
03.09.2019 - 16:44
![]() Anna Riboldi wrote:
Anna Riboldi wrote:
Chiedo scusa, per completare il modello occorre del filo di acciaio, ma non è specificato di quale diametro. Potreste darmi un suggerimento? Grazie in anticipo!
23.08.2019 - 12:27DROPS Design answered:
Buongiorno, purtroppo la grandezza del filo non è un'indicazione fornita, in ogni caso il diametro del filo di acciaio dev'essere sufficiente per sostenere la tesa del cappello. Buon lavoro!
23.08.2019 - 18:42
![]() Jenny Snashall wrote:
Jenny Snashall wrote:
Hello I'm really struggling to understand the chart. Is there any video help I can access? I normally work from a written pattern so this is all new to me. Any help you can give me would be grateful,y received. Thank you
09.08.2019 - 11:01DROPS Design answered:
Dear Mrs Snashall, see here how to read crochet diagrams. Happy crocheting!
09.08.2019 - 12:04
![]() Eb wrote:
Eb wrote:
Bonjour Madame, je n'arrive pas à lire et comprendre le diagramme entre A1 et A2, malgré la lecture et la tentative de traduction des differents commentaires. Je ke vois pas comment va se former le dessin...Ai cru comprendre malgré tout qu'il fallait lire A1 puis faire A2 après puis autre tour deA1,A2...je ne sais comment. Merci beaucoup de votre aide!
20.07.2019 - 00:52DROPS Design answered:
Bonjour Eb, au 1er tour, vous crochetez A.1 (et le répétez en rond), dès le 2ème tour, vous allez commencer par A.2 (= 3 ml au 1er tour de A.2) puis A.1 (= 3 brides), et répétez ainsi A.2, A.1, tout le tour. Continuez ainsi en commençant les tours par A.2, puis crochetez A.1 et répétez A.2, A.1 tout le tour jusqu'à ce que A.2 soit terminé. Il reste alors juste A.1 à répéter en largeur. Bon crochet!
05.08.2019 - 16:26
|
||||||||||||||||||||||||||||
Always Bright#alwaysbrighthat |
||||||||||||||||||||||||||||
 |
 |
|||||||||||||||||||||||||||
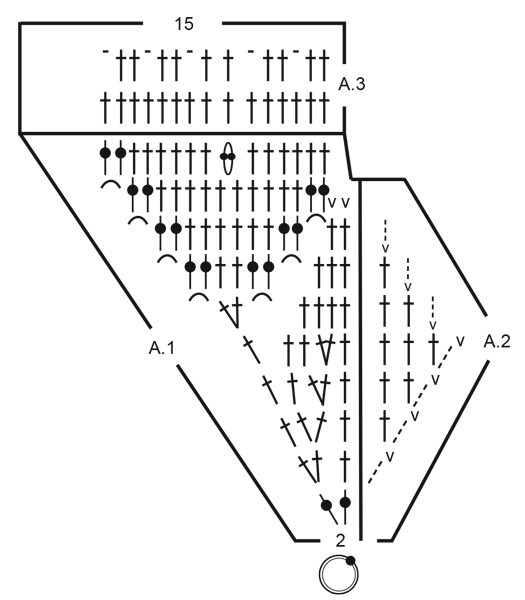
Crocheted hat in DROPS Bomull-Lin or DROPS Paris. Piece is crocheted top down with treble crochets and lace pattern.
DROPS 199-14 |
||||||||||||||||||||||||||||
|
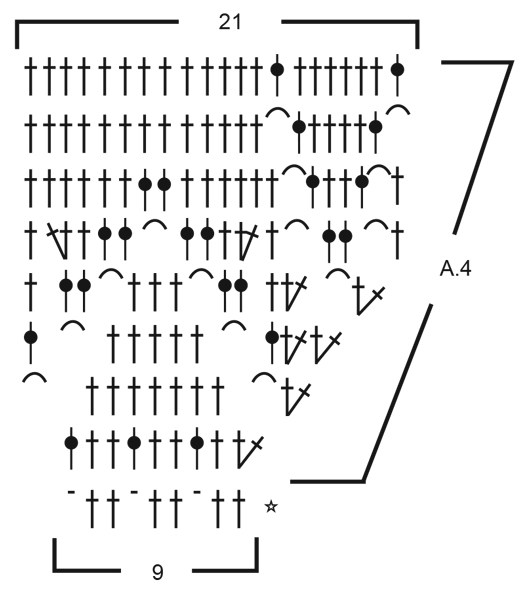
---------------------------------------------------------- EXPLANATION FOR THE PATTERN: ---------------------------------------------------------- PATTERN: See diagrams A.1 to A.4. CROCHET INFORMATION: Replace first treble crochet on round with 3 chain stitches. Finish round with 1 slip stitch in third chain stitch from beginning of round. (When A.2 is repeated, work the 3 chain stitches as 1 treble crochet). DECREASE TIP: Decrease 1 treble crochet by working the next 2 treble crochets together as follows: Work 1 treble crochet but wait with last pull through (= 2 loops on hook), then work next treble but now pull last yarn over through all 3 loops on hook. INCREASE TIP: Increase 1 treble crochet by working 2 treble crochets in same treble crochet. ---------------------------------------------------------- START THE PIECE HERE: ---------------------------------------------------------- HAT - SHORT OVERVIEW OF THE PIECE: Work in the round top down. HAT: Work 4 chain stitches on hook size 3.5 mm with Bomull-Lin or Paris and form a ring with 1 slip stitch in first chain stitch. Read CROCHET INFO! Work * A.2, A.1 *, work from *-* 6 times in total in width (there are no stitches in A.2 on first round). REMEMBER THE CROCHET TENSION! When A.1 and A.2 have been worked vertically, there are 90 treble crochets on round. Work 1st round in A.3 and repeat this round until piece measures approx. 16 cm from the top and down. Work last round in A.3 (= eyelet row). Then work brim as explained below: BRIM: Work A.4 in the round (= 10 repetitions of 9 stitches). When A.4 has been worked vertically, there are 210 stitches on round. Place a thin steel wire along the edge of brim. Work 1 double crochet in every treble crochet the entire round while AT THE SAME TIME working around steel wire. This is done to make the hat more stiff along the edge. Adjust the length on wire according to desired measurements on brim. Twine the steel wire ends together and hide them in the stitches. Cut and fasten the yarn. |
||||||||||||||||||||||||||||
Diagram explanations |
||||||||||||||||||||||||||||
|
||||||||||||||||||||||||||||
 |
||||||||||||||||||||||||||||
 |
||||||||||||||||||||||||||||
Have you finished this pattern?Tag your pictures with #dropspattern #alwaysbrighthat or submit them to the #dropsfan gallery. Do you need help with this pattern?You'll find 13 tutorial videos, a Comments/Questions area and more by visiting the pattern on garnstudio.com. © 1982-2026 DROPS Design A/S. We reserve all rights. This document, including all its sub-sections, has copyrights. Read more about what you can do with our patterns at the bottom of each pattern on our site. |
||||||||||||||||||||||||||||


With over 40 years in knitting and crochet design, DROPS Design offers one of the most extensive collections of free patterns on the internet - translated to 17 languages. As of today we count 324 catalogues and 12290 patterns translated into English (UK/cm). 12290
We work hard to bring you the best knitting and crochet have to offer, inspiration and advice as well as great quality yarns at incredible prices! Would you like to use our patterns for other than personal use? You can read what you are allowed to do in the Copyright text at the bottom of all our patterns. Happy crafting!
Post a comment to pattern DROPS 199-14
We would love to hear what you have to say about this pattern!
If you want to leave a question, please make sure you select the correct category in the form below, to speed up the answering process. Required fields are marked *.