
Popular categories
Looking for a yarn?


Comments / Questions (41)
![]() Noel wrote:
Noel wrote:
Thanks
28.01.2022 - 12:11
![]() Noel wrote:
Noel wrote:
"Place the sleeves on the same circular needle as the body, where you bind off stitches for the armholes (without working the stitches) = (135) 159-183-187-207 (219-247) stitches on needle." I'm having trouble fitting the 40 stitches on the round needle. Should I use thread or something? Any suggestions? Thanks, Noel
28.01.2022 - 01:42DROPS Design answered:
Dear Noel, this video shows how to work the sleeves over the cast off sts for armhole, the first rows might be somewhat tight/tricky, you can get help with another needle for example, after some rows, it would be easier. Happy knitting!
28.01.2022 - 09:22
![]() Elisabeth C wrote:
Elisabeth C wrote:
Bonjour, Le dos et devant est mis en attente à la fin d'un rang endroit. Pour réaliser l'empiècement, on place l'ensemble des mailles (devant, manches et dos) sans les tricoter. Ensuite il est indiqué de tricoter le rang suivant à l'endroit. Mais mon fil est en attente à gauche, le prochain rang devrait être un rang envers. Que faire ? Merci de votre réponse. Elisabeth C
27.01.2022 - 17:45DROPS Design answered:
Bonjour Elisabeth, pour que le point fantaisie continue correctement sur l'empiècement, vous devez reprendre le dos/les devants et les manches ensemble en tricotant le 1er rang sur l'endroit. Bon tricot!
04.02.2022 - 08:36
![]() Elisabeth C wrote:
Elisabeth C wrote:
Bonjour, Lorsque l'on fait les augmentations sous le bras de la manche, le motif A 3A se décale et ne dessine plus un losange régulier. Est-ce normal ou faut-il adapter le motif aux augmentations et comment ? Merci de votre réponse.
23.01.2022 - 13:47DROPS Design answered:
Bonjour Elisabeth, adaptez les augmentations pour que le motif continue en hauteur comme avant. À la fin du tour, tricotez la nouvelle maille comme la suivante du motif/d'un nouveau motif en largeur, en début de tour, tricotez la nouvelle maille comme la maille précédente d'un motif précédent (lisez le diagramme de gauche à droite pour adapter la maille à tricoter). Vous devez toujours avoir 3 mailles endroit entre chaque maille envers et les mailles envers de A.3 doivent toujours être alignées. Bon tricot!
24.01.2022 - 09:45
![]() Cindy Seibel wrote:
Cindy Seibel wrote:
I think there is an error in the pattern. 3rd line in the body should read to last 5 stitches, not last 6 stitches.
31.10.2021 - 01:09
![]() Rosa wrote:
Rosa wrote:
Dovreste dare la possibilità di poter tradurre in italiano i vari commenti e/o domande in modo da poter capire anche noi italiani. Grazie
26.04.2021 - 17:03DROPS Design answered:
Buonasera Rosa, riceviamo tantissimi commenti da tutto il mondo e ci risulterebbe davvero impossibile tradurre tutti i commenti nelle diverse lingue, ma può avvalersi di un traduttore online per la traduzione. Buon lavoro!
27.04.2021 - 20:38
![]() Maja wrote:
Maja wrote:
Är det någon av er som stickat denna koftasom kan svara på fråga angående ärmen? Verkar tyvärr inte få något svar här från Drops Tack på förhand
17.04.2021 - 14:04DROPS Design answered:
Hei Maja. Du har glemt å hake av din henvendelse fra 12.04 som et spørsmål. Du har kun lagt det som en kommentar og kommentarer blir ikke besvart, derfor har du ikke fått svar. Ang. ditt spørsmål, A.2 skal bare strikkes 1 gang. Slik står det: När A.2 är färdigstickat stickas A.3A runt. mvh DROPS design
19.04.2021 - 11:15
![]() Maja wrote:
Maja wrote:
När man stickar ärmarna... Efter 6 varv rätstickning står det att man ska ska sticka A2 men hur många ggr ska man sticka enligt diagrammet , ska de 12 varven ska de stickas flera gånger? Hur många i så fall innan man stickar A3A Tack för snabbt svar!
12.04.2021 - 14:59
![]() Jan Brik Brik Hansen wrote:
Jan Brik Brik Hansen wrote:
Hvordan får man printet opskrifter ud? Hver gang man trykker på opskriften skal man besøge side hvor der købes garn, men opskriften??? Hvor bliver den af???
05.04.2021 - 16:43DROPS Design answered:
Hej, Hvis du klikker på "Skriv Ud" knappen til højre for billedet, får du en rude hvor du i øverste højre hjørne vælger "Skriv opskriften ud" - nu er det bare at vælge de sider du vil skrive ud :)
06.04.2021 - 12:16
![]() Marina Fyhr wrote:
Marina Fyhr wrote:
Vad menas med ”Att man ska sluta 3e eller 7 e varvet? Är det mönstret som ska slutas? Ska det inte finnas A.3A i slutet av armen?
17.11.2020 - 21:04DROPS Design answered:
Hej Marina, det skal være efter 3. eller 8. varv du skall sluta. Nej du stickar bara 1 varv rät enligt mönstret. Lycka till :)
18.11.2020 - 15:38
|
|||||||||||||
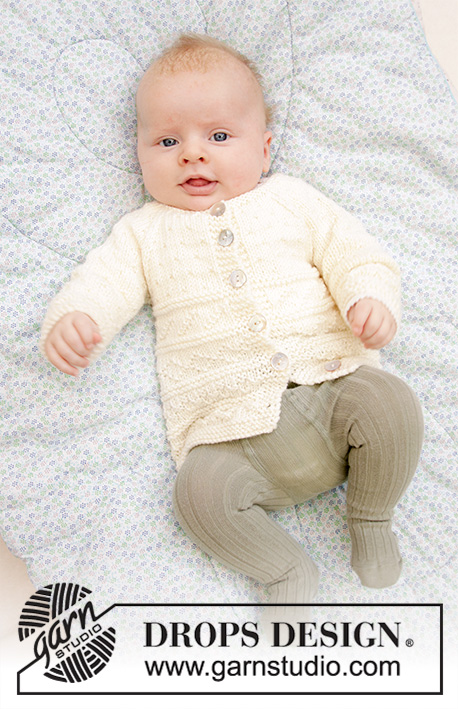
Precious Moments#preciousmomentsjacket |
|||||||||||||
 |
 |
||||||||||||
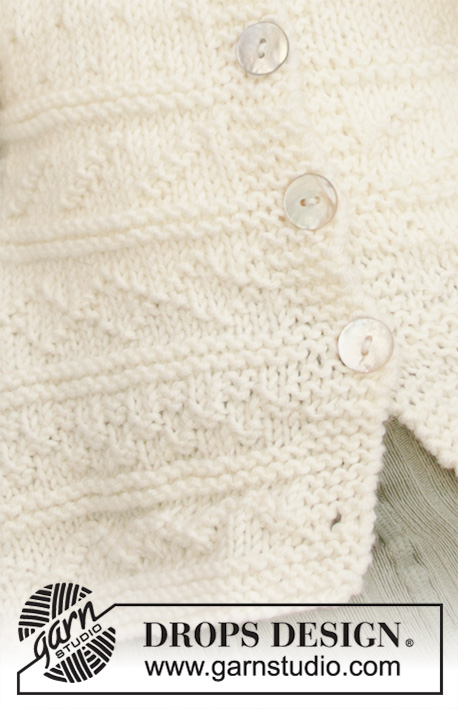
Knitted jacket for babies with raglan in DROPS Merino Extra Fine. The piece is worked bottom up with textured pattern. Sizes premature to 3/4 years.
DROPS Baby 33-11 |
|||||||||||||
|
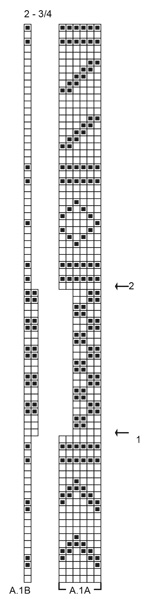
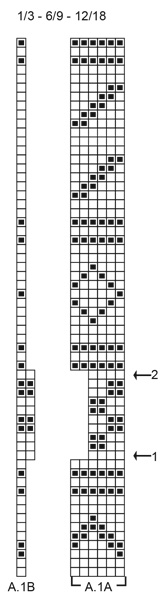
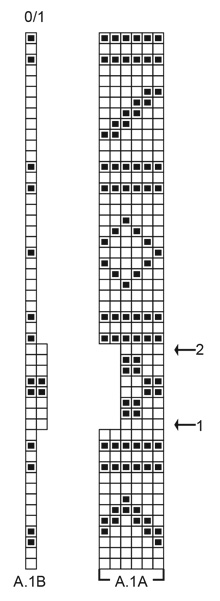
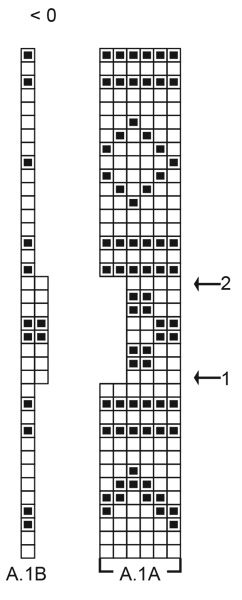
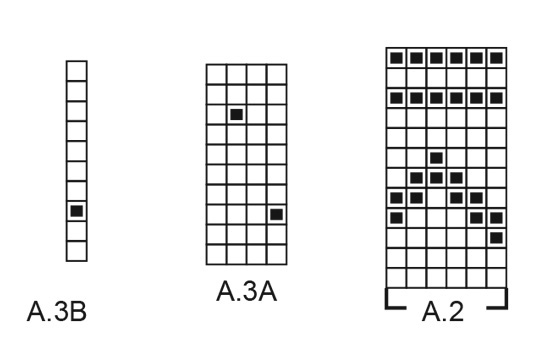
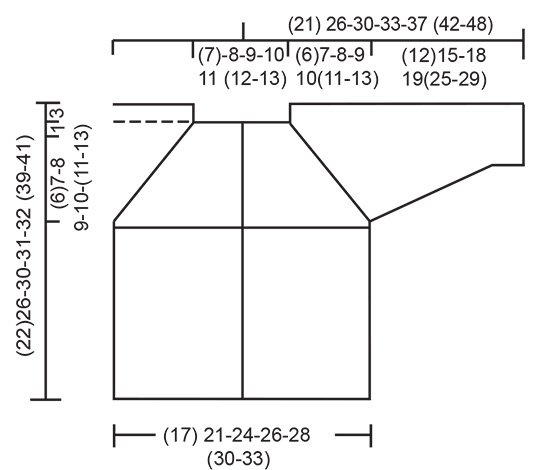
------------------------------------------------------- EXPLANATIONS FOR THE PATTERN: ------------------------------------------------------- RIDGE/GARTER STITCH (worked back and forth): 1 ridge in height = Knit 2 rows. RIDGE/GARTER STITCH (worked in the round): 1 ridge in height = 2 rounds; Knit 1 round and purl 1 round. PATTERN: See diagrams A.1 to A.3. Choose diagram for your size in A.1. The diagrams show all rows in the pattern seen from the right side. INCREASE TIP (for mid under sleeve): Start 1 stitch before the stitch with the marker, make 1 yarn over, work the stitch with the marker, 1 yarn over (= 2 stitches increased). On the next round work the yarn overs twisted to avoid holes. The increased stitches are worked into the pattern as you go. RAGLAN: Decrease to raglan on each side of the 4 markers in each transition between body and sleeves (= 8 stitches decreased on each decrease-row). All decreases are worked from the right side! Start 2 stitches before the marker, knit 2 together, marker, slip 1 stitch as if to knit, knit 1 and pass the slipped stitch over the knitted stitch. INCREASE/DECREASE TIP (evenly spaced): To work out how to increase/decrease evenly, count the total number of stitches on needle (e.g. 50 stitches) and divide by the number of increases/decreases to be made (e.g. 6) = 8.3. In this example, increase by making 1 yarn over after approx. each 8th stitch. On the next row work the yarn overs twisted to avoid holes. When decreasing, knit together approx. each 7th and 8th stitch. BUTTONHOLES: Work buttonholes on right band (when the garment is worn). 1 buttonhole = Start from the right side and knit the 2nd and 3rd stitch from the edge together, then make 1 yarn over. On the next row knit the yarn over to leave a hole. Work buttonholes when the piece measures: (the last buttonhole is worked on the last row before the neck as described in the text). <0 MONTH: 2, 5, 8, 11, 15 and 18 cm 0/1 MONTH: 2, 6, 10, 14, 18 and 22 cm 1/3 MONTHS: 2, 6, 10, 14, 18, 22 and 26 cm 6/9 MONTHS: 2, 6, 10, 14, 18, 22 and 27 cm 12/18 MONTHS: 2, 6, 10, 14, 18, 23 and 28 cm 2 YEARS: 2, 6, 11, 16, 21, 26, 30 and 35 cm 3/4 YEARS: 2, 7, 12, 17, 22, 27, 32 and 37 cm ------------------------------------------------------- START THE PIECE HERE: ------------------------------------------------------- JACKET - SHORT OVERVIEW OF THE PIECE: The body is worked back and forth with circular needle, from mid front and bottom up as far as the armholes. Then the sleeves are worked in the round with double pointed needles. Body and sleeves are joined together and the yoke is continued back and forth to finished length. BODY: Cast on (81) 99-111-117-129 (135-147) stitches with circular needle size 3.5 mm and Merino Extra Fine. Work 3 RIDGES – see description above. Change to circular needle size 4 mm and work the next row as follows, from the right side: 4 band stitches in garter stitch, work A.1A until there are 5 stitches left on the row (= (12) 15-17-18-20 (21-23) repeats of 6 stitches), A.1B (= 1 stitch) and finish with 4 band stitches in garter stitch. See diagram for right size in A.1A and A.1 B. Continue this pattern. REMEMBER THE KNITTING TENSION and BUTTONHOLES on right band – see description above. On the row marked with arrow-1 in A.1A (wrong side) decrease (3) 1-1-3-3 (1-1) stitches evenly spaced - do not decrease over band stitches = (78) 98-110-114-126 (134-146) stitches on needle. The next row is worked as follows from the right side: 4 band stitches in garter stitch, work A.1A until there are 6 stitches left on row (= (17) 22-25-26-29 (31-34) repeats of 4 stitches), A.1B (= 2 stitches) and finish with 4 band stitches in garter stitch. Continue this pattern. On the row marked with arrow-2 in A.1A increase (3) 1-1-3-3 (1-1) stitches evenly spaced = (81) 99-111-117-129 (135-147) stitches on the needle and the pattern is continued as before. When A.1 has been completed the piece measures approx. (12)15-18-18-18 (24-24) cm. Work 1 row from the right side. Then work next row from the wrong side: Knit 4 band stitches in garter stitch, purl (17) 21-24-24-28 (29-32) AT THE SAME TIME increase (0) 0-1-1-1 (0-1) stitch = (21) 25-29-29-33 (33-37) stitches (= front piece), cast off (4) 4-4-6-6 (6-6) stitches for armhole, purl (31) 41-47-49-53 (57-63) stitches, AT THE SAME TIME increase (2) 0-2-0-0 (0-2) stitches evenly spaced = (33) 41-49-49-53 (57-65) stitches (= back piece), cast off (4) 4-4-6-6 (6-6) stitches for armhole and purl (17) 21-24-24-28 (29-32) stitches AT THE SAME TIME increase (0) 0-1-1-1 (0-1) stitch, and finish with 4 band stitches in garter stitch = (21) 25-29-29-33 (33-37) stitches (= front piece). Lay the piece to one side and work the sleeves. SLEEVE: Cast on (30) 30-30-36-36 (36-42) stitches with double pointed needles size 3.5 mm and Merino Extra Fine. Work 3 RIDGES in the round – see description above. Change to double pointed needles size 4 mm and work A.2 in the round (= (5) 5-5-6-6 (6-7) repeats of 6 stitches). When A.2 has been completed work A.3A in the round. AT THE SAME TIME on the first round adjust the number of stitches to (28) 32-32-36-36 (36-40) stitches (there is now room for (7) 8-8-9-9 (9-10) repeats of 4 stitches) – see INCREASE/DECREASE TIP (evenly spaced). Insert 1 marker in the first stitch of the round (= mid under sleeve) and allow the marker to follow your work upwards. When the piece measures 6 cm increase 2 stitches mid under sleeve – see INCREASE TIP. Increase like this every (2½) 3-2½-3-2½ (2-2 ½) cm a total of (3) 3-5-5-7 (9-10) times = (34) 38-42-46-50 (54-60) stitches. Continue working until the piece measures approx. (12) 15-18-19-22 (25-29) cm but stop after round 3 or 8 in A.3A. The next round is worked as follows: Cast off (2) 2-2-3-3 (3-3) stitches for the armhole, knit (30) 34-38-40-44 (48-54) stitches, then cast off the remaining (2) 2-2-3-3-(3-3) stitches for armhole. Cut the strand and work the other sleeve in the same way. YOKE: Place the sleeves on the same circular needle as the body, where you cast off stitches for the armholes (without working the stitches) = (135) 159-183-187-207 (219-247) stitches on needle. The next row is worked as follows from the right side (when A.3 is worked (on both front-/back pieces and sleeves) it is important to continue the diagram from where you finished on the sleeves): Work 4 band stitches in garter stitch, A.3A over the next (16) 20-24-24-28 (28-32) stitches (= (4) 5-6-6-7 (7-8) repeats of 4 stitches), A.3 B (= 1 stitch), insert 1 marker (= front piece), continue A.3A over the next (30) 34-38-40-44 (48-54) stitches, insert 1 marker (= sleeve), work A.3A over the next (32) 40-48-48-52 (56-64) stitches (= (8) 10-12-12-13 (14-16) repeats of 4 stitches), A.3B (= 1 stitch), insert 1 marker (= back piece), continue A.3A over the next (30) 34-38-40-44 (48-54) stitches, insert 1 marker (= sleeve), work A.3A over the next (16) 20-24-24-28 (28-32) stitches, A.3 B and finish with 4 band stitches in garter stitch (= front piece). Continue this pattern back and forth. AT THE SAME TIME on the next row from the right side decrease to RAGLAN – see description above (= 8 stitches decreased). Decrease like this every 2nd row (i.e. each row from the right side) a total of (8) 10-11-12-14 (15-17) times. After the last decrease to raglan there are (71) 79-95-91-95 (99-111) stitches left on the needle. On the next row from the right side decrease (13) 17-29-19-19 (19-27) stitches evenly spaced – read DECREASE TIP, in addition work the last buttonhole on this row = (58) 62-66-72-76 (80-84) stitches on needle. Change to circular needle size 3.5 mm and knit 1 row from the wrong side, knit 1 row from the right side and knit 1 more row from the wrong side. Cast off with knit from the right side. The jacket measures approx. (22) 26-30-31-32 (39-41) cm from the shoulder down. ASSEMBLY: Sew openings under the sleeves. Sew buttons onto left band. |
|||||||||||||
Diagram explanations |
|||||||||||||
|
|||||||||||||
 |
|||||||||||||
 |
|||||||||||||
 |
|||||||||||||
 |
|||||||||||||
 |
|||||||||||||
 |
|||||||||||||
Have you finished this pattern?Tag your pictures with #dropspattern #preciousmomentsjacket or submit them to the #dropsfan gallery. Do you need help with this pattern?You'll find 25 tutorial videos, a Comments/Questions area and more by visiting the pattern on garnstudio.com. © 1982-2026 DROPS Design A/S. We reserve all rights. This document, including all its sub-sections, has copyrights. Read more about what you can do with our patterns at the bottom of each pattern on our site. |
|||||||||||||


With over 40 years in knitting and crochet design, DROPS Design offers one of the most extensive collections of free patterns on the internet - translated to 17 languages. As of today we count 324 catalogues and 12290 patterns translated into English (UK/cm). 12290
We work hard to bring you the best knitting and crochet have to offer, inspiration and advice as well as great quality yarns at incredible prices! Would you like to use our patterns for other than personal use? You can read what you are allowed to do in the Copyright text at the bottom of all our patterns. Happy crafting!
Post a comment to pattern DROPS Baby 33-11
We would love to hear what you have to say about this pattern!
If you want to leave a question, please make sure you select the correct category in the form below, to speed up the answering process. Required fields are marked *.