
Popular categories
Looking for a yarn?


Comments / Questions (41)
![]() Julie wrote:
Julie wrote:
How come I can’t see the diagram anymore?
29.04.2026 - 01:57DROPS Design answered:
Dear Julie, diagrams are back, happ knitting!
29.04.2026 - 09:25
![]() MatthewWowly wrote:
MatthewWowly wrote:
Устранение загрязнений в СПб! Студии, Загородные резиденции, Офисы. Высококлассный обслуживание по приемлемым предложениям. Избавьтесь от хлопот! Оформите заказ очистку прямо сейчас! Заходите Генеральная Уборка Квартир
12.10.2025 - 01:18
![]() Prodache wrote:
Prodache wrote:
Prodache
24.05.2025 - 23:55
![]() Kay Burgess wrote:
Kay Burgess wrote:
Could you please explain how I cast off 3 stitches at beginning of sleeve and 3 stitches at the end on the sleeve while knitting in the round. I seem to have a stitch in the middle of the 6 stitches when I do it the way it is worded.
28.03.2025 - 04:04DROPS Design answered:
Hi Kay, You work to the end of the round and cast off the last 3 stitches, then cut the strand and pull it through the final stitch. The remaining stitches are left on a stitch holder while you work the second sleeve. Happy knitting!
28.03.2025 - 05:34
![]() Francisca Muzard wrote:
Francisca Muzard wrote:
Me encantan sus productos, son muy lindos y con muy buenas explicaciones para poder hacerlas. Muchas gracias por ayudarnos a hacer estas cosas tan bonitas .
29.05.2024 - 17:54
![]() Francisca Muzard wrote:
Francisca Muzard wrote:
Estupendos y muy bonitos los productos que tienen y las lanas excelentes Gracias
03.05.2024 - 05:03
![]() Dorottya wrote:
Dorottya wrote:
Az ujja leírás nem jó, mert nem 38 cm hosszú az ujja, hanem 15...stb.Szerintem a szem számát írták oda.
15.03.2024 - 09:06
![]() Thifaine wrote:
Thifaine wrote:
Bonjour impossible d’avoir la version française je ne vois pas la liste déroulante
04.03.2024 - 21:13DROPS Design answered:
Bonjour Thifaine, le menu déroulant se trouve maintenant juste au-dessus de la partie écrite des explications, autrement dit, si vous avez le modèle en anglais par ex. juste au-dessus de: Pattern instructions. Bon tricot!
05.03.2024 - 09:41
![]() Bernard Berthet wrote:
Bernard Berthet wrote:
BONJOUR Pourriez vous m adresser la version francaise svp merci
14.09.2023 - 10:44DROPS Design answered:
Bonjour Mme Berthet, volontiers, cliquez simplement sur le menu déroulant sous la photo pour sélectionner "français". Bon tricot!
14.09.2023 - 17:10
![]() Vivia wrote:
Vivia wrote:
Der er en fejl i opskriften, hvor man skal stoppe efter 3. eller 8. omgang i A.3A i ermet, før man lukker af i næste omgang. Fordig, hvis jeg nu skal strikke efter A.3A så vil jeg have 5 glat masker i for og bag stykket, eller skal jeg strikke vrangmaskerne på flere omgange end hvad billedet viser. Den korrekte måde er “stop efter 1. eller 6. omgang” og luk af på næste omgang. - Så strikker jeg alle vrangmaskerne i samme pind, og det samsvarer med billedet.
07.07.2023 - 04:50
|
|||||||||||||
Precious Moments#preciousmomentsjacket |
|||||||||||||
 |
 |
||||||||||||
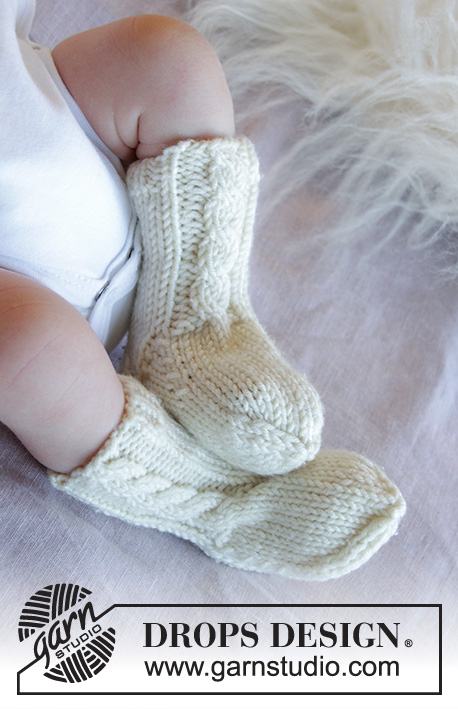
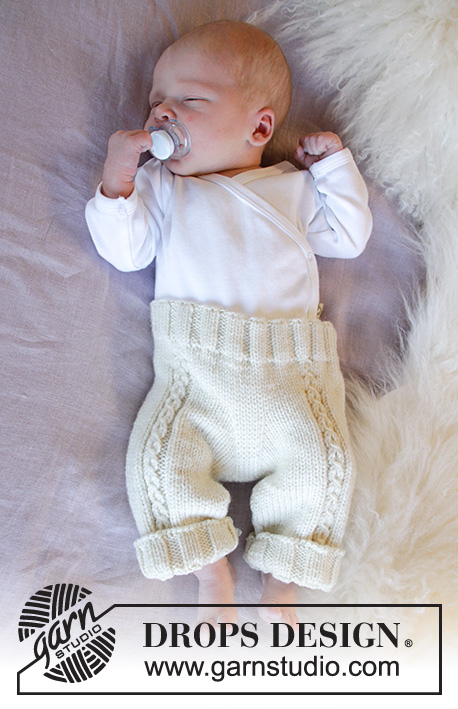
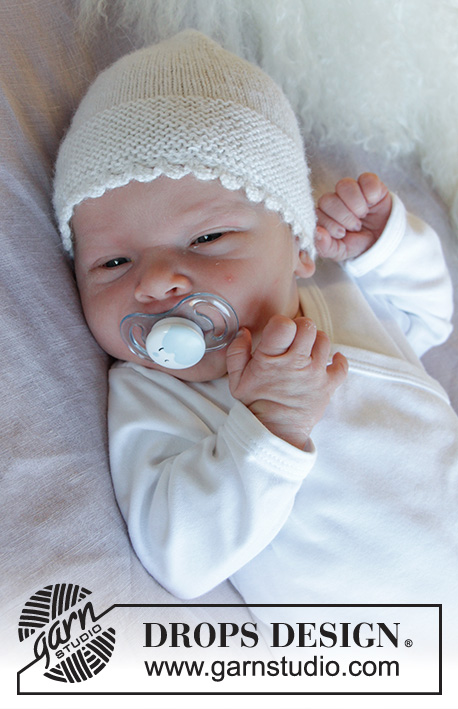
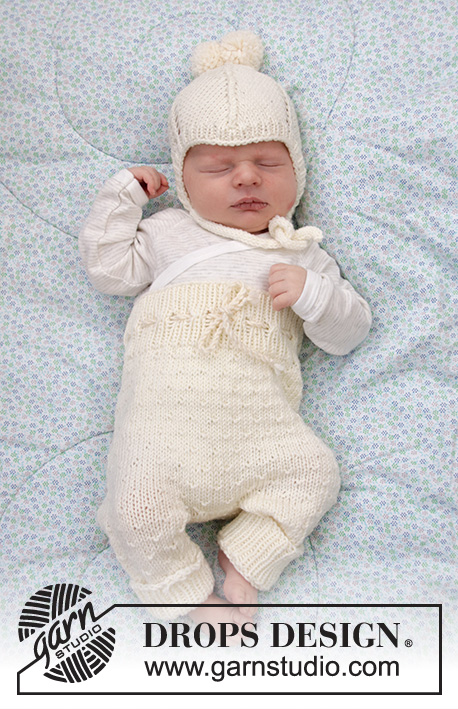
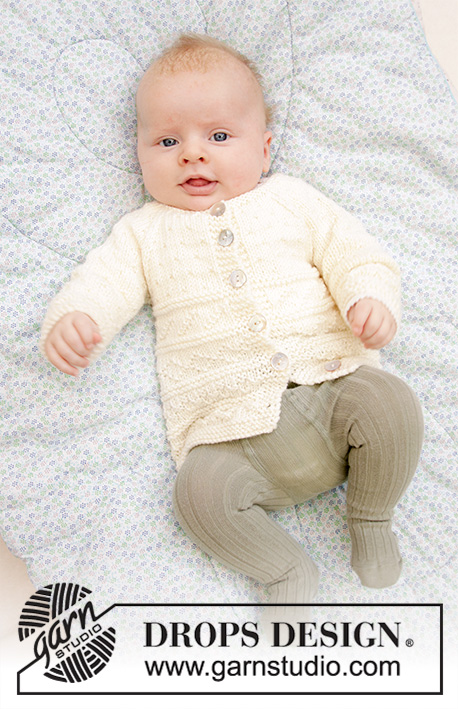
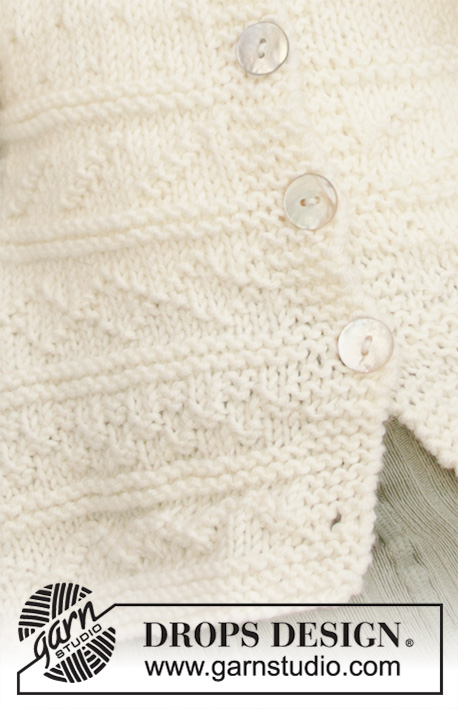
Knitted jacket for babies with raglan in DROPS Merino Extra Fine. The piece is worked bottom up with textured pattern. Sizes premature to 3/4 years.
DROPS Baby 33-11 |
|||||||||||||
|
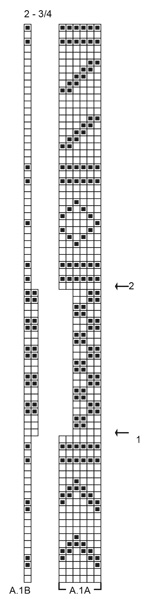
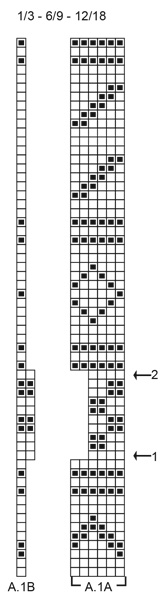
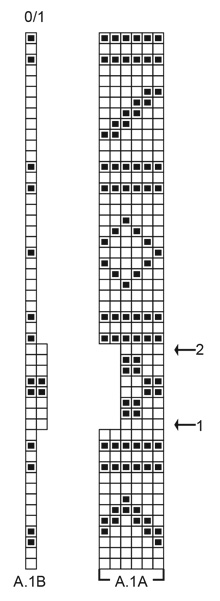
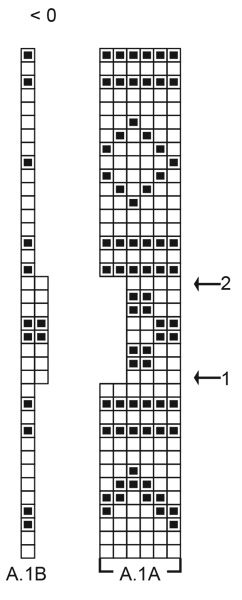
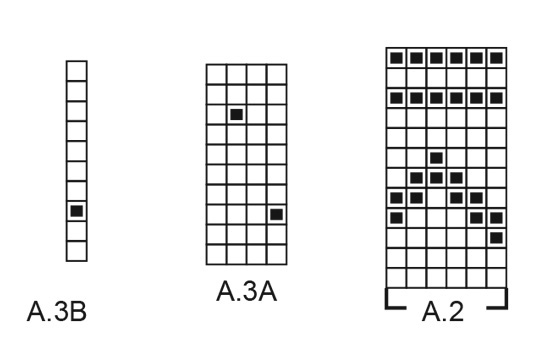
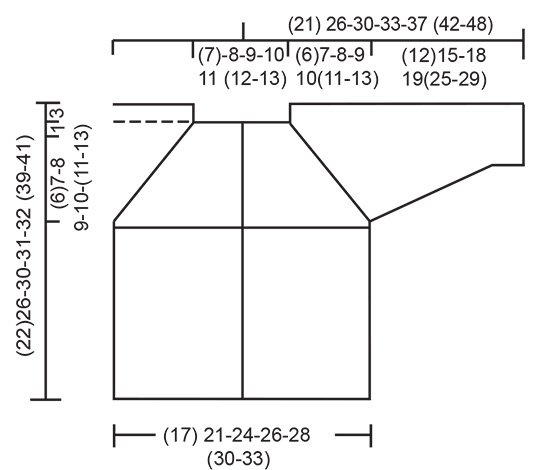
------------------------------------------------------- EXPLANATIONS FOR THE PATTERN: ------------------------------------------------------- RIDGE/GARTER STITCH (worked back and forth): 1 ridge in height = Knit 2 rows. RIDGE/GARTER STITCH (worked in the round): 1 ridge in height = 2 rounds; Knit 1 round and purl 1 round. PATTERN: See diagrams A.1 to A.3. Choose diagram for your size in A.1. The diagrams show all rows in the pattern seen from the right side. INCREASE TIP (for mid under sleeve): Start 1 stitch before the stitch with the marker, make 1 yarn over, work the stitch with the marker, 1 yarn over (= 2 stitches increased). On the next round work the yarn overs twisted to avoid holes. The increased stitches are worked into the pattern as you go. RAGLAN: Decrease to raglan on each side of the 4 markers in each transition between body and sleeves (= 8 stitches decreased on each decrease-row). All decreases are worked from the right side! Start 2 stitches before the marker, knit 2 together, marker, slip 1 stitch as if to knit, knit 1 and pass the slipped stitch over the knitted stitch. INCREASE/DECREASE TIP (evenly spaced): To work out how to increase/decrease evenly, count the total number of stitches on needle (e.g. 50 stitches) and divide by the number of increases/decreases to be made (e.g. 6) = 8.3. In this example, increase by making 1 yarn over after approx. each 8th stitch. On the next row work the yarn overs twisted to avoid holes. When decreasing, knit together approx. each 7th and 8th stitch. BUTTONHOLES: Work buttonholes on right band (when the garment is worn). 1 buttonhole = Start from the right side and knit the 2nd and 3rd stitch from the edge together, then make 1 yarn over. On the next row knit the yarn over to leave a hole. Work buttonholes when the piece measures: (the last buttonhole is worked on the last row before the neck as described in the text). <0 MONTH: 2, 5, 8, 11, 15 and 18 cm 0/1 MONTH: 2, 6, 10, 14, 18 and 22 cm 1/3 MONTHS: 2, 6, 10, 14, 18, 22 and 26 cm 6/9 MONTHS: 2, 6, 10, 14, 18, 22 and 27 cm 12/18 MONTHS: 2, 6, 10, 14, 18, 23 and 28 cm 2 YEARS: 2, 6, 11, 16, 21, 26, 30 and 35 cm 3/4 YEARS: 2, 7, 12, 17, 22, 27, 32 and 37 cm ------------------------------------------------------- START THE PIECE HERE: ------------------------------------------------------- JACKET - SHORT OVERVIEW OF THE PIECE: The body is worked back and forth with circular needle, from mid front and bottom up as far as the armholes. Then the sleeves are worked in the round with double pointed needles. Body and sleeves are joined together and the yoke is continued back and forth to finished length. BODY: Cast on (81) 99-111-117-129 (135-147) stitches with circular needle size 3.5 mm and Merino Extra Fine. Work 3 RIDGES – see description above. Change to circular needle size 4 mm and work the next row as follows, from the right side: 4 band stitches in garter stitch, work A.1A until there are 5 stitches left on the row (= (12) 15-17-18-20 (21-23) repeats of 6 stitches), A.1B (= 1 stitch) and finish with 4 band stitches in garter stitch. See diagram for right size in A.1A and A.1 B. Continue this pattern. REMEMBER THE KNITTING TENSION and BUTTONHOLES on right band – see description above. On the row marked with arrow-1 in A.1A (wrong side) decrease (3) 1-1-3-3 (1-1) stitches evenly spaced - do not decrease over band stitches = (78) 98-110-114-126 (134-146) stitches on needle. The next row is worked as follows from the right side: 4 band stitches in garter stitch, work A.1A until there are 6 stitches left on row (= (17) 22-25-26-29 (31-34) repeats of 4 stitches), A.1B (= 2 stitches) and finish with 4 band stitches in garter stitch. Continue this pattern. On the row marked with arrow-2 in A.1A increase (3) 1-1-3-3 (1-1) stitches evenly spaced = (81) 99-111-117-129 (135-147) stitches on the needle and the pattern is continued as before. When A.1 has been completed the piece measures approx. (12)15-18-18-18 (24-24) cm. Work 1 row from the right side. Then work next row from the wrong side: Knit 4 band stitches in garter stitch, purl (17) 21-24-24-28 (29-32) AT THE SAME TIME increase (0) 0-1-1-1 (0-1) stitch = (21) 25-29-29-33 (33-37) stitches (= front piece), cast off (4) 4-4-6-6 (6-6) stitches for armhole, purl (31) 41-47-49-53 (57-63) stitches, AT THE SAME TIME increase (2) 0-2-0-0 (0-2) stitches evenly spaced = (33) 41-49-49-53 (57-65) stitches (= back piece), cast off (4) 4-4-6-6 (6-6) stitches for armhole and purl (17) 21-24-24-28 (29-32) stitches AT THE SAME TIME increase (0) 0-1-1-1 (0-1) stitch, and finish with 4 band stitches in garter stitch = (21) 25-29-29-33 (33-37) stitches (= front piece). Lay the piece to one side and work the sleeves. SLEEVE: Cast on (30) 30-30-36-36 (36-42) stitches with double pointed needles size 3.5 mm and Merino Extra Fine. Work 3 RIDGES in the round – see description above. Change to double pointed needles size 4 mm and work A.2 in the round (= (5) 5-5-6-6 (6-7) repeats of 6 stitches). When A.2 has been completed work A.3A in the round. AT THE SAME TIME on the first round adjust the number of stitches to (28) 32-32-36-36 (36-40) stitches (there is now room for (7) 8-8-9-9 (9-10) repeats of 4 stitches) – see INCREASE/DECREASE TIP (evenly spaced). Insert 1 marker in the first stitch of the round (= mid under sleeve) and allow the marker to follow your work upwards. When the piece measures 6 cm increase 2 stitches mid under sleeve – see INCREASE TIP. Increase like this every (2½) 3-2½-3-2½ (2-2 ½) cm a total of (3) 3-5-5-7 (9-10) times = (34) 38-42-46-50 (54-60) stitches. Continue working until the piece measures approx. (12) 15-18-19-22 (25-29) cm but stop after round 3 or 8 in A.3A. The next round is worked as follows: Cast off (2) 2-2-3-3 (3-3) stitches for the armhole, knit (30) 34-38-40-44 (48-54) stitches, then cast off the remaining (2) 2-2-3-3-(3-3) stitches for armhole. Cut the strand and work the other sleeve in the same way. YOKE: Place the sleeves on the same circular needle as the body, where you cast off stitches for the armholes (without working the stitches) = (135) 159-183-187-207 (219-247) stitches on needle. The next row is worked as follows from the right side (when A.3 is worked (on both front-/back pieces and sleeves) it is important to continue the diagram from where you finished on the sleeves): Work 4 band stitches in garter stitch, A.3A over the next (16) 20-24-24-28 (28-32) stitches (= (4) 5-6-6-7 (7-8) repeats of 4 stitches), A.3 B (= 1 stitch), insert 1 marker (= front piece), continue A.3A over the next (30) 34-38-40-44 (48-54) stitches, insert 1 marker (= sleeve), work A.3A over the next (32) 40-48-48-52 (56-64) stitches (= (8) 10-12-12-13 (14-16) repeats of 4 stitches), A.3B (= 1 stitch), insert 1 marker (= back piece), continue A.3A over the next (30) 34-38-40-44 (48-54) stitches, insert 1 marker (= sleeve), work A.3A over the next (16) 20-24-24-28 (28-32) stitches, A.3 B and finish with 4 band stitches in garter stitch (= front piece). Continue this pattern back and forth. AT THE SAME TIME on the next row from the right side decrease to RAGLAN – see description above (= 8 stitches decreased). Decrease like this every 2nd row (i.e. each row from the right side) a total of (8) 10-11-12-14 (15-17) times. After the last decrease to raglan there are (71) 79-95-91-95 (99-111) stitches left on the needle. On the next row from the right side decrease (13) 17-29-19-19 (19-27) stitches evenly spaced – read DECREASE TIP, in addition work the last buttonhole on this row = (58) 62-66-72-76 (80-84) stitches on needle. Change to circular needle size 3.5 mm and knit 1 row from the wrong side, knit 1 row from the right side and knit 1 more row from the wrong side. Cast off with knit from the right side. The jacket measures approx. (22) 26-30-31-32 (39-41) cm from the shoulder down. ASSEMBLY: Sew openings under the sleeves. Sew buttons onto left band. |
|||||||||||||
Diagram explanations |
|||||||||||||
|
|||||||||||||
 |
|||||||||||||
 |
|||||||||||||
 |
|||||||||||||
 |
|||||||||||||
 |
|||||||||||||
 |
|||||||||||||
Have you finished this pattern?Tag your pictures with #dropspattern #preciousmomentsjacket or submit them to the #dropsfan gallery. Do you need help with this pattern?You'll find 25 tutorial videos, a Comments/Questions area and more by visiting the pattern on garnstudio.com. © 1982-2026 DROPS Design A/S. We reserve all rights. This document, including all its sub-sections, has copyrights. Read more about what you can do with our patterns at the bottom of each pattern on our site. |
|||||||||||||


With over 40 years in knitting and crochet design, DROPS Design offers one of the most extensive collections of free patterns on the internet - translated to 17 languages. As of today we count 324 catalogues and 12290 patterns translated into English (UK/cm). 12290
We work hard to bring you the best knitting and crochet have to offer, inspiration and advice as well as great quality yarns at incredible prices! Would you like to use our patterns for other than personal use? You can read what you are allowed to do in the Copyright text at the bottom of all our patterns. Happy crafting!
Post a comment to pattern DROPS Baby 33-11
We would love to hear what you have to say about this pattern!
If you want to leave a question, please make sure you select the correct category in the form below, to speed up the answering process. Required fields are marked *.